您好,登錄后才能下訂單哦!
您好,登錄后才能下訂單哦!
這篇文章主要講解了“docker如何利用WebHook實現持續集成”,文中的講解內容簡單清晰,易于學習與理解,下面請大家跟著小編的思路慢慢深入,一起來研究和學習“docker如何利用WebHook實現持續集成”吧!
git :我使用的碼云 我的主頁為:
jenkins:jenkins ver. 2.89.2
tomcat 8 jdk8 maven3.5
[root@iznz7e74o4ag3oz webapps]# java -version
java version "1.8.0_121"
java(tm) se runtime environment (build 1.8.0_121-b13)
java hotspot(tm) 64-bit server vm (build 25.121-b13, mixed mode)
[root@iznz7e74o4ag3oz webapps]# mvn -version
apache maven 3.5.0 (ff8f5e7444045639af65f6095c62210b5713f426; 2017-04-04t03:39:06+08:00)
maven home: /usr/local/src/maven
java version: 1.8.0_121, vendor: oracle corporation
java home: /usr/local/src/jdk/jre
default locale: en_us, platform encoding: utf-8
os name: "linux", version: "3.10.0-693.2.2.el7.x86_64", arch: "amd64", family: "unix"
[root@iznz7e74o4ag3oz webapps]#
配置好環境后,在tomcat中運行jenkins,并設置好用戶名密碼確保能正常登錄使用
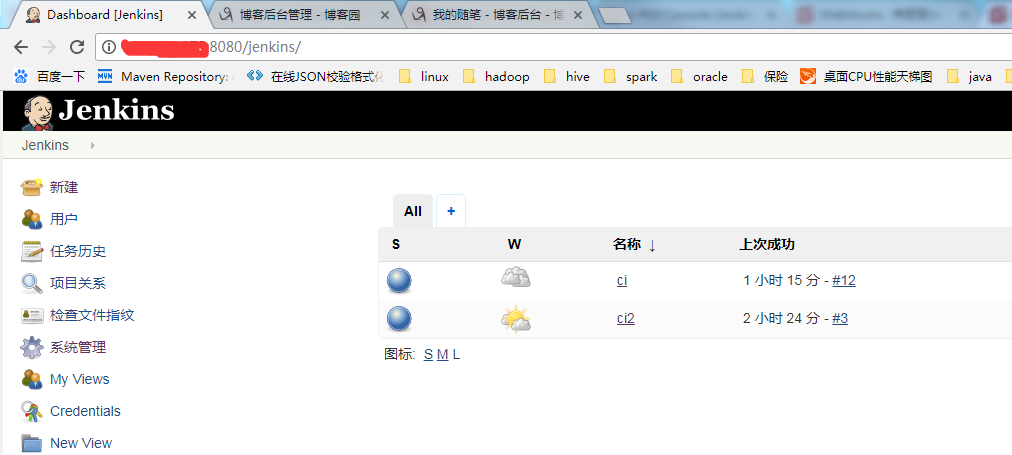
操作步驟:
1.安裝插件 generic webhook trigger plugin、deploy to container plugin、git plugin 由于這里暫時未發布到docker中,通過deploy to container plugin發布到tomcat中的
2.上傳maven項目到
3.jenkins中新建項目ci
3.1 配置提交的代碼地址,add有權限的用戶名和密碼(我的是私有項目),指定分支
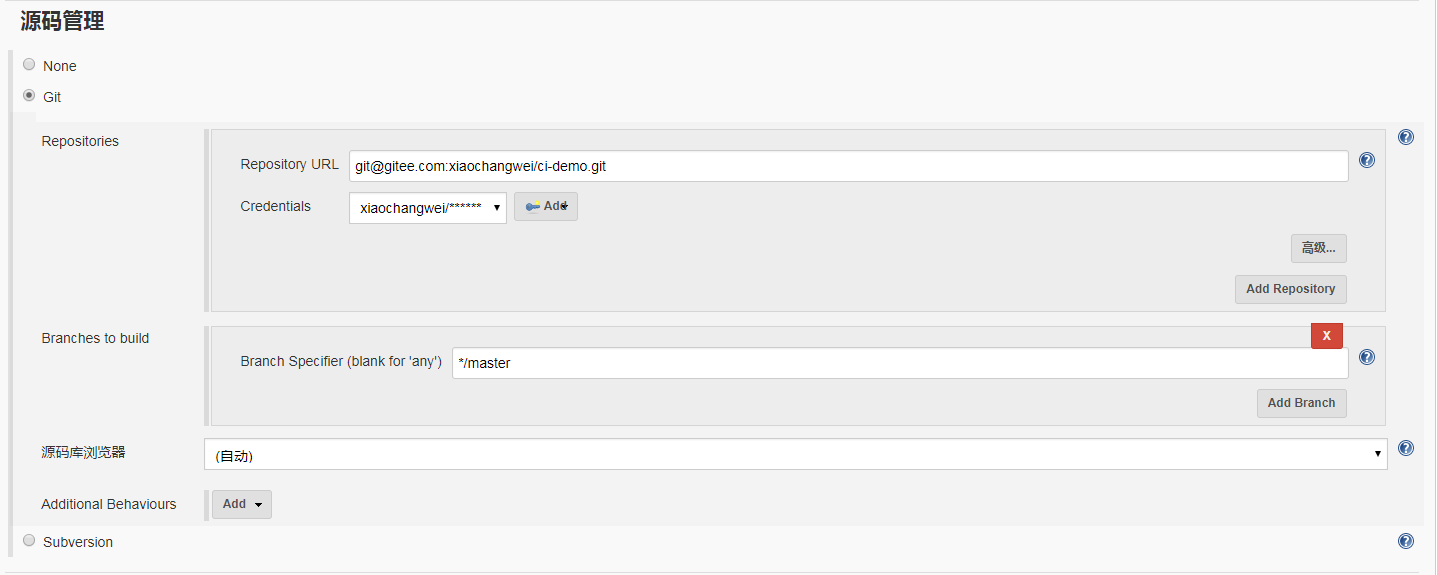
3.2:配置maven命令以及發布到的tomcat
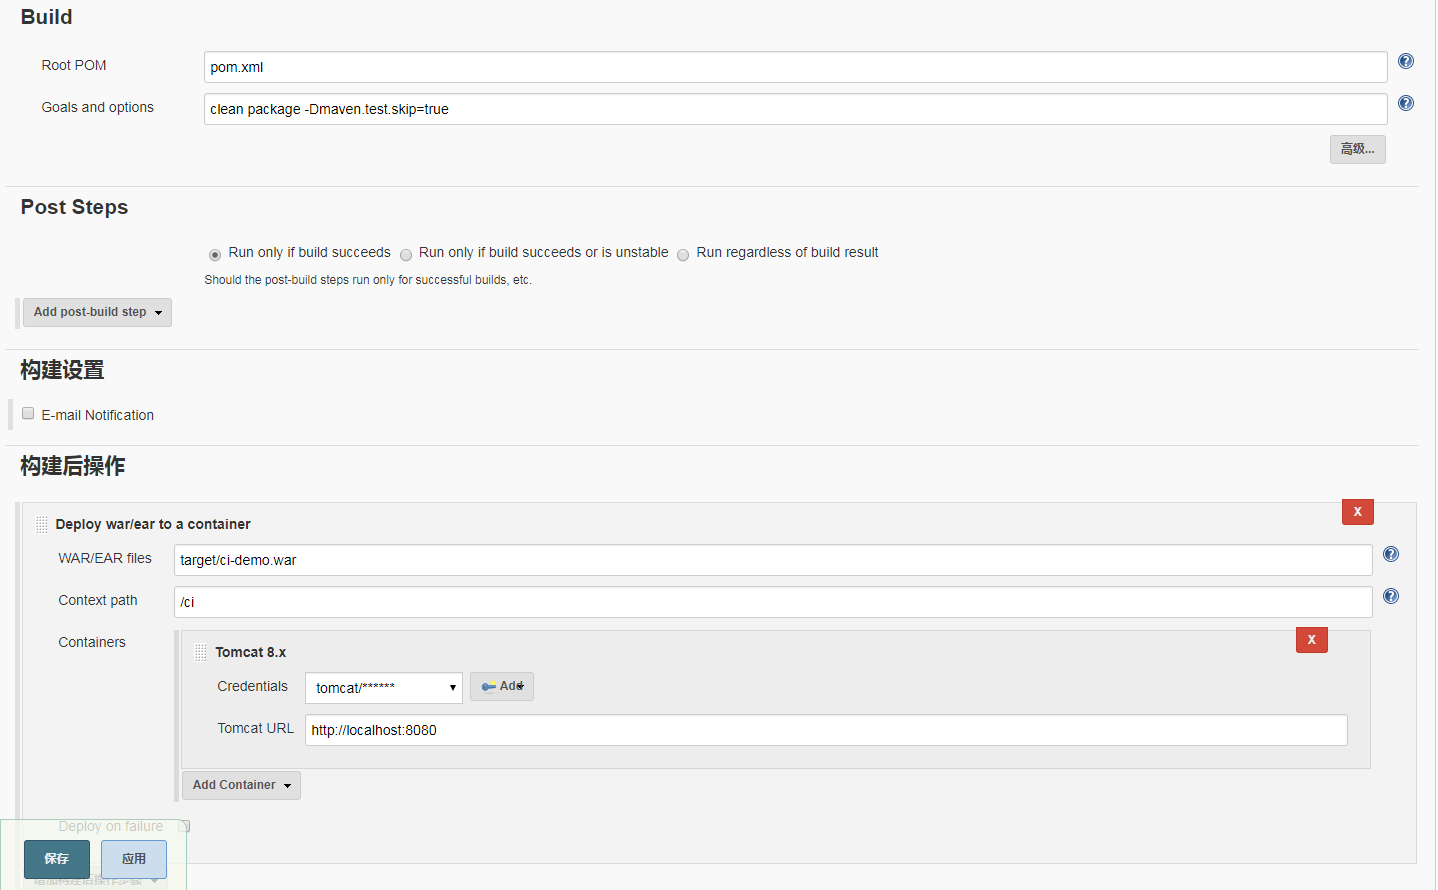
注意:發布項目的tomcat需要設置用戶信息,即修改conf下的user.xml 具體可以參考我很早之前寫的
這樣就可以手動構建項目了,請確保手動構建能成功后再進行下列操作
遇見的問題及解決方案:
如果構建時提示權限不對
生成公鑰: ssh-keygen -t rsa 一直回車直結束
cat ~/.ssh/id_rsa.pub 將內容增加到碼云上
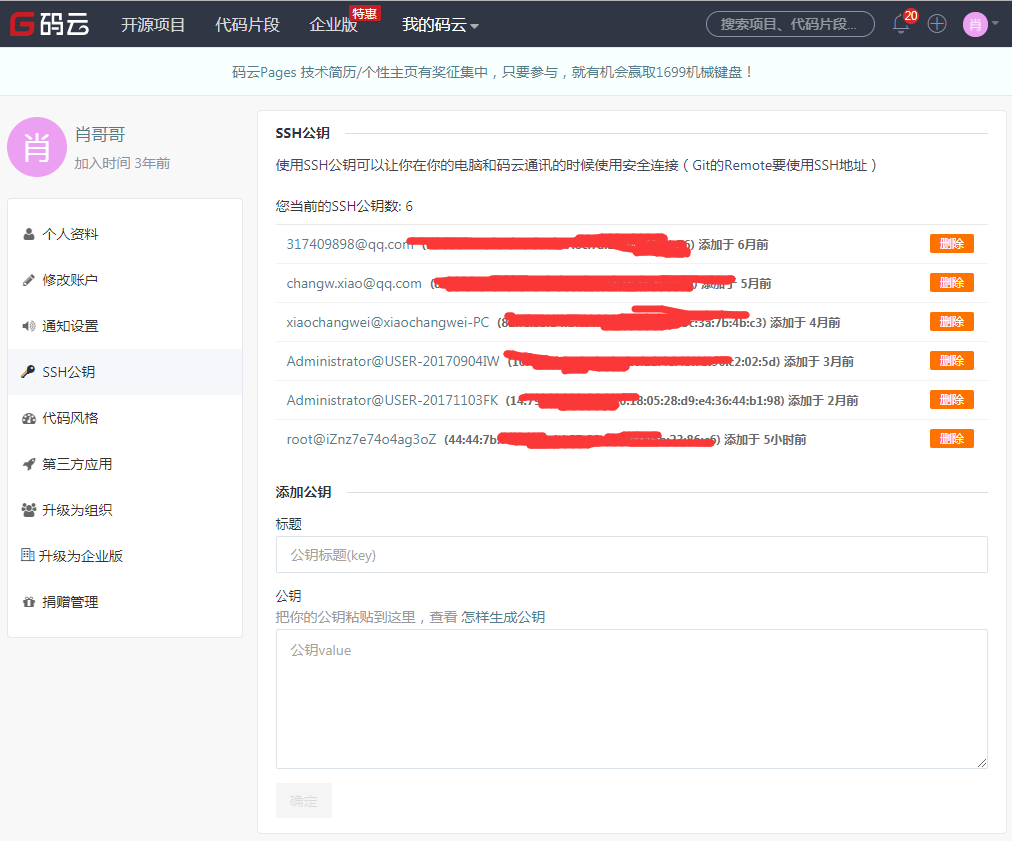
如果還提示沒權限
手動先在jenkins運行的機器上clone一次代碼 如 git clone 注意輸入yes

然后再看.ssh目錄,多了一個known_hosts 里面有碼云了,然后再手動構建,應該就能成功了

至此,手動打包并部署就已經實現了
------------------------------自動部署 --------------------------------------------------
1. 安裝上述插件后勾選generic webhook trigger 增加post參數 ref expression值為 $.ref 注意有個點
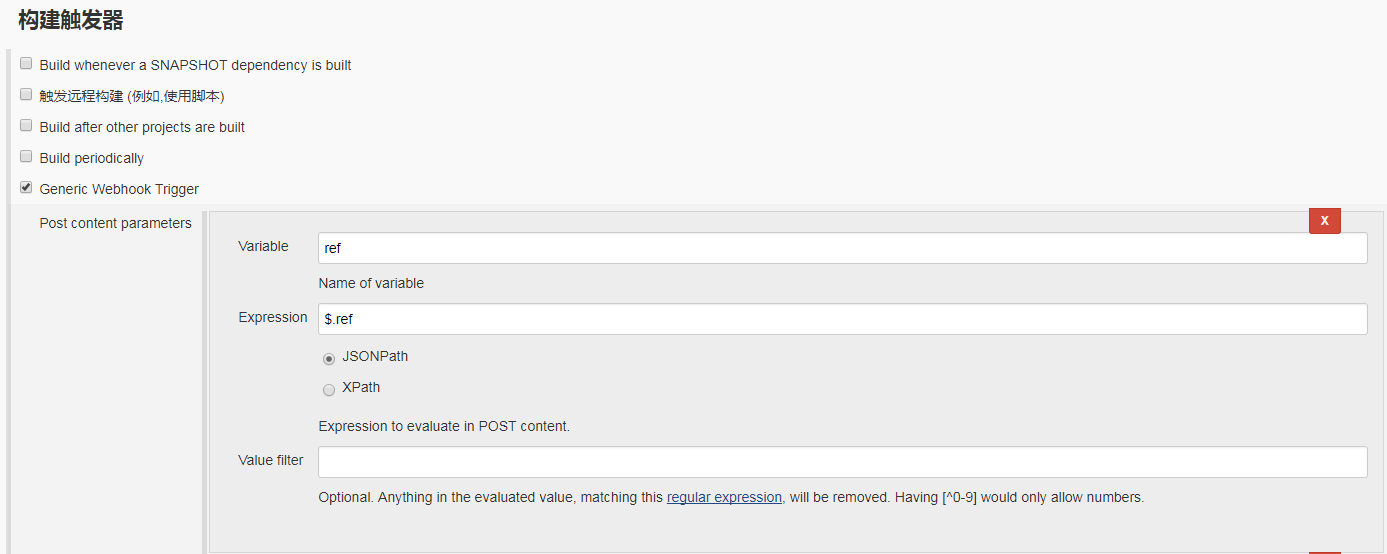
增加optional filter

其實上面這部分不用設置也行,尤其是只會在jenkins中部署一個項目的一個分支時,只需要勾選上generic webhook trigger就可以的
2. 在碼云中增加hook:http://user id:api token@jenkins部署的地址:端口號/jenkins/generic-webhook-trigger/invoke (紅色這部分不要變)
(這里不用api token 直接用jenkins的登錄密碼也可以, api token查看地址為:jenkins-用戶-點擊用戶名-api token)
同時勾選push或者其他你認為需要觸發部署的事件
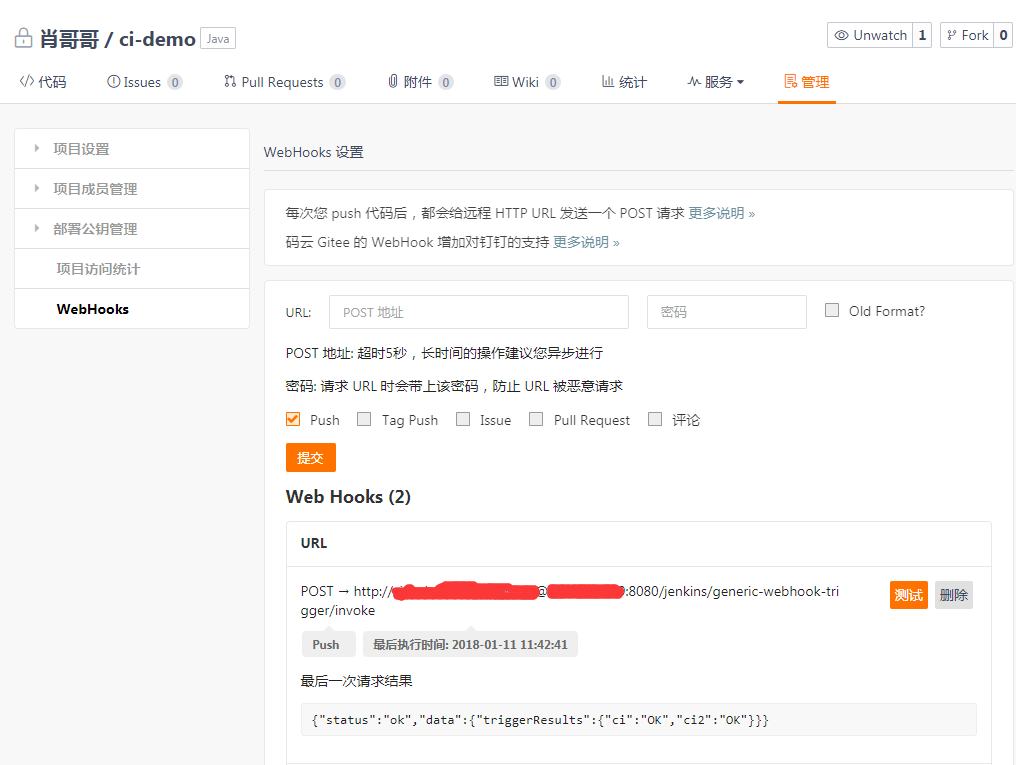
提交后點擊測試,如果返回ok,則表示成功,切換到jenkins,查看項目是否能夠自動部署
我自己寫了一個接口用來獲取點擊測試后,到底請求了些什么

格式化下內容如下:
{
 "hook_name": "push_hooks",
 "total_commits_count": 1,
 "before": "0000000000000000000000000000000000000000",
 "user_name": "肖哥哥",
 "project": {
  "path": "ci-demo",
  "git_svn_url": "svn://gitee.com/xiaochangwei/ci-demo",
  "path_with_namespace": "xiaochangwei/ci-demo",
  "name": "ci-demo",
  "namespace": "xiaochangwei",
  "default_branch": "master",
  "git_http_url": "https://gitee.com/xiaochangwei/ci-demo.git",
  "name_with_namespace": "肖哥哥/ci-demo",
  "url": "https://gitee.com/xiaochangwei/ci-demo",
  "git_ssh_url": "git@gitee.com:xiaochangwei/ci-demo.git"
 },
 "repository": {
  "name": "ci-demo",
  "description": "",
  "url": "https://gitee.com/xiaochangwei/ci-demo.git",
  "homepage": "https://gitee.com/xiaochangwei/ci-demo"
 },
 "commits_more_than_ten": false,
 "ref": "refs/heads/master",
 "password": "",
 "commits": [{
  "author": {
   "name": "肖哥哥",
   "time": "2015-11-06t13:21:07+08:00",
   "email": "317409898@qq.com"
  },
  "id": "ec7159240a346fa5988913aa3057b902a4acb126",
  "message": "a test for webhooks",
  "url": "https://gitee.com/xiaochangwei/ci-demo/commit/ec7159240a346fa5988913aa3057b902a4acb126",
  "timestamp": "2015-11-06t13:21:07+08:00"
 }],
 "after": "ec7159240a346fa5988913aa3057b902a4acb126",
 "user": {
  "name": "肖哥哥",
  "id": 372286,
  "time": "2018-01-11t12:38:38+08:00",
  "user": "xiaochangwei",
  "email": "317409898@qq.com",
  "url": "https://gitee.com/xiaochangwei"
 }
}
其實多建立幾個項目然后獲取信息后會發現,不同項目間存在差異的就是project.git_ssh_url 和分支 ref
至此,單個項目的自動部署就完了
如果你在jenkins中有多個項目,你觸發其中的一個webhook你就會發現,所有的項目都在構建?
這就有點不科學了,本來只想構建a項目,結果abc項目都構建了? 要解決這個就需要用到上面提到的post param 和 filer 了
解析觸發自動構建的請求參數,ref和project.git_ssh_url是差異性的東西,那就根據兩個來區分項目
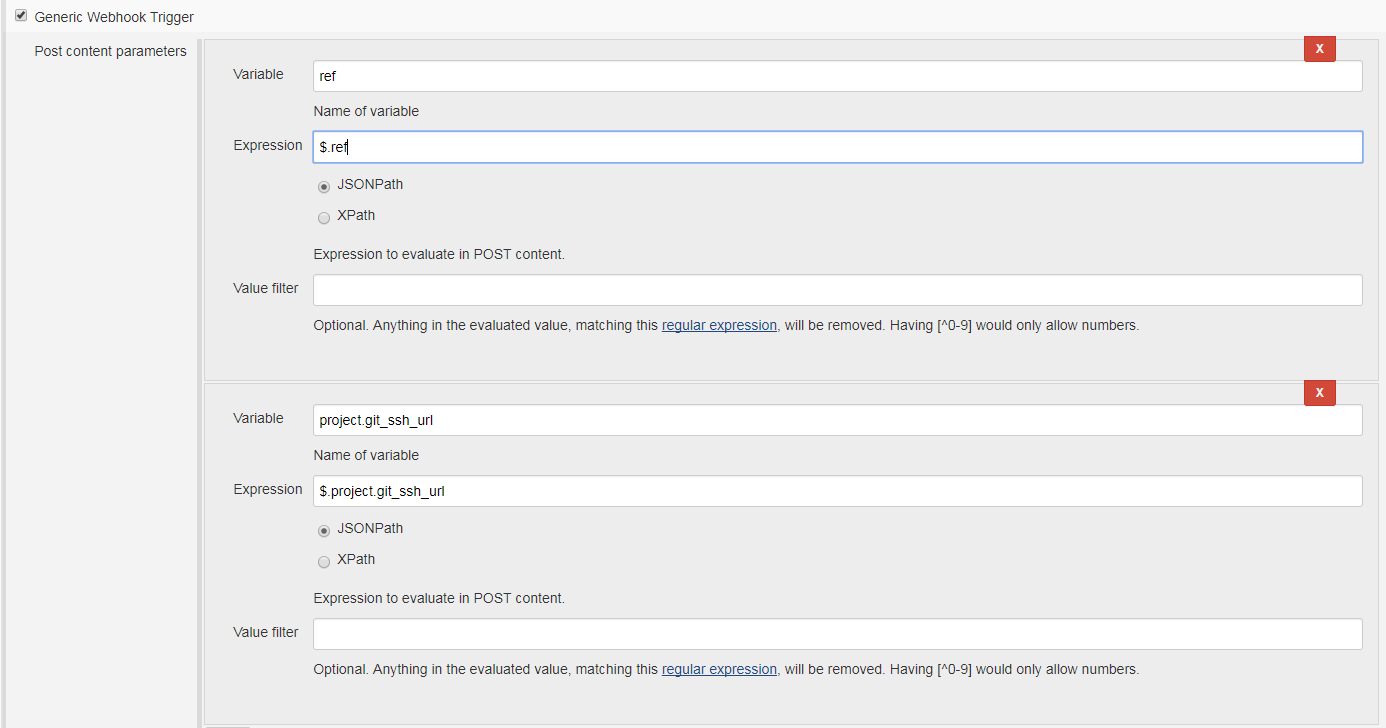
有這上面的兩個post參數還不行,因為只是獲取到了對應的參數值
其實要想區分不同的項目也簡單,只要獲取到的ref還有url 和需要構建的項目分支和 git地址相同就構建,否則就不構建
optional filter提供的方式就是最簡單的正則匹配

expression設置為 ^(refs/heads/master)_( 注意修改為自己的項目地址
text 設置為 $ref_$project.git_ssh_url
保存,再次構建,是不是只觸發了一個項目了,而不是所有項目了
測試:
1.提交代碼, 提交代碼后看到jenkins就自動編譯打包了
2.查看編譯日志:jenkins收到了webhook請求,并且拉取了代碼,提交信息和我們提交代碼時輸入信息一致
有同學質疑我這里為啥失敗了,是不是自動構建不可用,不是哈, 我這里是用的阿里服務器,內存不夠導致了自動發布失敗
完整編譯并正確部署的日志如下:
generic cause
building in workspace /root/.jenkins/workspace/ci
genericwebhookenvironmentcontributor received:
{"before":"0000000000000000000000000000000000000000","after":"ec7159240a346fa5988913aa3057b902a4acb126","ref":"refs/heads/master","user_name":"\u8096\u54e5\u54e5","user":{"id":372286,"email":"317409898@qq.com","name":"\u8096\u54e5\u54e5","user":"xiaochangwei","url":"https://gitee.com/xiaochangwei","time":"2018-01-12t08:56:18+08:00"},"repository":{"name":"ci-demo","url":"https://gitee.com/xiaochangwei/ci-demo.git","description":"","homepage":"https://gitee.com/xiaochangwei/ci-demo"},"commits":[{"id":"ec7159240a346fa5988913aa3057b902a4acb126","message":"a test for webhooks","timestamp":"2015-11-06t13:21:07+08:00","url":"https://gitee.com/xiaochangwei/ci-demo/commit/ec7159240a346fa5988913aa3057b902a4acb126","author":{"name":"\u8096\u54e5\u54e5","email":"317409898@qq.com","time":"2015-11-06t13:21:07+08:00"}}],"project":{"name":"ci-demo","path":"ci-demo","url":"https://gitee.com/xiaochangwei/ci-demo","git_ssh_url":"git@gitee.com:xiaochangwei/ci-demo.git","git_http_url":"https://gitee.com/xiaochangwei/ci-demo.git","git_svn_url":"svn://gitee.com/xiaochangwei/ci-demo","namespace":"xiaochangwei","name_with_namespace":"\u8096\u54e5\u54e5/ci-demo","path_with_namespace":"xiaochangwei/ci-demo","default_branch":"master"},"total_commits_count":1,"commits_more_than_ten":false,"enterprise":null,"hook_name":"push_hooks","password":""}
contributing variables:
 ref = refs/heads/master
 project.git_ssh_url = git@gitee.com:xiaochangwei/ci-demo.git
 > git rev-parse --is-inside-work-tree # timeout=10
fetching changes from the remote git repository
 > git config remote.origin.url git@gitee.com:xiaochangwei/ci-demo.git # timeout=10
fetching upstream changes from git@gitee.com:xiaochangwei/ci-demo.git
 > git --version # timeout=10
using git_askpass to set credentials
 > git fetch --tags --progress git@gitee.com:xiaochangwei/ci-demo.git +refs/heads/*:refs/remotes/origin/*
 > git rev-parse refs/remotes/origin/master^{commit} # timeout=10
 > git rev-parse refs/remotes/origin/origin/master^{commit} # timeout=10
checking out revision 2eca30803759e021f658c92c136aa72dc026c3be (refs/remotes/origin/master)
 > git config core.sparsecheckout # timeout=10
 > git checkout -f 2eca30803759e021f658c92c136aa72dc026c3be
commit message: "test auto package and deploy"
 > git rev-list --no-walk 2eca30803759e021f658c92c136aa72dc026c3be # timeout=10
parsing poms
established tcp socket on 44276
[ci] $ /usr/local/src/jdk/bin/java -cp /root/.jenkins/plugins/maven-plugin/web-inf/lib/maven35-agent-1.12-alpha-1.jar:/usr/local/src/maven/boot/plexus-classworlds-2.5.2.jar:/usr/local/src/maven/conf/logging jenkins.maven3.agent.maven35main /usr/local/src/maven /usr/local/src/tomcat/webapps/jenkins/web-inf/lib/remoting-3.14.jar /root/.jenkins/plugins/maven-plugin/web-inf/lib/maven35-interceptor-1.12-alpha-1.jar /root/.jenkins/plugins/maven-plugin/web-inf/lib/maven3-interceptor-commons-1.12-alpha-1.jar 44276
<===[jenkins remoting capacity]===>channel started
executing maven: -b -f /root/.jenkins/workspace/ci/pom.xml clean package -dmaven.test.skip=true
[info] scanning for projects...
[info]
[info] ------------------------------------------------------------------------
[info] building docker-demo 0.0.1-snapshot
[info] ------------------------------------------------------------------------
[info]
[info] --- maven-clean-plugin:2.6.1:clean (default-clean) @ ci-demo ---
[info] deleting /root/.jenkins/workspace/ci/target
[info]
[info] --- maven-resources-plugin:2.6:resources (default-resources) @ ci-demo ---
[info] using 'utf-8' encoding to copy filtered resources.
[info] copying 1 resource
[info] copying 0 resource
[info]
[info] --- maven-compiler-plugin:3.1:compile (default-compile) @ ci-demo ---
[info] changes detected - recompiling the module!
[info] compiling 6 source files to /root/.jenkins/workspace/ci/target/classes
[info]
[info] --- maven-resources-plugin:2.6:testresources (default-testresources) @ ci-demo ---
[info] not copying test resources
[info]
[info] --- maven-compiler-plugin:3.1:testcompile (default-testcompile) @ ci-demo ---
[info] not compiling test sources
[info]
[info] --- maven-surefire-plugin:2.18.1:test (default-test) @ ci-demo ---
[info] tests are skipped.
[info]
[info] --- maven-war-plugin:2.6:war (default-war) @ ci-demo ---
[info] packaging webapp
[info] assembling webapp [ci-demo] in [/root/.jenkins/workspace/ci/target/ci-demo]
[info] processing war project
[info] webapp assembled in [298 msecs]
[info] building war: /root/.jenkins/workspace/ci/target/ci-demo.war
[info]
[info] --- spring-boot-maven-plugin:1.5.9.release:repackage (default) @ ci-demo ---
[info] ------------------------------------------------------------------------
[info] build success
[info] ------------------------------------------------------------------------
[info] total time: 18.729 s
[info] finished at: 2018-01-12t08:56:46+08:00
[info] final memory: 30m/72m
[info] ------------------------------------------------------------------------
waiting for jenkins to finish collecting data
[jenkins] archiving /root/.jenkins/workspace/ci/pom.xml to com.xiao/ci-demo/0.0.1-snapshot/ci-demo-0.0.1-snapshot.pom
[jenkins] archiving /root/.jenkins/workspace/ci/target/ci-demo.war to com.xiao/ci-demo/0.0.1-snapshot/ci-demo-0.0.1-snapshot.war
channel stopped
deploying /root/.jenkins/workspace/ci/target/ci-demo.war to container tomcat 8.x remote with context /ci
 redeploying [/root/.jenkins/workspace/ci/target/ci-demo.war]
 undeploying [/root/.jenkins/workspace/ci/target/ci-demo.war]
 deploying [/root/.jenkins/workspace/ci/target/ci-demo.war]
finished: success
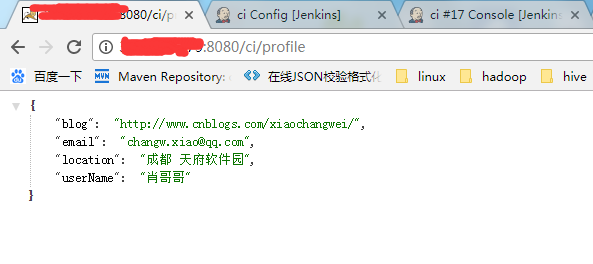
查看效果
感謝各位的閱讀,以上就是“docker如何利用WebHook實現持續集成”的內容了,經過本文的學習后,相信大家對docker如何利用WebHook實現持續集成這一問題有了更深刻的體會,具體使用情況還需要大家實踐驗證。這里是億速云,小編將為大家推送更多相關知識點的文章,歡迎關注!
免責聲明:本站發布的內容(圖片、視頻和文字)以原創、轉載和分享為主,文章觀點不代表本網站立場,如果涉及侵權請聯系站長郵箱:is@yisu.com進行舉報,并提供相關證據,一經查實,將立刻刪除涉嫌侵權內容。