您好,登錄后才能下訂單哦!
您好,登錄后才能下訂單哦!
系統環境:
jdk1.8環境
ubuntu16.04系統 172.20.1.10 node-1
ubuntu16.04系統 172.20.1.20 node-2
ubuntu16.0.4系統 172.20.1.30 node-3
安裝elasticsearch版本:elasticsearch-6.2.2.tar.gz
安裝包下載路徑(里邊有6.2.2版本、6.4.2版本和jdk1.8的包):
https://pan.baidu.com/s/1bTBb6n27wcunwAFCRB5yNQ 密碼:8raw
1.安裝elasticsearch參考:http://www.cnblogs.com/hanyinglong/p/5409003.html
說一下我自己的做法
查看一下自己的java環境換成jdk1.8,這個網上一大堆參考文檔。
這里大概說一下,就是解壓包然后配置環境變量
路徑根據自己解壓的位置去指定。最后source /etc/profile
mkdir -p /data/software/elasticsearch
創建用戶,因為啟動es不能用root用戶。
sudo adduser es
然后敲個Y完事。
cd /home/下看一下有沒有家目錄。
然后到下載包存放路徑解壓包。
sudo tar -zxvf elasticsearch-2.3.1.tar.gz
sudo mv elasticsearch-2.3.1 /data/software/elasticsearch
sudo chown -R es.es /data/software/elasticsearch
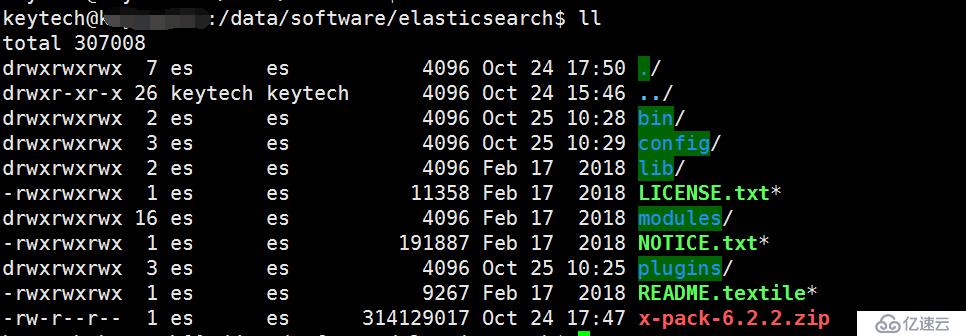
我們看一下es的文件結構:
我們每個機器上做一個es,這個不是建議也不是什么經驗之談,因為你是運維(背鍋俠),你的要注意都做一臺機器上萬一機器宕機了,數據可就全沒了。最普通小白安全的做法就是3臺機器每個服務器上只做一個節點(此做法允許且只允許任意一臺服務器宕機),不了解es為什么這樣做的請讀我的技術點篇。
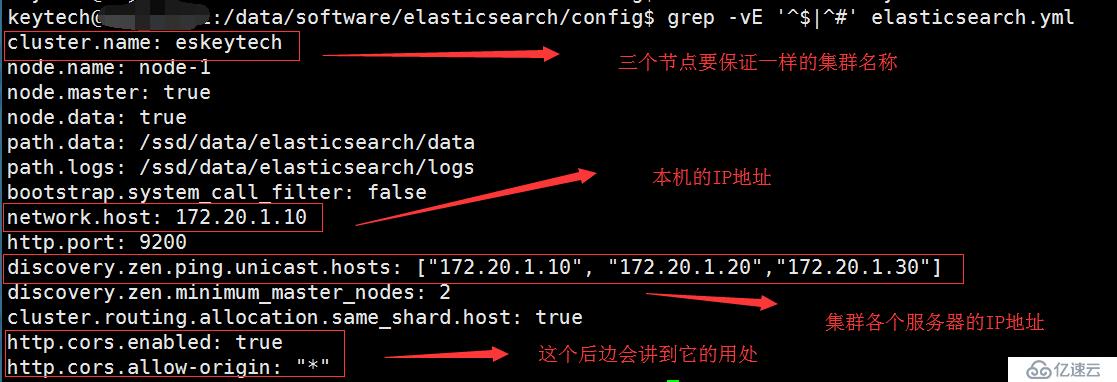
接下來我們修改elasticsearch的配置文件。

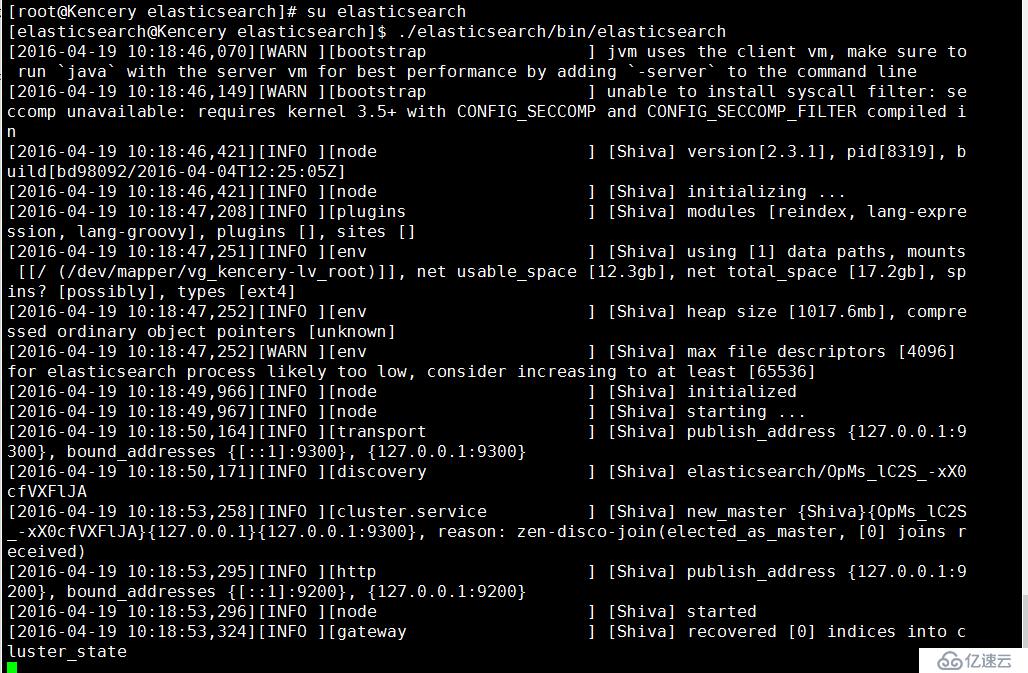
修改完成以后我們切換到es用戶去啟動es,記住:切換到es用戶!切換到es用戶!!切換到es用戶!!!
要不就會出現如下情況:
但是你可能會遇到如下情況哈哈,不要慌:基本操作。
[1]: max virtual memory areas vm.max_map_count [65530] is too low, increase to at least [262144]
等問題,修改幾個配置文件:/etc/profile文件最后邊添加:ulimit -SHn 65536
/etc/security/limits.conf文件最后添加:
- soft nofile 65536
- hard nofile 65536
- soft nproc 4096
- hard nproc 4096
然后我們把這些配置應用到es用戶可以看一下ulimit -Hn
一切正常后我們再啟動
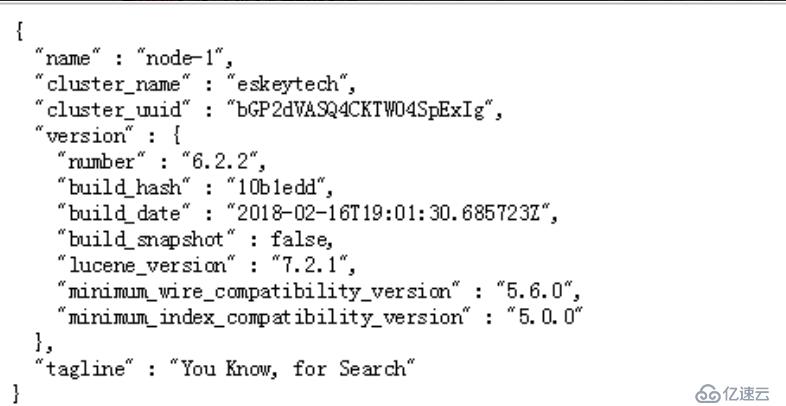
我們在網頁訪問ip:9200出來如下內容表示成功

其他的2個節點按上邊的操作正常操作完畢(可能會出現的一個問題啟動前先刪除/data/software/elasticsearch/data/節點目錄下的數據),出現如上圖恭喜你成功了.
接下來就是安裝比較麻煩又low的elasticsearch-head,也給大家操作一下吧,(生產環境能不用head插件盡量別用,因為安全性特別差暴露給別人,別人可以上你的es對節點進行操作)
elasticsearch 5.x之后不支持直接plugin安裝head插件,而是將head作為一個獨立的服務安裝的,首先需要安裝依賴的node,npm,grunt
apt-get install npm
apt-get install nodejs-legacy
npm install -g grunt
npm install -g grunt-cli
下載elasticsearch-head,我解壓到目錄/data/software/elasticsearch-head,將目錄用戶改為es
然后修改配置
1.修改head的連接地址 elasticsearch-head/_site/app.js
this.base_uri = this.config.base_uri || this.prefs.get("app-base_uri") || "http://localhost:9200";
localhost改為自己的ip
2.修改服務器的監聽地址elasticsearch-head/Gruntfile.js
connect: {
           server: {
               options: {
                   port: 9100,
                   base: '.',
                   keepalive: true
               }
           }
       }
options中添加 hostname: '*'
3.修改elasticseach的配置文件elasticsearch.yml, 修改對應的ip以及跨域的設置,添加:
http.cors.enabled: true
http.cors.allow-origin: "*"
3 在elasticsearch-head下運行: grunt server
3.1 但是會出現錯誤提示(當時命令敲的npm start,應該是一樣的):
root@ubuntu:/usr/local/kencery/elasticsearch-head# npm start
elasticsearch-head@0.0.0 start /usr/local/kencery/elasticsearch-head
grunt servergrunt-cli: The grunt command line interface (v1.2.0)
Fatal error: Unable to find local grunt.
If you're seeing this message, grunt hasn't been installed locally to
your project. For more information about installing and configuring grunt,
please see the Getting Started guide:http://gruntjs.com/getting-started
npm ERR! Linux 4.4.0-62-generic
npm ERR! argv "/usr/bin/nodejs" "/usr/bin/npm" "start"
npm ERR! node v4.2.6
npm ERR! npm v3.5.2
npm ERR! code ELIFECYCLE
npm ERR! elasticsearch-head@0.0.0 start:grunt server
npm ERR! Exit status 99
npm ERR!
npm ERR! Failed at the elasticsearch-head@0.0.0 start script 'grunt server'.
npm ERR! Make sure you have the latest version of node.js and npm installed.
npm ERR! If you do, this is most likely a problem with the elasticsearch-head package,
npm ERR! not with npm itself.
npm ERR! Tell the author that this fails on your system:
npm ERR! grunt server
npm ERR! You can get information on how to open an issue for this project with:
npm ERR! npm bugs elasticsearch-head
npm ERR! Or if that isn't available, you can get their info via:
npm ERR! npm owner ls elasticsearch-head
npm ERR! There is likely additional logging output above.
npm ERR! Please include the following file with any support request:
npm ERR! /usr/local/kencery/elasticsearch-head/npm-debug.log
看提示大概有提到版本不是最新的問題,所以就抱著試一試的心態去升級npm以及node
npm cache clean -f
npm install -g n
n stable
npm install npm@latest -g
再查看下版本,會看到
elasticsearch@ubuntu:~$ node -v
v10.4.0
elasticsearch@ubuntu:~$ npm -v
6.1.0
3.2 但是運行grunt server依然報錯:
grunt hasn't been installed locally to your project
參考 https://segmentfault.com/q/1010000004172559/a-1020000004193932, 執行:
npm install grunt --save-dev
3.3 再次運行,依然報錯:
elasticsearch@ubuntu:/usr/local/kencery/elasticsearch-head$ grunt server
Local Npm module "grunt-contrib-clean" not found. Is it installed?
Local Npm module "grunt-contrib-concat" not found. Is it installed?
Local Npm module "grunt-contrib-watch" not found. Is it installed?
Local Npm module "grunt-contrib-connect" not found. Is it installed?
Local Npm module "grunt-contrib-copy" not found. Is it installed?
Local Npm module "grunt-contrib-jasmine" not found. Is it installed?
Warning: Task "connect:server" not found. Use --force to continue.
然后我干脆把有關grunt的都裝了一遍最新的:
npm install grunt@latest
npm install grunt-cli@latest
npm install grunt-contrib-copy@latest
npm install grunt-contrib-concat@latest
npm install grunt-contrib-uglify@latest
npm install grunt-contrib-clean@latest
npm install grunt-contrib-watch@latest
npm install grunt-contrib-connect@latest
npm install grunt-contrib-jasmine@latest
4.4 最后grunt server終于可以啟動了:
elasticsearch@ubuntu:/usr/local/kencery/elasticsearch-head$ grunt server
(node:1527) ExperimentalWarning: The http2 module is an experimental API.
Running "connect:server" (connect) task
Waiting forever...
Started connect web server on http://localhost:9100

可以看到elasticsearch服務的端口是9200,head插件服務的端口是9100,我們訪問head然后head再訪問的elasticsearch。
參考文檔:
1https://blog.csdn.net/shm839218753/article/details/80618073
免責聲明:本站發布的內容(圖片、視頻和文字)以原創、轉載和分享為主,文章觀點不代表本網站立場,如果涉及侵權請聯系站長郵箱:is@yisu.com進行舉報,并提供相關證據,一經查實,將立刻刪除涉嫌侵權內容。