您好,登錄后才能下訂單哦!
您好,登錄后才能下訂單哦!
這篇文章主要講解了“docker下怎么搭建fastdfs分布式集群”,文中的講解內容簡單清晰,易于學習與理解,下面請大家跟著小編的思路慢慢深入,一起來研究和學習“docker下怎么搭建fastdfs分布式集群”吧!
本文在centos6.8下,通過一個實例演示fastdfs_in_docker工程的使用方法,利用docker搭建一個fastdfs集群環境。部署結構為:

1)所有機器均能連接外網
2)已安裝docker,具體看參考
3)已安裝git
4)防火墻開放對下面要使用的端口(端口在fastdfs集群啟動前開放即可)
2.1 所有機器上執行:
git clone https://git.oschina.net/zjg23/fastdfs_in_docker.git;#從git服務器下載工程
mkdir -p /home/fastdfs/{tracker,storage};                     #這兩個路徑用來掛載到docker容器,尤其是/home/fastdfs/storage路徑要保證有足夠的存儲空間
cd fastdfs_in_docker;
docker build -t zjg23/fastdfs:2.0 .;                          #構建鏡像
下圖表示鏡像構建成功

2.2 構建tracker,192.168.5.128上執行:
docker run -d --name fdfs_tracker -v /home/fastdfs/tracker:/export/fastdfs/tracker --net=host -e TRACKER_BASE_PATH=/export/fastdfs/tracker -e TRACKER_PORT=22123 zjg23/fastdfs:2.0 sh /usr/local/src/tracker.sh
2.3 構建storage
2.3.1 192.168.5.129上執行:
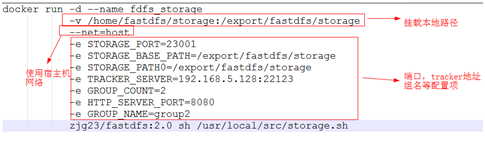
docker run -d --name fdfs_storage -v /home/fastdfs/storage:/export/fastdfs/storage --net=host -e STORAGE_PORT=23001 -e STORAGE_BASE_PATH=/export/fastdfs/storage -e STORAGE_PATH0=/export/fastdfs/storage -e TRACKER_SERVER=192.168.5.128:22123 -e GROUP_COUNT=2 -e HTTP_SERVER_PORT=8080 -e GROUP_NAME=group1 zjg23/fastdfs:2.0 sh /usr/local/src/storage.sh
2.3.2 192.168.5.130上執行:
docker run -d --name fdfs_storage -v /home/fastdfs/storage:/export/fastdfs/storage --net=host -e STORAGE_PORT=23001 -e STORAGE_BASE_PATH=/export/fastdfs/storage -e STORAGE_PATH0=/export/fastdfs/storage -e TRACKER_SERVER=192.168.5.128:22123 -e GROUP_COUNT=2 -e HTTP_SERVER_PORT=8080 -e GROUP_NAME=group1 zjg23/fastdfs:2.0 sh /usr/local/src/storage.sh
2.3.3 192.168.5.131上執行:
docker run -d --name fdfs_storage -v /home/fastdfs/storage:/export/fastdfs/storage --net=host -e STORAGE_PORT=23001 -e STORAGE_BASE_PATH=/export/fastdfs/storage -e STORAGE_PATH0=/export/fastdfs/storage -e TRACKER_SERVER=192.168.5.128:22123 -e GROUP_COUNT=2 -e HTTP_SERVER_PORT=8080 -e GROUP_NAME=group2 zjg23/fastdfs:2.0 sh /usr/local/src/storage.sh
2.3.4 192.168.5.132上執行:
docker run -d --name fdfs_storage -v /home/fastdfs/storage:/export/fastdfs/storage --net=host -e STORAGE_PORT=23001 -e STORAGE_BASE_PATH=/export/fastdfs/storage -e STORAGE_PATH0=/export/fastdfs/storage -e TRACKER_SERVER=192.168.5.128:22123 -e GROUP_COUNT=2 -e HTTP_SERVER_PORT=8080 -e GROUP_NAME=group2 zjg23/fastdfs:2.0 sh /usr/local/src/storage.sh
命令的解釋:


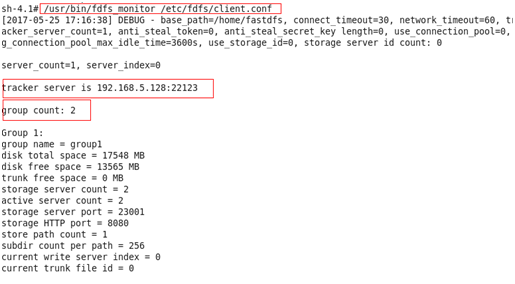
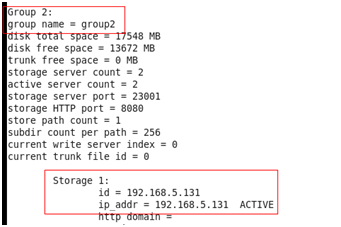
結果如下,說明我們已經按照預期部署架構正確的完成安裝
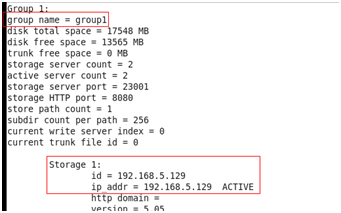


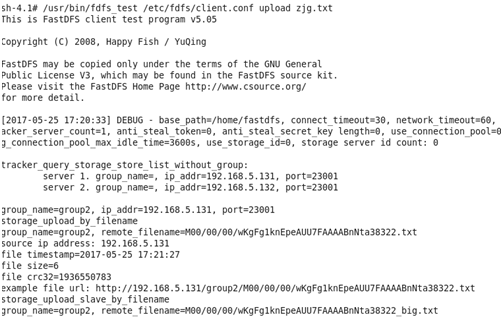
每個storage上裝有nginx,所以文件也可以通過http的方式直接訪問

https://git.oschina.net/zjg23/fastdfs_in_docker.git
如果文章中的圖片,附件不能查看,可直接查看工程中的文檔:

感謝各位的閱讀,以上就是“docker下怎么搭建fastdfs分布式集群”的內容了,經過本文的學習后,相信大家對docker下怎么搭建fastdfs分布式集群這一問題有了更深刻的體會,具體使用情況還需要大家實踐驗證。這里是億速云,小編將為大家推送更多相關知識點的文章,歡迎關注!
免責聲明:本站發布的內容(圖片、視頻和文字)以原創、轉載和分享為主,文章觀點不代表本網站立場,如果涉及侵權請聯系站長郵箱:is@yisu.com進行舉報,并提供相關證據,一經查實,將立刻刪除涉嫌侵權內容。