您好,登錄后才能下訂單哦!
您好,登錄后才能下訂單哦!
本篇內容介紹了“如何使用API v3接口”的有關知識,在實際案例的操作過程中,不少人都會遇到這樣的困境,接下來就讓小編帶領大家學習一下如何處理這些情況吧!希望大家仔細閱讀,能夠學有所成!
jdk:1.8
wechatpay-apache-httpclient:0.2.2
筆者以微信小程序支付接口為例展開說明,至于小程序注冊、認證、微信支付注冊本文概不說明。
登錄微信支付后臺,進入賬戶中心,API安全設置,如下圖 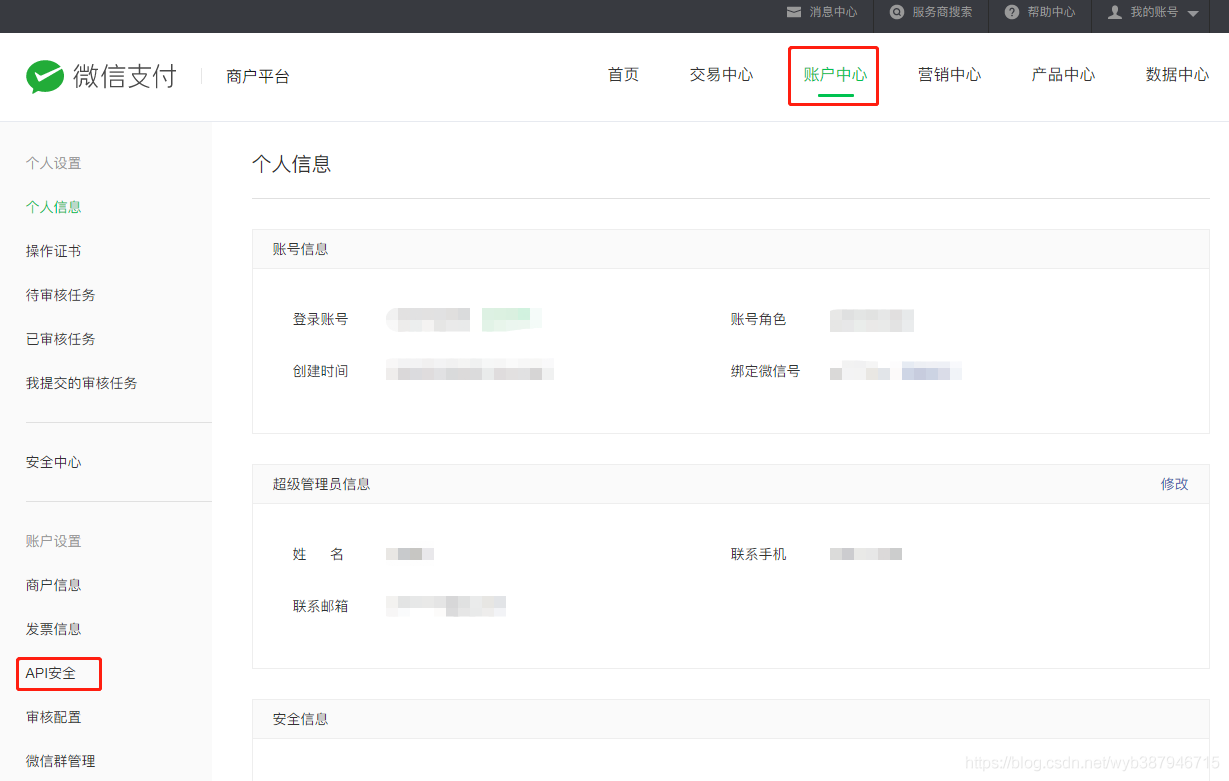 申請商戶證書,如下圖
 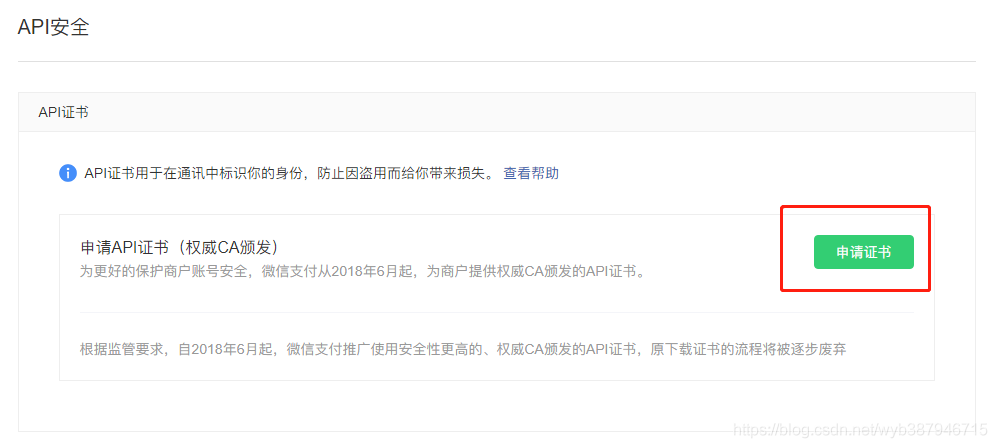 點擊“申請證書”按鈕后,彈出生成API證書申請框,如下圖
 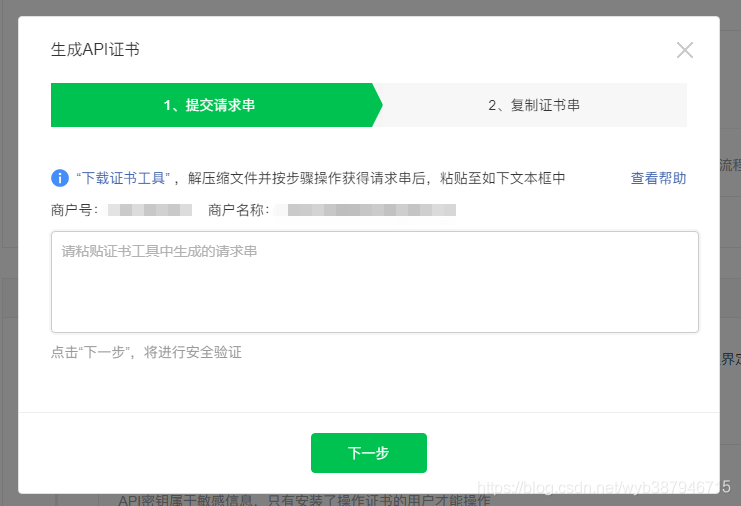 根據提示下載證書工具,當前頁面不要關閉,下載證書工具后打開,如下圖
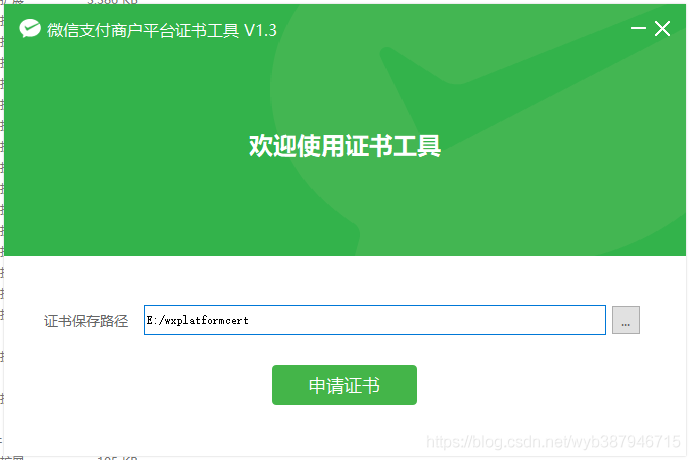
點擊“申請證書”按鈕后,進入填寫商戶信息界面,商戶信息經測試是自動填充的,如下圖 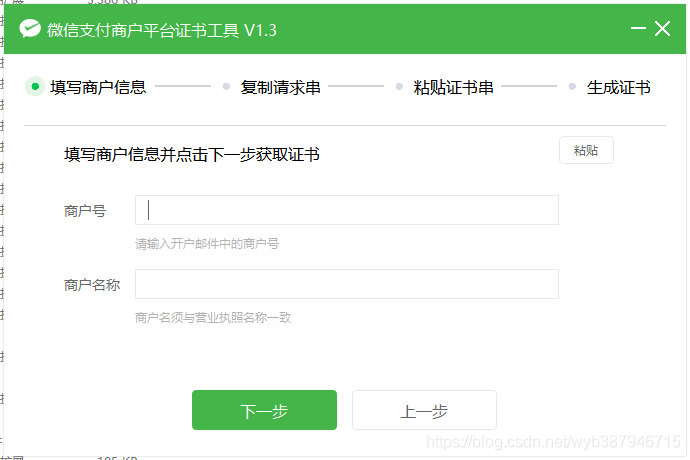 點擊“下一步”,進入復制請求串界面,如下圖
 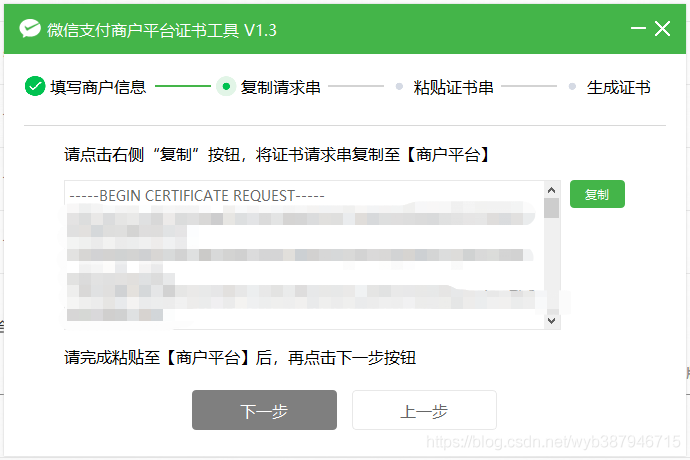 將證書請求串進行復制,復制后回到上述微信支付后臺申請API證書頁面,將請求串進行復制,經測試自動幫你完成復制粘貼,請求串復制后點擊“下一步”操作,進入復制證書串步驟,如下圖
 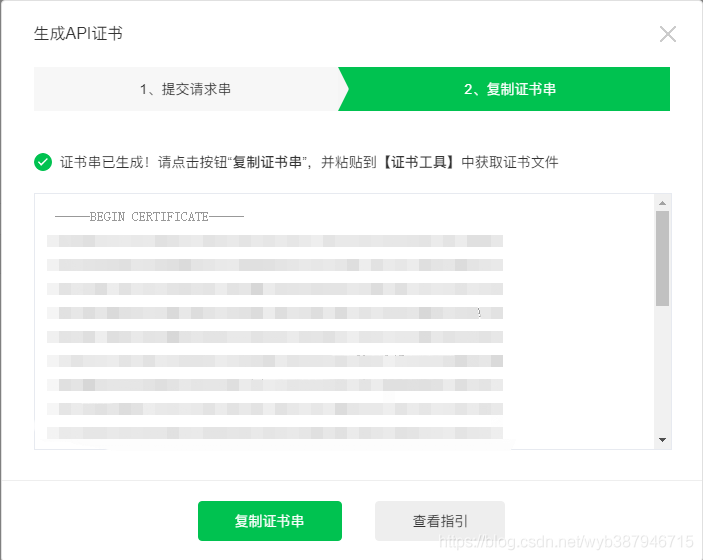 點擊“復制證書串”,將復制的證書串粘貼至證書工具中,如下圖
 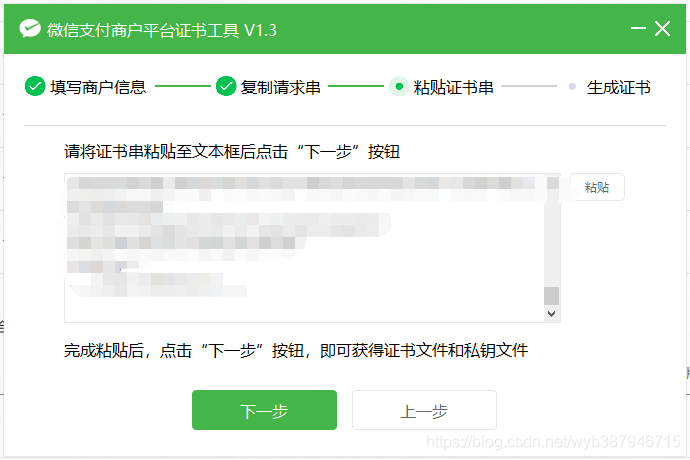 點擊“下一步”完成商戶證書的申請,如下圖
 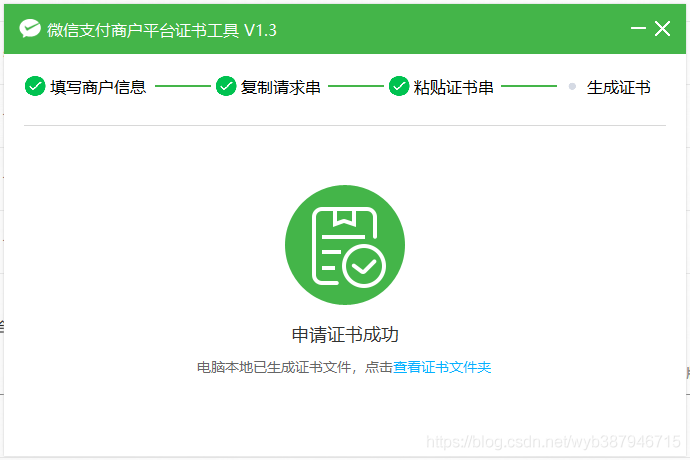 商戶API證書已生成,點擊查看證書文件夾,即可查看證書信息,如下圖
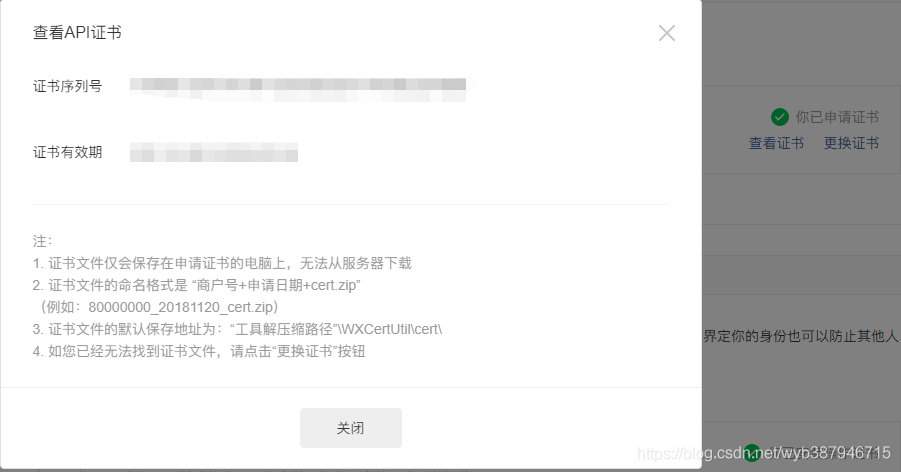
  在微信支付商戶后臺可獲取商戶API證書序列號及證書有效期,如下圖
設置API密鑰,現階段由于微信支付原先老接口并未全部升級至API v3版,涉及新老接口共存的情況,所以API密鑰及APIV3密鑰都需進行設置,新老接口請查閱微信支付開發文檔 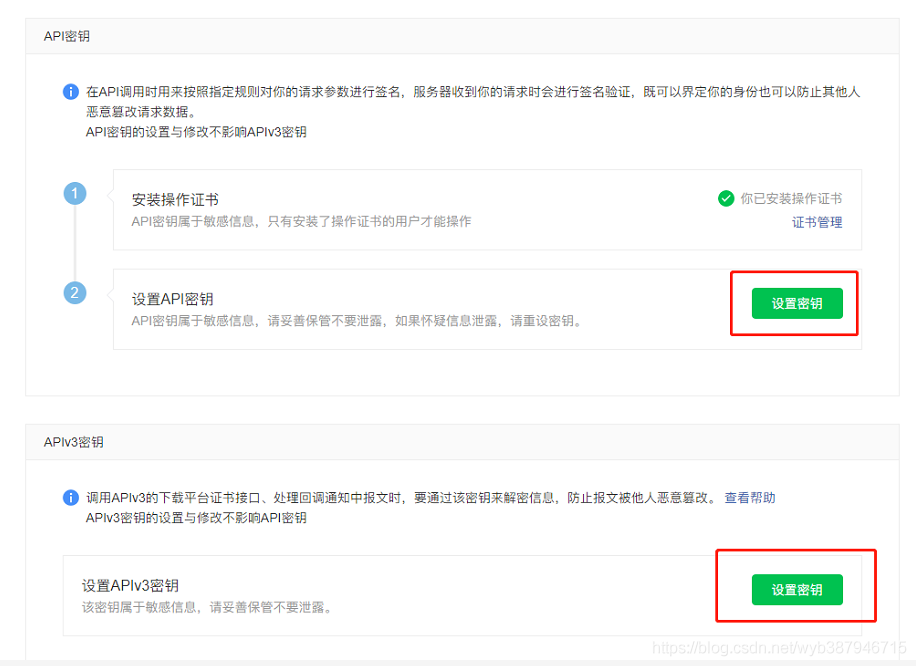 API v2老版本密鑰設置
 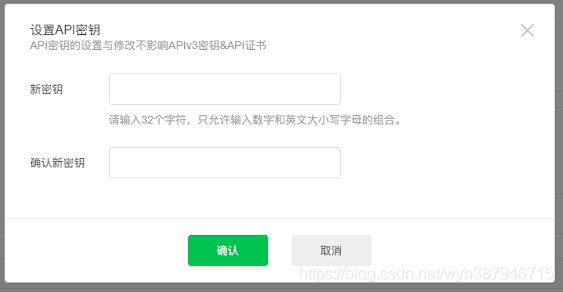 API v3密鑰設置
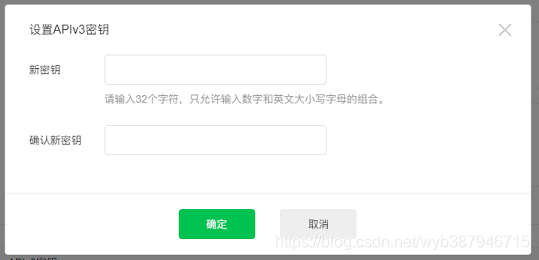
微信平臺證書下載,查閱開發文檔,微信已提供證書下載工具 如下圖 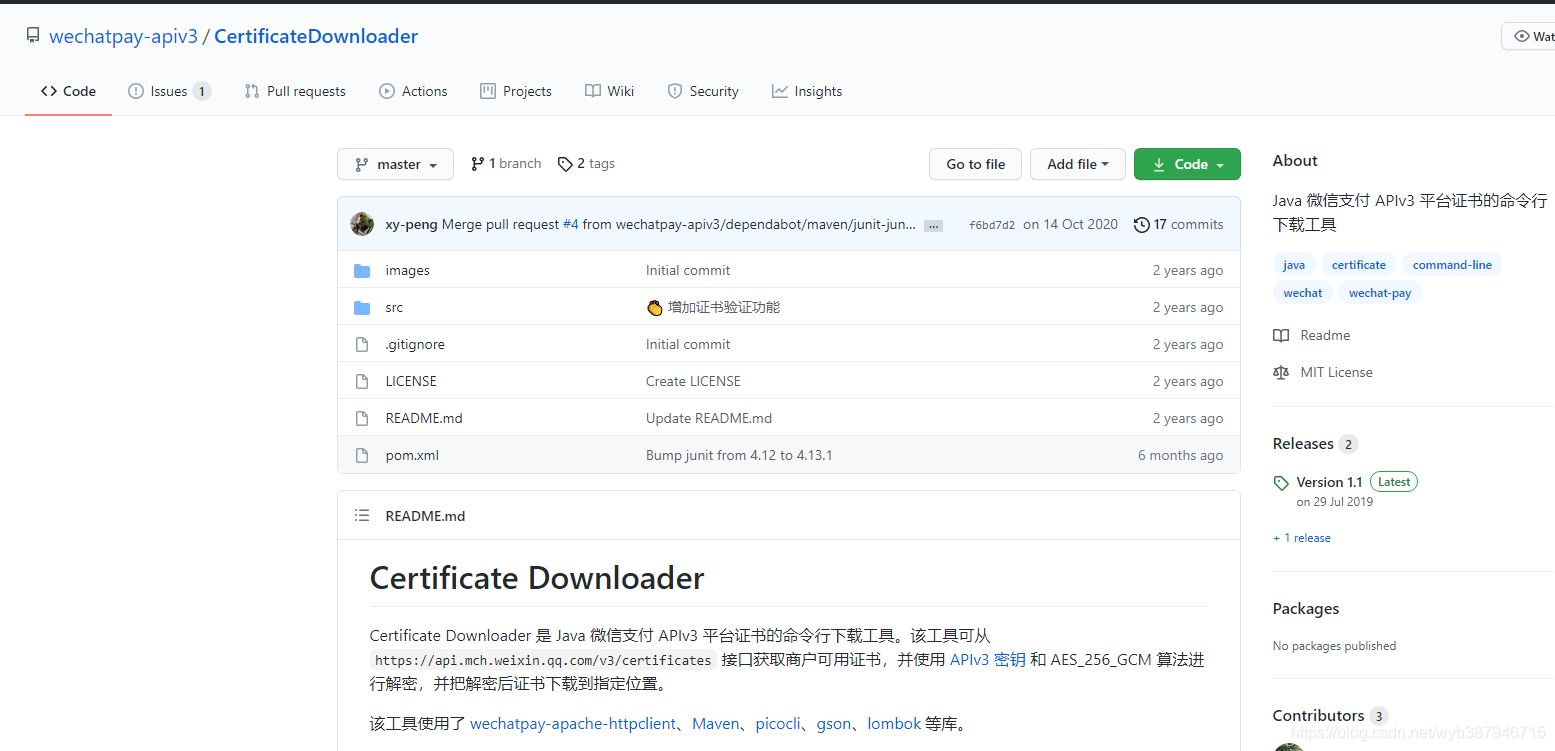
關注本文末尾微信公眾號,回復“666”獲取常用開發工具包,內含常用開發組件及微信證書下載工具,節省下載時間。
下載平臺證書至本地,執行命令
必需參數有:

商戶的私鑰文件,即 -f (商戶API證書中apiclient_key.pem文件路徑)
證書解密的密鑰,即 -k (微信支付后臺設置的APIv3密鑰)
商戶號,即 -m (微信支付商戶號,可在微信支付后臺查閱)
保存證書的路徑,即 -o (微信平臺證書保存路徑)
商戶證書的序列號,即 -s (商戶API證書,即上述第一步申請商戶API證書序列號)
非必需參數有:

微信支付證書,用于驗簽,即 -c

完整命令如下

java -jar CertificateDownloader-1.1.jar -k ${apiV3key} -m ${mchId} -f ${mchPrivateKeyFilePath} -s ${mchSerialNo} -o ${outputFilePath}
至此基礎配置參數已準備就緒
在請求接口之前先了解下接口中一些參數概念,首次接觸最容易搞混的就是商戶API證書和平臺證書,如下圖 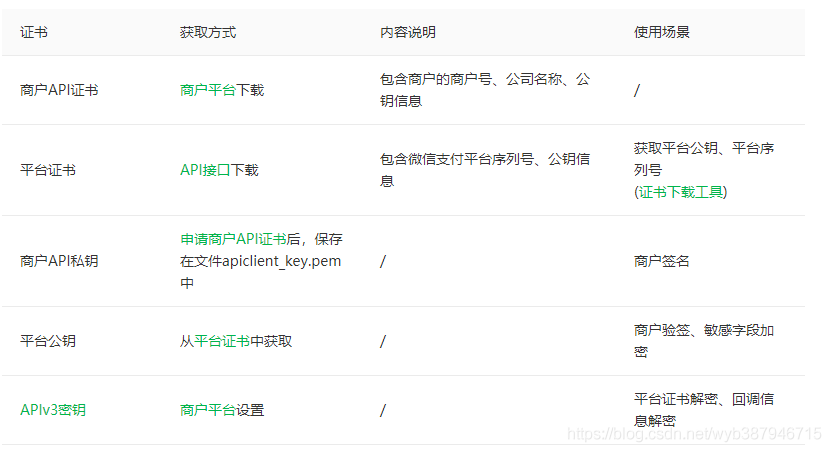
以往老吐槽微信支付接口文檔不友好,沒有sdk,現在API v3版本給你提供了一個客戶端,這點還是可以點贊的,對于開發人員來說,demo代碼直接拿過來,更改下配置參數就可以跑通,那簡直是對程序員莫大的關懷,這方面阿里相對做的比較好
talk is cheap, show me the code
以post請求方式說明,get請求類似
private static String basePostRequest(String requestUrl,String requestJson) {
        CloseableHttpClient httpClient = null;
        CloseableHttpResponse response = null;
        HttpEntity entity = null;
        try {
            PrivateKey merchantPrivateKey = PemUtil.loadPrivateKey(new ByteArrayInputStream(privateKey.getBytes("utf-8")));
            X509Certificate wechatpayCertificate = PemUtil.loadCertificate(new ByteArrayInputStream(certificate.getBytes("utf-8")));
            ArrayList<X509Certificate> listCertificates = new ArrayList<>();
            listCertificates.add(wechatpayCertificate);

            httpClient = WechatPayHttpClientBuilder.create()
                    .withMerchant(mchId, mchSerialNo, merchantPrivateKey)
                    .withWechatpay(listCertificates)
                    .build();

            HttpPost httpPost = new HttpPost(requestUrl);

            // NOTE: 建議指定charset=utf-8。低于4.4.6版本的HttpCore,不能正確的設置字符集,可能導致簽名錯誤
            StringEntity reqEntity = new StringEntity(requestJson, ContentType.create("application/json", "utf-8"));
            httpPost.setEntity(reqEntity);
            httpPost.addHeader("Accept", "application/json");
            response = httpClient.execute(httpPost);
            entity = response.getEntity();
            return EntityUtils.toString(entity);
        } catch (Exception e) {
            e.printStackTrace();
        } finally {
            // 關閉流
        }
        return null;
    }
方法中涉及參數說明
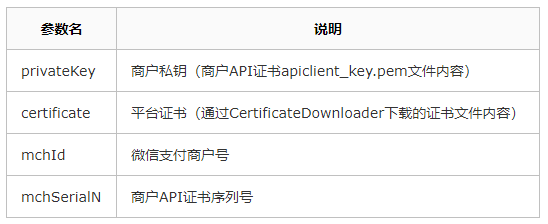
PemUtil.java類為com.wechat.pay.contrib.apache.httpclient.util.PemUtil
請求簽名及應答簽名校驗該客戶端均已幫你處理好,心中對微信支付開發文檔有了一點點好感。根據具體接口方法傳入接口地址及相應接口參數JSON數據即可完成接口聯調測試。
以小程序調起支付接口為例,簡單說明參數簽名方式,先看下文檔中簽名是怎么說的,如下圖 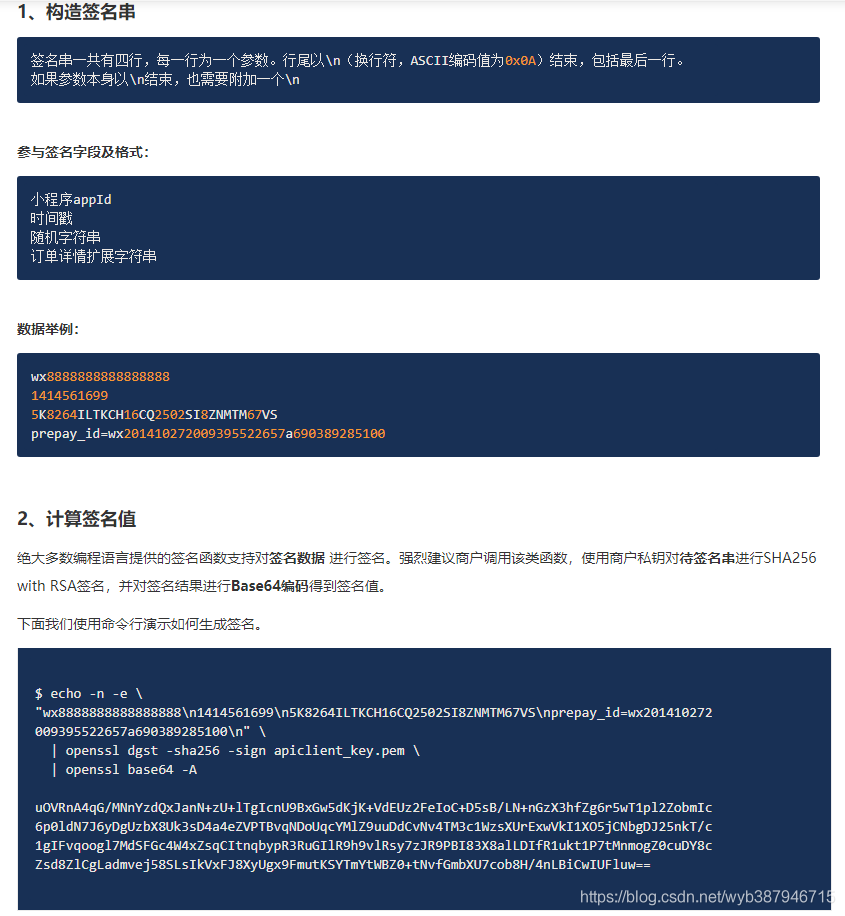
 /**
     * 微信支付-前端喚起支付參數
     * prepay_id=wx201410272009395522657a690389285100
     * @param packageStr 預下單接口返回數據 預支付交易會話標識	prepay_id
     * @return
     */
    public static Map<String,Object> createPayParams(String packageStr) {
        Map<String,Object> resultMap = new HashMap<>();
        String nonceStr = StringUtil.getUUID();
        Long timestamp = System.currentTimeMillis() / 1000;
        String message = buildMessage(timestamp, nonceStr, packageStr);
        String signature = null;
        try {
            signature = sign(message.getBytes("utf-8"));
        } catch (UnsupportedEncodingException e) {
            e.printStackTrace();
        }
        resultMap.put("appId", appId);
        resultMap.put("timeStamp",timestamp.toString());
        resultMap.put("nonceStr",nonceStr);
        resultMap.put("package",packageStr);
        resultMap.put("signType","RSA");
        resultMap.put("paySign",signature);
        return resultMap;
    }
    /**
     * 微信支付-前端喚起支付參數-簽名
     * @param message 簽名數據
     * @return
     */
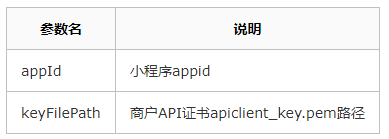
    public static String sign(byte[] message) {
        try{
            Signature sign = Signature.getInstance("SHA256withRSA");
            sign.initSign(getPrivateKey(keyFilePath));
            sign.update(message);
            return Base64.getEncoder().encodeToString(sign.sign());
        } catch(Exception e) {
            e.printStackTrace();
        }
        return null;
    }
    /**
     * 微信支付-前端喚起支付參數-構建簽名參數
     * @param nonceStr 簽名數據
     * @return
     */
    public static String buildMessage(long timestamp, String nonceStr, String packageStr) {
        return appId + "\n"
                + timestamp + "\n"
                + nonceStr + "\n"
                + packageStr + "\n";
    }


    /**
     * 微信支付-前端喚起支付參數-獲取商戶私鑰
     *
     * @param filename 私鑰文件路徑  (required)
     * @return 私鑰對象
     */
    public static PrivateKey getPrivateKey(String filename) throws IOException {

        String content = new String(Files.readAllBytes(Paths.get(filename)), "utf-8");
        try {
            String privateKey = content.replace("-----BEGIN PRIVATE KEY-----", "")
                    .replace("-----END PRIVATE KEY-----", "")
                    .replaceAll("\\s+", "");

            KeyFactory kf = KeyFactory.getInstance("RSA");
            return kf.generatePrivate(
                    new PKCS8EncodedKeySpec(Base64.getDecoder().decode(privateKey)));
        } catch (NoSuchAlgorithmException e) {
            throw new RuntimeException("當前Java環境不支持RSA", e);
        } catch (InvalidKeySpecException e) {
            throw new RuntimeException("無效的密鑰格式");
        }
    }
方法中涉及參數說明
回調通知涉及驗簽及解密
回調數據獲取
String body = request.getReader().lines().collect(Collectors.joining());
驗簽
/**
     * 回調驗簽
     * https://pay.weixin.qq.com/wiki/doc/apiv3/wechatpay/wechatpay4_1.shtml
     * @param wechatpaySerial 回調head頭部
     * @param wechatpaySignature 回調head頭部
     * @param wechatpayTimestamp 回調head頭部
     * @param wechatpayNonce 回調head頭部
     * @param body 請求數據
     * @return
     */
    public static boolean  responseSignVerify(String wechatpaySerial, String wechatpaySignature, String wechatpayTimestamp, String wechatpayNonce, String body) {
        FileInputStream fileInputStream = null;
        try {
            String signatureStr = buildMessage(wechatpayTimestamp, wechatpayNonce, body);
            Signature signer = Signature.getInstance("SHA256withRSA");

            fileInputStream = new FileInputStream(weixin_platform_cert_path);
            X509Certificate receivedCertificate = loadCertificate(fileInputStream);
            signer.initVerify(receivedCertificate);
            signer.update(signatureStr.getBytes(StandardCharsets.UTF_8));
            return signer.verify(Base64.getDecoder().decode(wechatpaySignature));
        } catch (Exception e ) {
            e.printStackTrace();
        } finally {
            if (fileInputStream != null) {
                try {
                    fileInputStream.close();
                } catch (IOException e) {
                    e.printStackTrace();
                }
            }
        }
        return false;
    }

    /**
     * 回調驗簽-加載微信平臺證書
     * @param inputStream
     * @return
     */
    public static X509Certificate loadCertificate(InputStream inputStream) {
        try {
            CertificateFactory cf = CertificateFactory.getInstance("X509");
            X509Certificate cert = (X509Certificate) cf.generateCertificate(inputStream);
            cert.checkValidity();
            return cert;
        } catch (CertificateExpiredException e) {
            throw new RuntimeException("證書已過期", e);
        } catch (CertificateNotYetValidException e) {
            throw new RuntimeException("證書尚未生效", e);
        } catch (CertificateException e) {
            throw new RuntimeException("無效的證書", e);
        }
    }
    /**
     * 回調驗簽-構建簽名數據
     * @param
     * @return
     */
    public static String buildMessage(String wechatpayTimestamp, String wechatpayNonce, String body) {
        return wechatpayTimestamp + "\n"
                + wechatpayNonce + "\n"
                + body + "\n";
    }
方法中涉及參數說明

解密
// https://pay.weixin.qq.com/wiki/doc/apiv3/apis/chapter3_1_5.shtml
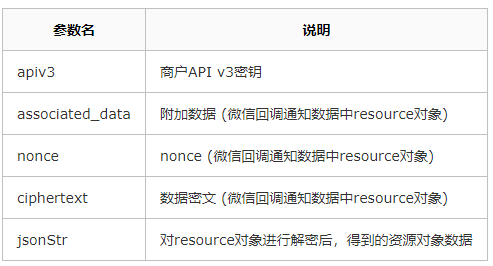
AesUtil wxAesUtil = new AesUtil(apiv3.getBytes());
String jsonStr = wxAesUtil.decryptToString("associated_data".getBytes(),"nonce".getBytes(),"ciphertext");
方法中涉及參數說明
“如何使用API v3接口”的內容就介紹到這里了,感謝大家的閱讀。如果想了解更多行業相關的知識可以關注億速云網站,小編將為大家輸出更多高質量的實用文章!
免責聲明:本站發布的內容(圖片、視頻和文字)以原創、轉載和分享為主,文章觀點不代表本網站立場,如果涉及侵權請聯系站長郵箱:is@yisu.com進行舉報,并提供相關證據,一經查實,將立刻刪除涉嫌侵權內容。