您好,登錄后才能下訂單哦!
您好,登錄后才能下訂單哦!
本篇內容介紹了“如何使用EasyCVS右側菜單欄的activeindex選定以及重定向”的有關知識,在實際案例的操作過程中,不少人都會遇到這樣的困境,接下來就讓小編帶領大家學習一下如何處理這些情況吧!希望大家仔細閱讀,能夠學有所成!
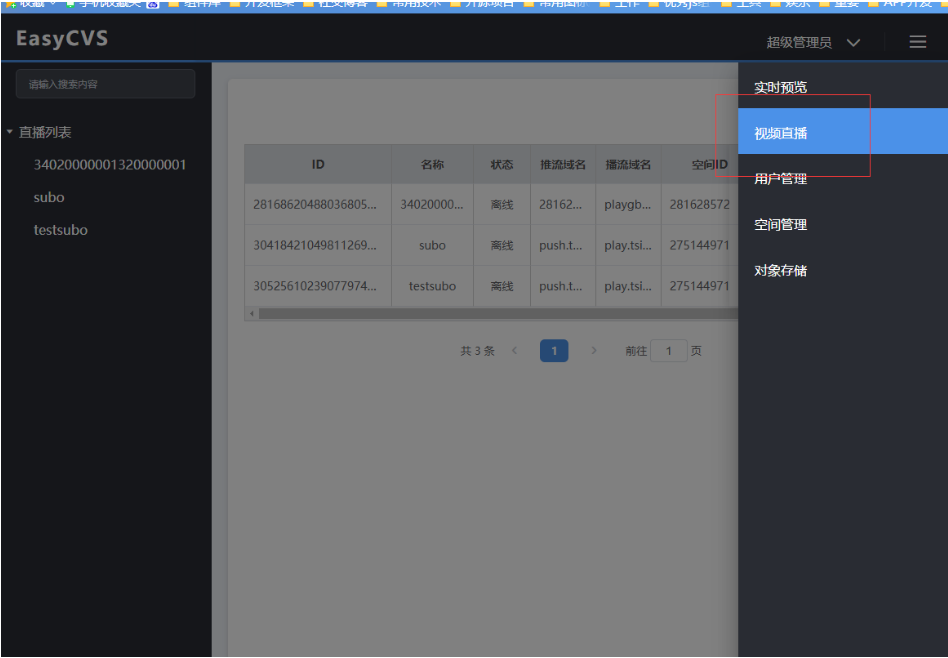
在實際使用中,EasyCVS右側菜單欄在頂部菜單欄切換時,菜單欄的activeindex就會改變,此時,若是打開右側菜單欄,相應的也是需要切換到相應菜單欄item,同時在頁面刷新時也需要重定向到相應的activeIndex。

首先右側菜單欄是使用elementUi的el-menu組件,該組件自帶default-active 屬性,當頂部導航欄切換時將他的activeIndex值給右側的導航欄default-active 值即可。
而重定向是檢測路由地址,來獲取事先確定好的每個導航欄的item對應的路由地址,然后將每個路由的activeInde值給導航欄的default-active賦值即可。
參考代碼如下:
        <el-menu
          :default-active="activeIndexRight"          class="el-menu-vertical-demo"          @open="handleOpen"          @select="select"          background-color="#292C33"          text-color="#fff"          @close="handleClose"          :router="true"        >
          <el-menu-item index="0" :route="'/scrren'">            <span slot="title">實時預覽</span>          </el-menu-item>          <el-menu-item index="1" :route="'/live/lis'">            <span slot="title">視頻直播</span>          </el-menu-item>          <el-menu-item index="2" :route="'/user/list'">            <span slot="title">用戶管理</span>          </el-menu-item>          <el-menu-item index="3" :route="'/space/list'">            <span slot="title">空間管理</span>          </el-menu-item>          <el-menu-item index="4" :route="'/bucket/list'">            <span slot="title">對象存儲</span>          </el-menu-item>        </el-menu>

    //導航欄重定向    RouteRedirection() {
      var path = this.$route.path;
      let paths = [
        { path: "/scrren", type: 0 },
        { path: "/live/list", type: 1 },
        { path: "/user", type: 2 },
        { path: "/space", type: 3 },
        { path: "/bucket", type: 4 },
        { path: "/oss/list", type: 5 },
      ];
      for (const i in paths) {
        if (path.indexOf(paths[i].path) != -1) {
          this.activeIndex = paths[i].type;
          this.activeIndexRight = JSON.stringify(this.activeIndex);
          console.log(this.activeIndex, "路由");
          return;
        }
      }
    },
EasyCVS目前雖不對外開放,但有興趣的用戶可以先了解EasyCVR。EasyCVR目前已經支持RTSP、GB28181、Ehome、海康SDK、大華SDK等協議設備的接入,其他主流廠家的私有協議在不斷擴展中。因此從長遠來看,EasyCVR具備很高的使用價值和適配性。

“如何使用EasyCVS右側菜單欄的activeindex選定以及重定向”的內容就介紹到這里了,感謝大家的閱讀。如果想了解更多行業相關的知識可以關注億速云網站,小編將為大家輸出更多高質量的實用文章!
免責聲明:本站發布的內容(圖片、視頻和文字)以原創、轉載和分享為主,文章觀點不代表本網站立場,如果涉及侵權請聯系站長郵箱:is@yisu.com進行舉報,并提供相關證據,一經查實,將立刻刪除涉嫌侵權內容。