您好,登錄后才能下訂單哦!
您好,登錄后才能下訂單哦!
這篇文章主要介紹“如何使用Frida框架繞過Android應用程序的SSL Pinning”,在日常操作中,相信很多人在如何使用Frida框架繞過Android應用程序的SSL Pinning問題上存在疑惑,小編查閱了各式資料,整理出簡單好用的操作方法,希望對大家解答”如何使用Frida框架繞過Android應用程序的SSL Pinning”的疑惑有所幫助!接下來,請跟著小編一起來學習吧!
大家好!本文我將詳細為大家解釋如何使用frida框架,繞過Android應用程序的SSL pinning。
以下是本文將涵蓋的內容:
Frida和SSL pinning簡介
要求
設置和安裝
Frida服務器設置
設置BurpSuite
推送代理的CA證書:
腳本注入繞過SSL pinning
步驟概述
疑難解答
Frida是什么?
Frida官網上是這么說的:
它是針對本地APP的類似油猴插件的東西,用更專業的術語來說,它是一個動態代碼檢測toolkit。它可以讓你注入JavaScript代碼片段或者你自己的庫到Windows中的APP中,也可以注入到macOS,GNU/Linux,iOS,Android和QNX的APP中。Frida還提供了一些構建在Frida之上的簡單工具。這些工具你可以直接使用,也可以根據自己的需求來調整,或者是作為如何使用API的示例。
簡而言之,Frida就是一個讓你可以注入腳本到本地APP(此案例我們將注入到安卓APP中)中的工具,從而修改APP的行為(在這里例子中,我們可以繞過ssl pinning并執行中間人攻擊,即使APP使用的是HTTPS/SSL連接),并且實時的進行動態測試。
如今,大多數應用程序已在其移動應用中實現了SSL pinning。這是為什么呢?讓我們思考一個問題,假設我們要在設備和服務器之間安全地交換一些數據。SSL傳輸層加密將使數據傳輸安全可靠?在數據傳輸之前,如果服務器的SSL證書與請求的主機名和受信任的根證書匹配,則客戶端會檢查該證書。

它不能確保提供的證書是服務器為請求的主機名提供的實際證書。因此,依賴設備的可信存儲證書不會使數據傳輸“安全”。
證書鎖定(Certificate pinning)是遠程服務器在應用程序本身中信任的硬編碼證書,因此它將忽略設備證書存儲,并將信任自己的硬編碼證書,進一步的應用程序將使用該硬編碼證書“安全地”與遠程服務器通信。
當我們對大多數移動應用程序的HTTP請求進行動態分析時,SSL pinning繞過是需要完成的主要步驟,因為現如今組織對數據隱私和通過網絡的數據安全傳輸變得更加重視,像一些來自中間人攻擊的威脅也成為了他們重點關注的對象。
Frida是一個框架,它將腳本注入到原生應用中,以在運行時操作應用程序的邏輯,這是一種更為動態的方法,可用于移動應用的滲透測試任務。
在開始使用之前我們需要進行一些設置,第一次設置可能需要花點時間,但在此之后就會變得很輕松。如果你在任何一個步驟都出現了問題,都可以參考文章末尾的“疑難解答”部分。建議將所有下載的內容保存在一個文件夾中。
我們需要一個已root的設備或模擬器,因為我們需要將腳本注入到設備的根目錄。我使用的是genymotion。Genymotion非常易于設置和使用,你可以在此處下載它。
一旦完成了genymotion的安裝,我們需要安裝一個Android設備(Android 7+)。我將使用具有以下配置的“Google pixel XL”設備。
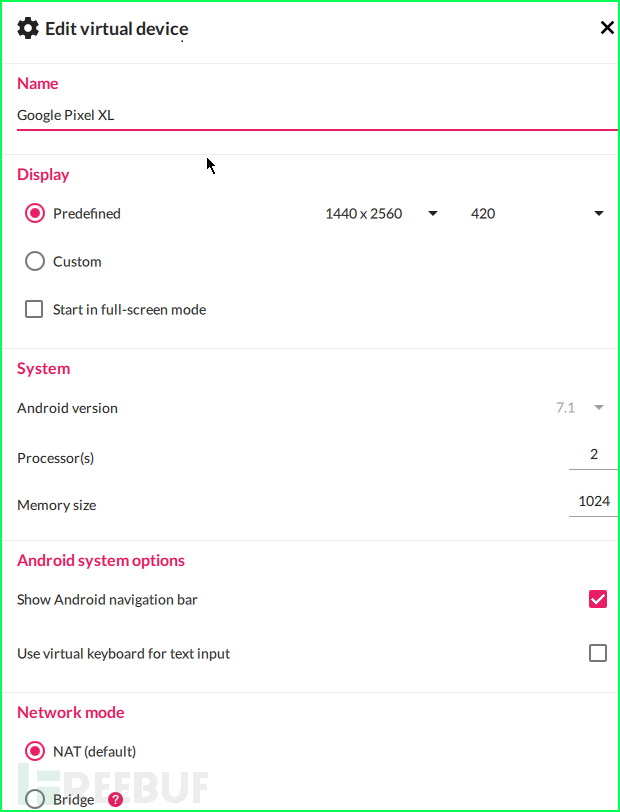
II. Python frida 包安裝:
從這里安裝Python for Windows。
我們需要為frida服務器安裝一些python包。在終端中輸入以下命令:
python -m pip install Fridapython -m pip install objectionpython -m pip install frida-toolsorpip install Fridapip install objectionpip install frida-tools
從此處下載用于Windows的平臺工具。
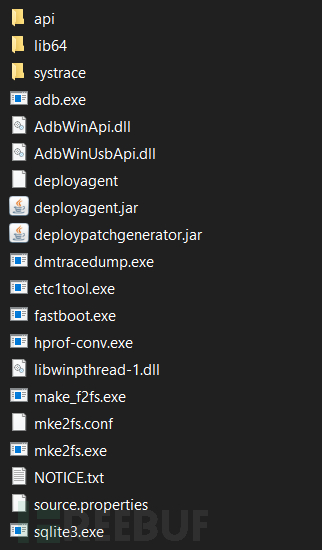
從此處下載我們將推送到設備用于注入目標應用的注入腳本。
或者可以將此代碼另存為fridascript.js,保存在與adb相同的文件夾中。
/*Android SSL Re-pinning frida script v0.2 030417-pier$ adb push burpca-cert-der.crt /data/local/tmp/cert-der.crt$ frida -U -f it.app.mobile -l frida-android-repinning.js --no-pausehttps://techblog.mediaservice.net/2017/07/universal-android-ssl-pinning-bypass-with-frida/UPDATE 20191605: Fixed undeclared var. Thanks to @oleavr and @ehsanpc9999 !*/setTimeout(function(){Java.perform(function (){console.log("");console.log("[.] Cert Pinning Bypass/Re-Pinning");var CertificateFactory = Java.use("java.security.cert.CertificateFactory");var FileInputStream = Java.use("java.io.FileInputStream");var BufferedInputStream = Java.use("java.io.BufferedInputStream");var X509Certificate = Java.use("java.security.cert.X509Certificate");var KeyStore = Java.use("java.security.KeyStore");var TrustManagerFactory = Java.use("javax.net.ssl.TrustManagerFactory");var SSLContext = Java.use("javax.net.ssl.SSLContext");// Load CAs from an InputStreamconsole.log("[+] Loading our CA...")var cf = CertificateFactory.getInstance("X.509");try {var fileInputStream = FileInputStream.$new("/data/local/tmp/cert-der.crt");}catch(err) {console.log("[o] " + err);}var bufferedInputStream = BufferedInputStream.$new(fileInputStream);var ca = cf.generateCertificate(bufferedInputStream);bufferedInputStream.close();var certInfo = Java.cast(ca, X509Certificate);console.log("[o] Our CA Info: " + certInfo.getSubjectDN());// Create a KeyStore containing our trusted CAsconsole.log("[+] Creating a KeyStore for our CA...");var keyStoreType = KeyStore.getDefaultType();var keyStore = KeyStore.getInstance(keyStoreType);keyStore.load(null, null);keyStore.setCertificateEntry("ca", ca);// Create a TrustManager that trusts the CAs in our KeyStoreconsole.log("[+] Creating a TrustManager that trusts the CA in our KeyStore...");var tmfAlgorithm = TrustManagerFactory.getDefaultAlgorithm();var tmf = TrustManagerFactory.getInstance(tmfAlgorithm);tmf.init(keyStore);console.log("[+] Our TrustManager is ready...");console.log("[+] Hijacking SSLContext methods now...")console.log("[-] Waiting for the app to invoke SSLContext.init()...")SSLContext.init.overload("[Ljavax.net.ssl.KeyManager;", "[Ljavax.net.ssl.TrustManager;", "java.security.SecureRandom").implementation = function(a,b,c) {console.log("[o] App invoked javax.net.ssl.SSLContext.init...");SSLContext.init.overload("[Ljavax.net.ssl.KeyManager;", "[Ljavax.net.ssl.TrustManager;", "java.security.SecureRandom").call(this, a, tmf.getTrustManagers(), c);console.log("[+] SSLContext initialized with our custom TrustManager!");}});},0);我們需要將設備連接到adb以在設備上運行命令。但首先轉到settings >> Developer options,并在設備中啟用調試模式,以便adb可以與設備通信。
轉到已提取平臺工具的文件夾,然后運行以下命令將設備連接到adb
//adb connect <ip of device:port>adb connect 192.168.1.190:5555
如果設備中出現彈出窗口,請單擊“允許Allow”。
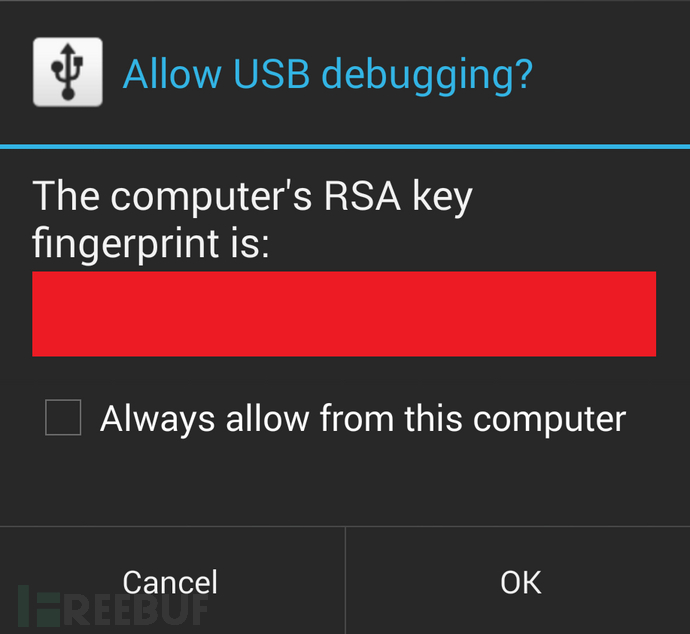
檢查設備是否已連接到adb:
adb devices
你應該能夠看到設備的IP以及名稱。
我們需要根據我們設備的arch版本,為我們的Android設備下載frida服務器包。
要查找設備的arch版本,請運行以下命令。
adb shell getprop ro.product.cpu.abi
如果設備配置與上面提到的相同,請下載:
frida-server-12.4.7-android-x86.xzfrida-server-12.4.7-android-x86_64.xz
在我們的設備中安裝需要繞過SSL pinning的應用程序。打開應用程序并使其在后臺運行。
在注入腳本之前,我們需要在設備中運行frida服務器。請按照以下步驟操作:
現在,我們需要將我們的frida-server文件推送到設備中。復制adb文件夾中的“frida-server-12.4.7-android-x86.xz”文件并運行以下命令。
//adb push <path_of_frida_server_folder><space></data/local/tmp>adb push C:\ADB\frida-server /data/local/tmp
adb shell chmod 777 /data/local/tmp/frida-server
請遵循本指南為android設備在burp中設置代理。
為了能夠攔截流量,frida需要訪問我們的Burpsuite CA證書。我們將在BurpSuite Setup中推送在步驟5中下載的相同證書。
將證書推送到設備并放置在與frida-server相同的位置,將其命名為cert-der.crt(因為此名稱和路徑已在fridascript.js中提到,這樣可以避免一些不必要的問題)
// adb push <path to cacert.der> /data/local/tmp/cert-der.crtadb push cacert.der /data/local/tmp/cert-der.crt
現在,讓我們將fridascript.js注入目標應用程序。
將fridascript.js復制到adb文件夾,并運行以下命令將fridascript.js推送到設備中。
//adb push <path_to_fridascript.js_folder> /data/local/tmpadb push C:\ADB\fridascript.js /data/local/tmp
adb shell /data/local/tmp/frida-server &
現在,我們需要找出目標應用程序的ID。我們將列出設備上所有正在運行的服務,包括你的應用程序進程。
打開一個新的終端,并鍵入以下命令。
frida-ps -U
IV. 找到你應用程序的包名稱。
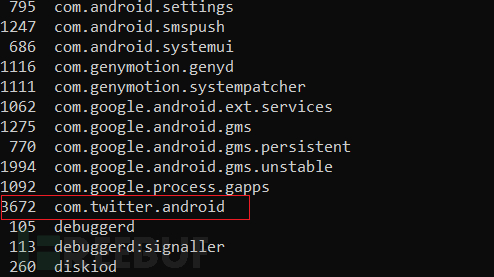
最后,我們將使用以下命令將fridascript.js hook到原生應用程序中:
//frida -U -f <your_application_package_name> -l <path_to_fridascript.js_on_your_computer> --no-pausfrida -U -f com.twitter.android -l D:\frida\fridascript.js --no-paus
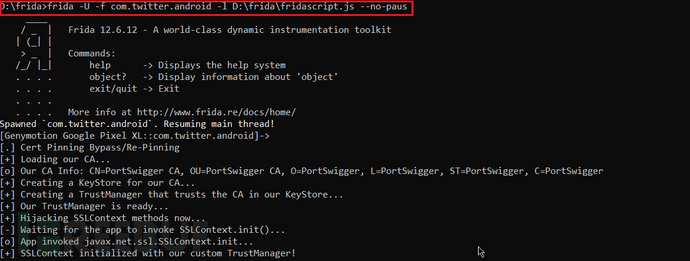
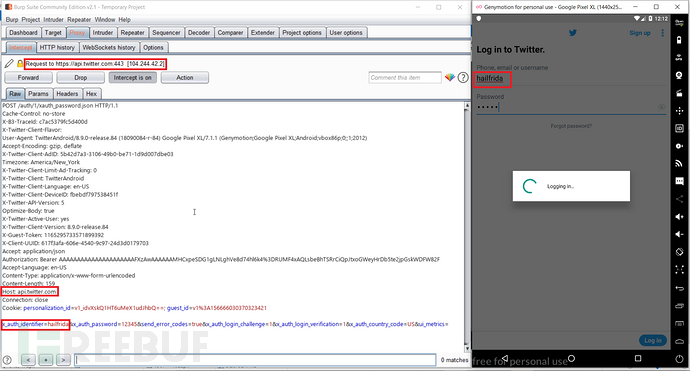
如果一切順利,那么目標應用程序的所有流量都將被BurpSuite攔截。
1. 在genymotion上下載并安裝設備
2. 安裝frida和objection工具
python -m pip install Frida python -m pip install frida-tools python -m pip install objection or pip install Frida pip install frida-tools pip install objection
3. 下載adb平臺工具
4. 下載frida注入腳本
5. 將設備連接到adb
//adb connect <ip of device:port>
6. 下載frida服務器以獲取支持Android設備的arch版本
7. 找出設備的arch版本
adb shell getprop ro.product.cpu.abi
8. 在設備中安裝目標應用程序。
9. 將frida-server推送到設備:
//adb push <path of frida-server folder><space></data/local/tmp>
10. 授予frida-server權限:
adb shell chmod 777 /data/local/tmp/frida-server
11. 設置burpsuite
12. 推送代理的CA證書
// adb push <path to cacert.der> /data/local/tmp/cert-der.crt
13. 將fridascript.js推送到設備:
//adb push <path to fridascript.js folder> /data/local/tmp
14. 檢查并運行設備中的frida服務器
adb shell /data/local/tmp/frida-server &
15. 列出設備上所有正在運行的進程:
frida-ps -U
16. 找到你應用程序的包名稱
17. 將fridascript.js hook到目標應用程序中
//frida -U -f <your_application_package_name> -l <path_to_fridascript.js_on_your_computer> --no-paus
18. 在BurpSuite中攔截流量。
1. ADB 守護程序無法連接
如果發生如下錯誤:
adb devicesadb server is out of date. killing...cannot bind 'tcp:5037'ADB server didn't ACK*failed to start daemon*error:
i. 打開 environment System properties>>Advanced>>Environment Variables
ii. 單擊路徑并刪除C:/Android條目或指向adb工具的路徑
iii. 將所有平臺工具復制到genymotion>>tools文件夾中
iv. 創建新路徑并添加genymotion>>tools文件夾的路徑。
2. frida/ pip 不被識別為內部或外部命令
i. 打開 environment System properties>>Advanced>>Environment Variables
ii. 創建新路徑并添加Python>>script文件夾的路徑
3. 將應用程序安裝到設備時出現 Arm translation error。
i. 從此處下載arm translation文件
ii. 將文件拖放到設備模擬器中,或是在使用物理設備時從恢復中刷新此文件
iii. 重啟設備后,你將能夠拖放安裝目標應用程序
4.Failed to spawn:spawn Android apps 時不支持 argv 選項
檢查計算機上的fridascript.js路徑。路徑可能不正確。你必須給出fridascript.js文件的絕對路徑。
5. frida 服務器已啟動但無法列出服務
斷開并重新連接設備中的wifi。
到此,關于“如何使用Frida框架繞過Android應用程序的SSL Pinning”的學習就結束了,希望能夠解決大家的疑惑。理論與實踐的搭配能更好的幫助大家學習,快去試試吧!若想繼續學習更多相關知識,請繼續關注億速云網站,小編會繼續努力為大家帶來更多實用的文章!
免責聲明:本站發布的內容(圖片、視頻和文字)以原創、轉載和分享為主,文章觀點不代表本網站立場,如果涉及侵權請聯系站長郵箱:is@yisu.com進行舉報,并提供相關證據,一經查實,將立刻刪除涉嫌侵權內容。