溫馨提示×
您好,登錄后才能下訂單哦!
點擊 登錄注冊 即表示同意《億速云用戶服務條款》
您好,登錄后才能下訂單哦!
小編給大家分享一下Android如何實現撥號器,相信大部分人都還不怎么了解,因此分享這篇文章給大家參考一下,希望大家閱讀完這篇文章后大有收獲,下面讓我們一起去了解一下吧!
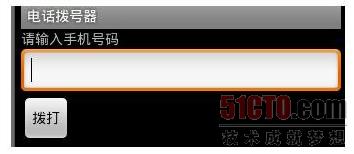
1、界面效果圖

2、AndroidManifest.xml
<?xml version="1.0" encoding="utf-8"?> <manifest xmlns:android="http://schemas.android.com/apk/res/android" package="com.tjp" android:versionCode="1" android:versionName="1.0"> <uses-sdk android:minSdkVersion="7" /> <application android:icon="@drawable/congsmall" android:label="@string/app_name"> <activity android:name=".PhoneActivity" android:label="@string/app_name"> <intent-filter> <action android:name="android.intent.action.MAIN" /> <category android:name="android.intent.category.LAUNCHER" /> </intent-filter> </activity> </application> <uses-permission android:name="android.permission.CALL_PHONE"/> </manifest>
注冊電話撥打服務<uses-permission android:name="android.permission.CALL_PHONE"/>
3、界面代碼
<?xml version="1.0" encoding="utf-8"?> <LinearLayout xmlns:android="http://schemas.android.com/apk/res/android" android:orientation="vertical" android:layout_width="fill_parent" android:layout_height="fill_parent" > <TextView android:layout_width="fill_parent" android:layout_height="wrap_content" android:text="@string/mobilelable" /> <EditText android:layout_width="fill_parent" android:layout_height="wrap_content" android:id="@+id/mobile"/><Button android:layout_width="wrap_content" android:layout_height="wrap_content" android:text="@string/buttonlabl" android:id="@+id/btncall" /> </LinearLayout>
4、界面值定義strings.xml
<?xml version="1.0" encoding="utf-8"?> <resources> <string name="mobilelable">請輸入手機號碼</string> <string name="app_name">電話撥號器</string> <string name="buttonlabl">撥打</string> </resources>
5、activity
package com.tjp; import android.app.Activity; import android.content.Intent; import android.net.Uri; import android.os.Bundle; import android.view.View; import android.widget.Button; import android.widget.EditText; public class PhoneActivity extends Activity { private EditText mobile; @Override public void onCreate(Bundle savedInstanceState) { super.onCreate(savedInstanceState); setContentView(R.layout.main); Button btncall=(Button)this.findViewById(R.id.btncall); mobile=(EditText)this.findViewById(R.id.mobile); btncall.setOnClickListener(new View.OnClickListener(){ //匿名內部類 @Override public void onClick(View v) { String mobilemobileText=mobile.getText().toString(); Intent intent=new Intent(Intent.ACTION_CALL,Uri.parse("tel:"+mobileText));//撥打電話 startActivity(intent); } }); } }以上是“Android如何實現撥號器”這篇文章的所有內容,感謝各位的閱讀!相信大家都有了一定的了解,希望分享的內容對大家有所幫助,如果還想學習更多知識,歡迎關注億速云行業資訊頻道!
免責聲明:本站發布的內容(圖片、視頻和文字)以原創、轉載和分享為主,文章觀點不代表本網站立場,如果涉及侵權請聯系站長郵箱:is@yisu.com進行舉報,并提供相關證據,一經查實,將立刻刪除涉嫌侵權內容。