您好,登錄后才能下訂單哦!
您好,登錄后才能下訂單哦!
這篇文章主要介紹“如何實現Web端指紋登錄”,在日常操作中,相信很多人在如何實現Web端指紋登錄問題上存在疑惑,小編查閱了各式資料,整理出簡單好用的操作方法,希望對大家解答”如何實現Web端指紋登錄”的疑惑有所幫助!接下來,請跟著小編一起來學習吧!
前言
現在越來越多的筆記本電腦內置了指紋識別,用于快速從鎖屏進入桌面,一些客戶端的軟件也支持通過指紋來認證用戶身份。
前幾天我在想,既然客戶端軟件能調用指紋設備,web端應該也可以調用,經過一番折騰后,終于實現了這個功能,并應用在了我的開源項目中。
本文就跟大家分享下我的實現思路以及過程,歡迎各位感興趣的開發者閱讀本文。
實現思路
瀏覽器提供了Web Authentication API, 我們可以利用這套API來調用用戶的指紋設備來實現用戶信息認證。
最終的實現效果視頻如下所示:
web端指紋登錄的實現
注冊指紋
首先,我們需要拿到服務端返回的用戶憑證,隨后將用戶憑證傳給指紋設備,調起系統的指紋認證,認證通過后,回調函數會返回設備id與客戶端信息,我們需要將這些信息保存在服務端,用于后面調用指紋設備來驗證用戶身份,從而實現登錄。
接下來,我們總結下注冊指紋的過程,如下所示:
用戶使用其他方式在網站登錄成功后,服務端返回用戶憑證,將用戶憑證保存到本地
檢測客戶端是否存在指紋設備
如果存在,將服務端返回的用戶憑證與用戶信息傳遞給指紋注冊函數來創建指紋
身份認證成功,回調函數返回設備id與客戶端信息,將設備id保存到本地
將設備id與客戶端信息發送至服務端,將其存儲到指定用戶數據中。
注意:注冊指紋只能工作在使用 https 連接,或是使用 localhost的網站中。
指紋認證
用戶在我們網站授權指紋登錄后,會將用戶憑證與設備id保存在本地,當用戶進入我們網站時,會從本地拿到這兩條數據,提示它是否需要通過指紋來登錄系統,同意之后則將設備id與用戶憑證傳給指紋設備,調起系統的指紋認證,認證通過后,調用登錄接口,獲取用戶信息。
接下來,我們總結下指紋認證的過程,如下所示:
從本地獲取用戶憑證與設備id
檢測客戶端是否存在指紋設備
如果存在,將用戶憑證與設備id傳給指紋認證函數進行校驗
身份認證成功,調用登錄接口獲取用戶信息
注意:指紋認證只能工作在使用 https 連接,或是使用 localhost的網站中。
實現過程
上一個章節,我們捋清了指紋登錄的具體實現思路,接下來我們來看下具體的實現過程與代碼。
服務端實現
首先,我們需要在服務端寫3個接口:獲取TouchID、注冊TouchID、指紋登錄
獲取TouchID
這個接口用于判斷登錄用戶是否已經在本網站注冊了指紋,如果已經注冊則返回TouchID到客戶端,方便用戶下次登錄。
controller層代碼如下
@ApiOperation(value = "獲取TouchID", notes = "通過用戶id獲取指紋登錄所需憑據") @CrossOrigin() @RequestMapping(value = "/getTouchID", method = RequestMethod.POST) public ResultVO<?> getTouchID(@ApiParam(name = "傳入userId", required = true) @Valid @RequestBody GetTouchIdDto touchIdDto, @RequestHeader(value = "token") String token) { JSONObject result = userService.getTouchID(JwtUtil.getUserId(token)); if (result.getEnum(ResultEnum.class, "code").getCode() == 0) { // touchId獲取成功 return ResultVOUtil.success(result.getString("touchId")); } // 返回錯誤信息 return ResultVOUtil.error(result.getEnum(ResultEnum.class, "code").getCode(), result.getEnum(ResultEnum.class, "code").getMessage()); }接口具體實現代碼如下
// 獲取TouchID @Override public JSONObject getTouchID(String userId) { JSONObject returnResult = new JSONObject(); // 根據當前用戶id從數據庫查詢touchId User user = userMapper.getTouchId(userId); String touchId = user.getTouchId(); if (touchId != null) { // touchId存在 returnResult.put("code", ResultEnum.GET_TOUCHID_SUCCESS); returnResult.put("touchId", touchId); return returnResult; } // touchId不存在 returnResult.put("code", ResultEnum.GET_TOUCHID_ERR); return returnResult; }注冊TouchID
這個接口用于接收客戶端指紋設備返回的TouchID與客戶端信息,將獲取到的信息保存到數據庫的指定用戶。
controller層代碼如下
@ApiOperation(value = "注冊TouchID", notes = "保存客戶端返回的touchid等信息") @CrossOrigin() @RequestMapping(value = "/registeredTouchID", method = RequestMethod.POST) public ResultVO<?> registeredTouchID(@ApiParam(name = "傳入userId", required = true) @Valid @RequestBody SetTouchIdDto touchIdDto, @RequestHeader(value = "token") String token) { JSONObject result = userService.registeredTouchID(touchIdDto.getTouchId(), touchIdDto.getClientDataJson(), JwtUtil.getUserId(token)); if (result.getEnum(ResultEnum.class, "code").getCode() == 0) { // touchId獲取成功 return ResultVOUtil.success(result.getString("data")); } // 返回錯誤信息 return ResultVOUtil.error(result.getEnum(ResultEnum.class, "code").getCode(), result.getEnum(ResultEnum.class, "code").getMessage()); }接口具體實現代碼如下
// 注冊TouchID @Override public JSONObject registeredTouchID(String touchId, String clientDataJson, String userId) { JSONObject result = new JSONObject(); User row = new User(); row.setTouchId(touchId); row.setClientDataJson(clientDataJson); row.setUserId(userId); // 根據userId更新touchId與客戶端信息 int updateResult = userMapper.updateTouchId(row); if (updateResult>0) { result.put("code", ResultEnum.SET_TOUCHED_SUCCESS); result.put("data", "touch_id設置成功"); return result; } result.put("code", ResultEnum.SET_TOUCHED_ERR); return result; }指紋登錄
這個接口接收客戶端發送的用戶憑證與touchId,隨后將其和數據庫中的數據進行校驗,返回用戶信息。
controller層代碼如下
@ApiOperation(value = "指紋登錄", notes = "通過touchId與用戶憑證登錄系統") @CrossOrigin() @RequestMapping(value = "/touchIdLogin", method = RequestMethod.POST) public ResultVO<?> touchIdLogin(@ApiParam(name = "傳入Touch ID與用戶憑證", required = true) @Valid @RequestBody TouchIDLoginDto touchIDLogin) { JSONObject result = userService.touchIdLogin(touchIDLogin.getTouchId(), touchIDLogin.getCertificate()); return LoginUtil.getLoginResult(result); }接口具體實現代碼如下
// 指紋登錄 @Override public JSONObject touchIdLogin(String touchId, String certificate) { JSONObject returnResult = new JSONObject(); User row = new User(); row.setTouchId(touchId); row.setUuid(certificate); User user = userMapper.selectUserForTouchId(row); String userName = user.getUserName(); String userId = user.getUserId(); // 用戶名為null則返回錯誤信息 if (userName == null) { // 指紋認證失敗 returnResult.put("code", ResultEnum.TOUCHID_LOGIN_ERR); return returnResult; } // 指紋認證成功,返回用戶信息至客戶端 // ... 此處代碼省略,根據自己的需要返回用戶信息即可 ...// returnResult.put("code", ResultEnum.LOGIN_SUCCESS); return returnResult; }前端實現
前端部分,需要將現有的登錄邏輯和指紋認證相結合,我們需要實現兩個函數:指紋注冊、指紋登錄。
指紋注冊
這個函數我們需要接收3個參數:用戶名、用戶id、用戶憑證,我們需要這三個參數來調用指紋設備來生成指紋,具體的實現代碼如下:
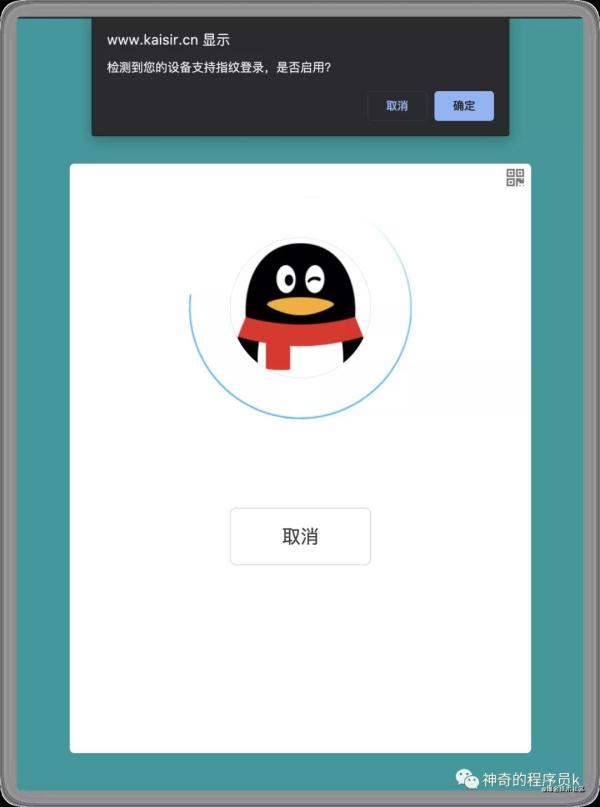
touchIDRegistered: async function( userName: string, userId: string, certificate: string ) { // 校驗設備是否支持touchID const hasTouchID = await PublicKeyCredential.isUserVerifyingPlatformAuthenticatorAvailable(); if ( hasTouchID && window.confirm("檢測到您的設備支持指紋登錄,是否啟用?") ) { // 更新注冊憑證 this.touchIDOptions.publicKey.challenge = this.base64ToArrayBuffer( certificate ); // 更新用戶名、用戶id this.touchIDOptions.publicKey.user.name = userName; this.touchIDOptions.publicKey.user.displayName = userName; this.touchIDOptions.publicKey.user.id = this.base64ToArrayBuffer( userId ); // 調用指紋設備,創建指紋 const publicKeyCredential = await navigator.credentials.create( this.touchIDOptions ); if (publicKeyCredential && "rawId" in publicKeyCredential) { // 將rowId轉為base64 const rawId = publicKeyCredential["rawId"]; const touchId = this.arrayBufferToBase64(rawId); const response = publicKeyCredential["response"]; // 獲取客戶端信息 const clientDataJSON = this.arrayBufferToString( response["clientDataJSON"] ); // 調用注冊TouchID接口 this.$api.touchIdLogingAPI .registeredTouchID({ touchId: touchId, clientDataJson: clientDataJSON }) .then((res: responseDataType<string>) => { if (res.code === 0) { // 保存touchId用于指紋登錄 localStorage.setItem("touchId", touchId); return; } alert(res.msg); }); } } }上面函數中在創建指紋時,用到了一個對象,它是創建指紋必須要傳的,它的定義以及每個參數的解釋如下所示:
const touchIDOptions = { publicKey: { rp: { name: "chat-system" }, // 網站信息 user: { name: "", // 用戶名 id: "", // 用戶id(ArrayBuffer) displayName: "" // 用戶名 }, pubKeyCredParams: [ { type: "public-key", alg: -7 // 接受的算法 } ], challenge: "", // 憑證(touchIDOptions) authenticatorSelection: { authenticatorAttachment: "platform" } } }由于touchIDOptions中,有的參數需要ArrayBuffer類型,我們數據庫保存的數據是base64格式的,因此我們需要實現base64與ArrayBuffer之間相互轉換的函數,實現代碼如下:
base64ToArrayBuffer: function(base64: string) { const binaryString = window.atob(base64); const len = binaryString.length; const bytes = new Uint8Array(len); for (let i = 0; i < len; i++) { bytes[i] = binaryString.charCodeAt(i); } return bytes.buffer; }, arrayBufferToBase64: function(buffer: ArrayBuffer) { let binary = ""; const bytes = new Uint8Array(buffer); const len = bytes.byteLength; for (let i = 0; i < len; i++) { binary += String.fromCharCode(bytes[i]); } return window.btoa(binary); }指紋認證通過后,會在回調函數中返回客戶端信息,數據類型是ArrayBuffer,數據庫需要的格式是string類型,因此我們需要實現ArrayBuffer轉string的函數,實現代碼如下:
arrayBufferToString: function(buffer: ArrayBuffer) { let binary = ""; const bytes = new Uint8Array(buffer); const len = bytes.byteLength; for (let i = 0; i < len; i++) { binary += String.fromCharCode(bytes[i]); } return binary; }注意:用戶憑證中不能包含 _ 和 **-**這兩個字符,否則base64ToArrayBuffer函數將無法成功轉換。
指紋登錄
這個函數接收2個參數:用戶憑證、設備id,我們會通過這兩個參數來調起客戶端的指紋設備來驗證身份,具體的實現代碼如下:
touchIDLogin: async function(certificate: string, touchId: string) { // 校驗設備是否支持touchID const hasTouchID = await PublicKeyCredential.isUserVerifyingPlatformAuthenticatorAvailable(); if (hasTouchID) { // 更新登錄憑證 this.touchIDLoginOptions.publicKey.challenge = this.base64ToArrayBuffer( certificate ); // 更新touchID this.touchIDLoginOptions.publicKey.allowCredentials[0].id = this.base64ToArrayBuffer( touchId ); // 開始校驗指紋 await navigator.credentials.get(this.touchIDLoginOptions); // 調用指紋登錄接口 this.$api.touchIdLogingAPI .touchIdLogin({ touchId: touchId, certificate: certificate }) .then((res: responseDataType) => { if (res.code == 0) { // 存儲當前用戶信息 localStorage.setItem("token", res.data.token); localStorage.setItem("refreshToken", res.data.refreshToken); localStorage.setItem("profilePicture", res.data.avatarSrc); localStorage.setItem("userID", res.data.userID); localStorage.setItem("username", res.data.username); const certificate = res.data.certificate; localStorage.setItem("certificate", certificate); // 跳轉消息組件 this.$router.push({ name: "message" }); return; } // 切回登錄界面 this.isLoginStatus = loginStatusEnum.NOT_LOGGED_IN; alert(res.msg); }); } }注意:注冊新的指紋后,舊的Touch id就會失效,只能通過新的Touch ID來登錄,否則系統無法調起指紋設備,會報錯:認證出了點問題。
整合現有登錄邏輯
完成上述步驟后,我們已經實現了整個指紋的注冊、登錄的邏輯,接下來我們來看看如何將其與現有登錄進行整合。
調用指紋注冊
當用戶使用用戶名、密碼或者第三方平臺授權登錄成功后,我們就調用指紋注冊函數,提示用戶是否對本網站進行授權,實現代碼如下:
authLogin: function(state: string, code: string, platform: string) { this.$api.authLoginAPI .authorizeLogin({ state: state, code: code, platform: platform }) .then(async (res: responseDataType) => { if (res.code == 0) { // ... 授權登錄成功,其他代碼省略 ... // // 保存用戶憑證,用于指紋登錄 const certificate = res.data.certificate; localStorage.setItem("certificate", certificate); // 校驗設備是否支持touchID const hasTouchID = await PublicKeyCredential.isUserVerifyingPlatformAuthenticatorAvailable(); if (hasTouchID) { // ... 其他代碼省略 ... // // 獲取Touch ID,檢測用戶是否已授權本網站指紋登錄 this.$api.touchIdLogingAPI .getTouchID({ userId: userId }) .then(async (res: responseDataType) => { if (res.code !== 0) { // touchId不存在, 詢問用戶是否注冊touchId await this.touchIDRegistered(username, userId, certificate); } // 保存touchid localStorage.setItem("touchId", res.data); // 跳轉消息組件 await this.$router.push({ name: "message" }); }); return; } // 設備不支持touchID,直接跳轉消息組件 await this.$router.push({ name: "message" }); return; } // 登錄失敗,切回登錄界面 this.isLoginStatus = loginStatusEnum.NOT_LOGGED_IN; alert(res.msg); }); }最終的效果如下所示:


每次第三方平臺授權登錄時都會檢測當前用戶是否已授權本網站,如果已授權則將Touch ID保存至本地,用于通過指紋直接登錄。
調用指紋登錄
當登錄頁面加載完畢1s后,我們從用戶本地取出用戶憑證與Touch ID,如果存在則提示用戶是否需要通過指紋來登錄系統,具體代碼如下所示:
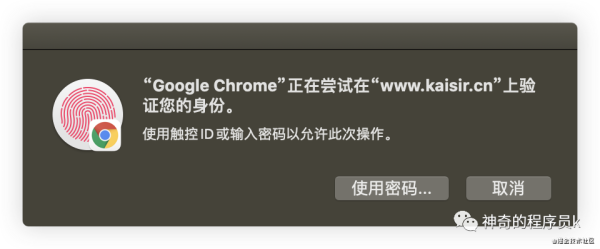
mounted() { const touchId = localStorage.getItem("touchId"); const certificate = localStorage.getItem("certificate"); // 如果touchId存在,則調用指紋登錄 if (touchId && certificate) { // 提示用戶是否需要touchId登錄 setTimeout(() => { if (window.confirm("您已授權本網站通過指紋登錄,是否立即登錄?")) { this.touchIDLogin(certificate, touchId); } }, 1000); } }最終效果如下所示:


項目地址
本文代碼的完整地址請移步:Login.vue
在線體驗地址:chat-system
項目GitHub地址:chat-system-github
到此,關于“如何實現Web端指紋登錄”的學習就結束了,希望能夠解決大家的疑惑。理論與實踐的搭配能更好的幫助大家學習,快去試試吧!若想繼續學習更多相關知識,請繼續關注億速云網站,小編會繼續努力為大家帶來更多實用的文章!
免責聲明:本站發布的內容(圖片、視頻和文字)以原創、轉載和分享為主,文章觀點不代表本網站立場,如果涉及侵權請聯系站長郵箱:is@yisu.com進行舉報,并提供相關證據,一經查實,將立刻刪除涉嫌侵權內容。