您好,登錄后才能下訂單哦!
您好,登錄后才能下訂單哦!
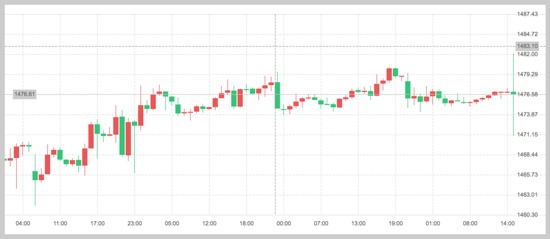
本篇文章為大家展示了怎么在HTML5中利用Canvas繪制一個K線圖,內容簡明扼要并且容易理解,絕對能使你眼前一亮,通過這篇文章的詳細介紹希望你能有所收獲。
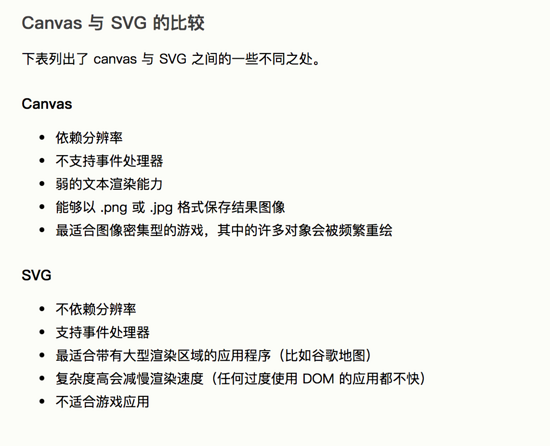
SVG 是一種使用 XML 描述 2D 圖形的語言。 Canvas 通過 JavaScript 來繪制 2D 圖形。 Canvas 是逐像素進行渲染的。
 '
'
經過上面的比較不難發現, SVG 更適用于偏靜態,渲染頻率不高的場景,所以這種要實現實時報價更新繪制的情況只能選擇 canvas。
2. 實現哪些需求
歷史報價 和 實時報價 繪制圖表
支持 拖拽 查看歷史時間段的報價圖表
支持鼠標 滾輪 和觸摸板 雙指 操作放大或縮小圖表
支持鼠標指針 移動 查看鼠標位置報價
3. 代碼實現過程
1. 準備工作
/**
 * K-line - K線圖渲染函數
 * Date: 2019.12.18  Author: isnan
 */
const BLOCK_MARGIN = 2; //方塊水平間距
const START_PRICE_INDEX = 'open_price'; //開始價格在數據組中的位置
const END_PRICE_INDEX = 'close'; //結束價格在數據組中的位置
const MIN_PRICE_INDEX = 'low'; //最小價格在數據組中的位置
const MAX_PRICE_INDEX = 'high'; //最大價格在數據組中的位置
const TIME_INDEX = 'time'; //時間在數據組中的位置
const LINE_WIDTH = 1; //1px 寬度 (中間線、x軸等)
const BOTTOM_SPACE = 40; //底部空間
const TOP_SPACE = 20; //頂部空間
const RIGHT_SPACE = 60; //右側空間
let _addEventListener, _removeEventListener, prefix = ''; //addEventListener 瀏覽器兼容
function RenderKLine (id, /*Optional*/options) {
  if (!id) return;
  options = options || {};
  this.id = id;   //canvas box id
  // detect event model
  if (window.addEventListener) {
    _addEventListener = "addEventListener";
    _removeEventListener = "removeEventListener";
  } else {
    _addEventListener = "attachEvent";
    _removeEventListener = "detachEvent"
    prefix = "on";
  }
  // options params
  this.sharpness = options.sharpness;  // 清晰度 (正整數 太大可能會卡頓,取決于電腦配置 建議在2~5區間)
  this.blockWidth = options.blockWidth; // 方塊的寬度 (最小為3,最大49 為了防止中間線出現位置偏差 設定為奇數,若為偶數則向下減1)
  this.buyColor = options.buyColor || '#F05452';  // color 漲
  this.sellColor = options.sellColor || '#25C875';  // color 跌
  this.fontColor = options.fontColor || '#666666';  //文字顏色
  this.lineColor = options.lineColor || '#DDDDDD';  //參考線顏色
  this.digitsPoint = options.digitsPoint || 2; //報價的digits (有幾位小數)
  this.horizontalCells = options.horizontalCells || 5; //水平方向切割多少格子 (中間虛線數 = 5 - 1)
  this.crossLineStatus = options.crossLineStatus || true; //鼠標移動十字線顯示狀態

  //basic params
  this.totalWidth = 0;  //總寬度
  this.movingRange = 0; //橫向移動的距離 取正數值,使用時再加負號
  this.minPrice = 9999999;
  this.maxPrice = 0; //繪制的所有數據中 最小/最大數據 用來繪制y軸
  this.diffPrice = 0;  //最大報價與最小報價的差值
  this.perPricePixel = 0; //每一個單位報價占用多少像素
  this.centerSpace = 0; //x軸到頂部的距離 繪圖區域
  this.xDateSpace = 6;  //x軸上的時間繪制間隔多少組
  this.fromSpaceNum = 0;  //x軸上的時間繪制從第 (fromSpaceNum%xDateSpace) 組數據開始
  this.dataArr = [];  //數據
  this.lastDataTimestamp = undefined; //歷史報價中第一個時間戳, 用來和實時報價做比較畫圖
  this.buyColorRGB = {r: 0, g: 0, b: 0};
  this.sellColorRGB = {r: 0, g: 0, b: 0};

  this.processParams();
  this.init();
}
定義了一些常量和變量,生成一個 構造函數 ,接收兩個參數,一個是id,canvas會在插入到這個id的盒子內,第二個參數是一些配置項,可選。
/**
 *    sharpness {number} 清晰度
 *    buyColor {string} color - 漲
 *    sellColor {string} color - 跌
 *    fontColor {string} 文字顏色
 *    lineColor {string} 參考線顏色
 *    blockWidth {number} 方塊的寬度
 *    digitsPoint {number} 報價有幾位小數
 *    horizontalCells {number} 水平方向切割幾個格子
 *    crossLineStatus {boolean} 鼠標移動十字線顯示狀態
 */
2. init方法和canvas畫布的翻轉
RenderKLine.prototype.init = function () {
  let cBox = document.getElementById(this.id);
  // 創建canvas并獲得canvas上下文
  this.canvas = document.createElement("canvas");
  if (this.canvas && this.canvas.getContext) {
    this.ctx = this.canvas.getContext("2d");
  }

  this.canvas.innerHTML = '您的當前瀏覽器不支持HTML5 canvas';
  cBox.appendChild(this.canvas);
  this.actualWidth = cBox.clientWidth;
  this.actualHeight = cBox.clientHeight;

  this.enlargeCanvas();
}
// 因為繪制區域超出canvas區域,此方法也用來代替clearRect 清空畫布的作用
RenderKLine.prototype.enlargeCanvas = function () {
  this.canvas.width = this.actualWidth * this.sharpness;
  this.canvas.height = this.actualHeight * this.sharpness;
  this.canvas.style.height = this.canvas.height / this.sharpness + 'px';
  this.canvas.style.width = this.canvas.width / this.sharpness + 'px';
  this.centerSpace = this.canvas.height - (BOTTOM_SPACE + TOP_SPACE) * this.sharpness;
  // 將canvas原點坐標轉換到右上角
  this.transformOrigin();
  // base settings
  this.ctx.lineWidth = LINE_WIDTH*this.sharpness;
  this.ctx.font = `${12*this.sharpness}px Arial`;
  // 還原之前滾動的距離
  this.ctx.translate(-this.movingRange * this.sharpness, 0);
  // console.log(this.movingRange);
}
init方法初始化了一個canvas,enlargeCanvas是一個替代clearRect的方法,其中需要注意的是 transformOrigin 這個方法,因為正常的canvas原點坐標在坐上角,但是我們需要繪制的圖像是從右側開始繪制的,所以我這里為了方便繪圖,把整個canvas做了一次轉換,原點坐標轉到了右上角位置。
// 切換坐標系走向 (原點在左上角 or 右上角)
RenderKLine.prototype.transformOrigin = function () {
  this.ctx.translate(this.canvas.width, 0);
  this.ctx.scale(-1, 1);
}
這里有一點需要注意的是,雖然翻轉過來繪制一些矩形,直線沒什么問題,但是繪制文本是不行的,繪制文本需要還原回去,不然文字就是翻轉過來的狀態。如下圖所示:

3. 移動、拖拽、滾輪事件
//監聽鼠標移動
RenderKLine.prototype.addMouseMove = function () {
  this.canvas[_addEventListener](prefix+"mousemove", mosueMoveEvent);
  this.canvas[_addEventListener](prefix+"mouseleave", e => {
    this.event = undefined;
    this.enlargeCanvas();
    this.updateData();
  });
  const _this = this;
  function mosueMoveEvent (e) {
    if (!_this.dataArr.length) return;
    _this.event = e || event;
    _this.enlargeCanvas();
    _this.updateData();
  }
}

//拖拽事件
RenderKLine.prototype.addMouseDrag = function () {
  let pageX, moveX = 0;
  this.canvas[_addEventListener](prefix+'mousedown', e => {
    e = e || event;
    pageX = e.pageX;
    this.canvas[_addEventListener](prefix+'mousemove', dragMouseMoveEvent);
  });
  this.canvas[_addEventListener](prefix+'mouseup', e => {
    this.canvas[_removeEventListener](prefix+'mousemove', dragMouseMoveEvent);
  });
  this.canvas[_addEventListener](prefix+'mouseleave', e => {
    this.canvas[_removeEventListener](prefix+'mousemove', dragMouseMoveEvent);
  });

  const _this = this;
  function dragMouseMoveEvent (e) {
    if (!_this.dataArr.length) return;
    e = e || event;
    moveX = e.pageX - pageX;
    pageX = e.pageX;
    _this.translateKLine(moveX);
    // console.log(moveX);
  }
}

//Mac雙指行為 & 鼠標滾輪
RenderKLine.prototype.addMouseWheel = function () {
  addWheelListener(this.canvas, wheelEvent);
  const _this = this;
  function wheelEvent (e) {
      if (Math.abs(e.deltaX) !== 0 && Math.abs(e.deltaY) !== 0) return; //沒有固定方向,忽略
      if (e.deltaX < 0) return _this.translateKLine(parseInt(-e.deltaX)); //向右
      if (e.deltaX > 0) return _this.translateKLine(parseInt(-e.deltaX)); //向左
      if (e.ctrlKey) {
        if (e.deltaY > 0) return _this.scaleKLine(-1); //向內
        if (e.deltaY < 0) return _this.scaleKLine(1); //向外
      } else {
        if (e.deltaY > 0) return _this.scaleKLine(1); //向上
        if (e.deltaY < 0) return _this.scaleKLine(-1); //向下
      }
  }
}
滾輪事件 上一篇已經說過了,這里就是對不同情況做相應的處理;
鼠標移動事件 把event更新到 this 上,然后調用 updateData 方法,繪制圖像即可。會調用下面方法畫出十字線。
function drawCrossLine () {
  if (!this.crossLineStatus || !this.event) return;
  let cRect = this.canvas.getBoundingClientRect();
  //layerX 有兼容性問題,使用clientX
  let x = this.canvas.width - (this.event.clientX - cRect.left - this.movingRange) * this.sharpness;
  let y = (this.event.clientY - cRect.top) * this.sharpness;
  // 在報價范圍內畫線
  if (y < TOP_SPACE*this.sharpness || y > this.canvas.height - BOTTOM_SPACE * this.sharpness) return;
  this.drawDash(this.movingRange * this.sharpness, y, this.canvas.width+this.movingRange * this.sharpness, y, '#999999');
  this.drawDash(x, TOP_SPACE*this.sharpness, x, this.canvas.height - BOTTOM_SPACE*this.sharpness, '#999999');
  //報價
  this.ctx.save();
  this.ctx.translate(this.movingRange * this.sharpness, 0);
  // 填充文字時需要把canvas的轉換還原回來,防止文字翻轉變形
  let str = (this.maxPrice - (y - TOP_SPACE * this.sharpness) / this.perPricePixel).toFixed(this.digitsPoint);
  this.transformOrigin();
  this.ctx.translate(this.canvas.width - RIGHT_SPACE * this.sharpness, 0);
  this.drawRect(-3*this.sharpness, y-10*this.sharpness, this.ctx.measureText(str).width+6*this.sharpness, 20*this.sharpness, "#ccc");
  this.drawText(str, 0, y, RIGHT_SPACE * this.sharpness)
  this.ctx.restore();
}
拖拽事件 把 pageX 的移動距離傳遞給 translateKLine 方法來實現橫向滾動查看。
/**
 * 縮放圖表
 * @param {int} scaleTimes 縮放倍數
 *  正數為放大,負數為縮小,數值*2 代表蠟燭圖width的變化度
 *  eg:  2 >> this.blockWidth + 2*2
 *      -3 >> this.blockWidth - 3*2
 * 為了保證縮放的效果,
 * 應該以當前可視區域的中心為基準縮放
 * 所以縮放前后兩邊的長度在總長度中所占比例應該一樣
 * 公式:(oldRange+0.5*canvasWidth)/oldTotalLen = (newRange+0.5*canvasWidth)/newTotalLen
 * diffRange = newRange - oldRange
 *           = (oldRange*newTotalLen + 0.5*canvasWidth*newTotalLen - 0.5*canvasWidth*oldTotalLen)/oldTotalLen - oldRange
 */
RenderKLine.prototype.scaleKLine = function (scaleTimes) {
  if (!this.dataArr.length) return;
  let oldTotalLen = this.totalWidth;
  this.blockWidth += scaleTimes*2;
  this.processParams();
  this.computeTotalWidth();
  let newRange = (this.movingRange*this.sharpness*this.totalWidth+this.canvas.width/2*this.totalWidth-this.canvas.width/2*oldTotalLen)/oldTotalLen/this.sharpness;
  let diffRange = newRange - this.movingRange;
  // console.log(newRange, this.movingRange, diffRange);
  this.translateKLine(diffRange);
}
// 移動圖表
RenderKLine.prototype.translateKLine = function (range) {
  if (!this.dataArr.length) return;
  this.movingRange += parseInt(range);
  let maxMovingRange =  (this.totalWidth - this.canvas.width) / this.sharpness + this.blockWidth;
  if (this.totalWidth <= this.canvas.width || this.movingRange <= 0) {
    this.movingRange = 0;
  } else if (this.movingRange >= maxMovingRange) {
    this.movingRange = maxMovingRange;
  }
  this.enlargeCanvas();
  this.updateData();
}
4. 核心方法 updateData
所有的繪制過程都是在這個方法中完成的,這樣無論想要什么操作,都可以通過此方法重繪canvas來實現,需要做的只是改變原型上的一些屬性而已,比如想要左右移動,只需要把 this.movingRange 設置好,再調用 updateData 就完成了。
RenderKLine.prototype.updateData = function (isUpdateHistory) {
  if (!this.dataArr.length) return;
  if (isUpdateHistory) {
    this.fromSpaceNum = 0;
  }
  // console.log(data);
  this.computeTotalWidth();
  this.computeSpaceY();
  this.ctx.save();
  // 把原點坐標向下方移動 TOP_SPACE 的距離,開始繪制水平線
  this.ctx.translate(0, TOP_SPACE * this.sharpness);
  this.drawHorizontalLine();
  // 把原點坐標再向左邊移動 RIGHT_SPACE 的距離,開始繪制垂直線和蠟燭圖
  this.ctx.translate(RIGHT_SPACE * this.sharpness, 0);
  // 開始繪制蠟燭圖
  let item, col;
  let lineWidth = LINE_WIDTH * this.sharpness,
      margin = blockMargin = BLOCK_MARGIN*this.sharpness,
      blockWidth = this.blockWidth*this.sharpness;//乘上清晰度系數后的間距、塊寬度
  let blockHeight, lineHeight, blockYPoint, lineYPoint; //單一方塊、單一中間線的高度、y坐標點
  let realTime, realTimeYPoint; //實時(最后)報價及y坐標點
  for (let i=0; i<this.dataArr.length; i++) {
    item = this.dataArr[i];
    if (item[START_PRICE_INDEX] > item[END_PRICE_INDEX]) {
      //跌了 sell
      col = this.sellColor;
      blockHeight = (item[START_PRICE_INDEX] - item[END_PRICE_INDEX])*this.perPricePixel;
      blockYPoint = (this.maxPrice - item[START_PRICE_INDEX])*this.perPricePixel;
    } else {
      //漲了 buy
      col = this.buyColor;
      blockHeight = (item[END_PRICE_INDEX] - item[START_PRICE_INDEX])*this.perPricePixel;
      blockYPoint = (this.maxPrice - item[END_PRICE_INDEX])*this.perPricePixel;
    }
    lineHeight = (item[MAX_PRICE_INDEX] - item[MIN_PRICE_INDEX])*this.perPricePixel;
    lineYPoint = (this.maxPrice - item[MAX_PRICE_INDEX])*this.perPricePixel;
    // if (i === 0) console.log(lineHeight, blockHeight, lineYPoint, blockYPoint);
    lineHeight = lineHeight > 2*this.sharpness ? lineHeight : 2*this.sharpness;
    blockHeight = blockHeight > 2*this.sharpness ? blockHeight : 2*this.sharpness;
    if (i === 0) {
      realTime = item[END_PRICE_INDEX];
      realTimeYPoint = blockYPoint + (item[START_PRICE_INDEX] > item[END_PRICE_INDEX] ? blockHeight : 0)
    };
    // 繪制垂直方向的參考線、以及x軸的日期時間
    if (i%this.xDateSpace === (this.fromSpaceNum%this.xDateSpace)) {
      this.drawDash(margin+(blockWidth-1*this.sharpness)/2, 0, margin+(blockWidth-1*this.sharpness)/2, this.centerSpace);
      this.ctx.save();
      // 填充文字時需要把canvas的轉換還原回來,防止文字翻轉變形
      this.transformOrigin();
      // 翻轉后將原點移回翻轉前的位置
      this.ctx.translate(this.canvas.width, 0);
      this.drawText(processXDate(item[TIME_INDEX], this.dataType), -(margin+(blockWidth-1*this.sharpness)/2), this.centerSpace + 12*this.sharpness, undefined, 'center', 'top');

      this.ctx.restore();
    }
    this.drawRect(margin+(blockWidth-1*this.sharpness)/2, lineYPoint, lineWidth, lineHeight, col);
    this.drawRect(margin, blockYPoint, blockWidth, blockHeight, col);
    margin = margin+blockWidth+blockMargin;
  }
  //繪制實時報價線、價格
  this.drawLine((this.movingRange-RIGHT_SPACE) * this.sharpness, realTimeYPoint, (this.movingRange-RIGHT_SPACE) * this.sharpness + this.canvas.width, realTimeYPoint, '#cccccc');
  this.ctx.save();
  this.ctx.translate(-RIGHT_SPACE * this.sharpness, 0);
  this.transformOrigin();
  this.drawRect((17-this.movingRange) * this.sharpness, realTimeYPoint - 10 * this.sharpness, this.ctx.measureText(realTime).width+6*this.sharpness, 20*this.sharpness, "#ccc");
  this.drawText(realTime, (20-this.movingRange) * this.sharpness, realTimeYPoint);
  this.ctx.restore();
  //最后繪制y軸上報價,放在最上層
  this.ctx.translate(-RIGHT_SPACE * this.sharpness, 0);
  this.drawYPrice();
  this.ctx.restore();
  drawCrossLine.call(this);
}
這個方法不難,只是繪制時為了方便計算位置,需要經常變換原點坐標,不要搞錯了就好。
還需要注意的是 sharpness 這個變量,代表清晰度,整個canvas的寬高是在原有的基礎上乘上了這個系數得到的,所以,計算時需要特別注意帶上這個系數。
5. 更新歷史&實時報價方法
// 實時報價
RenderKLine.prototype.updateRealTimeQuote = function (quote) {
  if (!quote) return;
  pushQuoteInData.call(this, quote);
}
/**
 * 歷史報價
 * @param {Array} data 數據
 * @param {int}   type 報價類型  默認 60(1小時)
 *    (1, 5, 15, 30, 60, 240, 1440, 10080, 43200)
      (1分鐘 5分鐘 15分鐘 30分鐘 1小時 4小時 日 周 月)
 */
RenderKLine.prototype.updateHistoryQuote = function (data, type = 60) {
  if (!data instanceof Array || !data.length) return;
  this.dataArr = data;
  this.dataType = type;
  this.updateData(true);
}
6. 調用demo
<div id="myCanvasBox" style="width: 1000px; height: 500px;"></div>

<script>
    let data = [
      {
        "time": 1576648800,
        "open_price": "1476.94",
        "high": "1477.44",
        "low": "1476.76",
        "close": "1476.96"
      },
      //...
    ];
    let options = {
      sharpness: 3,
      blockWidth: 11,
      horizontalCells: 10
    };
    let kLine = new RenderKLine("myCanvasBox", options);
    //更新歷史報價
    kLine.updateHistoryQuote(data);
    //模擬實時報價
    let realTime = `{
      "time": 1575858840,
      "open_price": "1476.96",
      "high": "1482.12",
      "low": "1470.96",
      "close": "1476.96"
    }`;
    setInterval(() => {
      let realTimeCopy = JSON.parse(realTime);
      realTimeCopy.time = parseInt(new Date().getTime()/1000);
      realTimeCopy.close = (1476.96 - (Math.random() * 4 - 2)).toFixed(2);
      kLine.updateRealTimeQuote(realTimeCopy);
     }, parseInt(Math.random() * 1000 + 500))
</script>
7. 效果圖

上述內容就是怎么在HTML5中利用Canvas繪制一個K線圖,你們學到知識或技能了嗎?如果還想學到更多技能或者豐富自己的知識儲備,歡迎關注億速云行業資訊頻道。
免責聲明:本站發布的內容(圖片、視頻和文字)以原創、轉載和分享為主,文章觀點不代表本網站立場,如果涉及侵權請聯系站長郵箱:is@yisu.com進行舉報,并提供相關證據,一經查實,將立刻刪除涉嫌侵權內容。