您好,登錄后才能下訂單哦!
您好,登錄后才能下訂單哦!
ASP.NET 2.0中怎么創建一個自定義排序用戶界面,針對這個問題,這篇文章詳細介紹了相對應的分析和解答,希望可以幫助更多想解決這個問題的小伙伴找到更簡單易行的方法。
步驟1:創建一個普通的,能夠排序的GridView
在我們學習如何創建增強型排序用戶界面之前,先創建一個普通的列出所有產品GridView并且能夠排序.現在打PagingAndSorting文件夾下的CustomSortingUI.aspx,添加一個GridView,設置ID="ProductList",以一個ObjectDataSource為數據源,ObjectDataSource的數據從ProductsBLL類的GetProducts()取得。
接下來設置GridView的列,包括ProductName, CategoryName, SupplierName, UnitPrice綁定列和Discontinued復選框列,再設置GridView允許排序。設置完這些以后你應該可以在代碼編輯看到下面這些代碼:
<asp:GridView ID="ProductList" runat="server" AllowSorting="True" AutoGenerateColumns="False"
 DataKeyNames="ProductID" DataSourceID="ObjectDataSource1" EnableViewState="False">
 <Columns>
  <asp:BoundField DataField="ProductName" HeaderText="Product" SortExpression="ProductName" />
  <asp:BoundField DataField="CategoryName" HeaderText="Category" ReadOnly="True" SortExpression="CategoryName" />
  <asp:BoundField DataField="SupplierName" HeaderText="Supplier" ReadOnly="True" SortExpression="SupplierName" />
  <asp:BoundField DataField="UnitPrice" DataFormatString="{0:C}" HeaderText="Price"
   HtmlEncode="False" SortExpression="UnitPrice" />
  <asp:CheckBoxField DataField="Discontinued" HeaderText="Discontinued" SortExpression="Discontinued" />
 </Columns>
</asp:GridView>

<asp:ObjectDataSource ID="ObjectDataSource1" runat="server" OldValuesParameterFormatString="original_{0}"
 SelectMethod="GetProducts" TypeName="ProductsBLL"></asp:ObjectDataSource>
這時你在瀏覽器中預覽你將看到類似圖2的界面,數據按類別的字母順序排序.
圖2:可排序GridView按Category按序
步驟2:如何添加分界行
完成創建創建一個普通的,能夠排序的GridView后,就要在每一個類別的第一行之前添加分界行。怎么把這些分界行添加進GridView呢?一開始我們會想到遍歷GridView的所有行,遇到排序列中的值不同就插入分界行。按照這種想法我們自然倒想利用GridView的DataRowBound事件來實現,DataRowBound事件我們已經在基于數據的自定義格式化一章中講過,DataRowBound事件通常應用于格式化數據行。但是,DataRowBound事件不能解決這個問題,因為不能用這個事件動態地添加行到GridView,GridView的Rows集合是只讀的.
要添加行到GridView有以下3個方法:
添加分界行到GridView綁定的數據源中
GridView綁定數據后,添加額外的TableRow對象到GridView的控件集
創建一個自定義服務器控件,擴展GridView控件,重寫它的方法以重新構造GridView的結構
如果自定義排序用戶界面廣泛應用多個頁面或多個網站,創建一個自定義服務器控件是最好的方法.但采用這種方法要寫太多的代碼并且要深入理解GridView控件的的內部原理。因此,我們在這篇文章中不考慮使用這種方法。另外兩種不同的方法-添加分界行到GridView綁定的數據源中和在GridView綁定數據后操作它的子控件,值得討論.
添加分界行到綁定GridView的數據源中
當GridView被綁定到數據源,GridView從數據源中的每一條記錄創建一條GridViewRow.因此我們可以在數據綁定(binding)之前添加一條"分界記錄",圖3描述了這個過程.
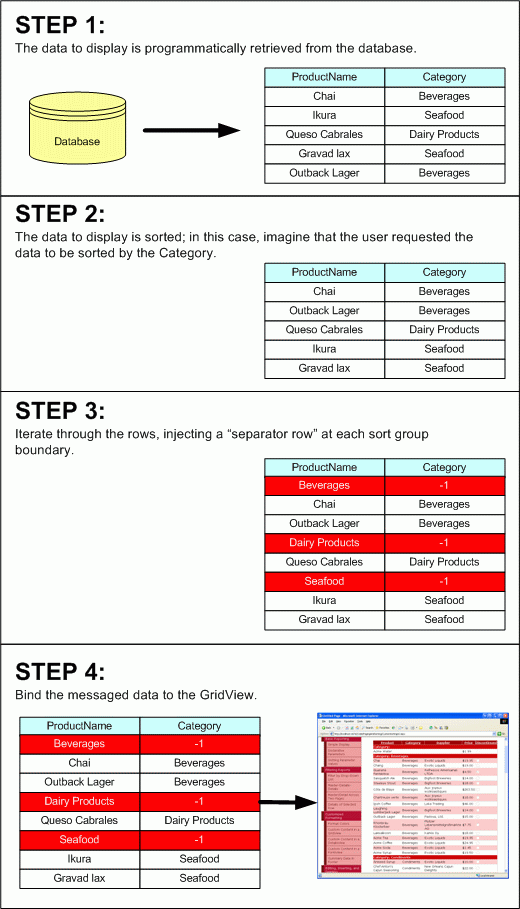
圖3:添加分界行到數據源原理圖
"分界記錄"這個術語之所以加引號是因為實際沒有這條特殊的記錄,我們只是在數據源中添加一些標記行。打個比方,綁定ProductsDataTable對象到GridView,ProductsDataTable由ProductRow組成。我們可以標記一條記錄作為"分界記錄"并且設置CategoryID為-1(因為-1不存在普通記錄中).
使用這種方法要以下的步驟實現:
1.得到綁定到GirdView的數據(一個ProductsDataTable對象)
2.基于GridView的SortExpression和SortDirection屬性排列數據
3.遍歷ProductsDataTable中的ProductsRows,尋找排序列的分界。
4.在每組的分界處插入"分界行"ProductsRow到DataTable中,CategoryID列值為-1(或其它可以標記"分界行"的值).
5.插入"分界行"后動態地綁定數據到GridView.
完成以上5個步驟,還要在RowDataBound事件中判斷哪些行是"分界行"(CategoryID=-1的行),格式化"分界行"的顯示樣式.此外還要再做一些工作,在Sorting事件中保留SortExpressiont和SortDirection的值.
GridView綁定數據后,添加額外的TableRow對象到GridView的控件集
相比在GridView綁定數據之前,在GridView綁定數據之后添加"分界行"更勝一籌.GridView是由一個Table構成,一個Table由Rows集構成,一個Row由Cells集構成,這就是GridView的控件層次.GridView根部是Table對象,再由數據源的每條記錄生成GridViewRow (由TableRow派生出來),數據源的每一格的值又在GridViewRow生成TableCell.
我們可以利用GridView的控件層次構成以后在每組之間的添加分界行.因為GridView的控件層次結構是在頁面呈現的時候創建的,所以重寫Page類的Render方法,在需要的地方加上分界行,圖4描述了這個過程.
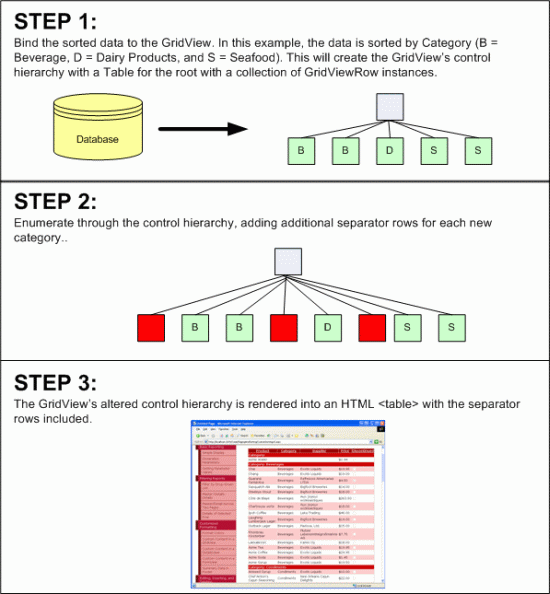
圖4:更改GridView控件層次結構添加界行原理圖
這篇文章將用最后一個方法創建自定義排序用戶界面.
注意:這里使用的代碼是基于Teemu Keiski Blog中的Playing a Bit with GridView Sort Grouping一文.
步驟3:添加分界行到GridView的控件層次結構中
我們要在GridView的控件層次已經構造完畢后,以及在頁面呈現之前添加分界行,必須在頁面生命周期的最后階段但又必須在GridView生成HTML語言之前進行,因此要重寫Page類的Render方法,比如在下面的代碼:
protected override void Render(HtmlTextWriter writer)
{
 // Add code to manipulate the GridView control hierarchy
 base.Render(writer);
}
當頁面的原來的Render方法(base.Render(writer))被調用,頁面的每個控件將被顯示出來,產生出來的HTML標記基于控件層次.因此我們勢必要在base.Render(writer)被調用之前更改GridView的控件層次結構.要添加分界行必須確保用戶已經排好序,但剛開始GridView是沒有按類別排好序的,不必要添加分界行.
注意:如果要使GridView默認是按某一列排序的,就要在Page_Load中調用GridView的Sort方法,注意要在if(!IsPostBack)中.請參考分頁和排序數據(Paging and Sorting Report Data)一章獲得關Sort方法的更多相關知識.
假設已經完成排序,下面要做的是判斷是按哪一列排序并尋找該列不同組的分界處,下面的代碼判斷是否排序,按哪一列排序:
protected override void Render(HtmlTextWriter writer)
{
 // Only add the sorting UI if the GridView is sorted
 if (!string.IsNullOrEmpty(ProductList.SortExpression))
 {
  // Determine the index and HeaderText of the column that
  //the data is sorted by
  int sortColumnIndex = -1;
  string sortColumnHeaderText = string.Empty;
  for (int i = 0; i < ProductList.Columns.Count; i++)
  {
   if (ProductList.Columns[i].SortExpression.CompareTo(ProductList.SortExpression) == 0)
   {
    sortColumnIndex = i;
    sortColumnHeaderText = ProductList.Columns[i].HeaderText;
    break;
   }
  }

  // TODO: Scan the rows for differences in the sorted column's values
}
假如GridView沒有排序,SortExpression就沒有設置值.我們要做的是對已經排序的GridView添加分界行.完成排序后,下一步要判斷是按第幾列排序,遍歷每一列,比較SortExpression和哪一列的HeaderText相同,用兩個變量sortColumnIndext和sortColumnHeaderText分別保存該列的索引和標題.
知道是按第幾列排序后,最后一步是添加分界行到GridView中,遍歷排序列的每一行,比較每上一行的值和它的當前行的值相不相同,不相同就要在中間插入分界行,代碼如下:
protected override void Render(HtmlTextWriter writer)
{
 // Only add the sorting UI if the GridView is sorted
 if (!string.IsNullOrEmpty(ProductList.SortExpression))
 {
  // ... Code for finding the sorted column index removed for brevity ...


  // Reference the Table the GridView has been rendered into
  Table gridTable = (Table)ProductList.Controls[0];

  // Enumerate each TableRow, adding a sorting UI header if
  // the sorted value has changed
  string lastValue = string.Empty;
  foreach (GridViewRow gvr in ProductList.Rows)
  {
   string currentValue = gvr.Cells[sortColumnIndex].Text;

   if (lastValue.CompareTo(currentValue) != 0)
   {
    // there's been a change in value in the sorted column
    int rowIndex = gridTable.Rows.GetRowIndex(gvr);

    // Add a new sort header row
    GridViewRow sortRow = new GridViewRow(rowIndex, rowIndex, DataControlRowType.DataRow, DataControlRowState.Normal);
    TableCell sortCell = new TableCell();
    sortCell.ColumnSpan = ProductList.Columns.Count;
    sortCell.Text = string.Format("{0}: {1}", sortColumnHeaderText, currentValue);
    sortCell.CssClass = "SortHeaderRowStyle";

    // Add sortCell to sortRow, and sortRow to gridTable
    sortRow.Cells.Add(sortCell);
    gridTable.Controls.AddAt(rowIndex, sortRow);

    // Update lastValue
    lastValue = currentValue;
   }
  }
 }

 base.Render(writer);
}
首先獲得GridView控件層次結構的根控件,一個Table,用gridTable表示.另外用字符串變量lastValue表示上一行的值,currentValue表示當前行的值.
注意:我獲得通過單元格(cell)的Text屬性賦值給lastValue和currentValue,這只能應用的綁定列(BoundFields),對于其它種類的列如模板列(TemplateField),復選框列(CheckBoxField)等等是不可行的,我將會在后面說明如何解決非綁定列的取值問題.
比較lastValue和currentValue,如果不同就要添加分界行到GridView的控件層次結構中.取得當前行的索引,創建一個GridViewRow對象(它由TableCell組成)插入到GridView的控件層次結構中.另外我們要把分界行格式化成單獨的一個單元格,寬度與GridView相同,樣式與應用SortHeaderRowStyle樣式(css文件在下面給出),顯示的文字是排序列名(如Category)和組名(如SeaFood),最后把currentValue賦值給lastValue.下面給出css代碼:
.SortHeaderRowStyle
{
 background-color: #c00;
 text-align: left;
 font-weight: bold;
 color: White;
}
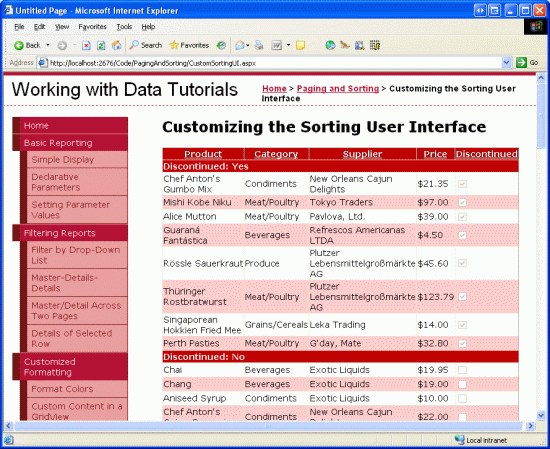
完成上面的代碼后,就可以對按綁定列排序后生成有分界行的排序界面(圖5是按supplier排序后給出的截圖).但是我現在還不能對其它種類的列(如模板列或者復選框列)生成用戶定義排序界面,如圖6所示(按Discontinue排序).
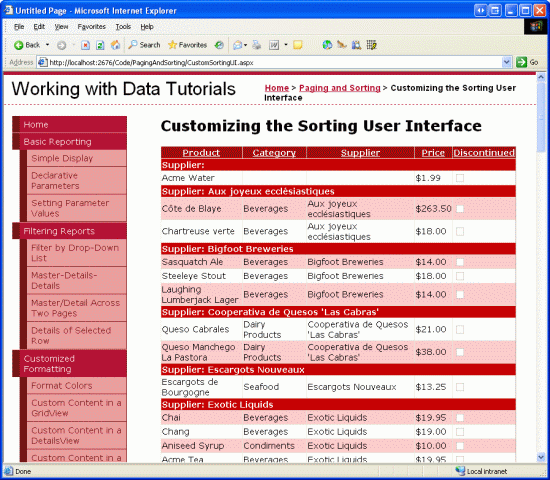
圖5:綁定列排序
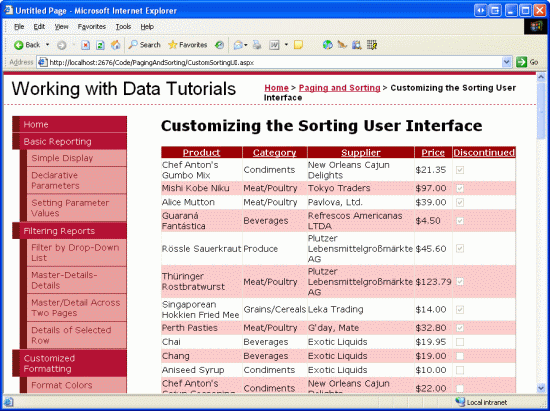
圖6:按ChectBox列排序沒有出現分界行
按復選框列排序沒有出現分界行是的原因是代碼通過獲取TableCell的Text屬性判斷按哪一列排序的,但復選框列TableCell的Text是空的,我們要從TableCell包含的控件取得CheckBox控件.遇到這種類型的列,要判斷CheckBox有沒有打勾,把currentValue = gvr.Cells[sortColumnIndex].Text替換成以下代碼:
string currentValue = string.Empty;
if (gvr.Cells[sortColumnIndex].Controls.Count > 0)
{
 if (gvr.Cells[sortColumnIndex].Controls[0] is CheckBox)
 {
  if (((CheckBox)gvr.Cells[sortColumnIndex].Controls[0]).Checked)
   currentValue = "Yes";
  else
   currentValue = "No";
 }

 // ... Add other checks here if using columns with other
 //  Web controls in them (Calendars, DropDownLists, etc.) ...
}
else
 currentValue = gvr.Cells[sortColumnIndex].Text;
這段代碼判斷有沒有控件存在排序列的TableCell中,如果有并且第一個控件是CheckBox,按照CheckBox的Checked屬性給currentValue賦值為"Yes"或者"NO",要是綁定就把TableCell的Text屬性值賦給currentValue.同樣道理,模板列使用此方法.圖7是完善代碼按Discontinue排序后的截圖.
關于ASP.NET 2.0中怎么創建一個自定義排序用戶界面問題的解答就分享到這里了,希望以上內容可以對大家有一定的幫助,如果你還有很多疑惑沒有解開,可以關注億速云行業資訊頻道了解更多相關知識。
免責聲明:本站發布的內容(圖片、視頻和文字)以原創、轉載和分享為主,文章觀點不代表本網站立場,如果涉及侵權請聯系站長郵箱:is@yisu.com進行舉報,并提供相關證據,一經查實,將立刻刪除涉嫌侵權內容。