溫馨提示×
您好,登錄后才能下訂單哦!
點擊 登錄注冊 即表示同意《億速云用戶服務條款》
您好,登錄后才能下訂單哦!
這篇文章主要為大家展示了“MVVM模式下WPF如何動態綁定展示圖片”,內容簡而易懂,條理清晰,希望能夠幫助大家解決疑惑,下面讓小編帶領大家一起研究并學習一下“MVVM模式下WPF如何動態綁定展示圖片”這篇文章吧。
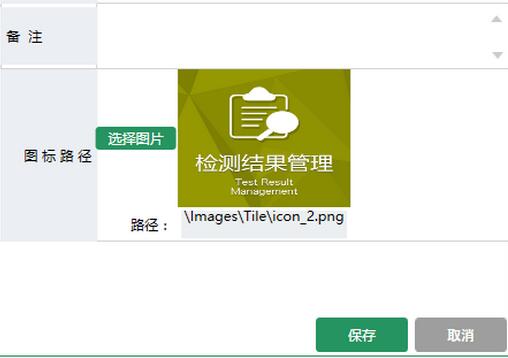
MVVM模式下WPF動態展示圖片,界面選擇圖標,復制到項目中固定目錄下面,保存到數據庫的是相對路徑,再次讀取的時候是根據數據庫的相對路徑去獲取項目中絕對路徑的圖片展示。
首先在ViewModel中
//屬性定義
    BitmapImage _ImageSource;
    /// <summary>
    /// 顯示的圖標
    /// </summary>
    public BitmapImage ImageSource
    {
      get { return _ImageSource; }
      set
      {
        _ImageSource = value;
        NotifyOfPropertyChange("ImageSource");
      }
    }

    string _ImagePath;
    /// <summary>
    /// 顯示的圖標路徑
    /// </summary>
    public string ImagePath
    {
      get { return _ImagePath; }
      set
      {
        _ImagePath = value;
        NotifyOfPropertyChange("ImagePath");
      }
    }
//初始化數據
//編輯的時候綁定數據
public GroupInfoViewModel(sys_Right_Group groupInfo, OperType type)
{
if (type == OperType.Edit || type == OperType.Show)
{
IsAdd = false;
TitleName = "編輯分組";
RightGroup = groupInfo;
ImagePath = groupInfo.ImagePath;
GetImgData(groupInfo.ImagePath);
}
}
/// <summary>
/// 獲取圖片數據
/// </summary>
/// <param name="imgPath">相對路徑</param>
private void GetImgData(string imgPath)
{
if (string.IsNullOrEmpty(imgPath)) return;
try
{
string fileName = System.Environment.CurrentDirectory + imgPath; //獲取文件的絕對路徑
byte[] buf;
if (!PathToByte(fileName, out buf))
{
MessageHelper.ShowAutoCloseWarning("獲取圖標失敗");
return;
}
ImageSource =ByteToImage(buf);
}
catch (Exception ex)
{
throw ex;
}
}//界面選擇圖片按鈕事件
/// <summary>
/// 修改圖片
/// </summary>
public void ChangedIcon()
{
try
{
OpenFileDialog open = new OpenFileDialog();
open.Filter = string.Format("照片|*.jpg;*.jpeg;*.png;*.gif;*.bmp");
if (open.ShowDialog() == true)
{
var path = open.FileName;
//檢查圖標目錄,絕對路徑下面
string NewPath = System.Environment.CurrentDirectory + @"\Images\Tile\Group\";
string newFile = NewPath + Path.GetFileName(path);
if (!System.IO.Directory.Exists(NewPath))
{
System.IO.Directory.CreateDirectory(NewPath);
}
File.Copy(path, newFile, true); //復制文件到目錄絕對路徑文件夾
FileInfo info = new FileInfo(newFile); //新文件
if (info.Length > MenuViewModel.UserImageMaxLength)
{
MessageHelper.ShowAutoCloseWarning(string.Format("圖標不能大于{0}M",
MenuViewModel.UserImageMaxLength / 1024 / 1024));
return;
}
byte[] buf;
if (!PathToByte(path, out buf))
{
MessageHelper.ShowAutoCloseWarning("修改失敗");
return;
}
ImageSource = ByteToImage(buf);
ImagePath = @"\Images\Tile\Group\" + Path.GetFileName(path); //顯示相對路徑
}
}
catch (Exception ex)
{
throw ex;
}
}點擊保存的時候再把相對路徑保存到數據庫RightGroup.ImagePath = ImagePath;
//公共幫助方法

//把圖片文件轉換為byte數組
 public static bool PathToByte(string path, out byte[] buffer)
    {
      FileStream fs = new FileStream(path, FileMode.Open, FileAccess.Read);
      try
      {
        buffer = new byte[fs.Length];
        fs.Read(buffer, 0, (int)fs.Length);
        return true;
      }
      catch (Exception ex)
      {
        buffer = null;
        return false;
      }
      finally
      {
        if (fs != null)
        {
          //關閉資源
          fs.Close();
        }
      }

    }

//把byte數組轉化為BitmapImage
    public static BitmapImage ByteToImage(byte[] buf)
    {
      BitmapImage bmp = new BitmapImage();
      bmp.BeginInit();
      bmp.StreamSource = new MemoryStream(buf);
      bmp.EndInit();

      return bmp;
    }
View 界面綁定代碼:
<Button Grid.Row="0" Grid.Column="0" Content="選擇圖片" cm:Message.Attach="[Click]=[ChangedIcon()]" Style="{StaticResource BtnOperationStyle}" Height="20" Width="70"></Button>
          <Grid Grid.Row="0" Grid.Column="1" Background="LightGray">
            <Image Height="120" Width="150" Stretch="Fill" Source="{Binding ImageSource,Mode=TwoWay, UpdateSourceTrigger=PropertyChanged}"></Image>
    </Grid>
   <Label Grid.Row="1" Grid.Column="0" Style="{StaticResource GridColumnLabelStyle}" Content="路徑:"></Label>
<TextBox Grid.Row="1" Grid.Column="1" Style="{StaticResource StyleForTextBox}" Text="{Binding ImagePath,Mode=TwoWay,UpdateSourceTrigger=PropertyChanged}" Height="30" TextAlignment="Center" IsReadOnly="True"></TextBox>
界面效果:

以上是“MVVM模式下WPF如何動態綁定展示圖片”這篇文章的所有內容,感謝各位的閱讀!相信大家都有了一定的了解,希望分享的內容對大家有所幫助,如果還想學習更多知識,歡迎關注億速云行業資訊頻道!
免責聲明:本站發布的內容(圖片、視頻和文字)以原創、轉載和分享為主,文章觀點不代表本網站立場,如果涉及侵權請聯系站長郵箱:is@yisu.com進行舉報,并提供相關證據,一經查實,將立刻刪除涉嫌侵權內容。