您好,登錄后才能下訂單哦!
您好,登錄后才能下訂單哦!
這篇文章主要介紹“.Net Core 2.2升級3.1時要注意什么”,在日常操作中,相信很多人在.Net Core 2.2升級3.1時要注意什么問題上存在疑惑,小編查閱了各式資料,整理出簡單好用的操作方法,希望對大家解答”.Net Core 2.2升級3.1時要注意什么”的疑惑有所幫助!接下來,請跟著小編一起來學習吧!
寫在前面
微軟在更新.Net Core版本的時候,動作往往很大,使得每次更新版本的時候都得小心翼翼,坑實在是太多。往往是悄咪咪的移除了某項功能或者組件,或者不在支持XX方法,這就很花時間去找回需要的東西了,下面是個人在遷移.Net Core WebApi項目過程中遇到的問題匯總:
開始遷移
1. 修改*.csproj項目文件
<TargetFramework>netcoreapp2.2</TargetFramework>
修改為
<TargetFramework>netcoreapp3.1</TargetFramework>
2 修改Program
public static void Main(string[] args)
    {
      CreateWebHostBuilder(args).Build().Run();
    }

    public static IWebHostBuilder CreateWebHostBuilder(string[] args) =>
        WebHost.CreateDefaultBuilder(args)
          .UseStartup<Startup>().ConfigureAppConfiguration((hostingContext, config) =>
          {
            config.AddJsonFile($"你的json文件.json", optional: true, reloadOnChange: true);
          }
          );
修改為
public static void Main(string[] args)
    {
      CreateHostBuilder(args).Build().Run();
    }

    public static IHostBuilder CreateHostBuilder(string[] args) =>
      Host.CreateDefaultBuilder(args)
        .ConfigureWebHostDefaults(webBuilder =>
        {
          webBuilder.UseStartup<Startup>()
                .ConfigureAppConfiguration((hostingContext, config)=>
                {
                  config.AddJsonFile($"你的json文件.json", optional: true, reloadOnChange: true);
                });
        });
3.1 修改Startup.ConfigureServices
services.AddMvc();
修改為
services.AddControllers();
3.2 修改Startup.Configure
public void Configure(IApplicationBuilder app, IHostingEnvironment env)

修改為
using Microsoft.Extensions.Hosting;
public void Configure(IApplicationBuilder app, IWebHostEnvironment env)
IHostingEnvironment在3.0之后已被標記棄用。
路由配置:
app.UseMvc(routes =>
        {
          routes.MapRoute(
            name: "areas",
            template: "{area:exists}/{controller=Home}/{action=Index}/{id?}"
          );

          routes.MapRoute(
            name: "default",
            template: "{controller=Home}/{action=Index}/{id?}"
          );
        });

修改為

      app.UseRouting();
      app.UseEndpoints(endpoints =>
      {
        endpoints.MapControllers();
        endpoints.MapControllerRoute(
            name: "areas",
            pattern: "{area:exists}/{controller=Home}/{action=Index}/{id?}");
        endpoints.MapControllerRoute(
            name: "default",
            pattern: "{controller=Home}/{action=Index}/{id?}");
      });
你以為結束了?還沒。
坑
這時候你以為結束了,興高采烈的去服務器裝好runningTime和hosting相應的版本,運行……

HTTP Error 500.30 – ANCM In-Process Start Failure
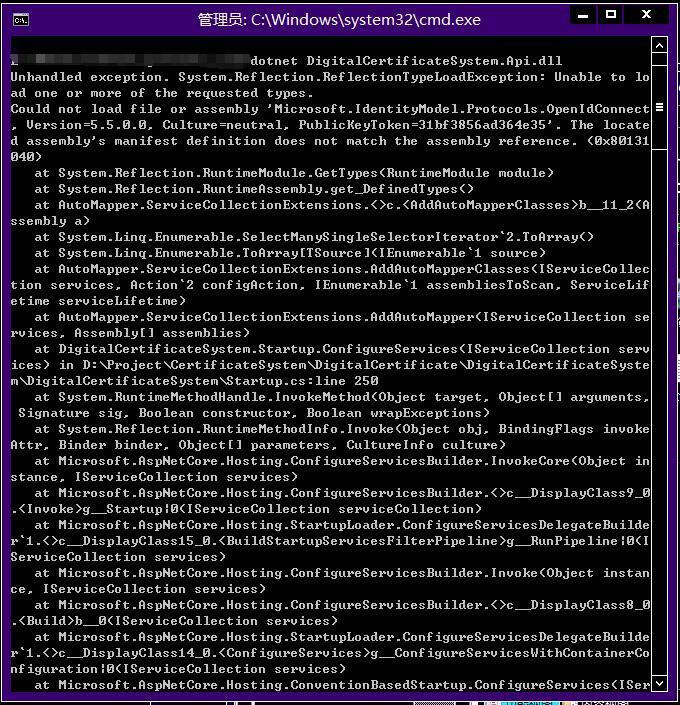
直接cmd,進入到發布目錄,執行:
E:\你的路徑>dotnet xxx.dll
顯示詳細錯誤

而我的相應250代碼行是:
services.AddAutoMapper(AppDomain.CurrentDomain.GetAssemblies());
搜索最新的AutoMapper根本沒更新或改變,所以不是這個組件的問題。
嘗試下載補丁Windows6.1-KB974405-x64.msu,無果……
卸載sdk重置,無果……
修改web.config,無果……
修改應用池32位,無果……
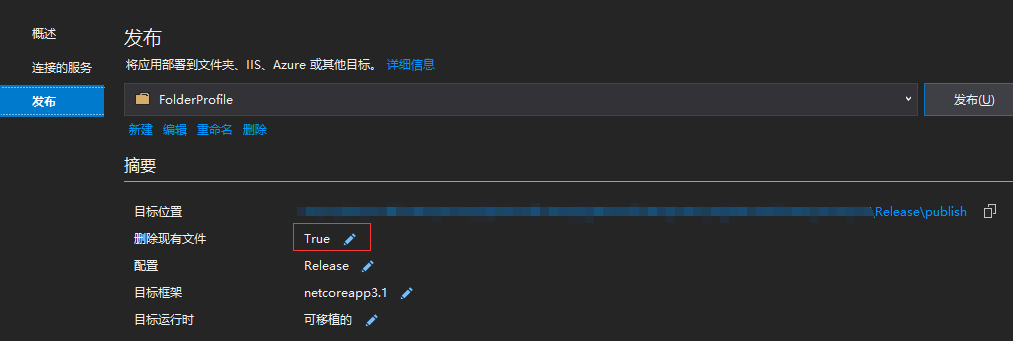
最后,查看發布:勾選上【刪除現有文件】,解決……

Endpoint contains CORS metadata, but a middleware was not found that supports CORS.
順利可以啟動項目之后,發現有些接口:
2020-06-29 10:02:23,357 [14] ERROR System.String - 全局異常捕捉:異常:Endpoint contains CORS metadata, but a middleware was not found that supports CORS.
Configure your application startup by adding app.UseCors() inside the call to Configure(..) in the application startup code. The call to app.UseAuthorization() must appear between app.UseRouting() and app.UseEndpoints(...).
提示很明顯,在.net core 2.2 的時候
app.UseCors();
不是需要強制在指定位置的,在3.0之后需要設置在app.UseRouting和app.UseEndpoints 之間
app.UseRouting();//跨域
app.UseCors(one);
app.UseCors(two);
……
app.UseEndpoints(endpoints => ……
The JSON value could not be converted to System.Int32. Path……
運行之后,有些接口沒有數據返回,而有些直接報錯了。原因又是爸爸把Newtonsoft.Json移除,使用內置的System.Text.Json,所以依賴于Newtonsoft.Json的組件將不可用,那么,只能手動添加。
Install-Package Microsoft.AspNetCore.Mvc.NewtonsoftJson -Version 3.1.5
然后添加引用
public void ConfigureServices(IServiceCollection services)
{
  services.AddControllers().AddNewtonsoftJson();
}
目前還不太建議你使用內置的序列化,因為實在太多功能或方法不支持,詳細對比請參考https://docs.microsoft.com/zh-cn/dotnet/standard/serialization/system-text-json-migrate-from-newtonsoft-how-to
授權相關
基于策略授權,我想在座的加班狗都是大同小異,在2.2以前:
public class PolicyHandler : AuthorizationHandler<PolicyRequirement>
  {
    /// <summary>
    /// 授權方式(cookie, bearer, oauth, openid)
    /// </summary>
    public IAuthenticationSchemeProvider Schemes { get; set; }

    private IConfiguration _configuration;

    /// <summary>
    /// ctor
    /// </summary>
    /// <param name="configuration"></param>
    /// <param name="schemes"></param>
    /// <param name="jwtApp"></param>
    public PolicyHandler(IConfiguration configuration, IAuthenticationSchemeProvider schemes)
    {
      Schemes = schemes;
      _jwtApp = jwtApp;
      _configuration = configuration;
    }

    /// <summary>
    /// 授權處理
    /// </summary>
    /// <param name="context"></param>
    /// <param name="requirement"></param>
    protected override async Task HandleRequirementAsync(AuthorizationHandlerContext context, PolicyRequirement requirement)
    {
      var httpContext = (context.Resource as AuthorizationFilterContext).HttpContext;

      //獲取授權方式
      var defaultAuthenticate = await Schemes.GetDefaultAuthenticateSchemeAsync();
      if (defaultAuthenticate != null)
      {
        //驗證簽發的用戶信息
        var result = await httpContext.AuthenticateAsync(defaultAuthenticate.Name);
        if (result.Succeeded)
        {
          httpContext.User = result.Principal;

          //判斷是否過期
          var expirationTime = DateTime.Parse(httpContext.User.Claims.SingleOrDefault(s => s.Type == ClaimTypes.Expiration).Value);
          if (expirationTime >= DateTime.UtcNow)
          {
             //你的校驗方式
             //todo
            context.Succeed(requirement);
          }
          else
          {
            HandleBlocked(context, requirement);
          }
          return;
        }
      }
      HandleBlocked(context, requirement);
    }

    /// <summary>
    /// 驗證失敗返回
    /// </summary>
    private void HandleBlocked(AuthorizationHandlerContext context, PolicyRequirement requirement)
    {
      var authorizationFilterContext = context.Resource as AuthorizationFilterContext;
      authorizationFilterContext.Result = new Microsoft.AspNetCore.Mvc.JsonResult(new UnAuthorizativeResponse()) { StatusCode = 202 };
      //不要調用 context.Fail(),設置為403會顯示不了自定義信息,改為Accepted202,由客戶端處理,;
      context.Succeed(requirement);
    }
  }
然后發現升級到3.0之后,
var httpContext = (context.Resource as AuthorizationFilterContext).HttpContext;
3.0不再支持返回AuthorizationFilterContext,而是返回的是RouteEndpoint,這句代碼就會報錯,所以修改的方式就是注入IHttpContextAccessor,從里面獲取HttpContext,這里就不用演示了吧。
并修改PolicyHandler校驗失敗時候調用的方法:
/// <summary>
    /// 驗證失敗返回
    /// </summary>
    private void HandleBlocked(AuthorizationHandlerContext context, PolicyRequirement requirement)
    {
      context.Fail();
    }
并在Startup.ConfigureServices修改
services.AddHttpContextAccessor();
在AddJwtBearer中
.AddJwtBearer(s =>
      {
        //3、添加 Jwt bearer
        s.TokenValidationParameters = new TokenValidationParameters
        {
          ValidIssuer = issuer,
          ValidAudience = audience,
          IssuerSigningKey = key,
          //允許的服務器時間偏差的偏移量
          ClockSkew = TimeSpan.FromSeconds(5),
          ValidateLifetime = true
        };
        s.Events = new JwtBearerEvents
        {
          OnAuthenticationFailed = context =>
          {
            //Token 過期
            if (context.Exception.GetType() == typeof(SecurityTokenExpiredException))
            {
              context.Response.Headers.Add("Token-Expired", "true");
            }
            return Task.CompletedTask;
          },
          OnChallenge = context =>
          {
            context.HandleResponse();
            context.Response.StatusCode = StatusCodes.Status200OK;
            context.Response.ContentType = "application/json";
            //無授權返回自定義信息
            context.Response.WriteAsync(JsonConvert.SerializeObject(new UnAuthorizativeResponse()));
            return Task.CompletedTask;
          }
        };
      });
UnAuthorizativeResponse 是自定義返回的內容。
Startup.Configure中啟用Authentication,注意順序
app.UseRouting();
//跨域
app.UseCors(one);
app.UseCors(two);
……
//啟用 Authentication
app.UseAuthorization();
app.UseAuthentication();
app.UseEndpoints(endpoints => ……
也必須在app.UseRouting和app.UseEndpoints之間。
文件下載
單獨封裝的HttpContext下載方法:
public static void DownLoadFile(this HttpContext context,string fileName, byte[] fileByte, string contentType = "application/octet-stream")
    {
      int bufferSize = 1024;

      context.Response.ContentType = contentType;
      context.Response.Headers.Append("Content-Disposition", "attachment;filename=" + HttpUtility.UrlEncode(fileName));
      context.Response.Headers.Append("Charset", "utf-8");
      context.Response.Headers.Append("Access-Control-Expose-Headers", "Content-Disposition");

      //context.Response.Headers.Append("Access-Control-Allow-Origin", "*");
      //使用FileStream開始循環讀取要下載文件的內容
      using (Stream fs = new MemoryStream(fileByte))
      {
        using (context.Response.Body)
        {
          long contentLength = fs.Length;
          context.Response.ContentLength = contentLength;

          byte[] buffer;
          long hasRead = 0;
          while (hasRead < contentLength)
          {
            if (context.RequestAborted.IsCancellationRequested)
            {
              break;
            }

            buffer = new byte[bufferSize];
            //從下載文件中讀取bufferSize(1024字節)大小的內容到服務器內存中
            int currentRead = fs.Read(buffer, 0, bufferSize);
            context.Response.Body.Write(buffer, 0, currentRead);
            context.Response.Body.Flush();
            hasRead += currentRead;
          }
        }
      }
    }
下載的時候發現以下錯誤:Synchronous operations are disallowed. Call WriteAsync or set AllowSynchronousIO to true instead.
2020-06-29 14:18:38,898 [109] ERROR System.String - System.InvalidOperationException: Synchronous operations are disallowed. Call WriteAsync or set AllowSynchronousIO to true instead.
  at Microsoft.AspNetCore.Server.IIS.Core.HttpResponseStream.Write(Byte[] buffer, Int32 offset, Int32 count)
  at Microsoft.AspNetCore.Server.IIS.Core.WrappingStream.Write(Byte[] buffer, Int32 offset, Int32 count)
  at DigitalCertificateSystem.Common.Extensions.HttpContextExtension.DownLoadFile(HttpContext context, String fileName, Byte[] fileByte, String contentType) in ……
意思不運行同步操作,修改為
context.Response.Body.WriteAsync(buffer, 0, currentRead);
這才順利完成了更新。真的太坑了,不過也感覺微軟的抽象化做得很好,按需引入,減少項目的冗余。
到此,關于“.Net Core 2.2升級3.1時要注意什么”的學習就結束了,希望能夠解決大家的疑惑。理論與實踐的搭配能更好的幫助大家學習,快去試試吧!若想繼續學習更多相關知識,請繼續關注億速云網站,小編會繼續努力為大家帶來更多實用的文章!
免責聲明:本站發布的內容(圖片、視頻和文字)以原創、轉載和分享為主,文章觀點不代表本網站立場,如果涉及侵權請聯系站長郵箱:is@yisu.com進行舉報,并提供相關證據,一經查實,將立刻刪除涉嫌侵權內容。