溫馨提示×
您好,登錄后才能下訂單哦!
點擊 登錄注冊 即表示同意《億速云用戶服務條款》
您好,登錄后才能下訂單哦!
今天就跟大家聊聊有關利用C#如何實現一個窗體抖動功能,可能很多人都不太了解,為了讓大家更加了解,小編給大家總結了以下內容,希望大家根據這篇文章可以有所收獲。
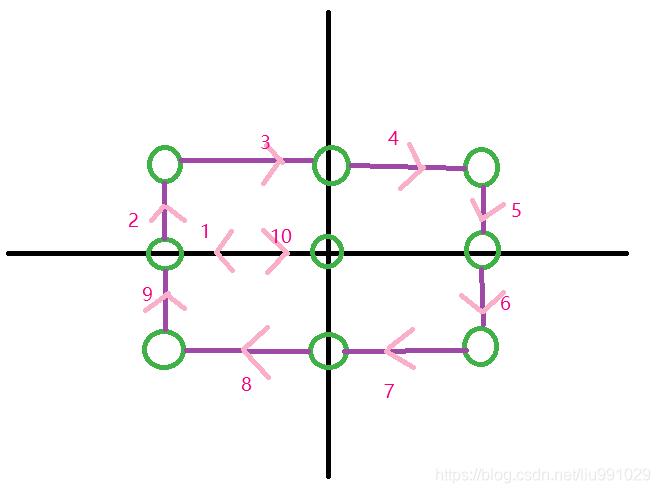
原理:圍繞中心點運動一圈

方法一:通過線程實現
需求:需要using System.Threading;命名空間和button按鈕以及for循環
具體代碼如下:
using System;
using System.Collections.Generic;
using System.ComponentModel;
using System.Data;
using System.Drawing;
using System.Linq;
using System.Text;
using System.Threading.Tasks;
using System.Windows.Forms;
using System.Threading;//添加線程

namespace Test_Window_jitter
{
  public partial class Form1 : Form
  {
    public Form1()
    {
      InitializeComponent();
    }

    private void Form1_Load(object sender, EventArgs e)
    {
      this.Location = new Point(Screen.PrimaryScreen.WorkingArea.Width/2-this.Width/2,Screen.PrimaryScreen.Bounds.Height/2-this.Height/2);
      button1.BackgroundImage = Image.FromFile("../../img/1.jpg");
      button1.BackgroundImageLayout = ImageLayout.Stretch;
    }

    private void button1_Click(object sender, EventArgs e)
    {
      int x = this.Left;
      int y = this.Top;
      for (int i = 0; i < 3; i++)
      {
        this.Location = new Point(x - 3, y);
        Thread.Sleep(10);//設置執行完上一步停留時間
        this.Location = new Point(x - 3, y - 3);
        Thread.Sleep(10);
        this.Location = new Point(x, y - 3);
        Thread.Sleep(10);
        this.Location = new Point(x + 3, y - 3);
        Thread.Sleep(10);
        this.Location = new Point(x + 3, y);
        Thread.Sleep(10);
        this.Location = new Point(x + 3, y + 3);
        Thread.Sleep(10);
        this.Location = new Point(x, y + 3);
        Thread.Sleep(10);
        this.Location = new Point(x - 3, y + 3);
        Thread.Sleep(10);
        this.Location = new Point(x - 3, y);
        Thread.Sleep(10);
        this.Location = new Point(x, y);
      }
    }
  }
}方法二:通過計時器實現
需求:timer控件,button按鈕,for循環
具體代碼如下:
using System;
using System.Collections.Generic;
using System.ComponentModel;
using System.Data;
using System.Drawing;
using System.Linq;
using System.Text;
using System.Threading.Tasks;
using System.Windows.Forms;

namespace Test_Window_jitter
{
  public partial class Form2 : Form
  {
    public Form2()
    {
      InitializeComponent();
    }

    private void Form2_Load(object sender, EventArgs e)
    {
      this.Location = new Point(Screen.PrimaryScreen.WorkingArea.Width / 2 - this.Width / 2, Screen.PrimaryScreen.Bounds.Height / 2 - this.Height / 2);
    }

    private void button1_Click(object sender, EventArgs e)
    {
      timer1.Start();
    }

    private void timer1_Tick(object sender, EventArgs e)
    {
      int x = this.Left;
      int y = this.Top;
      for (int i = 0; i < 10; i++)
      {
        this.Location = new Point(x - 10, y);
        this.Location = new Point(x - 10, y - 10);
        this.Location = new Point(x, y - 10);
        this.Location = new Point(x + 10, y - 10);
        this.Location = new Point(x + 10, y);
        this.Location = new Point(x + 10, y + 10);
        this.Location = new Point(x, y + 10);
        this.Location = new Point(x - 10, y + 10);
        this.Location = new Point(x - 10, y);
        this.Location = new Point(x, y);
      }
      timer1.Stop();
    }
  }
}
看完上述內容,你們對利用C#如何實現一個窗體抖動功能有進一步的了解嗎?如果還想了解更多知識或者相關內容,請關注億速云行業資訊頻道,感謝大家的支持。
免責聲明:本站發布的內容(圖片、視頻和文字)以原創、轉載和分享為主,文章觀點不代表本網站立場,如果涉及侵權請聯系站長郵箱:is@yisu.com進行舉報,并提供相關證據,一經查實,將立刻刪除涉嫌侵權內容。