您好,登錄后才能下訂單哦!
您好,登錄后才能下訂單哦!
這篇文章將為大家詳細講解有關使用SpringBoot怎么對MybatisPlus進行整合,文章內容質量較高,因此小編分享給大家做個參考,希望大家閱讀完這篇文章后對相關知識有一定的了解。
Mybatis-Plus(簡稱MP)是一個 Mybatis 的增強工具,在 Mybatis 的基礎上只做增強不做改變,為簡化開發、提高效率而生。
它已經封裝好了一些crud方法,對于非常常見的一些sql我們不用寫xml了,直接調用這些方法就行,但它也是支持我們自己手動寫xml。
幫我們擺脫了用mybatis需要寫大量的xml文件的麻煩,非常安逸哦
用過就不想用其他了,太舒服了
好了,我們開始整合整合

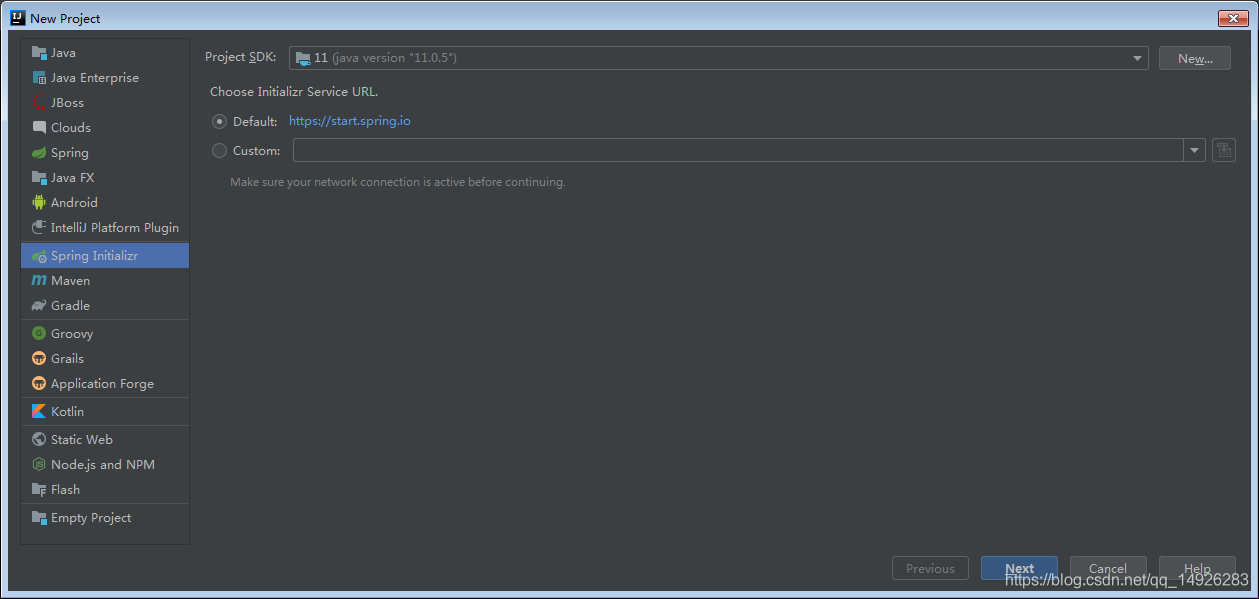
新建一個SpringBoot的工程

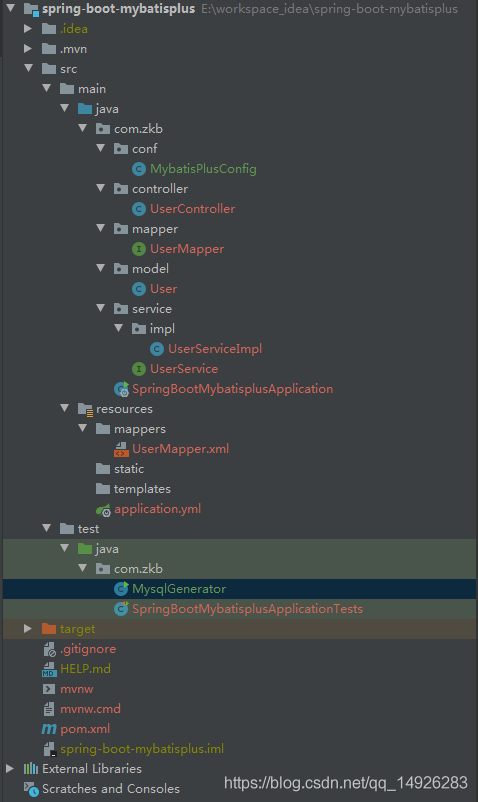
這里是我整合完一個最終的結構,可以參考一下
<?xml version="1.0" encoding="UTF-8"?>
<project xmlns="http://maven.apache.org/POM/4.0.0" xmlns:xsi="http://www.w3.org/2001/XMLSchema-instance"
xsi:schemaLocation="http://maven.apache.org/POM/4.0.0 https://maven.apache.org/xsd/maven-4.0.0.xsd">
<modelVersion>4.0.0</modelVersion>
<parent>
<groupId>org.springframework.boot</groupId>
<artifactId>spring-boot-starter-parent</artifactId>
<version>2.4.0</version>
<relativePath/> <!-- lookup parent from repository -->
</parent>
<groupId>com.zkb</groupId>
<artifactId>spring-boot-mybatisplus</artifactId>
<version>0.0.1-SNAPSHOT</version>
<name>spring-boot-mybatisplus</name>
<description>Demo project for Spring Boot</description>
<properties>
<java.version>11</java.version>
</properties>
<dependencies>
<dependency>
<groupId>org.springframework.boot</groupId>
<artifactId>spring-boot-starter-web</artifactId>
</dependency>
<dependency>
<groupId>org.projectlombok</groupId>
<artifactId>lombok</artifactId>
<optional>true</optional>
</dependency>
<dependency>
<groupId>org.springframework.boot</groupId>
<artifactId>spring-boot-starter-test</artifactId>
<scope>test</scope>
</dependency>
<dependency>
<groupId>mysql</groupId>
<artifactId>mysql-connector-java</artifactId>
<version>8.0.18</version>
</dependency>
<dependency>
<groupId>com.alibaba</groupId>
<artifactId>druid</artifactId>
<version>1.1.21</version>
</dependency>
<dependency>
<groupId>com.baomidou</groupId>
<artifactId>mybatis-plus-boot-starter</artifactId>
<version>3.3.2</version>
</dependency>
<dependency>
<groupId>com.baomidou</groupId>
<artifactId>mybatis-plus-generator</artifactId>
<version>3.3.2</version>
<scope>test</scope>
</dependency>
<dependency>
<groupId>org.freemarker</groupId>
<artifactId>freemarker</artifactId>
<version>2.3.30</version>
<scope>test</scope>
</dependency>
</dependencies>
<build>
<plugins>
<plugin>
<groupId>org.springframework.boot</groupId>
<artifactId>spring-boot-maven-plugin</artifactId>
</plugin>
</plugins>
</build>
</project>引入相關的jar包

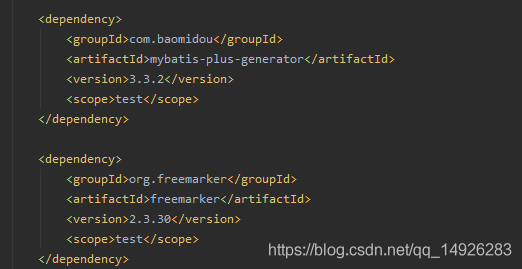
可以看到我這邊策略也有引入,它與mybatis一樣,也有對應生成代碼的策略,我們直接用這個來幫我們把代碼生成就好
package com.example.mybatisplus;

import com.baomidou.mybatisplus.core.toolkit.StringPool;
import com.baomidou.mybatisplus.generator.AutoGenerator;
import com.baomidou.mybatisplus.generator.InjectionConfig;
import com.baomidou.mybatisplus.generator.config.*;
import com.baomidou.mybatisplus.generator.config.po.TableInfo;
import com.baomidou.mybatisplus.generator.config.rules.NamingStrategy;
import com.baomidou.mybatisplus.generator.engine.FreemarkerTemplateEngine;

import java.util.ArrayList;
import java.util.List;


public class MysqlGenerator {

  public static void main(String[] args) {
    // 代碼生成器
    AutoGenerator mpg = new AutoGenerator();

    // 全局配置
    GlobalConfig gc = new GlobalConfig();
    String projectPath = System.getProperty("user.dir");
    gc.setOutputDir(projectPath + "/src/main/java");
    gc.setAuthor("zkb");
    gc.setOpen(false);
    // service 命名方式
    gc.setServiceName("%sService");
    // service impl 命名方式
    gc.setServiceImplName("%sServiceImpl");
    gc.setMapperName("%sMapper");
    gc.setXmlName("%sMapper");
    gc.setFileOverride(true);
    gc.setActiveRecord(true);
    // XML 二級緩存
    gc.setEnableCache(false);
    // XML ResultMap
    gc.setBaseResultMap(true);
    // XML columList
    gc.setBaseColumnList(false);
    // gc.setSwagger2(true); 實體屬性 Swagger2 注解
    mpg.setGlobalConfig(gc);

    // 數據源配置
    DataSourceConfig dsc = new DataSourceConfig();
    dsc.setUrl("jdbc:mysql://localhost:3306/900?serverTimezone=UTC&useUnicode=true&characterEncoding=utf8&useSSL=false");
    // dsc.setSchemaName("public");
    dsc.setDriverName("com.mysql.cj.jdbc.Driver");
    dsc.setUsername("root");
    dsc.setPassword("baishou888");
    mpg.setDataSource(dsc);

    // 包配置
    PackageConfig pc = new PackageConfig();
    pc.setParent("com.zkb");
    pc.setEntity("model");
    pc.setService("service");
    pc.setServiceImpl("service.impl");
    mpg.setPackageInfo(pc);

    // 自定義配置
    InjectionConfig cfg = new InjectionConfig() {
      @Override
      public void initMap() {
        // to do nothing
      }
    };

    // 如果模板引擎是 freemarker
    String templatePath = "/templates/mapper.xml.ftl";
    // 如果模板引擎是 velocity
    // String templatePath = "/templates/mapper.xml.vm";

    // 自定義輸出配置
    List<FileOutConfig> focList = new ArrayList<>();
    // 自定義配置會被優先輸出
    focList.add(new FileOutConfig(templatePath) {
      @Override
      public String outputFile(TableInfo tableInfo) {
        // 自定義輸出文件名 , 如果你 Entity 設置了前后綴、此處注意 xml 的名稱會跟著發生變化!!
        return projectPath + "/src/main/resources/mappers/"
            + "/" + tableInfo.getEntityName() + "Mapper" + StringPool.DOT_XML;
      }
    });
    /*
    cfg.setFileCreate(new IFileCreate() {
      @Override
      public boolean isCreate(ConfigBuilder configBuilder, FileType fileType, String filePath) {
        // 判斷自定義文件夾是否需要創建
        checkDir("調用默認方法創建的目錄");
        return false;
      }
    });
    */
    cfg.setFileOutConfigList(focList);
    mpg.setCfg(cfg);

    // 配置模板
    TemplateConfig templateConfig = new TemplateConfig();

    // 配置自定義輸出模板
    //指定自定義模板路徑,注意不要帶上.ftl/.vm, 會根據使用的模板引擎自動識別
    // templateConfig.setEntity("templates/entity2.java");
    // templateConfig.setService();
    // templateConfig.setController();

    templateConfig.setXml(null);
    mpg.setTemplate(templateConfig);

    // 策略配置
    StrategyConfig strategy = new StrategyConfig();
    strategy.setNaming(NamingStrategy.underline_to_camel);
    strategy.setColumnNaming(NamingStrategy.underline_to_camel);
//    strategy.setSuperEntityClass("com.baomidou.ant.common.BaseEntity");
    strategy.setEntityLombokModel(true);
    strategy.setRestControllerStyle(true);
    // 公共父類
//    strategy.setSuperControllerClass("com.baomidou.ant.common.BaseController");
    // 寫于父類中的公共字段
//    strategy.setSuperEntityColumns("id");
    strategy.setInclude(new String[]{"t_user"});
    strategy.setControllerMappingHyphenStyle(true);
    strategy.setTablePrefix("t" + "_");
    mpg.setStrategy(strategy);
    mpg.setTemplateEngine(new FreemarkerTemplateEngine());
    mpg.execute();
  }
}
我有一個t_user的表
CREATE TABLE `t_user` (
 `id` bigint NOT NULL AUTO_INCREMENT,
 `username` varchar(255) COLLATE utf8mb4_unicode_ci NOT NULL,
 `password` varchar(255) COLLATE utf8mb4_unicode_ci NOT NULL,
 `nickname` varchar(255) COLLATE utf8mb4_unicode_ci NOT NULL,
 `gender` varchar(255) COLLATE utf8mb4_unicode_ci NOT NULL,
 `telephone` varchar(255) COLLATE utf8mb4_unicode_ci NOT NULL,
 `registerdate` datetime NOT NULL,
 `address` varchar(255) COLLATE utf8mb4_unicode_ci NOT NULL,
 `addTime` timestamp NOT NULL DEFAULT '2015-09-15 00:00:00',
 `updateTime` timestamp NOT NULL DEFAULT '2015-09-15 00:00:00' ON UPDATE CURRENT_TIMESTAMP,
 PRIMARY KEY (`id`)
) ENGINE=InnoDB AUTO_INCREMENT=44138653810545248 DEFAULT CHARSET=utf8mb4 COLLATE=utf8mb4_unicode_ci;
我是直接針對它執行策略的,

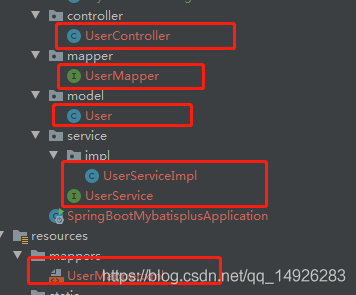
這幾個文件都是策略生成的,我沒有去動過
package com.zkb.conf;

import com.baomidou.mybatisplus.extension.plugins.PaginationInterceptor;
import org.springframework.context.annotation.Bean;
import org.springframework.context.annotation.Configuration;

/**
 * 配置分頁插件
 *
 */
@Configuration
public class MybatisPlusConfig {

  /**
   * 分頁插件
   */
  @Bean
  public PaginationInterceptor paginationInterceptor() {
    return new PaginationInterceptor();
  }
}
server: port: 8081 servlet: context-path: / spring: datasource: # mysql5.x 配置,高版本需要加useSSL=false #url: jdbc:mysql://localhost:3306/test?characterEncoding=utf8&useSSL=false # mysql8.0 需要加&useSSL=false&serverTimezone=UTC url: jdbc:mysql://localhost:3306/900?zeroDateTimeBehavior=convertToNull&characterEncoding=utf8&useSSL=false&serverTimezone=UTC username: root password: baishou888 # mysql8.0 驅動 driver-class-name: com.mysql.cj.jdbc.Driver # mysql5.x 驅動 #driver-class-name: com.mysql.jdbc.Driver debug: false #Druid# name: test type: com.alibaba.druid.pool.DruidDataSource filters: stat maxActive: 20 initialSize: 1 maxWait: 60000 minIdle: 1 timeBetweenEvictionRunsMillis: 60000 minEvictableIdleTimeMillis: 300000 validationQuery: select 'x' testWhileIdle: true testOnBorrow: false testOnReturn: false poolPreparedStatements: true maxOpenPreparedStatements: 20 jackson: date-format: yyyy-MM-dd HH:mm:ss time-zone: GMT+8 mybatis-plus: configuration: map-underscore-to-camel-case: true auto-mapping-behavior: full log-impl: org.apache.ibatis.logging.stdout.StdOutImpl mapper-locations: classpath*:mapper/**/*Mapper.xml global-config: # 邏輯刪除配置 db-config: # 刪除前 logic-not-delete-value: 1 # 刪除后 logic-delete-value: 0
package com.zkb;

import org.mybatis.spring.annotation.MapperScan;
import org.springframework.boot.SpringApplication;
import org.springframework.boot.autoconfigure.SpringBootApplication;

@SpringBootApplication
@MapperScan("com.zkb.mapper")
public class SpringBootMybatisplusApplication {

  public static void main(String[] args) {
    SpringApplication.run(SpringBootMybatisplusApplication.class, args);
  }

}
@MapperScan("com.zkb.mapper")一定是掃描到自己mapper的接口類
package com.zkb.controller;


import com.zkb.model.User;
import com.zkb.service.UserService;
import org.springframework.beans.factory.annotation.Autowired;
import org.springframework.web.bind.annotation.GetMapping;
import org.springframework.web.bind.annotation.PostMapping;
import org.springframework.web.bind.annotation.RequestMapping;

import org.springframework.web.bind.annotation.RestController;

/**
 * <p>
 * 前端控制器
 * </p>
 *
 * @author zkb
 * @since 2020-11-23
 */
@RestController
@RequestMapping("/user")
public class UserController {

  @Autowired
  private UserService userService;
  @GetMapping("/getUser")
  public User getUser(){
    return userService.getById(1231);
  }

}
寫了一個get方法來測試自己是否與mybatis-plus整合成功,所以直接調用了mybatis-plus內置的方法
當然數據庫我自己手動寫了一個id為1231的數據

關于使用SpringBoot怎么對MybatisPlus進行整合就分享到這里了,希望以上內容可以對大家有一定的幫助,可以學到更多知識。如果覺得文章不錯,可以把它分享出去讓更多的人看到。
免責聲明:本站發布的內容(圖片、視頻和文字)以原創、轉載和分享為主,文章觀點不代表本網站立場,如果涉及侵權請聯系站長郵箱:is@yisu.com進行舉報,并提供相關證據,一經查實,將立刻刪除涉嫌侵權內容。