您好,登錄后才能下訂單哦!
您好,登錄后才能下訂單哦!
本篇文章為大家展示了Springcloud+Mybatis使用多數據源的方法有哪些,內容簡明扼要并且容易理解,絕對能使你眼前一亮,通過這篇文章的詳細介紹希望你能有所收獲。
分包方式
在yml中,配置兩個數據源,id分別為master和s1。
spring:
 datasource:
  master:
   jdbcUrl: jdbc:mysql://192.168.xxx.xxx:xxxx/db1?.........
   username: xxx
   password: xxx
   driverClassName: com.mysql.cj.jdbc.Driver
  s1:
   jdbcUrl: jdbc:mysql://192.168.xxx.xxx:xxxx/db2?........
   username: xxx
   password: xxx
   driverClassName: com.mysql.cj.jdbc.Driver
master數據源配置類
注意點:
需要用@Primary注解指定默認數據源,否則spring不知道哪個是主數據源;
@Configuration
@MapperScan(basePackages = "com.hosjoy.xxx.xxx.xxx.xxx.mapper.master", sqlSessionFactoryRef = "masterSqlSessionFactory")
public class MasterDataSourceConfig {

  //默認數據源
  @Bean(name = "masterDataSource")
  @Primary
  @ConfigurationProperties(prefix = "spring.datasource.master")
  public HikariDataSource masterDataSource() {
    return DataSourceBuilder.create().type(HikariDataSource.class).build();
  }

  @Bean(name = "masterSqlSessionFactory")
  @Primary
  public SqlSessionFactory masterSqlSessionFactory(@Qualifier("masterDataSource") DataSource datasource, PaginationInterceptor paginationInterceptor)
      throws Exception {
    MybatisSqlSessionFactoryBean bean = new MybatisSqlSessionFactoryBean();
    bean.setDataSource(datasource);
    bean.setMapperLocations(
        // 設置mybatis的xml所在位置
        new PathMatchingResourcePatternResolver().getResources("classpath*:mapper/master/**/**.xml"));
    bean.setPlugins(new Interceptor[]{paginationInterceptor});
    return bean.getObject();
  }

  @Bean(name = "masterSqlSessionTemplate")
  @Primary
  public SqlSessionTemplate masterSqlSessionTemplate(
      @Qualifier("masterSqlSessionFactory") SqlSessionFactory sessionfactory) {
    return new SqlSessionTemplate(sessionfactory);
  }
}
s1數據源配置類
@Configuration
@MapperScan(basePackages = "com.hosjoy.xxx.xxx.xxx.xxx.mapper.s1", sqlSessionFactoryRef = "s1SqlSessionFactory")
public class S1DataSourceConfig {

  @Bean(name = "s1DataSource")
  @ConfigurationProperties(prefix = "spring.datasource.s1")
  public HikariDataSource s1DataSource() {
    return DataSourceBuilder.create().type(HikariDataSource.class).build();
  }

  @Bean(name = "s1SqlSessionFactory")
  public SqlSessionFactory s1SqlSessionFactory(@Qualifier("s1DataSource") DataSource datasource
      , PaginationInterceptor paginationInterceptor)
      throws Exception {
    MybatisSqlSessionFactoryBean bean = new MybatisSqlSessionFactoryBean();
    bean.setDataSource(datasource);
    bean.setMapperLocations(
        // 設置mybatis的xml所在位置
        new PathMatchingResourcePatternResolver().getResources("classpath*:mapper/s1/**/**.xml"));
    bean.setPlugins(new Interceptor[]{paginationInterceptor});
    return bean.getObject();
  }

  @Bean(name = "s1SqlSessionTemplate")
  public SqlSessionTemplate s1SqlSessionTemplate(
      @Qualifier("s1SqlSessionFactory") SqlSessionFactory sessionfactory) {
    return new SqlSessionTemplate(sessionfactory);
  }
}可以看出,mapper接口、xml文件,需要按照不同的數據源分包。在操作數據庫時,根據需要在service類中注入dao層。
特點分析
優點
實現起來簡單,只需要編寫數據源配置文件和配置類,mapper接口和xml文件注意分包即可。
缺點
很明顯,如果后面要增加或刪除數據源,不僅要修改數據源配置文件,還需要修改配置類。
例如增加一個數據源,同時還需要新寫一個該數據源的配置類,同時還要考慮新建mapper接口包、xml包等,沒有實現 “熱插拔” 效果。
參數化切換數據源,意思是,業務側需要根據當前業務參數,動態的切換到不同的數據源。
這與分包思想不同。分包的前提是在編寫代碼的時候,就已經知道當前需要用哪個數據源,而參數化切換數據源需要根據業務參數決定用哪個數據源。
例如,請求參數userType值為1時,需要切換到數據源slave1;請求參數userType值為2時,需要切換到數據源slave2。
/**偽代碼**/
int userType = reqUser.getType();
if (userType == 1){
  //切換到數據源slave1
  //數據庫操作
} else if(userType == 2){
  //切換到數據源slave2
  //數據庫操作
}數據源注冊
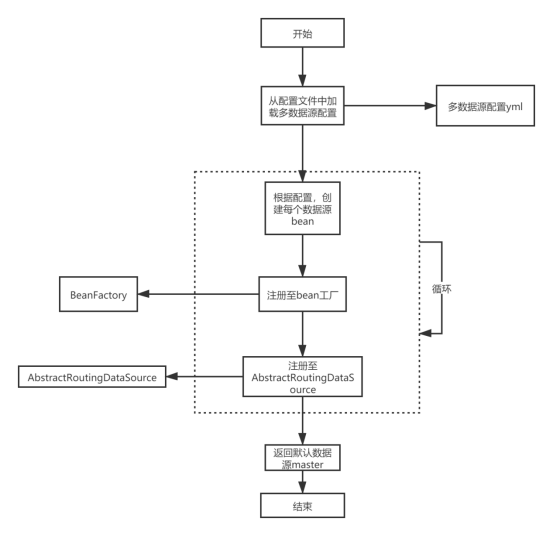
數據源配置類創建datasource時,從yml配置文件中讀取所有數據源配置,自動創建每個數據源,并注冊至bean工廠和AbstractRoutingDatasource(后面聊聊這個),同時返回默認的數據源master。
數據源切換
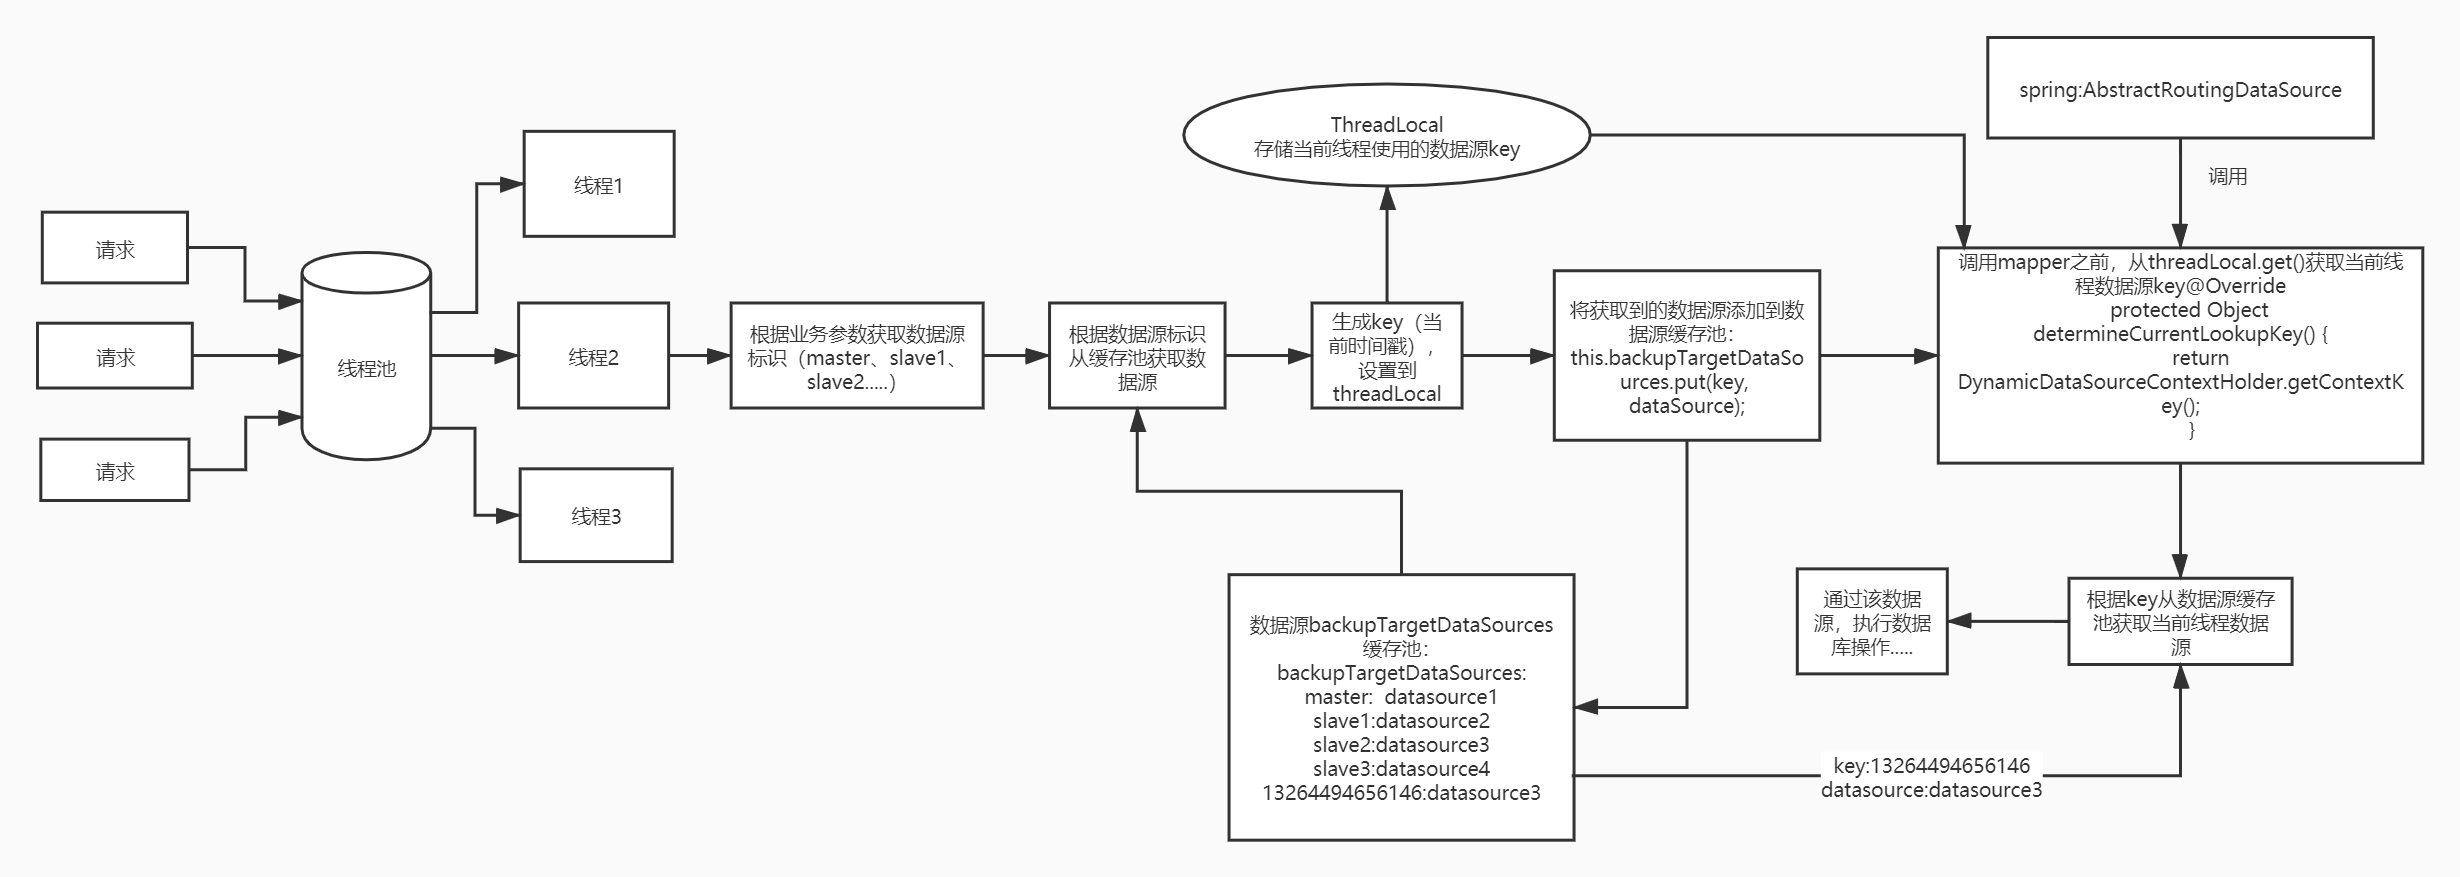
(1)通過線程池處理請求,每個請求獨占一個線程,這樣每個線程切換數據源時互不影響。
(2)根據業務參數獲取應切換的數據源ID,根據ID從數據源緩存池獲取數據源bean;
(3)生成當前線程數據源key;
(4)將key設置到threadLocal;
(5)將key和數據源bean放入數據源緩存池;
(6)在執行mapper方法前,spring會調用determineCurrentLookupKey方法獲取key,然后根據key去數據源緩存池取出數據源,然后getConnection獲取該數據源連接;
(7)使用該數據源執行數據庫操作;
(8)釋放當前線程數據源。
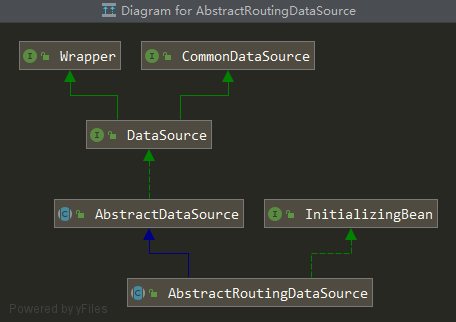
spring為我們提供了AbstractRoutingDataSource抽象類,該類就是實現動態切換數據源的關鍵。
我們看下該類的類圖,其實現了DataSource接口。
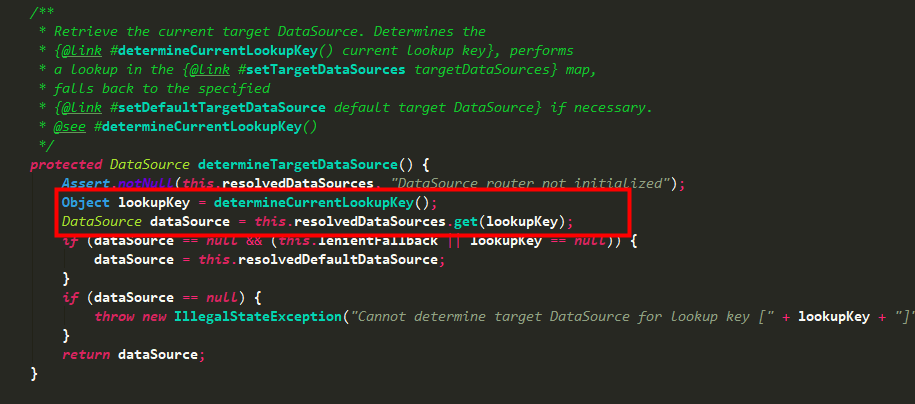
我們看下它的getConnection方法的邏輯,其首先調用determineTargetDataSource來獲取數據源,再獲取數據庫連接。很容易猜想到就是這里來決定具體使用哪個數據源的。

進入到determineTargetDataSource方法,我們可以看到它先是調用determineCurrentLookupKey獲取到一個lookupKey,然后根據這個key去resolvedDataSources里去找相應的數據源。
看下該類定義的幾個對象,defaultTargetDataSource是默認數據源,resolvedDataSources是一個map對象,存儲所有主從數據源。

所以,關鍵就是這個lookupKey的獲取邏輯,決定了當前獲取的是哪個數據源,然后執行getConnection等一系列操作。determineCurrentLookupKey是AbstractRoutingDataSource類中的一個抽象方法,而它的返回值是你所要用的數據源dataSource的key值,有了這個key值,resolvedDataSource(這是個map,由配置文件中設置好后存入的)就從中取出對應的DataSource,如果找不到,就用配置默認的數據源。
所以,通過擴展AbstractRoutingDataSource類,并重寫其中的determineCurrentLookupKey()方法,可以實現數據源的切換。
下面貼出關鍵代碼實現。
數據源配置文件
這里配了3個數據源,其中主數據源是MySQL,兩個從數據源是sqlserver。
spring:
 datasource:
  master:
   jdbcUrl: jdbc:mysql://192.168.xx.xxx:xxx/db1?........
   username: xxx
   password: xxx
   driverClassName: com.mysql.cj.jdbc.Driver
  slave1:
   jdbcUrl: jdbc:sqlserver://192.168.xx.xxx:xxx;DatabaseName=db2
   username: xxx
   password: xxx
   driverClassName: com.microsoft.sqlserver.jdbc.SQLServerDriver
  slave2:
   jdbcUrl: jdbc:sqlserver://192.168.xx.xxx:xxx;DatabaseName=db3
   username: xxx
   password: xxx
   driverClassName: com.microsoft.sqlserver.jdbc.SQLServerDriver
定義動態數據源
主要是繼承AbstractRoutingDataSource,實現determineCurrentLookupKey方法。
public class DynamicDataSource extends AbstractRoutingDataSource {
  /*存儲所有數據源*/
  private Map<Object, Object> backupTargetDataSources;

  public Map<Object, Object> getBackupTargetDataSources() {
    return backupTargetDataSources;
  }
  /*defaultDataSource為默認數據源*/
  public DynamicDataSource(DataSource defaultDataSource, Map<Object, Object> targetDataSource) {
    backupTargetDataSources = targetDataSource;
    super.setDefaultTargetDataSource(defaultDataSource);
    super.setTargetDataSources(backupTargetDataSources);
    super.afterPropertiesSet();
  }
  public void addDataSource(String key, DataSource dataSource) {
    this.backupTargetDataSources.put(key, dataSource);
    super.setTargetDataSources(this.backupTargetDataSources);
    super.afterPropertiesSet();
  }
  /*返回當前線程的數據源的key*/
  @Override
  protected Object determineCurrentLookupKey() {
    return DynamicDataSourceContextHolder.getContextKey();
  }
}
定義數據源key線程變量持有
定義一個ThreadLocal靜態變量,該變量持有了線程和線程的數據源key之間的關系。當我們要切換數據源時,首先要自己生成一個key,將這個key存入threadLocal線程變量中;同時還應該從DynamicDataSource對象中的backupTargetDataSources屬性中獲取到數據源對象, 然后將key和數據源對象再put到backupTargetDataSources中。 這樣,spring就能根據determineCurrentLookupKey方法返回的key,從backupTargetDataSources中取出我們剛剛設置的數據源對象,進行getConnection等一系列操作了。
public class DynamicDataSourceContextHolder {
/**
* 存儲線程和數據源key的映射關系
*/
private static final ThreadLocal<String> DATASOURCE_CONTEXT_KEY_HOLDER = new ThreadLocal<>();
/***
* 設置當前線程數據源key
*/
public static void setContextKey(String key) {
DATASOURCE_CONTEXT_KEY_HOLDER.set(key);
}
/***
* 獲取當前線程數據源key
*/
public static String getContextKey() {
String key = DATASOURCE_CONTEXT_KEY_HOLDER.get();
return key == null ? DataSourceConstants.DS_KEY_MASTER : key;
}
/***
* 刪除當前線程數據源key
*/
public static void removeContextKey() {
DynamicDataSource dynamicDataSource = RequestHandleMethodRegistry.getContext().getBean(DynamicDataSource.class);
String currentKey = DATASOURCE_CONTEXT_KEY_HOLDER.get();
if (StringUtils.isNotBlank(currentKey) && !"master".equals(currentKey)) {
dynamicDataSource.getBackupTargetDataSources().remove(currentKey);
}
DATASOURCE_CONTEXT_KEY_HOLDER.remove();
}
}多數據源自動配置類
這里通過讀取yml配置文件中所有數據源的配置,自動為每個數據源創建datasource 對象并注冊至bean工廠。同時將這些數據源對象,設置到AbstractRoutingDataSource中。
通過這種方式,后面如果需要添加或修改數據源,都無需新增或修改java配置類,只需去配置中心修改yml文件即可。
@Configuration
@MapperScan(basePackages = "com.hosjoy.xxx.xxx.modules.xxx.mapper")
public class DynamicDataSourceConfig {
  @Autowired
  private BeanFactory beanFactory;
  @Autowired
  private DynamicDataSourceProperty dynamicDataSourceProperty;
  /**
   * 功能描述: <br>
   * 〈動態數據源bean 自動配置注冊所有數據源〉
   *
   * @param
   * @return javax.sql.DataSource
   * @Author li.he
   * @Date 2020/6/4 16:47
   * @Modifier
   */
  @Bean
  @Primary
  public DataSource dynamicDataSource() {
    DefaultListableBeanFactory listableBeanFactory = (DefaultListableBeanFactory) beanFactory;
    /*獲取yml所有數據源配置*/
    Map<String, Object> datasource = dynamicDataSourceProperty.getDatasource();
    Map<Object, Object> dataSourceMap = new HashMap<>(5);
    Optional.ofNullable(datasource).ifPresent(map -> {
      for (Map.Entry<String, Object> entry : map.entrySet()) {
        //創建數據源對象
        HikariDataSource dataSource = (HikariDataSource) DataSourceBuilder.create().build();
        String dataSourceId = entry.getKey();
        configeDataSource(entry, dataSource);
        /*bean工廠注冊每個數據源bean*/
        listableBeanFactory.registerSingleton(dataSourceId, dataSource);
        dataSourceMap.put(dataSourceId, dataSource);
      }
    });
    //AbstractRoutingDataSource設置主從數據源
    return new DynamicDataSource(beanFactory.getBean("master", DataSource.class),     dataSourceMap);
  }

  private void configeDataSource(Map.Entry<String, Object> entry, HikariDataSource dataSource) {
    Map<String, Object> dataSourceConfig = (Map<String, Object>) entry.getValue();
    dataSource.setJdbcUrl(MapUtils.getString(dataSourceConfig, "jdbcUrl"));
    dataSource.setDriverClassName(MapUtils.getString(dataSourceConfig, "driverClassName"));
    dataSource.setUsername(MapUtils.getString(dataSourceConfig, "username"));
    dataSource.setPassword(MapUtils.getString(dataSourceConfig, "password"));
  }

}
數據源切換工具類
切換邏輯:
(1)生成當前線程數據源key
(2)根據業務條件,獲取應切換的數據源ID;
(3)根據ID從數據源緩存池中獲取數據源對象,并再次添加到backupTargetDataSources緩存池中;
(4)threadLocal設置當前線程對應的數據源key;
(5)在執行數據庫操作前,spring會調用determineCurrentLookupKey方法獲取key,然后根據key去數據源緩存池取出數據源,然后getConnection獲取該數據源連接;
(6)使用該數據源執行數據庫操作;
(7)釋放緩存:threadLocal清理當前線程數據源信息、數據源緩存池清理當前線程數據源key和數據源對象,目的是防止內存泄漏。
@Slf4j
@Component
public class DataSourceUtil {
@Autowired
private DataSourceConfiger dataSourceConfiger;
/*根據業務條件切換數據源*/
public void switchDataSource(String key, Predicate<? super Map<String, Object>> predicate) {
try {
//生成當前線程數據源key
String newDsKey = System.currentTimeMillis() + "";
List<Map<String, Object>> configValues = dataSourceConfiger.getConfigValues(key);
Map<String, Object> db = configValues.stream().filter(predicate)
.findFirst().get();
String id = MapUtils.getString(db, "id");
//根據ID從數據源緩存池中獲取數據源對象,并再次添加到backupTargetDataSources
addDataSource(newDsKey, id);
//設置當前線程對應的數據源key
DynamicDataSourceContextHolder.setContextKey(newDsKey);
log.info("當前線程數據源切換成功,當前數據源ID:{}", id);
}
catch (Exception e) {
log.error("切換數據源失敗,請檢查數據源配置文件。key:{}, 條件:{}", key, predicate.toString());
throw new ClientException("切換數據源失敗,請檢查數據源配置", e);
}
}
/*將數據源添加至多數據源緩存池中*/
public static void addDataSource(String key, String dataSourceId) {
DynamicDataSource dynamicDataSource = RequestHandleMethodRegistry.getContext().getBean(DynamicDataSource.class);
DataSource dataSource = (DataSource) dynamicDataSource.getBackupTargetDataSources().get(dataSourceId);
dynamicDataSource.addDataSource(key, dataSource);
}
}使用
public void doExecute(ReqTestParams reqTestParams){
//構造條件
Predicate<? super Map<String, Object>> predicate =.........;
//切換數據源
dataSourceUtil.switchDataSource("testKey", predicate);
//數據庫操作
mapper.testQuery();
//清理緩存,避免內存泄漏
DynamicDataSourceContextHolder.removeContextKey();
}每次數據源使用后,都要調用removeContextKey方法清理緩存,避免內存泄漏,這里可以考慮用AOP攔截特定方法,利用后置通知為執行方法代理執行緩存清理工作。
@Aspect
@Component
@Slf4j
public class RequestHandleMethodAspect {
  @After("xxxxxxxxxxxxxxExecution表達式xxxxxxxxxxxxxxxxxx")
  public void afterRunning(JoinPoint joinPoint){
    String name = joinPoint.getSignature().toString();
    long id = Thread.currentThread().getId();
    log.info("方法執行完畢,開始清空當前線程數據源,線程id:{},代理方法:{}",id,name);
    DynamicDataSourceContextHolder.removeContextKey();
    log.info("當前線程數據源清空完畢,已返回至默認數據源:{}",id);
  }
}(1)參數化切換數據源方式,出發點和分包方式不一樣,適合于在運行時才能確定用哪個數據源。
(2)需要手動執行切換數據源操作;
(3)無需分包,mapper和xml路徑自由定義;
(4)增加數據源,無需修改java配置類,只需修改數據源配置文件即可。
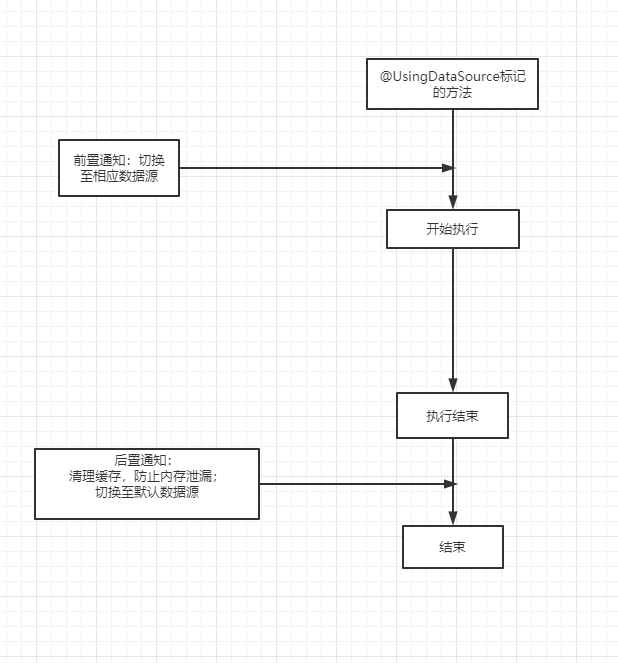
該方式利用注解+AOP思想,為需要切換數據源的方法標記自定義注解,注解屬性指定數據源ID,然后利用AOP切面攔截注解標記的方法,在方法執行前,切換至相應數據源;在方法執行結束后,切換至默認數據源。
需要注意的是,自定義切面的優先級需要高于@Transactional注解對應切面的優先級。
否則,在自定義注解和@Transactional同時使用時,@Transactional切面會優先執行,切面在調用getConnection方法時,會去調用AbstractRoutingDataSource.determineCurrentLookupKey方法,此時獲取到的是默認數據源master。這時@UsingDataSource對應的切面即使再設置當前線程的數據源key,后面也不會再去調用determineCurrentLookupKey方法來切換數據源了。
數據源注冊
同上。
數據源切換
利用切面,攔截所有@UsingDataSource注解標記的方法,根據dataSourceId屬性,在方法執行前,切換至相應數據源;在方法執行結束后,清理緩存并切換至默認數據源。
數據源配置文件
同上。
定義動態數據源
同上。
定義數據源key線程變量持有
同上。
多數據源自動配置類
同上。
數據源切換工具類
切換邏輯:
(1)生成當前線程數據源key
(3)根據ID從數據源緩存池中獲取數據源對象,并再次添加到backupTargetDataSources緩存池中;
(4)threadLocal設置當前線程對應的數據源key;
(5)在執行數據庫操作前,spring會調用determineCurrentLookupKey方法獲取key,然后根據key去數據源緩存池取出數據源,然后getConnection獲取該數據源連接;
(6)使用該數據源執行數據庫操作;
(7)釋放緩存:threadLocal清理當前線程數據源信息、數據源緩存池清理當前線程數據源key和數據源對象。
public static void switchDataSource(String dataSourceId) {
  if (StringUtils.isBlank(dataSourceId)) {
    throw new ClientException("切換數據源失敗,數據源ID不能為空");
  }
  try {
    String threadDataSourceKey = UUID.randomUUID().toString();
    DataSourceUtil.addDataSource(threadDataSourceKey, dataSourceId);
    DynamicDataSourceContextHolder.setContextKey(threadDataSourceKey);
  }
  catch (Exception e) {
    log.error("切換數據源失敗,未找到指定的數據源,請確保所指定的數據源ID已在配置文件中配置。dataSourceId:{}", dataSourceId);
    throw new ClientException("切換數據源失敗,未找到指定的數據源,請確保所指定的數據源ID已在配置文件中配置。dataSourceId:" + dataSourceId, e);
  }
}
自定義注解
自定義注解標記當前方法所使用的數據源,默認為主數據源。
@Target(ElementType.METHOD)
@Retention(RetentionPolicy.RUNTIME)
public @interface UsingDataSource {

  String dataSourceId() default "master";
}
切面
主要是定義前置通知和后置通知,攔截UsingDataSource注解標記的方法,方法執行前切換數據源,方法執行后清理數據源緩存。
需要標記切面的優先級比@Transaction注解對應切面的優先級要高。否則,在自定義注解和@Transactional同時使用時,@Transactional切面會優先執行,切面在調用getConnection方法時,會去調用AbstractRoutingDataSource.determineCurrentLookupKey方法,此時獲取到的是默認數據源master。這時@UsingDataSource對應的切面即使再設置當前線程的數據源key,后面也不會再去調用determineCurrentLookupKey方法來切換數據源了。
@Aspect
@Component
@Slf4j
@Order(value = 1)
public class DynamicDataSourceAspect {

  //攔截UsingDataSource注解標記的方法,方法執行前切換數據源
  @Before(value = "@annotation(usingDataSource)")
  public void before(JoinPoint joinPoint, UsingDataSource usingDataSource) {
    String dataSourceId = usingDataSource.dataSourceId();
    log.info("執行目標方法前開始切換數據源,目標方法:{}, dataSourceId:{}", joinPoint.getSignature().toString(), dataSourceId);
    try {
      DataSourceUtil.switchDataSource(dataSourceId);
    }
    catch (Exception e) {
      log.error("切換數據源失敗!數據源可能未配置或不可用,數據源ID:{}", dataSourceId, e);
      throw new ClientException("切換數據源失敗!數據源可能未配置或不可用,數據源ID:" + dataSourceId, e);
    }
    log.info("目標方法:{} , 已切換至數據源:{}", joinPoint.getSignature().toString(), dataSourceId);
  }

  //攔截UsingDataSource注解標記的方法,方法執行后清理數據源,防止內存泄漏
  @After(value = "@annotation(com.hosjoy.hbp.dts.common.annotation.UsingDataSource)")
  public void after(JoinPoint joinPoint) {
    log.info("目標方法執行完畢,執行清理,切換至默認數據源,目標方法:{}", joinPoint.getSignature().toString());
    try {
      DynamicDataSourceContextHolder.removeContextKey();
    }
    catch (Exception e) {
      log.error("清理數據源失敗", e);
      throw new ClientException("清理數據源失敗", e);
    }
    log.info("目標方法:{} , 數據源清理完畢,已返回默認數據源", joinPoint.getSignature().toString());
  }
}
使用
@UsingDataSource(dataSourceId = "slave1")
@Transactional
public void test(){
  AddressPo po = new AddressPo();
  po.setMemberCode("asldgjlk");
  po.setName("lihe");
  po.setPhone("13544986666");
  po.setProvince("asdgjwlkgj");
  addressMapper.insert(po);
  int i = 1 / 0;
}這種業務場景不是很常見,但肯定是有人遇到過的。
項目里面只配置了1個默認的數據源,而具體運行時需要動態的添加新的數據源,非已配置好的靜態的多數據源。例如需要去服務器實時讀取數據源配置信息(非配置在本地),然后再執行數據庫操作。
這種業務場景,以上3種方式就都不適用了,因為上述的數據源都是提前在yml文件配制好的。
除了第6步外,利用之前寫好的代碼就可以實現。
思路是:
(1)創建新數據源;
(2)DynamicDataSource注冊新數據源;
(3)切換:設置當前線程數據源key;添加臨時數據源;
(4)數據庫操作(必須在另一個service實現,否則無法控制事務);
(5)清理當前線程數據源key、清理臨時數據源;
(6)清理剛剛注冊的數據源;
(7)此時已返回至默認數據源。
代碼寫的比較粗陋,但是模板大概就是這樣子,主要想表達實現的方式。
Service A:
public String testUsingNewDataSource(){
    DynamicDataSource dynamicDataSource = RequestHandleMethodRegistry.getContext().getBean("dynamicDataSource", DynamicDataSource.class);
    try {
      //模擬從服務器讀取數據源信息
      //..........................
      //....................

      //創建新數據源
      HikariDataSource dataSource = (HikariDataSource)          DataSourceBuilder.create().build();
      dataSource.setJdbcUrl("jdbc:mysql://192.168.xxx.xxx:xxxx/xxxxx?......");
      dataSource.setDriverClassName("com.mysql.cj.jdbc.Driver");
      dataSource.setUsername("xxx");
      dataSource.setPassword("xxx");

      //DynamicDataSource注冊新數據源
      dynamicDataSource.addDataSource("test_ds_id", dataSource);

      //設置當前線程數據源key、添加臨時數據源
      DataSourceUtil.switchDataSource("test_ds_id");

      //數據庫操作(必須在另一個service實現,否則無法控制事務)
      serviceB.testInsert();
    }
    finally {
      //清理當前線程數據源key
      DynamicDataSourceContextHolder.removeContextKey();

      //清理剛剛注冊的數據源
      dynamicDataSource.removeDataSource("test_ds_id");

    }
    return "aa";
  }
Service B:
@Transactional(rollbackFor = Exception.class)
  public void testInsert() {
    AddressPo po = new AddressPo();
    po.setMemberCode("555555555");
    po.setName("李郃");
    po.setPhone("16651694996");
    po.setProvince("江蘇省");
    po.setCity("南京市");
    po.setArea("浦口區");
    po.setAddress("南京市浦口區寧六路219號");
    po.setDef(false);
    po.setCreateBy("23958");
    addressMapper.insert(po);
    //測試事務回滾
    int i = 1 / 0;
  }
DynamicDataSource: 增加removeDataSource方法, 清理注冊的新數據源。
public class DynamicDataSource extends AbstractRoutingDataSource {

      .................
      .................
      .................
  public void removeDataSource(String key){
    this.backupTargetDataSources.remove(key);
    super.setTargetDataSources(this.backupTargetDataSources);
    super.afterPropertiesSet();
  }

      .................
      .................
      .................
}| 分包方式 | 參數化切換 | 注解方式 | 動態添加方式 | |
|---|---|---|---|---|
| 適用場景 | 編碼時便知道用哪個數據源 | 運行時才能確定用哪個數據源 | 編碼時便知道用哪個數據源 | 運行時動態添加新數據源 |
| 切換模式 | 自動 | 手動 | 自動 | 手動 |
| mapper路徑 | 需要分包 | 無要求 | 無要求 | 無要求 |
| 增加數據源是否需要修改配置類 | 需要 | 不需要 | 不需要 | \ |
| 實現復雜度 | 簡單 | 復雜 | 復雜 | 復雜 |
使用上述數據源配置方式,可實現單個數據源事務控制。
例如在一個service方法中,需要操作多個數據源執行CUD時,是可以實現單個數據源事務控制的。方式如下,分別將需要事務控制的方法單獨抽取到另一個service,可實現單個事務方法的事務控制。
ServiceA:
public void updateMuilty(){
   serviceB.updateDb1();
   serviceB.updateDb2();
}
ServiceB:
@UsingDataSource(dataSourceId = "slave1")
@Transactional
public void updateDb1(){
  //業務邏輯......
}

@UsingDataSource(dataSourceId = "slave2")
@Transactional
public void updateDb2(){
  //業務邏輯......
}
但是在同一個方法里控制多個數據源的事務就不是這么簡單了,這就屬于分布式事務的范圍,可以考慮使用atomikos開源項目實現JTA分布式事務處理或者阿里的Fescar框架。
上述內容就是Springcloud+Mybatis使用多數據源的方法有哪些,你們學到知識或技能了嗎?如果還想學到更多技能或者豐富自己的知識儲備,歡迎關注億速云行業資訊頻道。
免責聲明:本站發布的內容(圖片、視頻和文字)以原創、轉載和分享為主,文章觀點不代表本網站立場,如果涉及侵權請聯系站長郵箱:is@yisu.com進行舉報,并提供相關證據,一經查實,將立刻刪除涉嫌侵權內容。