您好,登錄后才能下訂單哦!
您好,登錄后才能下訂單哦!
本篇內容主要講解“Python怎么實現在線聊天室私聊”,感興趣的朋友不妨來看看。本文介紹的方法操作簡單快捷,實用性強。下面就讓小編來帶大家學習“Python怎么實現在線聊天室私聊”吧!
對于私聊,我覺得應該有如下兩點需要實現
私聊列表更新
每個人都需要有一個私聊的列表,并且需要準實時的更新,這樣這個人才能知道當前誰準備和自己私聊,以及自己正在私聊的人。
私聊聊天室
對于私聊的聊天室,其實可以復用群聊的聊天室實現,只不過這個聊天室里只有兩個人而已。同時對于消息的傳遞,同樣可以復用群聊中實現的功能。
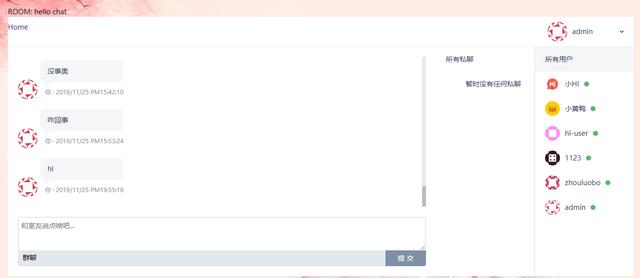
那么既然思路有了,首先就開始布局。這一點對于一個半殘前端來說,太楠楠楠了,搞了好久了,只整出這么個布局,略丑,但是也沒辦法了。

對于不會調樣式的我來說,這能對原有的 CSS 代碼做些簡單的修改了
在原來所有用戶列表旁增加一個私聊
<div class="chat_pleft">
 <ul class="puser_list" title="" id="pchat">
 <li class="fn-clear selected"><em id="pall">所有私聊</em></li>
 <li class="fn-clear" data-id="112" id="private"><span></span><em>暫時沒有任何私聊</em></li>
 </ul>
 </div>
然后再通過調整控件的寬度,來使得新增的 div 顯示在聊天框旁邊,而不是在下邊
.chat_left{ padding:20px; width:-moz-calc(100% - 440px); }
.chat_right{ width:199px; }
.chat_pleft{ width:199px; }
好了,頁面布局就說這么多,說多了都是淚。
現在開始編寫后端邏輯,首先我們要先有一個私聊的聊天室,那么先來改造下 create_room 函數,創建私聊
@main.route('/createroom/', methods=["GET", 'POST'])
@login_required
def create_room(chatwith=None):
 if chatwith:
 rname = chatwith
 if r.exists("pchat-" + rname + '-' + current_user.username) is False:
 r.zadd("pchat-" + rname + '-' + current_user.username, current_user.username, 1)
 r.zadd("pchat-" + rname + '-' + current_user.username, rname, 2)
...
當前函數可以接收一個 chatwith 的參數,如果該參數不為 None 則在 redis 中創建 pchat 數據,即為私聊聊天室。
接下來創建私聊頁面視圖函數,這里在后面可以完善成需要某些權限才可以發起私聊
@main.route('/privatechat/', methods=['GET', 'POST'])
@login_required
def private_chat():
 # 后面可以增加私聊權限
 user_right = True
 if user_right:
 uname = request.args.get('to', "")
 create_room(chatwith=uname)
 ulist = r.zrange("pchat-" + uname + '-' + current_user.username, 0, -1)
 messages = r.zrange("pmsg-" + uname + '-' + current_user.username, 0, -1, withscores=True)
 msg_list = []
 for i in messages:
 msg_list.append([json.loads(i[0]), time.strftime("%Y/%m/%d %p%H:%M:%S", time.localtime(i[1]))])
 return render_template('privatechat.html', rname=uname, user_list=ulist, msg_list=msg_list)
 else:
 pass
下面還需要一個返回私聊列表的函數
# 獲取個人私聊信息
@main.route('/api/pchat/<user>', methods=['GET', 'POST'])
def pchat_info(user):
 pchat = r.keys(pattern='pchat-*')
 pchatlist = []
 for i in pchat:
 i_str = str(i)
 user1 = i_str.split('-', 2)[1]
 if user in i_str:
 pchatlist.append({user1: i_str})
 html = []
 for i in pchatlist:
 html.append(f'<li class="fn-clear"><em id="{list(i.keys())[0]}" onclick="pchat(this.id)">{list(i.values())[0]}</em></li>')
 return json.dumps(html)
這里直接拼接了 HTML 代碼并返回,之所以這么做是因為 JavaScript 代碼能力過弱,在 Python 側做了。
在寫這塊代碼時,我是深刻的體會到了 Vue 等前端框架的好處,不僅僅是快速搭建 UI,在處理數據等方面也是爽的一米。
最后就是改造發送消息的函數 send_chat
...
 rtype = request.form.get("rtype", "")
 if rtype and rtype == 'p':
 ulist = r.zrange("pchat-" + rname + '-' + current_user.username, 0, -1)
 if current_user.username in ulist:
 body = {"username": current_user.username, "msg": info}
 r.zadd("pmsg-" + rname + '-' + current_user.username, json.dumps(body), time.time())
 socket_send(info, current_user.username)
 data = json.dumps({'code': 200, 'msg': info})
 return data
 else:
 data = json.dumps({'code': 403, 'msg': 'You are not in this room'})
 return data
...
前端需要在 URL 參數中傳遞 rtype 參數來標識該請求是私聊發出的,其他代碼基本復用原來的。
首先就是要定時刷新私聊列表
// 定時更新私聊列表
 setInterval(function() {
 $.get("http://127.0.0.1:8889/api/pchat/" + "{{ current_user.username }}",//GET請求的url地址
 function(data,status){
 var roomlist = JSON.parse(data);
 for (var i =0; i<roomlist.length; i++) {
 li_html += roomlist[i];
 }
 console.log(li_html);
 $("#pchat").html(li_html);//更新列表內容
 });
 }, 5000); //定時刷新界面(0.5秒)
這里有一些硬編碼,請忽略
接下來就是發起私聊的入口了,這里我設置到了雙擊某個用戶,即可發起私聊
// 用戶列表操作
	var fromname = $('#fromname').val();
	var to_uid = 0; // 默認為0,表示發送給所有用戶
	var to_uname = '';
	$('.user_list > li').dblclick(function(){
		to_uname = $(this).find('em').text();
		to_uid = $(this).attr('data-id');
 var redirect_url = 'http://' + document.domain + ':' + location.port + '/privatechat/?to=' + to_uname;
		if(to_uname == fromname){
		 alert('您不能和自己聊天!');
			return false;
		}
		if(to_uname == '所有用戶'){
		 $("#toname").val('');
			$('#chat_type').text('群聊');
		}else{
		 // 新開窗口私聊
		 window.open(redirect_url);
		}
		$(this).addClass('selected').siblings().removeClass('selected');
	});
當然,用戶也可以單擊私聊列表來進入私聊聊天室,因為在后端返回時已經給 em 標簽設置了 onclick 事件,這里直接實現事件函數即可
function pchat(id){
 var to_user = id;
 var redirect_url = 'http://' + document.domain + ':' + location.port + '/privatechat/?to=' + to_user;
 window.open(redirect_url);
 }
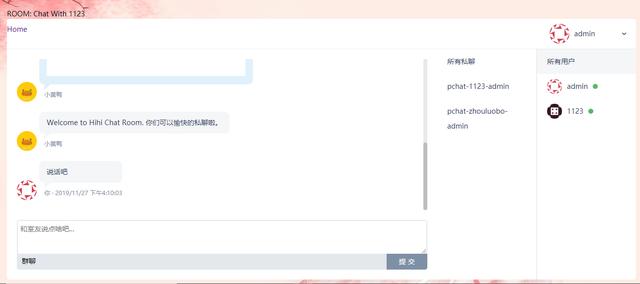
這樣,基本改造完成,可以愉快的私聊嘍!
私聊效果

到此,相信大家對“Python怎么實現在線聊天室私聊”有了更深的了解,不妨來實際操作一番吧!這里是億速云網站,更多相關內容可以進入相關頻道進行查詢,關注我們,繼續學習!
免責聲明:本站發布的內容(圖片、視頻和文字)以原創、轉載和分享為主,文章觀點不代表本網站立場,如果涉及侵權請聯系站長郵箱:is@yisu.com進行舉報,并提供相關證據,一經查實,將立刻刪除涉嫌侵權內容。