您好,登錄后才能下訂單哦!
您好,登錄后才能下訂單哦!
這篇文章將為大家詳細講解有關spring中aop不生效怎么辦,小編覺得挺實用的,因此分享給大家做個參考,希望大家閱讀完這篇文章后可以有所收獲。
先看下這個問題的背景:假設有一個spring應用,開發人員希望自定義一個注解@Log,可以加到指定的方法上,實現自動記錄日志(入參、出參、響應耗時這些)
package com.cnblogs.yjmyzz.springbootdemo.aspect;

import java.lang.annotation.ElementType;
import java.lang.annotation.Retention;
import java.lang.annotation.RetentionPolicy;
import java.lang.annotation.Target;

@Retention(RetentionPolicy.RUNTIME)
@Target(ElementType.METHOD)
public @interface Log {

}
然后再寫一個Aspect來解析這個注解,對打了Log注解的方法進行增強處理
package com.cnblogs.yjmyzz.springbootdemo.aspect;
import org.aspectj.lang.JoinPoint;
import org.aspectj.lang.ProceedingJoinPoint;
import org.aspectj.lang.annotation.Around;
import org.aspectj.lang.annotation.Aspect;
import org.aspectj.lang.annotation.Pointcut;
import org.springframework.stereotype.Component;
import java.lang.reflect.Method;
@Component
@Aspect
public class LogAspect {
@Pointcut("execution (* com.cnblogs.yjmyzz.springbootdemo.service..*.*(..))")
public void logPointcut() {
}
@Around("logPointcut()")
public void around(JoinPoint point) {
String methodName = point.getSignature().getName();
Object[] args = point.getArgs();
Class<?>[] argTypes = new Class[point.getArgs().length];
for (int i = 0; i < args.length; i++) {
argTypes[i] = args[i].getClass();
}
Method method = null;
try {
method = point.getTarget().getClass().getMethod(methodName, argTypes);
} catch (Exception e) {
e.printStackTrace();
}
//獲取方法上的注解
Log log = method.getAnnotation(Log.class);
if (log != null) {
//演示方法執行前,記錄一行日志
System.out.println("before:" + methodName);
}
try {
//執行方法
((ProceedingJoinPoint) point).proceed();
} catch (Throwable throwable) {
throwable.printStackTrace();
} finally {
if (log != null) {
//演示方法執行后,記錄一行日志
System.out.println("after:" + methodName);
}
}
}
}寫一個測試Service類:
package com.cnblogs.yjmyzz.springbootdemo.service;

import com.cnblogs.yjmyzz.springbootdemo.aspect.Log;
import org.springframework.stereotype.Component;

@Component
public class HelloService {

  @Log
  public void sayHi(String msg) {
    System.out.println("\tsayHi:" + msg);
  }

  public void anotherSayHi(String msg) {
    this.sayHi(msg);
  }

}
最后來跑一把:
package com.cnblogs.yjmyzz.springbootdemo;

import com.cnblogs.yjmyzz.springbootdemo.service.HelloService;
import org.springframework.context.annotation.AnnotationConfigApplicationContext;
import org.springframework.context.annotation.ComponentScan;
import org.springframework.context.annotation.Configuration;
import org.springframework.context.annotation.EnableAspectJAutoProxy;

/**
 * @author 菩提樹下的楊過
 */
@ComponentScan("com.cnblogs.yjmyzz")
@Configuration
@EnableAspectJAutoProxy
public class SampleApplication {

  public static void main(String[] args) {
    AnnotationConfigApplicationContext context = new AnnotationConfigApplicationContext(SampleApplication.class);
    HelloService helloService = context.getBean(HelloService.class);
    helloService.sayHi("hi-1");
    System.out.println("\n");
    helloService.anotherSayHi("hi-2");
  }
}
輸出如下:
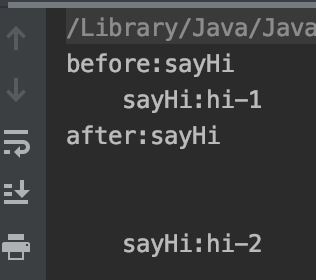
顯然HelloService中的anotherSayHi方法,并未被aop增強。 原因其實很簡單,了解AOP原理的同學想必都知道,AOP的實現有二類,如果是基于接口的,會采用動態代理,生成一個代理類,如果是基于類的,會采用CGLib生成子類,然后在子類中擴展父類中的方法。
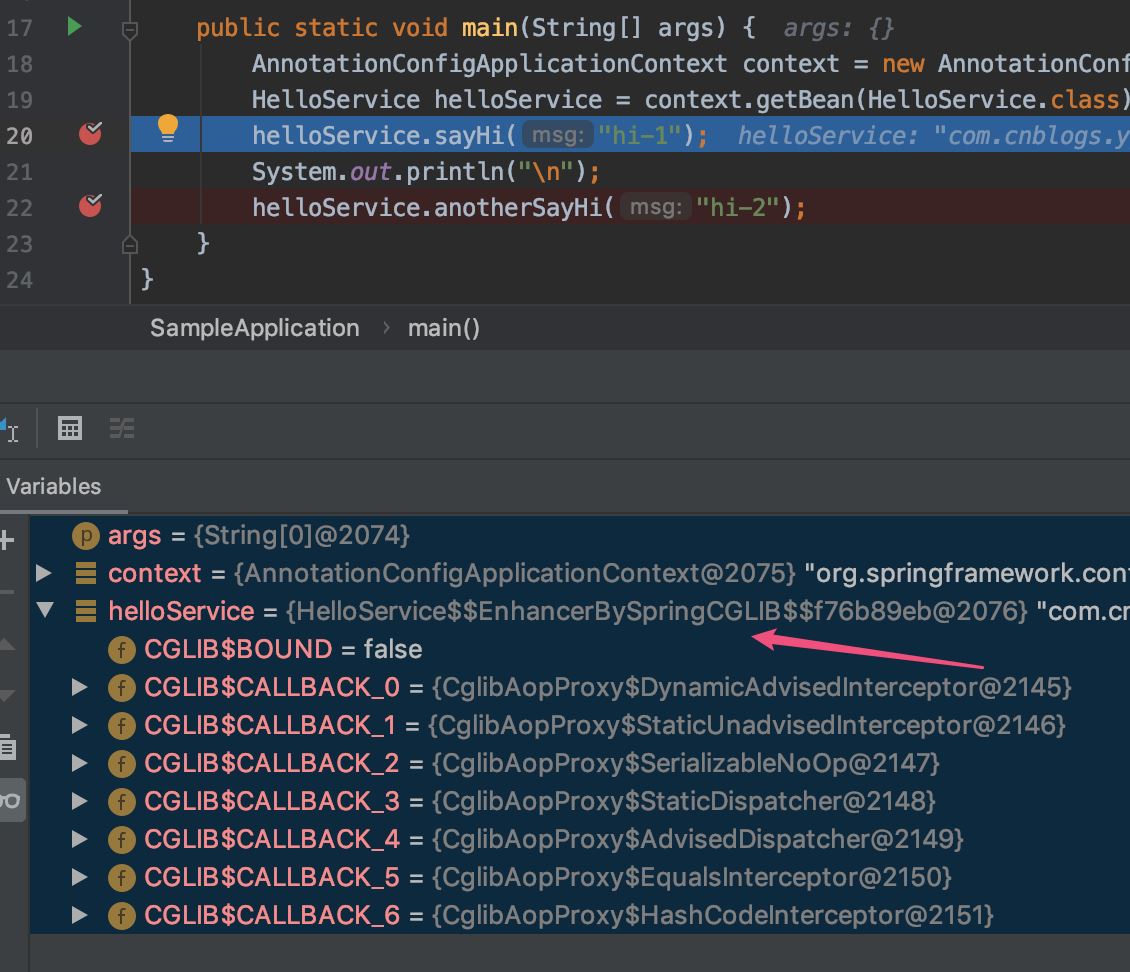
本文中HelloService并不是一個接口,所以從上圖的斷點中可以看出,當Spring運行時,HelloService被增加為...EnhancerBySpringCGLib...。但是當調用到anotherSayHi時
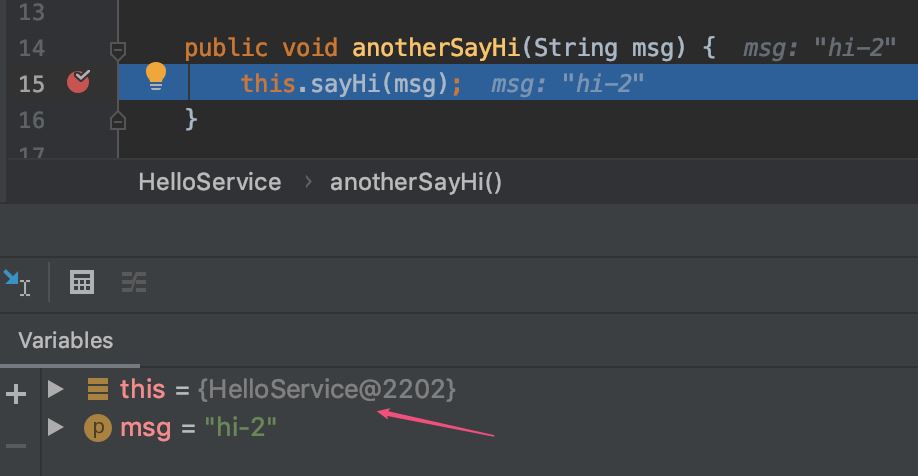
方法的調用方,其實是原始的HelloSerfvice實例,即:是未經過Spring AOP增強的對象實例。所以解決問題的思路就有了,想辦法用增強后的HelloService實例來調用!
方法一:用Autowired 注入自身的實例
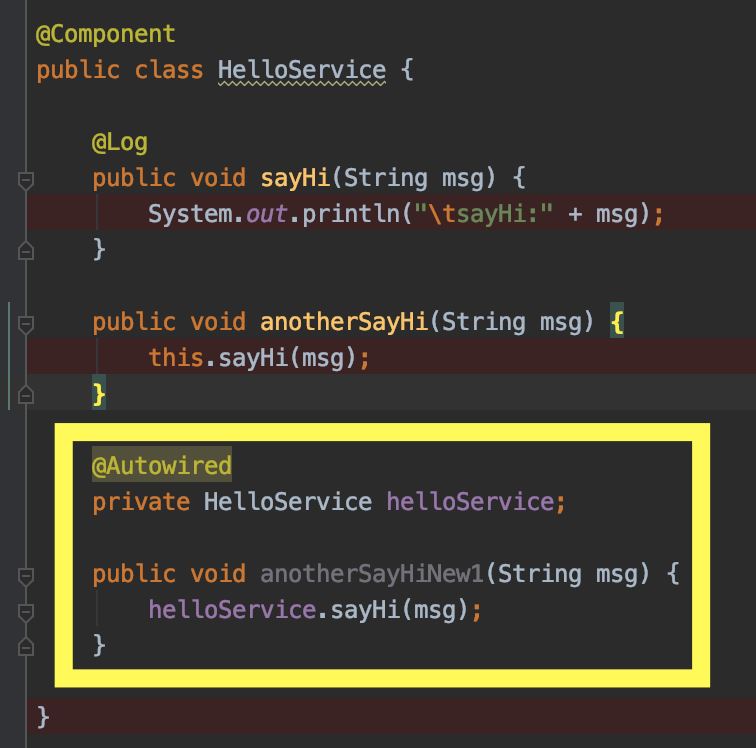
這個方法,第一眼看上去感覺有些怪,自己注入自己,感覺有點象遞歸/死循環的搞法,但確實可以work,Spring在解決循環依賴上有自己的處理方式,避免了死循環。
方法二:從Spring上下文獲取增強后的實例引用
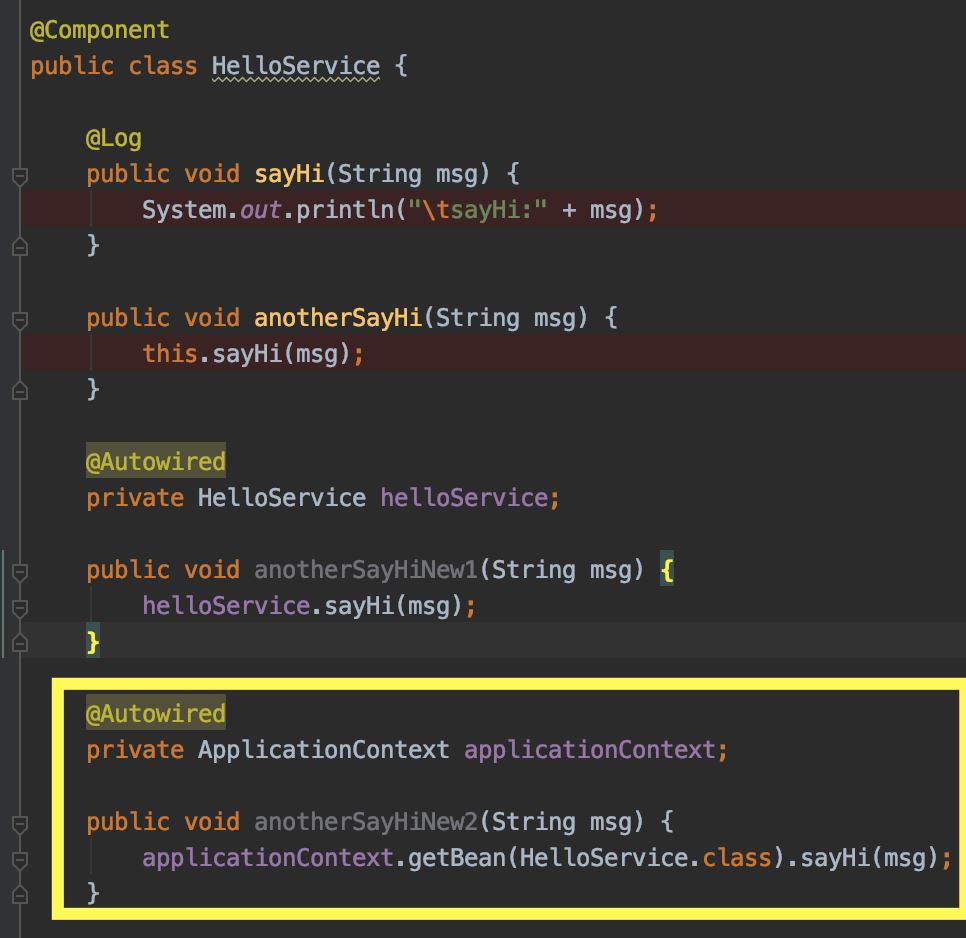
原理與方法一其實類似,不多解釋。
方法三: 利用AopContext
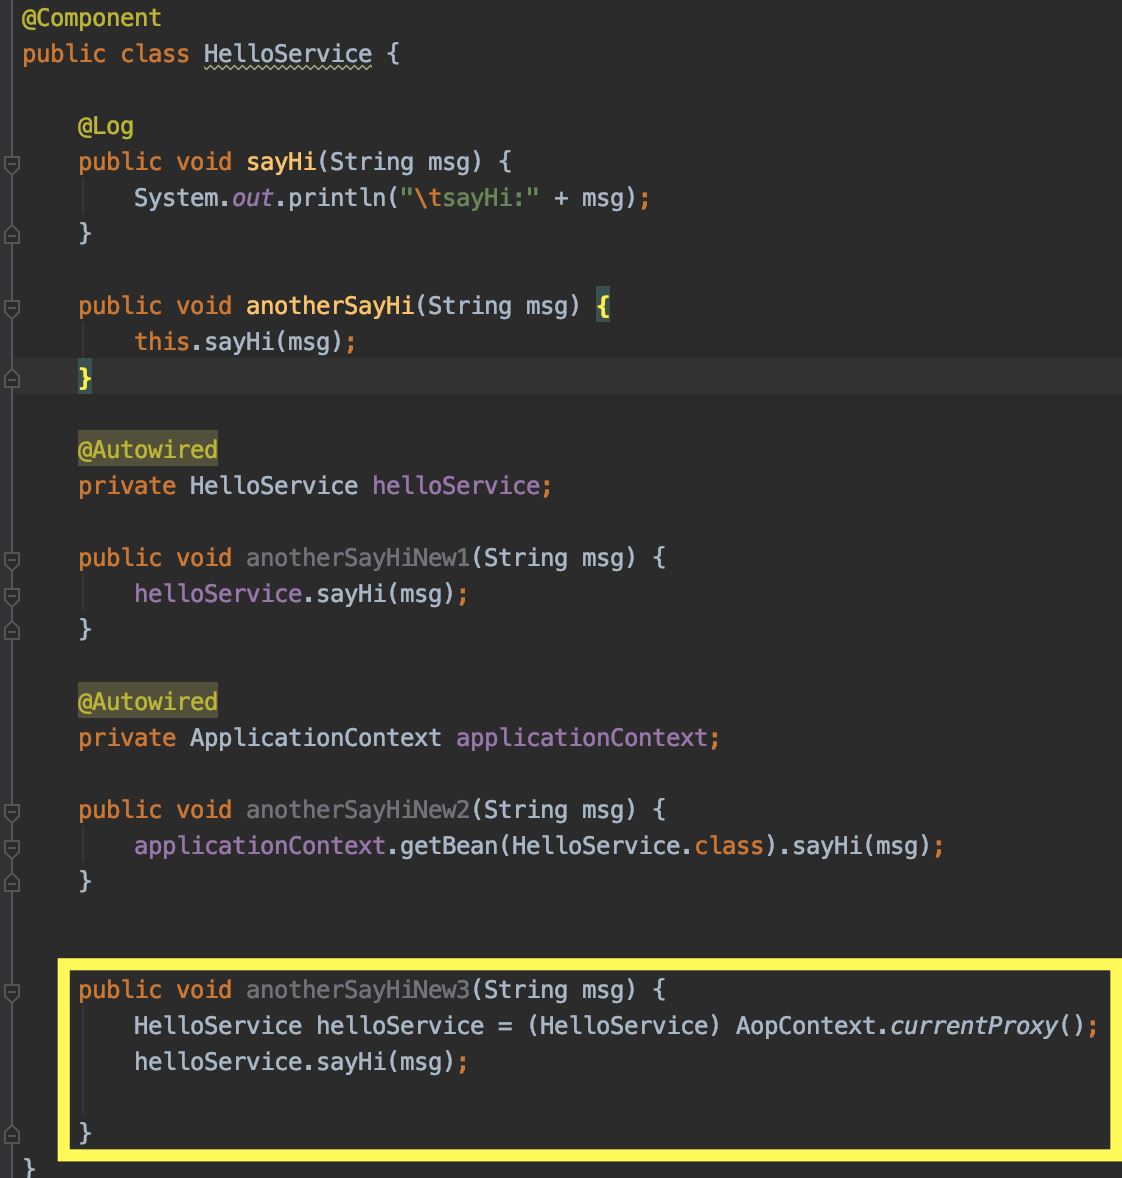
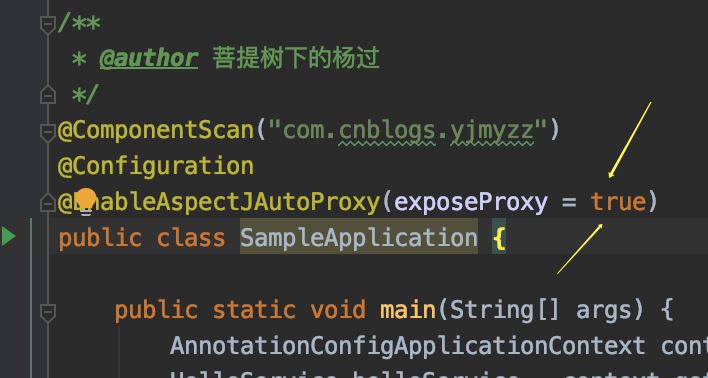
不過這個方法要注意的是,主類入口上,必須加上exporseProxy=true,參考下圖:
最后來驗證下這3種方法是否生效:
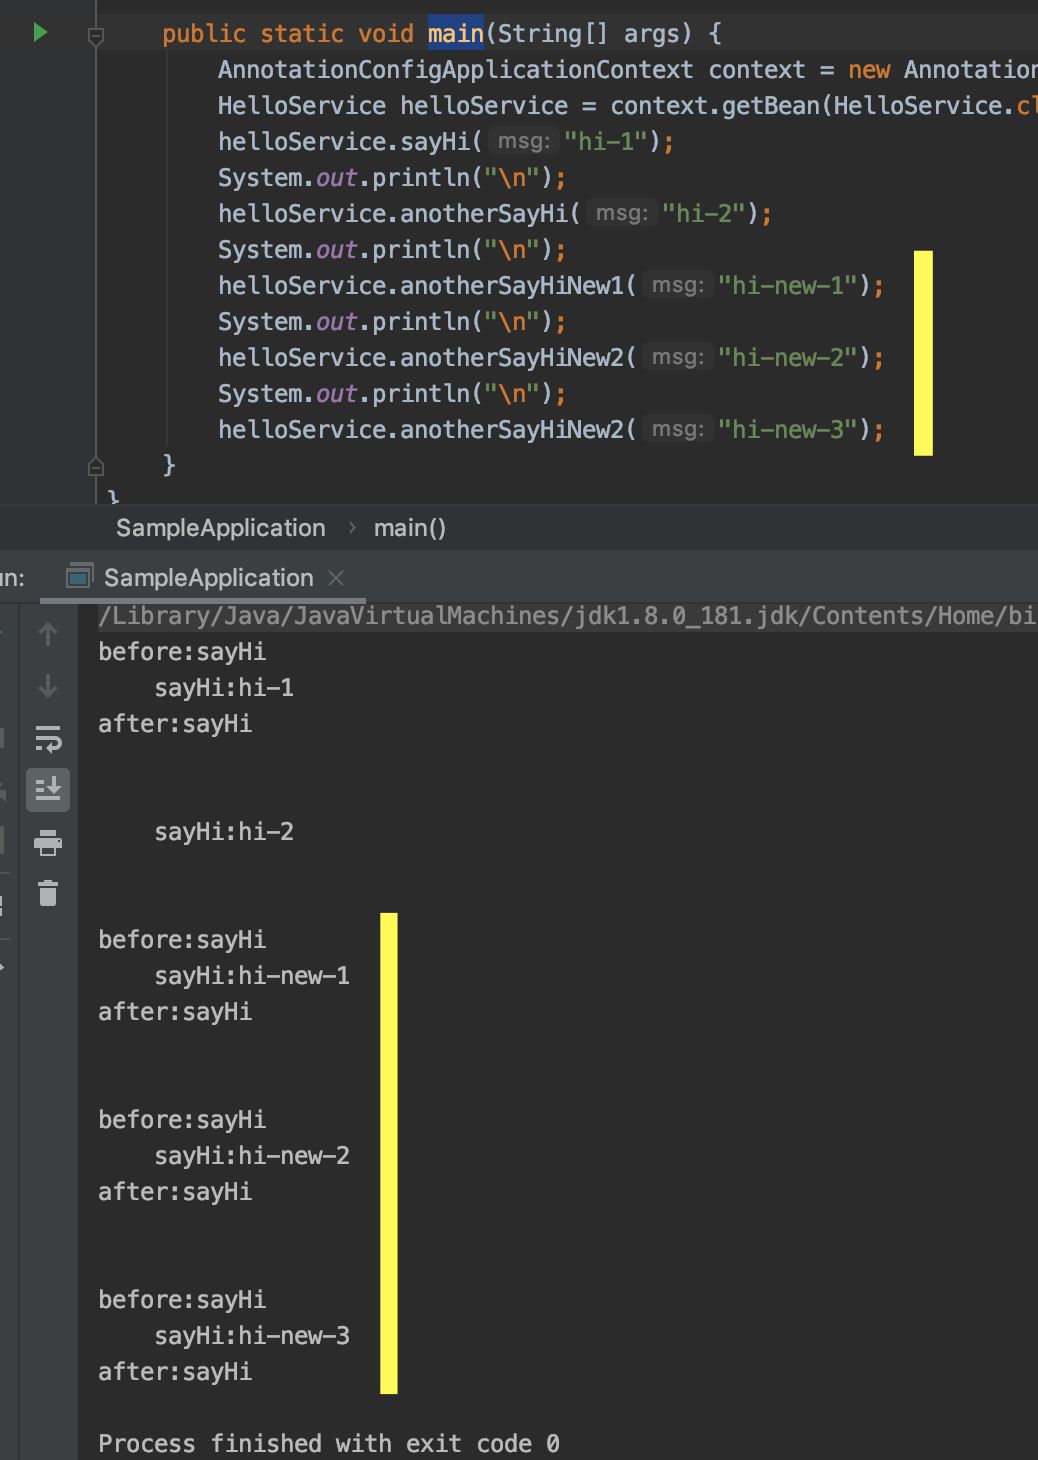
從運行結果上看,3種方法都可以解決這個問題。
關于spring中aop不生效怎么辦就分享到這里了,希望以上內容可以對大家有一定的幫助,可以學到更多知識。如果覺得文章不錯,可以把它分享出去讓更多的人看到。
免責聲明:本站發布的內容(圖片、視頻和文字)以原創、轉載和分享為主,文章觀點不代表本網站立場,如果涉及侵權請聯系站長郵箱:is@yisu.com進行舉報,并提供相關證據,一經查實,將立刻刪除涉嫌侵權內容。