溫馨提示×
您好,登錄后才能下訂單哦!
點擊 登錄注冊 即表示同意《億速云用戶服務條款》
您好,登錄后才能下訂單哦!
這篇文章將為大家詳細講解有關python編寫計算器程序的方法,小編覺得挺實用的,因此分享給大家做個參考,希望大家閱讀完這篇文章后可以有所收獲。

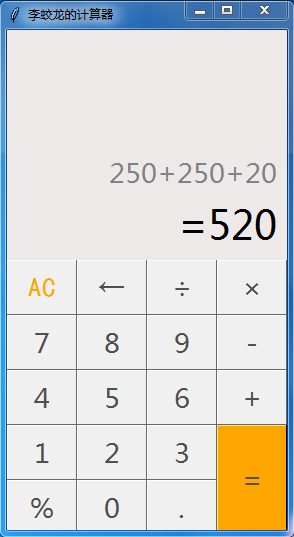
該計算器是使用Python tkinter模塊進行開發的。下面給大家介紹具體代碼:
效果如下圖:

代碼如下:
import tkinter #導入tkinter模塊

root  = tkinter.Tk()
root.minsize(280,500)
root.title('李蛟龍的計算器')

#1.界面布局
#顯示面板
result = tkinter.StringVar()
result.set(0)                      #顯示面板顯示結果1,用于顯示默認數字0
result2 = tkinter.StringVar()           #顯示面板顯示結果2,用于顯示計算過程
result2.set('')
#顯示版
label = tkinter.Label(root,font = ('微軟雅黑',20),bg = '#EEE9E9',bd ='9',fg = '#828282',anchor = 'se',textvariable
= result2)
label.place(width = 280,height = 170)
label2 = tkinter.Label(root,font = ('微軟雅黑',30),bg = '#EEE9E9',bd ='9',fg = 'black',anchor = 'se',textvariable
= result)
label2.place(y = 170,width = 280,height = 60)

#數字鍵按鈕

btn7 = tkinter.Button(root,text = '7',font = ('微軟雅黑',20),fg = ('#4F4F4F'),bd = 0.5,command = lambda :
pressNum('7'))
btn7.place(x = 0,y = 285,width = 70,height = 55)
btn8 = tkinter.Button(root,text = '8',font = ('微軟雅黑',20),fg = ('#4F4F4F'),bd = 0.5,command = lambda :
pressNum('8'))
btn8.place(x = 70,y = 285,width = 70,height = 55)
btn9 = tkinter.Button(root,text = '9',font = ('微軟雅黑',20),fg = ('#4F4F4F'),bd = 0.5,command = lambda :
pressNum('9'))
btn9.place(x = 140,y = 285,width = 70,height = 55)

btn4 = tkinter.Button(root,text = '4',font = ('微軟雅黑',20),fg = ('#4F4F4F'),bd = 0.5,command = lambda :
pressNum('4'))
btn4.place(x = 0,y = 340,width = 70,height = 55)
btn5 = tkinter.Button(root,text = '5',font = ('微軟雅黑',20),fg = ('#4F4F4F'),bd = 0.5,command = lambda :
pressNum('5'))
btn5.place(x = 70,y = 340,width = 70,height = 55)
btn6 = tkinter.Button(root,text = '6',font = ('微軟雅黑',20),fg = ('#4F4F4F'),bd = 0.5,command = lambda :
pressNum('6'))
btn6.place(x = 140,y = 340,width = 70,height = 55)

btn1 = tkinter.Button(root,text = '1',font = ('微軟雅黑',20),fg = ('#4F4F4F'),bd = 0.5,command = lambda :
pressNum('1'))
btn1.place(x = 0,y = 395,width = 70,height = 55)
btn2 = tkinter.Button(root,text = '2',font = ('微軟雅黑',20),fg = ('#4F4F4F'),bd = 0.5,command = lambda :
pressNum('2'))
btn2.place(x = 70,y = 395,width = 70,height = 55)
btn3 = tkinter.Button(root,text = '3',font = ('微軟雅黑',20),fg = ('#4F4F4F'),bd = 0.5,command = lambda :
pressNum('3'))
btn3.place(x = 140,y = 395,width = 70,height = 55)
btn0 = tkinter.Button(root,text = '0',font = ('微軟雅黑',20),fg = ('#4F4F4F'),bd = 0.5,command = lambda :
pressNum('0'))
btn0.place(x = 70,y = 450,width = 70,height = 55)


#運算符號按鈕
btnac = tkinter.Button(root,text = 'AC',bd = 0.5,font = ('黑體',20),fg = 'orange',command = lambda :pressCompute('AC'))
btnac.place(x = 0,y = 230,width = 70,height = 55)
btnback = tkinter.Button(root,text = '←',font = ('微軟雅黑',20),fg = '#4F4F4F',bd = 0.5,command = lambda:
pressCompute('b'))
btnback.place(x = 70,y = 230,width = 70,height = 55)
btndivi = tkinter.Button(root,text = '÷',font = ('微軟雅黑',20),fg = '#4F4F4F',bd = 0.5,command = lambda:
pressCompute('/'))
btndivi.place(x = 140,y = 230,width = 70,height = 55)
btnmul = tkinter.Button(root,text ='×',font = ('微軟雅黑',20),fg = "#4F4F4F",bd = 0.5,command = lambda:
pressCompute('*'))
btnmul.place(x = 210,y = 230,width = 70,height = 55)
btnsub = tkinter.Button(root,text = '-',font = ('微軟雅黑',20),fg = ('#4F4F4F'),bd = 0.5,command = lambda:
pressCompute('-'))
btnsub.place(x = 210,y = 285,width = 70,height = 55)
btnadd = tkinter.Button(root,text = '+',font = ('微軟雅黑',20),fg = ('#4F4F4F'),bd = 0.5,command = lambda:
pressCompute('+'))
btnadd.place(x = 210,y = 340,width = 70,height = 55)
btnequ = tkinter.Button(root,text = '=',bg = 'orange',font = ('微軟雅黑',20),fg = ('#4F4F4F'),bd = 0.5,command =
lambda :pressEqual())
btnequ.place(x = 210,y = 395,width = 70,height = 110)
btnper = tkinter.Button(root,text = '%',font = ('微軟雅黑',20),fg = ('#4F4F4F'),bd = 0.5,command = lambda:
pressCompute('%'))
btnper.place(x = 0,y = 450,width = 70,height = 55)
btnpoint = tkinter.Button(root,text = '.',font = ('微軟雅黑',20),fg = ('#4F4F4F'),bd = 0.5,command = lambda:
pressCompute('.'))
btnpoint.place(x = 140,y = 450,width = 70,height = 55)

#操作函數
lists = []                            #設置一個變量 保存運算數字和符號的列表
isPressSign = False                  #添加一個判斷是否按下運算符號的標志,假設默認沒有按下按鈕
isPressNum = False
#數字函數
def pressNum(num):                   #設置一個數字函數 判斷是否按下數字 并獲取數字將數字寫在顯示版上
    global lists                     #全局化lists和按鈕狀態isPressSign
    global isPressSign
    if isPressSign == False:
        pass
    else:                            #重新將運算符號狀態設置為否
        result.set(0)
        isPressSign = False

    #判斷界面的數字是否為0
    oldnum = result.get()             #第一步
    if oldnum =='0':                 #如過界面上數字為0 則獲取按下的數字
       result.set(num)
    else:                            #如果界面上的而數字不是0  則鏈接上新按下的數字
        newnum = oldnum + num
        result.set(newnum)            #將按下的數字寫到面板中

#運算函數
def pressCompute(sign):
    global lists
    global isPressSign
    num = result.get()              #獲取界面數字
    lists.append(num)               #保存界面獲取的數字到列表中

    lists.append(sign)              #講按下的運算符號保存到列表中
    isPressSign = True

    if sign =='AC':                #如果按下的是'AC'按鍵,則清空列表內容,講屏幕上的數字鍵設置為默認數字0
        lists.clear()
        result.set(0)
    if sign =='b':                 #如果按下的是退格‘’,則選取當前數字第一位到倒數第二位
        a = num[0:-1]
        lists.clear()
        result.set(a)

#獲取運算結果函數
def pressEqual():
    global lists
    global isPressSign

    curnum = result.get()           #設置當前數字變量,并獲取添加到列表
    lists.append(curnum)

    computrStr = ''.join(lists)     #講列表內容用join命令將字符串鏈接起來
    endNum = eval(computrStr)       #用eval命令運算字符串中的內容
#    a = str(endNum)
#   b = '='+a                       #給運算結果前添加一個 ‘=’ 顯示   不過這樣寫會有BUG
不能連續運算,這里注釋,不要 =
#   c = b[0:10]                     #所有的運算結果取9位數
    result.set(endNum)                   #講運算結果顯示到屏幕1
    result2.set(computrStr)         #將運算過程顯示到屏幕2
    lists.clear()                   #清空列表內容

root.mainloop()
關于python編寫計算器程序的方法就分享到這里了,希望以上內容可以對大家有一定的幫助,可以學到更多知識。如果覺得文章不錯,可以把它分享出去讓更多的人看到。
免責聲明:本站發布的內容(圖片、視頻和文字)以原創、轉載和分享為主,文章觀點不代表本網站立場,如果涉及侵權請聯系站長郵箱:is@yisu.com進行舉報,并提供相關證據,一經查實,將立刻刪除涉嫌侵權內容。