您好,登錄后才能下訂單哦!
您好,登錄后才能下訂單哦!
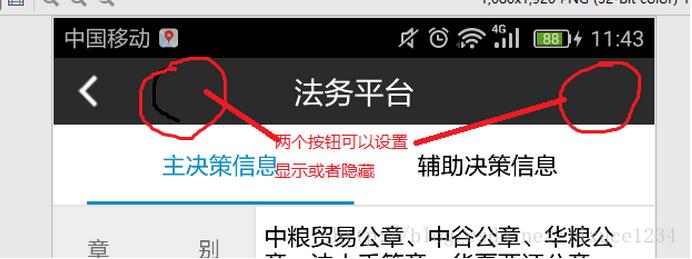
再做一個項目的時候,要求標題欄的標題再中間,樣式,字體大小都要自定義。左邊一個返回按鈕,一個關閉按鈕,右邊定義一個提交按鈕,有時候顯示有時候隱藏。因為原生的title標題是再左邊的,然后去給Titlebar設置自定義View的時候,也會不盡人意,標題不是再正中間的,標題欄太高等問題。
我們要求的是這樣的,右邊的按鈕可以顯示或者隱藏。

于是就決定自己寫一個BaseActivity,所有的都去繼承這個基類,然后自己去定義標題欄的樣式就可以就可以了。
下面來講一下這個界面是怎么實現的:
首先定義一個類BaseActivity:
public class BaseActivity extends AppCompatActivity implements View.OnClickListener{

  private TextView mTitleTextView;//標題
  private TextView close_tv;//
  protected TextView commint_tv;
  @Override
  protected void onCreate(Bundle savedInstanceState) {
    super.onCreate(savedInstanceState);
    getWindow().requestFeature(Window.FEATURE_NO_TITLE);
    //將界面加入到棧中,方便管理
    MyApplication.getInstance().addActivity(this);
    initViews();
  }


  private void initViews() {
    super.setContentView(R.layout.activity_abstract_title);
    mTitleTextView = (TextView) findViewById(R.id.action_bar_title_tv);
    mContentLayout = (FrameLayout) findViewById(R.id.layout_content);
     close_tv = ((TextView) findViewById(R.id.action_bar_close_tv));
    ImageView back_ic = (ImageView) findViewById(R.id.action_bar_back_iv);
     commint_tv = (TextView) findViewById(R.id.action_bar_comint_tv);
     back_ic.setOnClickListener(this);
    mTitleTextView.setOnClickListener(this);
  }

  // 返回鍵返回事件
  @Override
  public boolean onKeyDown(int keyCode, KeyEvent event) {
    if (KeyEvent.KEYCODE_BACK == keyCode) {
      onBackPressed();
    }
    return super.onKeyDown(keyCode, event);
  }

  public boolean onTouchEvent(MotionEvent event) {
    if(null != this.getCurrentFocus()){
      /**
       * 點擊空白位置 隱藏軟鍵盤
       */
      InputMethodManager mInputMethodManager = (InputMethodManager) getSystemService(INPUT_METHOD_SERVICE);
      return mInputMethodManager.hideSoftInputFromWindow(this.getCurrentFocus().getWindowToken(), 0);
    }
    return super .onTouchEvent(event);
  }

  /**
   * 顯示關閉按鈕
   */
  public void showCloseBT(){
    if (close_tv!=null){
      close_tv.setVisibility(View.VISIBLE);
      close_tv.setOnClickListener(this);
    }
  }
  /**
   * 顯示提交按鈕按鈕
   */

  public void showCommintBT(String s){
    if (commint_tv!=null){
      commint_tv.setVisibility(View.VISIBLE);
      commint_tv.setOnClickListener(this);
      commint_tv.setText(s);
    }
  }


  /**
   * 返回按鈕點擊后觸發
   */
  protected void onLeftBackward() {
    onBackPressed();
  }

  /**
   * 右邊提交按鈕點擊后觸發
   */
  protected void onRightForward() {

  }
  /**
   * 提交關閉按鈕點擊后觸發
   */
  protected void onLeftCloseword(){
    Intent intent = new Intent(this, MainActivity.class);
    intent.putExtra("tabpos", 2);
    startActivity(intent);
    finish();
  }
  //設置標題內容
  @Override
  public void setTitle(int titleId) {
    mTitleTextView.setText(titleId);
  }

  //設置標題內容
  @Override
  public void setTitle(CharSequence title) {
    mTitleTextView.setText(title);
  }

//點擊標題時出發的事件操作
  public void onTitle() {

  }

  //取出FrameLayout并調用父類removeAllViews()方法
  @Override
  public void setContentView(int layoutResID) {
    mContentLayout.removeAllViews();
    View.inflate(this, layoutResID, mContentLayout);
    onContentChanged();
  }

  @Override
  public void setContentView(View view){
    mContentLayout.removeAllViews();
    mContentLayout.addView(view);
    onContentChanged();
  }

  @Override
  public void onClick(View v) {
    switch (v.getId()) {
      case R.id.action_bar_back_iv:
        onLeftBackward();
        break;
      case R.id.action_bar_comint_tv:
        onRightForward();
        break;
      case R.id.action_bar_close_tv:
        onLeftCloseword();
      case R.id.action_bar_title_tv:
        onTitle();
      default:
        break;
    }
  }

}
這樣的話別的Activity去繼承BaseActivity的時候,只需要去設置是否顯示某個按鈕即可,標題欄各個按鈕的點擊事件不需要去設置,直接重寫
onLeftBackward();onRightForward();onRightForward();onTitle();
然后對應各自的方法就可以了。
下面給出布局文件activity_abstract_title.xml:
<?xml version="1.0" encoding="utf-8"?>
<LinearLayout xmlns:android="http://schemas.android.com/apk/res/android"
  android:layout_width="match_parent"
  android:layout_height="match_parent"
  android:orientation="vertical" >
  <!-- Title -->
  <include layout="@layout/actionbar_layout" />
  <FrameLayout
    android:id="@+id/layout_content"
    android:layout_width="match_parent"
    android:layout_height="match_parent"
    android:background="#fff" >
  </FrameLayout>

</LinearLayout>
actionbar_layout.xml文件
<?xml version="1.0" encoding="utf-8"?>
<RelativeLayout xmlns:android="http://schemas.android.com/apk/res/android"
  android:id="@+id/layout_titlebar"
  android:layout_width="match_parent"
  android:layout_height="40dp"
  android:background="#2B2B2B">

  <TextView
    android:id="@+id/action_bar_title_tv"
    android:layout_width="180dp"
    android:layout_height="match_parent"
    android:ellipsize="marquee"
    android:gravity="center_horizontal|center"
    android:lines="1"
    android:textColor="#fff"
    android:focusable="true"
    android:marqueeRepeatLimit="marquee_forever"
    android:layout_centerInParent="true"
    android:focusableInTouchMode="true"
    android:scrollHorizontally="true"
    android:textSize="18sp" />

  <ImageView
    android:contentDescription="@string/cancel"
    android:id="@+id/action_bar_back_iv"
    android:layout_width="wrap_content"
    android:layout_height="wrap_content"
    android:layout_centerVertical="true"
    android:padding="10dp"
    android:textSize="15sp"
    android:textStyle="bold"
    android:textColor="#fff"
    android:src="@drawable/arrow_left" />

  <TextView
    android:layout_toEndOf="@id/action_bar_back_iv"
    android:text="@string/action_bar_close"
    android:id="@+id/action_bar_close_tv"
    android:textColor="#fff"
    android:visibility="invisible"
    android:textSize="15sp"
    android:textStyle="bold"
    android:layout_width="wrap_content"
    android:layout_height="match_parent"
    android:padding="10dp"/>
  <TextView
    android:visibility="invisible"
    android:padding="10dp"
    android:layout_alignParentEnd="true"
    android:text="@string/action_bar_commint"
    android:id="@+id/action_bar_comint_tv"
    android:textSize="15sp"
    android:textColor="#fff"
    android:textStyle="bold"
    android:layout_marginEnd="3dp"
    android:layout_width="wrap_content"
    android:layout_height="match_parent" />
</RelativeLayout>
下面是一個簡單的應用:
public class DemoActivity extends MyBaseActivity {

  @Override
  protected void onCreate(Bundle savedInstanceState) {
    super.onCreate(savedInstanceState);
    setTitle("APPBaseActivity");//設置標題
    showCloseBT();//顯示關閉按鈕,默認時隱藏的

  }


    //如果返回按鈕有其他操作的話可以重寫
  @Override
  protected void onLeftBackward() {
    super.onLeftBackward();
    //里面寫事件就可以
  }
}
以上就是本文的全部內容,希望對大家的學習有所幫助,也希望大家多多支持億速云。
免責聲明:本站發布的內容(圖片、視頻和文字)以原創、轉載和分享為主,文章觀點不代表本網站立場,如果涉及侵權請聯系站長郵箱:is@yisu.com進行舉報,并提供相關證據,一經查實,將立刻刪除涉嫌侵權內容。