溫馨提示×
您好,登錄后才能下訂單哦!
點擊 登錄注冊 即表示同意《億速云用戶服務條款》
您好,登錄后才能下訂單哦!
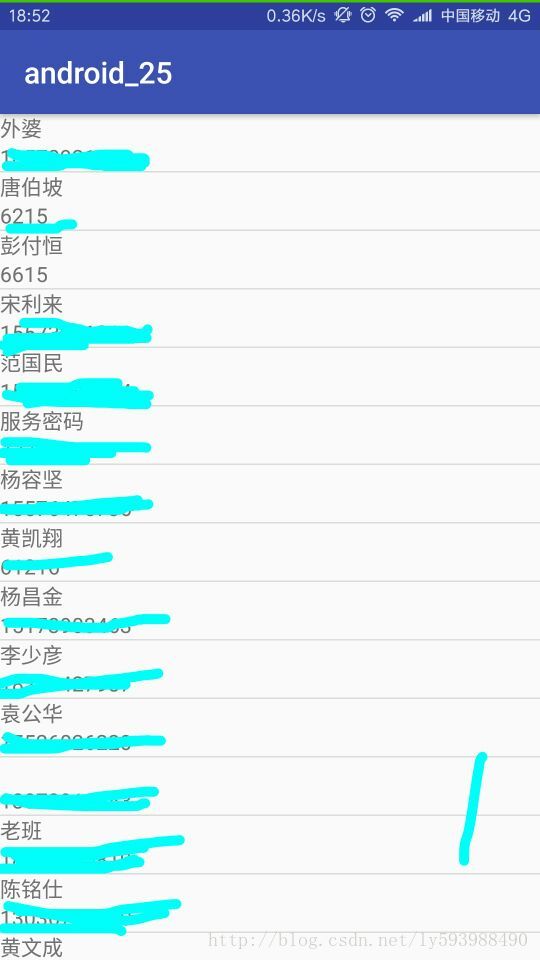
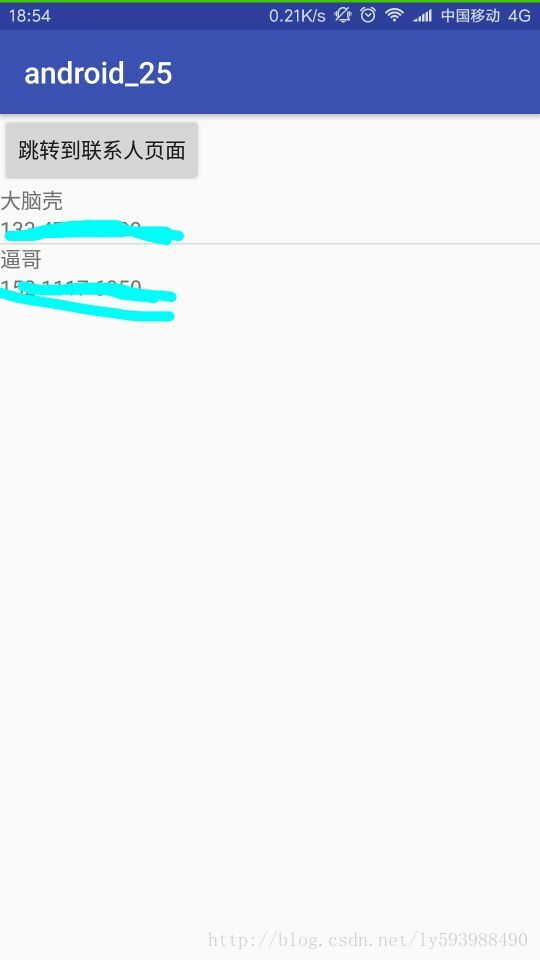
利用ContentResolver內容訪問者,獲取手機聯系人信息我做了兩種不同的做法。第一種,直接獲取所有手機聯系人信息,展示在ListView中。第二種,通過Butten按鈕跳轉到系統的手機聯系人界面,單個獲取手機聯系人信息,展示在ListView中,結果如下:
第一種:

第二種:

第一種:直接獲取所有手機聯系人信息
首先需要在AndroidManifest.xml文件中添加權限:
<uses-permission android:name="android.permission.READ_CONTACTS" />

  activity_main.xml布局:
  <LinearLayout xmlns:android="http://schemas.android.com/apk/res/android"
    xmlns:tools="http://schemas.android.com/tools"
    android:id="@+id/activity_main"
    android:layout_width="match_parent"
    android:layout_height="match_parent"
    android:orientation="vertical"
    tools:context="com.example.android_25.MainActivity">

    <ListView
      android:layout_width="wrap_content"
      android:layout_height="wrap_content"
      android:id="@+id/lv_lxr"
      >
    </ListView>
  </LinearLayout>
activity_xs.xml布局:
<LinearLayout xmlns:android="http://schemas.android.com/apk/res/android"
    xmlns:tools="http://schemas.android.com/tools"
    android:id="@+id/activity_xs"
    android:layout_width="match_parent"
    android:layout_height="match_parent"
    android:orientation="vertical"
    tools:context="com.example.android_25.XsActivity">
  <TextView
      android:layout_width="match_parent"
      android:layout_height="wrap_content"
      android:id="@+id/tv_name"
    />
    <TextView
      android:layout_width="match_parent"
      android:layout_height="wrap_content"
      android:id="@+id/tv_telephone"
    />
  </LinearLayout>
MainActivity類:
private ListView lv_lxr;
private Button b_name;
private ContentResolver cr;
private List<Map<String, Object>> datalistView;

@Override
protected void onCreate(Bundle savedInstanceState) {
  super.onCreate(savedInstanceState);
  setContentView(R.layout.activity_main);
  //獲得ListView
  lv_lxr = (ListView) findViewById(R.id.lv_lxr);
  //得到訪問者
  cr = getContentResolver();
  //定義一個接收聯系人姓名和電話號碼的集合
  datalistView = new ArrayList<>();
      Uri uri=Uri.parse("content://com.android.contacts/raw_contacts");
      Cursor cursor= cr.query(uri,null,null,null,null);
      while(cursor.moveToNext()){
        int id=cursor.getInt(cursor.getColumnIndex("_id"));
        Uri uriData=Uri.parse("content://com.android.contacts/raw_contacts/"+id+"/data");
        Cursor contactData= cr.query(uriData,null,null,null,null);
        //用來裝姓名
        String aa="";
        //用來裝號碼
        String bb="";
        while(contactData.moveToNext()){
          String type=contactData.getString(contactData.getColumnIndex("mimetype"));
          //如果獲取的是vnd.android.cursor.item/phone_v2則是號碼
          if(type.equals("vnd.android.cursor.item/phone_v2")){
            bb=contactData.getString(contactData.getColumnIndex("data1"));
            //如果獲取的是vnd.android.cursor.item/name則是姓名
          }else if(type.equals("vnd.android.cursor.item/name")) {
            aa=contactData.getString(contactData.getColumnIndex("data1"));
          }
        }
        //將用戶名和號碼放入Map集合中
        Map<String,Object> map=new HashMap<>();
        map.put("images",aa);
        map.put("titles",bb);
        datalistView.add(map);
      }
  SimpleAdapter adapter=new SimpleAdapter(this, datalistView,R.layout.activity_xs,new String[]{"images","titles"},new int[]{R.id.tv_name,R.id.tv_telephone});
  lv_lxr.setAdapter(adapter);
}
第二種:通過Butten按鈕跳轉到系統的手機聯系人界面,單個獲取手機聯系人信息,展示在ListView中
activity_contacts.xml布局:
<LinearLayout xmlns:android="http://schemas.android.com/apk/res/android"
      xmlns:tools="http://schemas.android.com/tools"
      android:id="@+id/activity_contacts"
      android:layout_width="match_parent"
      android:layout_height="match_parent"
      android:orientation="vertical"
      tools:context="com.example.android_25.ContactsActivity">
    <LinearLayout
      android:layout_width="match_parent"
      android:layout_height="wrap_content">
        <Button
          android:layout_width="wrap_content"
          android:layout_height="wrap_content"
          android:text="跳轉到聯系人頁面"
          android:id="@+id/b_tzcontacts"
          />
    </LinearLayout>
    <ListView
      android:layout_width="wrap_content"
      android:layout_height="wrap_content"
        android:id="@+id/lv_contacts"
      ></ListView>
</LinearLayout>
ContactsActivity類:
private Button b_tzcontacts;
private String phoneName;
private String phoneNumber;
private List<Map<String,Object>> datalistView;
private ListView lv_contacts;
private SimpleAdapter adapter;

@Override
protected void onCreate(Bundle savedInstanceState) {
  super.onCreate(savedInstanceState);
  setContentView(R.layout.activity_contacts);
  //獲得跳轉到聯系人的id
  b_tzcontacts =(Button) findViewById(R.id.b_tzcontacts);
  //獲得ListView的ID
  lv_contacts =(ListView) findViewById(R.id.lv_contacts);
  //定義一個接受聯系人姓名和電話號碼的集合
  datalistView = new ArrayList<>();
  //獲取聯系人的點擊事件
  b_tzcontacts.setOnClickListener(new View.OnClickListener() {
    @Override
    public void onClick(View view) {
      Intent intentPhone=new Intent(Intent.ACTION_PICK);
      intentPhone.setData(ContactsContract.Contacts.CONTENT_URI);
      startActivityForResult(intentPhone,0);
    }
  });
  //R.layout.activity_xs就是上文的activity_xs布局問價
  adapter = new SimpleAdapter(this, datalistView, R.layout.activity_xs,new String[]{"images","titles"},new int[]{R.id.tv_name,R.id.tv_telephone});
  lv_contacts.setAdapter(adapter);
}


  //獲得返回的結果
@Override
protected void onActivityResult(int requestCode, int resultCode, Intent data) {
  super.onActivityResult(requestCode, resultCode, data);
  switch (requestCode){
    case 0:
      if(resultCode== Activity.RESULT_OK){
        Uri uri=data.getData();
        Cursor cursor=managedQuery(uri,null,null,null,null);
        cursor.moveToFirst();
        String contactid=cursor.getString(cursor.getColumnIndex(ContactsContract.Contacts._ID));
        //得到ContentResolver
        ContentResolver contentResolver=getContentResolver();
        Cursor phone=contentResolver.query(ContactsContract.CommonDataKinds.Phone.CONTENT_URI,null,ContactsContract.CommonDataKinds.Phone.CONTACT_ID+"="+contactid,null,null);
        while (phone.moveToNext()){
          //聯系人
          phoneName =phone.getString(phone.getColumnIndex(ContactsContract.CommonDataKinds.Phone.DISPLAY_NAME));
          //手機號碼
          phoneNumber =phone.getString(phone.getColumnIndex(ContactsContract.CommonDataKinds.Phone.NUMBER));
          //格式化手機號
          phoneNumber = phoneNumber.replace("-","");
          phoneNumber = phoneNumber.replace("","");
          //將用戶名和號碼放入Map集合中
          Map<String,Object> map=new HashMap<>();
          map.put("images",phoneName);
          map.put("titles",phoneNumber);
          datalistView.add(map);
        }
        //刷新適配器
        adapter.notifyDataSetChanged();
      }
      break;
  }

}
以上就是本文的全部內容,希望對大家的學習有所幫助,也希望大家多多支持億速云。
免責聲明:本站發布的內容(圖片、視頻和文字)以原創、轉載和分享為主,文章觀點不代表本網站立場,如果涉及侵權請聯系站長郵箱:is@yisu.com進行舉報,并提供相關證據,一經查實,將立刻刪除涉嫌侵權內容。