溫馨提示×
您好,登錄后才能下訂單哦!
點擊 登錄注冊 即表示同意《億速云用戶服務條款》
您好,登錄后才能下訂單哦!
這期內容當中小編將會給大家帶來有關Android應用中怎么實現一個導航鍵透明效果,文章內容豐富且以專業的角度為大家分析和敘述,閱讀完這篇文章希望大家可以有所收獲。
MainActivity代碼
public class MainActivity extends AppCompatActivity {
  @Override
  protected void onCreate(Bundle savedInstanceState) {
    super.onCreate(savedInstanceState);
    // 隱藏標題欄
    supportRequestWindowFeature(Window.FEATURE_NO_TITLE);
    View root = LayoutInflater.from(this).inflate(R.layout.activity_main, null);
    // 或者 在界面的根層加入 android:fitsSystemWindows=”true” 這個屬性,這樣就可以讓內容界面從 狀態欄 下方開始。
    ViewCompat.setFitsSystemWindows(root, true);
    setContentView(root);
    if (Build.VERSION.SDK_INT >= Build.VERSION_CODES.LOLLIPOP) {
      // Android 5.0 以上 全透明
      Window window = getWindow();
      window.clearFlags(WindowManager.LayoutParams.FLAG_TRANSLUCENT_STATUS
          | WindowManager.LayoutParams.FLAG_TRANSLUCENT_NAVIGATION);
      window.getDecorView().setSystemUiVisibility(View.SYSTEM_UI_FLAG_LAYOUT_FULLSCREEN
          | View.SYSTEM_UI_FLAG_LAYOUT_HIDE_NAVIGATION
          | View.SYSTEM_UI_FLAG_LAYOUT_STABLE);
      window.addFlags(WindowManager.LayoutParams.FLAG_DRAWS_SYSTEM_BAR_BACKGROUNDS);
      // 狀態欄(以上幾行代碼必須,參考setStatusBarColor|setNavigationBarColor方法源碼)
      window.setStatusBarColor(Color.TRANSPARENT);
      // 虛擬導航鍵
      window.setNavigationBarColor(Color.TRANSPARENT);
    } else if (Build.VERSION.SDK_INT >= Build.VERSION_CODES.KITKAT) {
      // Android 4.4 以上 半透明
      Window window = getWindow();
      // 狀態欄
      window.addFlags(WindowManager.LayoutParams.FLAG_TRANSLUCENT_STATUS);
      // 虛擬導航鍵
      window.addFlags(WindowManager.LayoutParams.FLAG_TRANSLUCENT_NAVIGATION);
    }
  }
}
activity_main.xml代碼:
<?xml version="1.0" encoding="utf-8"?>
<RelativeLayout
  xmlns:android="http://schemas.android.com/apk/res/android"
  android:id="@+id/activity_main"
  android:layout_width="match_parent"
  android:layout_height="match_parent"
  android:background="@color/colorPrimary"
  >
  <TextView
    android:layout_width="wrap_content"
    android:layout_height="wrap_content"
    android:text="Hello World!"
    />
</RelativeLayout>
5.0以上的幾行代碼不是很懂,從源碼看是需要添加的,以后找到這幾個方法是做什么用的再回來注明
setStatusBarColor源碼
/**
   * Sets the color of the status bar to {@code color}.
   *
   * For this to take effect,
   * the window must be drawing the system bar backgrounds with
   * {@link android.view.WindowManager.LayoutParams#FLAG_DRAWS_SYSTEM_BAR_BACKGROUNDS} and
   * {@link android.view.WindowManager.LayoutParams#FLAG_TRANSLUCENT_STATUS} must not be set.
   *
   * If {@code color} is not opaque, consider setting
   * {@link android.view.View#SYSTEM_UI_FLAG_LAYOUT_STABLE} and
   * {@link android.view.View#SYSTEM_UI_FLAG_LAYOUT_FULLSCREEN}.
   * <p>
   * The transitionName for the view background will be "android:status:background".
   * </p>
   */
  public abstract void setStatusBarColor(@ColorInt int color);
setNavigationBarColor源碼方法
 /**
   * Sets the color of the navigation bar to {@param color}.
   *
   * For this to take effect,
   * the window must be drawing the system bar backgrounds with
   * {@link android.view.WindowManager.LayoutParams#FLAG_DRAWS_SYSTEM_BAR_BACKGROUNDS} and
   * {@link android.view.WindowManager.LayoutParams#FLAG_TRANSLUCENT_NAVIGATION} must not be set.
   *
   * If {@param color} is not opaque, consider setting
   * {@link android.view.View#SYSTEM_UI_FLAG_LAYOUT_STABLE} and
   * {@link android.view.View#SYSTEM_UI_FLAG_LAYOUT_HIDE_NAVIGATION}.
   * <p>
   * The transitionName for the view background will be "android:navigation:background".
   * </p>
   */
  public abstract void setNavigationBarColor(@ColorInt int color);
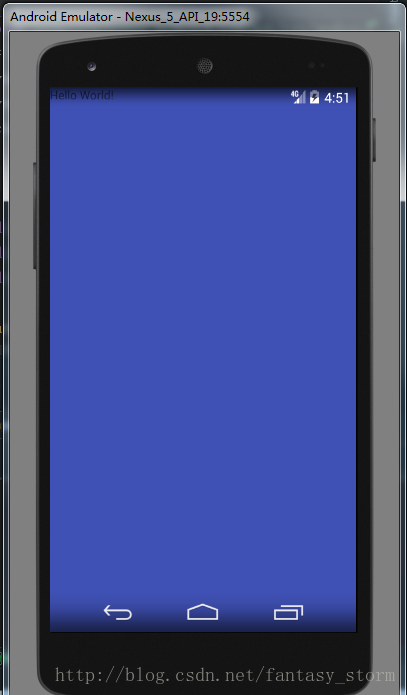
fitsSystemWindows屬性需設置為true,否則布局會和狀態欄重疊
如圖:

兩種方式:
方式一(xml文件根布局添加屬性):
Android:fitsSystemWindows=”true”
方式二(代碼中設置):
ViewCompat.setFitsSystemWindows(rootView, true);
其實還有第三種方式解決此問題,獲取狀態欄高度,在最上設置一個等高的View
/**
   * 獲取狀態欄高度
   * @return
   */
  public int getStatusBarHeight() {
    int statusBarHeight = 0;
    int resourceId = getResources().getIdentifier("status_bar_height", "dimen", "android");
    if (resourceId > 0) {
      statusBarHeight = getResources().getDimensionPixelSize(resourceId);
    }
    return statusBarHeight;
  }
上述就是小編為大家分享的Android應用中怎么實現一個導航鍵透明效果了,如果剛好有類似的疑惑,不妨參照上述分析進行理解。如果想知道更多相關知識,歡迎關注億速云行業資訊頻道。
免責聲明:本站發布的內容(圖片、視頻和文字)以原創、轉載和分享為主,文章觀點不代表本網站立場,如果涉及侵權請聯系站長郵箱:is@yisu.com進行舉報,并提供相關證據,一經查實,將立刻刪除涉嫌侵權內容。