您好,登錄后才能下訂單哦!
您好,登錄后才能下訂單哦!
拖延癥最可怕的地方就是:就算自己這邊沒有拖延,但對方也會拖延,進而導致自己這邊也開始拖延起來!現在這個項目我這邊已經是完工了,但是對方遲遲沒有搞定,導致整個項目無法提交。
這就是拖延癥的可怕:我們不僅是與自己的拖延癥作戰,而是與所有有關人士的拖延癥作戰,決定項目是否能夠提交,在于那個最慢的人。
既然決定權已經不在我的手上,那么我也可以做做其他事情,像是現在這樣寫寫博客。
這次就介紹一下ListView中比較簡單但又非常方便的ArrayAdapter。
ArrayAdapter是BaseAdapter的派生類,在BaseAdapter的基礎上,添加了一項重大的功能:可以直接使用泛型構造。
我們先來看一個簡單的例子:
@Override
  protected void onCreate(Bundle savedInstanceState) {
    super.onCreate(savedInstanceState);
    setContentView(R.layout.activity_main);
    ListView listView = (ListView) this.findViewById(R.id.list);
    UserAdapter adapter = new UserAdapter(this, R.layout.list_item);
    adapter.add(new User(10, "小智", "男"));
    adapter.add(new User(10, "小霞", "女"));
    listView.setAdapter(adapter);
  }
  @Override
  public boolean onCreateOptionsMenu(Menu menu) {
    // Inflate the menu; this adds items to the action bar if it is present.
    getMenuInflater().inflate(R.menu.main, menu);
    return true;
  }
  class UserAdapter extends ArrayAdapter<User> {
    private int mResourceId;
    public UserAdapter(Context context, int textViewResourceId) {
      super(context, textViewResourceId);
      this.mResourceId = textViewResourceId;
    }
    @Override
    public View getView(int position, View convertView, ViewGroup parent) {
      User user = getItem(position);
      LayoutInflater inflater = getLayoutInflater();
      View view = inflater.inflate(mResourceId, null);
      TextView nameText = (TextView) view.findViewById(R.id.name);
      TextView ageText = (TextView) view.findViewById(R.id.age);
      TextView sexText = (TextView) view.findViewById(R.id.sex);
      nameText.setText(user.getName());
      ageText.setText(user.getAge());
      sexText.setText(user.getSex());
      return view;
    }
  }
  class User {
    private int mAge;
    private String mName;
    private String mSex;
    public User(int age, String name, String sex) {
      this.mAge = age;
      this.mName = name;
      this.mSex = sex;
    }
    public String getName() {
      return this.mName;
    }
    public String getAge() {
      return this.mAge + "";
    }
    public String getSex() {
      return this.mSex;
    }
  }
這里自定義了一個ArrayAdapter,有關于Adapter的使用在之前的SimpleAdapter中已經涉及到了,所以這里直接就是以自定義的ArrayAdapter作為例子。
我們這里需要將學生的信息羅列出來,需要三個TextView:
<?xml version="1.0" encoding="utf-8"?>
<LinearLayout xmlns:android="http://schemas.android.com/apk/res/android"
  android:layout_width="match_parent"
  android:layout_height="match_parent"
  android:orientation="vertical" >
  <TextView
    android:id="@+id/name"
    android:layout_width="wrap_content"
    android:layout_height="wrap_content" />
  <TextView
    android:id="@+id/age"
    android:layout_width="wrap_content"
    android:layout_height="wrap_content" />
  <TextView
    android:id="@+id/sex"
    android:layout_width="wrap_content"
    android:layout_height="wrap_content" />
</LinearLayout>

在自定義ArrayAdapter的時候,最神奇的地方就是我們可以指定ArrayAdapter綁定的數據類型,可以是基本數據類型,也可以是自定義的對象類型,像是這次的User類型。對于自定義的ArrayAdapter的構造方法,存在很多形式,這次是傳進一個View的資源Id,但是我們也可以指定綁定的數據類型。
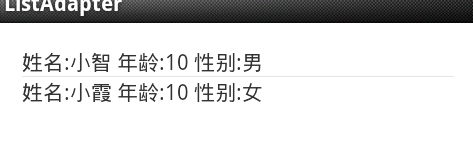
ArrayAdapter的神奇之處就是我們竟然可以像是操作Array一樣來操作ArrayAdapter!像是例子中的添加操作,而其他的適配器都是需要傳進一個容器的。ArrayAdapter為什么可以處理對象類型的數據呢?其實,ArrayAdapter是使用數組中對象的toString()方法來填充指定的TextView,所以我們可以通過重寫對象的toString()方法來自定義ListView的顯示。
@Override
    public View getView(int position, View convertView, ViewGroup parent) {
      User user = getItem(position);
      LayoutInflater inflater = getLayoutInflater();
      View view = inflater.inflate(mResourceId, null);
      TextView text = (TextView) view.findViewById(R.id.info);
      text.setText(user.toString());
      return view;
    }
   class User {
     private int mAge;
     private String mName;
     private String mSex;
     public User(int age, String name, String sex) {
       this.mAge = age;
       this.mName = name;
       this.mSex = sex;
     }
    @Override
    public String toString() {
      return "姓名:" + mName + " " + "年齡:" + mAge + " " + "性別:" + mSex;
    }
  }
這樣我們可以只在一行中顯示所有數據。

使用ArrayAdapter最大的疑問就是我們是否需要將一個現成的容器傳入ArrayAdapter中?原本ArrayAdapter本身就用一般容器的基本操作,像是添加新的元素等,但它本身并不能完成當成容器使用,我們更多的時候是要將一個容器中的元素交給ArrayAdapter,由后者決定它的顯示形式。
class UserAdapter extends ArrayAdapter<User> {
    private int mResourceId;
    public UserAdapter(Context context, int textViewResourceId,
        List<User> users) {
      super(context, textViewResourceId, users);
      this.mResourceId = textViewResourceId;
    }
    @Override
    public View getView(int position, View convertView, ViewGroup parent) {
      User user = getItem(position);
      LayoutInflater inflater = getLayoutInflater();
      View view = inflater.inflate(mResourceId, null);
      TextView text = (TextView) view.findViewById(R.id.info);
      text.setText(user.toString());
      return view;
    }
  }
List<User> users = new ArrayList<User>();
users.add(new User(10, "小智", "男"));
users.add(new User(10, "小霞", "女"));
UserAdapter adapter = new UserAdapter(this, R.layout.list_item, users);
listView.setAdapter(adapter);
如果我們將ArrayAdapter綁定的數據類型定義為Object,我們可以自由的傳入任何類型的容器而不需要任何有關類型轉換的操作!
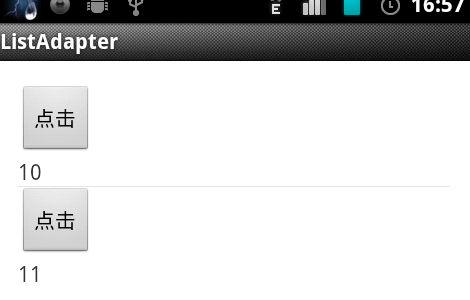
ArrayAdapter不僅僅是可以顯示TextView,它當讓也像是其他Adapter一樣,可以顯示任何其他非TextView的組件:
@Override
  protected void onCreate(Bundle savedInstanceState) {
    super.onCreate(savedInstanceState);
    setContentView(R.layout.activity_main);
    ListView listView = (ListView) this.findViewById(R.id.list);
    List<Object> users = new ArrayList<Object>();
    users.add(10);
    users.add(11);
    UserAdapter adapter = new UserAdapter(this, R.layout.list_item,
        R.id.info, users);
    listView.setAdapter(adapter);
  }
  @Override
  public boolean onCreateOptionsMenu(Menu menu) {
    // Inflate the menu; this adds items to the action bar if it is present.
    getMenuInflater().inflate(R.menu.main, menu);
    return true;
  }
  class UserAdapter extends ArrayAdapter<Object> {
    private int mResourceId;
    public UserAdapter(Context context, int resourceId,
        int textViewResourceId, List<Object> users) {
      super(context, resourceId, textViewResourceId, users);
      this.mResourceId = resourceId;
    }
    @Override
    public View getView(int position, View convertView, ViewGroup parent) {
      Object user = getItem(position);
      LayoutInflater inflater = getLayoutInflater();
      View view = inflater.inflate(mResourceId, null);
      TextView text = (TextView) view.findViewById(R.id.info);
      text.setText(user.toString());
      return view;
    }
  }
<?xml version="1.0" encoding="utf-8"?>
<LinearLayout xmlns:android="http://schemas.android.com/apk/res/android"
  android:layout_width="match_parent"
  android:layout_height="match_parent"
  android:orientation="vertical" >
  <Button
    android:layout_width="wrap_content"
    android:layout_height="wrap_content"
    android:text="點擊" />
  <TextView
    android:id="@+id/info"
    android:layout_width="wrap_content"
    android:layout_height="wrap_content" />
</LinearLayout>

如果我們的布局中需要其他組件,必須指定該布局中用于顯示ArrayAdapter中數據的TextView的Id。
如果只是方便綁定數據的話,其實是沒有必要專門獨立個ArrayAdapter出來,只要覆寫getView()就可以,正如使用容器就是為了方便大量數據的處理一樣的道理,使用ArrayAdapter也是為了處理數據較大的情況,像是超過100條或者頻繁動態增刪數據時,就可以使用ArrayAdapter,而且,為了方便我們刷新UI,ArrayAdapter也提供了setNotifyOnChange()方法,這樣可以降低UI的處理量,使得刷新UI更加快速,主要是通過停止對add,insert,remove和clear的操作來實現這點。
總結
以上就是本文關于簡單好用的Adapter---ArrayAdapter詳解的全部內容,希望對大家有所幫助。感興趣的朋友可以繼續參閱本站:python好玩的項目—色情圖片識別代碼分享、Python實現一個簡單的驗證碼程序、Python生成數字圖片代碼分享等,有什么問題可以隨時留言,陪伴是最長情的告白,感謝大家一直以來對本站的支持!
免責聲明:本站發布的內容(圖片、視頻和文字)以原創、轉載和分享為主,文章觀點不代表本網站立場,如果涉及侵權請聯系站長郵箱:is@yisu.com進行舉報,并提供相關證據,一經查實,將立刻刪除涉嫌侵權內容。