您好,登錄后才能下訂單哦!
您好,登錄后才能下訂單哦!
這篇文章給大家分享的是有關Spring boot + mybatis + orcale怎么實現的內容。小編覺得挺實用的,因此分享給大家做個參考,一起跟隨小編過來看看吧。
添加 mybatis 查詢 orcale 數據庫
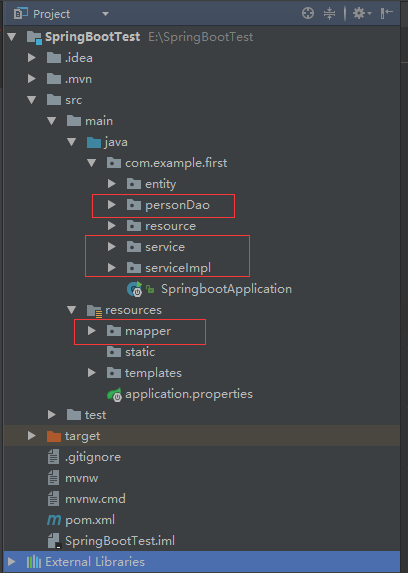
第一步: 新建幾個必須的包, 結果如下

第二步: 在service包下新建personService.java 根據名字查person方法接口
package com.example.first.service;
import com.example.first.entity.Person;
public interface personService {
 Person queryPersonByName(String name);
}
第三步: 在serviceImpl包下新建personServiceImpl.java 實現personService.java接口
package com.example.first.serviceImpl;
import com.example.first.personDao.personMapperDao;
import com.example.first.entity.Person;
import com.example.first.service.personService;
import org.springframework.beans.factory.annotation.Autowired;
import org.springframework.stereotype.Service;
import org.springframework.transaction.annotation.Transactional;
@Service
@Transactional
public class personServiceImpl implements personService {
 @Autowired
 personMapperDao personMapperDao;
 @Override
 public Person queryPersonByName(String name) {
  Person person = personMapperDao.findByName(name);
  return person;
 }
}
第四步: personDao下新建personMapperDao.java 有一個查詢person的方法
package com.example.first.personDao;
import com.example.first.entity.Person;
import org.apache.ibatis.annotations.Mapper;
@Mapper
public interface personMapperDao {
 Person findByName(String name);
}
第五步: 在resource下新建personMapper.xml
<?xml version="1.0" encoding="UTF-8" ?>
<!DOCTYPE mapper PUBLIC "-//mybatis.org//DTD Mapper 3.0//EN" "http://mybatis.org/dtd/mybatis-3-mapper.dtd" >
<mapper namespace="com.example.first.personDao.personMapperDao">
 <resultMap id="findPerson" type="com.example.first.entity.Person">
  <result property="name" column="name"/>
  <result property="age" column="age"/>
 </resultMap>
 <select id="findByName" resultMap="findPerson">
  select name,age from person where name = #{name}
 </select>
</mapper>
第六步: 在application.properties 中添加數據源 , mapper文件路徑 和實體路徑
spring.jpa.database=oracle
spring.datasource.driver-class-name=oracle.jdbc.driver.OracleDriver
spring.datasource.url=jdbc:oracle:thin:@//192.168.3.177:1521/orcl
spring.datasource.username=liguang_dev
spring.datasource.password=123456
spring.jpa.hibernate.ddl-auto=update
mybatis.mapperLocations=classpath:/mapper/*.xml
mybatis.typeAliasesPackag= com.example.first.entity
spring.thymeleaf.prefix=classpath:/templates/
spring.thymeleaf.suffix=.html
spring.thymeleaf.mode = HTML5
第七步: 在pom文件中添加依賴
<?xml version="1.0" encoding="UTF-8"?>
<project xmlns="http://maven.apache.org/POM/4.0.0" xmlns:xsi="http://www.w3.org/2001/XMLSchema-instance"
 xsi:schemaLocation="http://maven.apache.org/POM/4.0.0 http://maven.apache.org/xsd/maven-4.0.0.xsd">
 <modelVersion>4.0.0</modelVersion>
 <groupId>com.example.first</groupId>
 <artifactId>springboot</artifactId>
 <version>0.0.1-SNAPSHOT</version>
 <packaging>jar</packaging>
 <name>springboot</name>
 <description>Demo project for Spring Boot</description>
 <parent>
  <groupId>org.springframework.boot</groupId>
  <artifactId>spring-boot-starter-parent</artifactId>
  <version>1.5.6.RELEASE</version>
  <relativePath/> <!-- lookup parent from repository -->
 </parent>
 <properties>
  <project.build.sourceEncoding>UTF-8</project.build.sourceEncoding>
  <project.reporting.outputEncoding>UTF-8</project.reporting.outputEncoding>
  <java.version>1.8</java.version>
 </properties>
 <dependencies>
  <dependency>
   <groupId>org.springframework.boot</groupId>
   <artifactId>spring-boot-starter-web</artifactId>
  </dependency>
  <dependency>
   <groupId>org.springframework.boot</groupId>
   <artifactId>spring-boot-starter-test</artifactId>
   <scope>test</scope>
  </dependency>
  <dependency>
   <groupId>org.springframework.boot</groupId>
   <artifactId>spring-boot-starter-thymeleaf</artifactId>
  </dependency>
  <!--orcale數據庫依賴-->
  <dependency>
   <groupId>oracle</groupId>
   <artifactId>ojdbc7</artifactId>
   <version>1.0.0.1</version>
  </dependency>
  <!--mybatis依賴-->
  <dependency>
   <groupId>org.mybatis.spring.boot</groupId>
   <artifactId>mybatis-spring-boot-starter</artifactId>
   <version>1.1.1</version>
  </dependency>
  <dependency>
   <groupId>org.springframework.boot</groupId>
   <artifactId>spring-boot-starter-jdbc</artifactId>
  </dependency>
 </dependencies>
 <build>
  <plugins>
   <plugin>
    <groupId>org.springframework.boot</groupId>
    <artifactId>spring-boot-maven-plugin</artifactId>
   </plugin>
  </plugins>
 </build>
</project>
第八步:瀏覽器輸入http://localhost:8080/person/show?name=zhang

感謝各位的閱讀!關于“Spring boot + mybatis + orcale怎么實現”這篇文章就分享到這里了,希望以上內容可以對大家有一定的幫助,讓大家可以學到更多知識,如果覺得文章不錯,可以把它分享出去讓更多的人看到吧!
免責聲明:本站發布的內容(圖片、視頻和文字)以原創、轉載和分享為主,文章觀點不代表本網站立場,如果涉及侵權請聯系站長郵箱:is@yisu.com進行舉報,并提供相關證據,一經查實,將立刻刪除涉嫌侵權內容。