您好,登錄后才能下訂單哦!
您好,登錄后才能下訂單哦!
這篇文章主要介紹Android如何實現通話最小化懸浮框效果,文中介紹的非常詳細,具有一定的參考價值,感興趣的小伙伴們一定要看完!
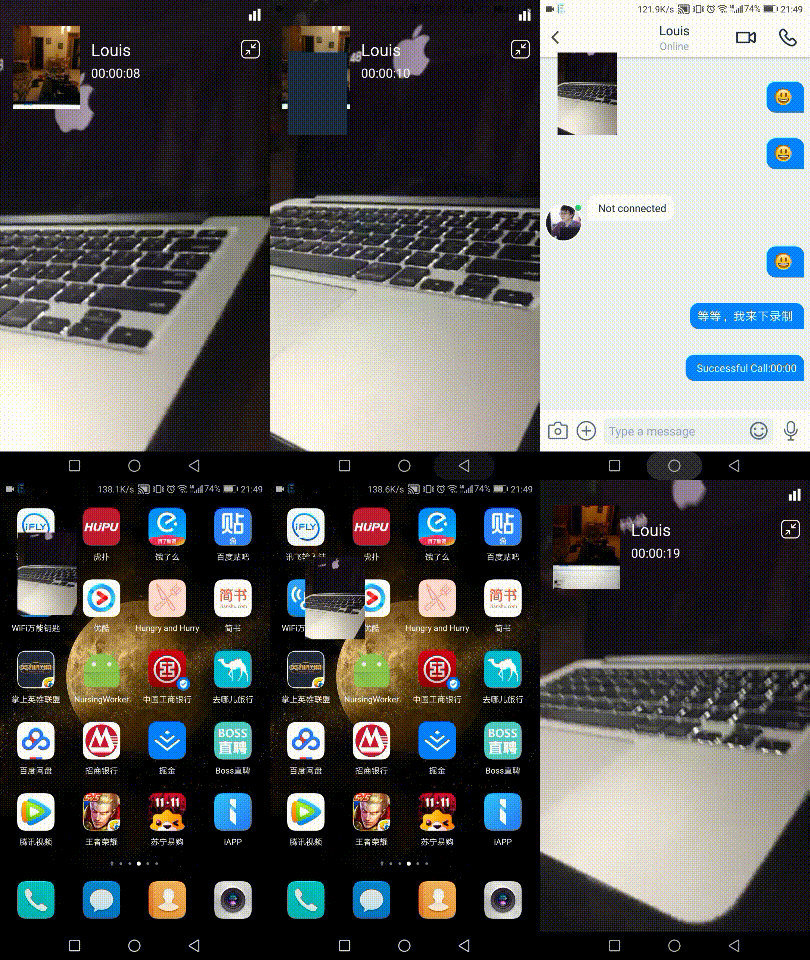
一、實現效果(gif效果可能錄制的不是特別好)


二、實現思路
關于這個功能的實現其實不難,這里我把實現思路拆分為了兩步:1、視頻通話Activity的最小化。 2、視頻通話懸浮框的開啟
具體思路是這樣的:當用戶點擊最小化按鈕的時候,最小化我們的視頻通話Activity(這時Activity處于后臺狀態),移除原先在Activity的視頻畫布(因為我用的是網易云信,這里他們只能允許一個視頻畫布存在,這里看情況要不要移除),于此同時,延時個幾百毫秒,開啟懸浮框,新建一個新的視頻畫布然后動態添加到懸浮框里面去,監聽懸浮框的觸摸事件,讓懸浮框可以拖拽移動;監聽懸浮框的點擊事件,如果用戶點擊了懸浮框,則移除懸浮框里面新建的那個視頻畫布,然后重新調起我們在后臺的視頻通話Activity,緊接著新建一個新的視頻畫布重新動態的添加到Activity里面去。關于視頻畫布的添加移除方法,這里要看一下所接入的第三方SDK,如用的若是網易云信的SDK,他們的方法如下(下面摘自他們的SDK說明文檔),也就是說移除畫布我只需要傳入null就行了。

1.Activity是如何實現最小化的?
Activity最小化可能你沒有聽過,但是只要姿勢對的話,其實實現起來非常簡單,因為Activity本身就自帶了一個moveTaskToBack(boolean nonRoot),如果我們要實現最小化,只需要調用moveTaskToBack(true)傳入一個true值就可以了,但是這里有一個前提,就是需要設置Activity的啟動模式為singleInstance模式,兩步搞定。(注:這里先記住一個小知識點,就是activity最小化后重新從后臺回到前臺會回調onRestart()方法)
@Override
public boolean moveTaskToBack(boolean nonRoot) {
return super.moveTaskToBack(nonRoot);
}
2.懸浮框是如何開啟的?
這里我把懸浮框的實現方法寫在一個服務Service里面,將懸浮框的開啟關閉與服務Service的綁定解綁所關聯起來,開啟服務即相當于開啟我們的懸浮框,解綁服務則相當于關閉關閉的懸浮框,以此來達到更好的控制效果。
a. 首先我們聲明一個服務類,取名為FloatVideoWindowService:
public class FloatVideoWindowService extends Service {

 @Nullable
 @Override
 public IBinder onBind(Intent intent) {
  return new MyBinder();
 }

 public class MyBinder extends Binder {
  public FloatVideoWindowService getService() {
   return FloatVideoWindowService.this;
  }
 }

 @Override
 public void onCreate() {
  super.onCreate();
 }

 @Override
 public int onStartCommand(Intent intent, int flags, int startId) {
  return super.onStartCommand(intent, flags, startId);
 }

 @Override
 public void onDestroy() {
  super.onDestroy();
 }
}
b. 為懸浮框建立一個布局文件alert_float_video_layout,這里根據需求去寫,如果只是像我上面gif那樣,只需要懸浮框顯示對方的視頻畫布,那么布局文件可以如下所示:(其中懸浮框大小我這里固定為長80dp,高110dp,id為small_size_preview的Linearlayout主要是一個容器,可以動態的添加view到里面去,也就是我們的視頻畫布)
<?xml version="1.0" encoding="utf-8"?>
<LinearLayout xmlns:android="http://schemas.android.com/apk/res/android"
 xmlns:app="http://schemas.android.com/apk/res-auto"
 android:layout_width="wrap_content"
 android:layout_height="wrap_content">

 <FrameLayout
  android:layout_width="80dp"
  android:layout_height="110dp"
  android:background="@color/black_1f2d3d">

  <LinearLayout
   android:id="@+id/small_size_preview"
   android:layout_width="match_parent"
   android:layout_height="match_parent"
   android:background="@color/transparent"
   android:orientation="vertical" />
 </FrameLayout>
</LinearLayout>
c. 布局定義好后,接下來就要對懸浮框做一些初始化操作了,初始化操作這里我們放在服務的onCreate()生命周期里面執行,因為只需要執行一次就行了。這里的初始化主要包括對:懸浮框的基本參數(位置,寬高等),懸浮框的點擊事件以及懸浮框的觸摸事件(即可拖動范圍)等的設置,代碼注釋已經很清楚,直接看代碼,如下所示:
public class FloatVideoWindowService extends Service {
 private WindowManager mWindowManager;
 private WindowManager.LayoutParams wmParams;
 private LayoutInflater inflater;

 //constant
 private boolean clickflag;

 //view
 private View mFloatingLayout; //浮動布局
 private LinearLayout smallSizePreviewLayout; //容器父布局

 @Nullable
 @Override
 public IBinder onBind(Intent intent) {
  return new MyBinder();
 }

 public class MyBinder extends Binder {
  public FloatVideoWindowService getService() {
   return FloatVideoWindowService.this;
  }
 }

 @Override
 public void onCreate() {
  super.onCreate();
  initWindow();//設置懸浮窗基本參數(位置、寬高等)
  initFloating();//懸浮框點擊事件的處理
 }

 @Override
 public int onStartCommand(Intent intent, int flags, int startId) {
  return super.onStartCommand(intent, flags, startId);
 }


 @Override
 public void onDestroy() {
  super.onDestroy();
 }

 /**
  * 設置懸浮框基本參數(位置、寬高等)
  */
 private void initWindow() {
  mWindowManager = (WindowManager) getApplicationContext().getSystemService(Context.WINDOW_SERVICE);
  wmParams = getParams();//設置好懸浮窗的參數
  // 懸浮窗默認顯示以左上角為起始坐標
  wmParams.gravity = Gravity.LEFT | Gravity.TOP;
  //懸浮窗的開始位置,因為設置的是從左上角開始,所以屏幕左上角是x=0;y=0
  wmParams.x = 70;
  wmParams.y = 210;
  //得到容器,通過這個inflater來獲得懸浮窗控件
  inflater = LayoutInflater.from(getApplicationContext());
  // 獲取浮動窗口視圖所在布局
  mFloatingLayout = inflater.inflate(R.layout.alert_float_video_layout, null);
  // 添加懸浮窗的視圖
  mWindowManager.addView(mFloatingLayout, wmParams);
 }


 private WindowManager.LayoutParams getParams() {
  wmParams = new WindowManager.LayoutParams();
  //設置window type 下面變量2002是在屏幕區域顯示,2003則可以顯示在狀態欄之上
  wmParams.type = WindowManager.LayoutParams.TYPE_TOAST;
  //設置可以顯示在狀態欄上
  wmParams.flags = WindowManager.LayoutParams.FLAG_NOT_FOCUSABLE | WindowManager.LayoutParams.FLAG_NOT_TOUCH_MODAL |
    WindowManager.LayoutParams.FLAG_LAYOUT_IN_SCREEN | WindowManager.LayoutParams.FLAG_LAYOUT_INSET_DECOR |
    WindowManager.LayoutParams.FLAG_WATCH_OUTSIDE_TOUCH;

  //設置懸浮窗口長寬數據
  wmParams.width = WindowManager.LayoutParams.WRAP_CONTENT;
  wmParams.height = WindowManager.LayoutParams.WRAP_CONTENT;
  return wmParams;
 }


 private void initFloating() {
  smallSizePreviewLayout = mFloatingLayout.findViewById(R.id.small_size_preview);

  //懸浮框點擊事件
  smallSizePreviewLayout.setOnClickListener(new View.OnClickListener() {
   @Override
   public void onClick(View v) {
     //在這里實現點擊重新回到Activity
   }
  });

  //懸浮框觸摸事件,設置懸浮框可拖動
  smallSizePreviewLayout.setOnTouchListener(new FloatingListener());
 }

 //開始觸控的坐標,移動時的坐標(相對于屏幕左上角的坐標)
 private int mTouchStartX, mTouchStartY, mTouchCurrentX, mTouchCurrentY;
 //開始時的坐標和結束時的坐標(相對于自身控件的坐標)
 private int mStartX, mStartY, mStopX, mStopY;
   //判斷懸浮窗口是否移動,這里做個標記,防止移動后松手觸發了點擊事件
 private boolean isMove;

 private class FloatingListener implements View.OnTouchListener {

  @Override
  public boolean onTouch(View v, MotionEvent event) {
   int action = event.getAction();
   switch (action) {
    case MotionEvent.ACTION_DOWN:
     isMove = false;
     mTouchStartX = (int) event.getRawX();
     mTouchStartY = (int) event.getRawY();
     mStartX = (int) event.getX();
     mStartY = (int) event.getY();
     break;
    case MotionEvent.ACTION_MOVE:
     mTouchCurrentX = (int) event.getRawX();
     mTouchCurrentY = (int) event.getRawY();
     wmParams.x += mTouchCurrentX - mTouchStartX;
     wmParams.y += mTouchCurrentY - mTouchStartY;
     mWindowManager.updateViewLayout(mFloatingLayout, wmParams);

     mTouchStartX = mTouchCurrentX;
     mTouchStartY = mTouchCurrentY;
     break;
    case MotionEvent.ACTION_UP:
     mStopX = (int) event.getX();
     mStopY = (int) event.getY();
     if (Math.abs(mStartX - mStopX) >= 1 || Math.abs(mStartY - mStopY) >= 1) {
      isMove = true;
     }
     break;
   }

   //如果是移動事件不觸發OnClick事件,防止移動的時候一放手形成點擊事件
   return isMove;
  }
 }
}
d. 在懸浮框成功被初始化以及相關參數被設置后,接下來就需要將對方的視頻畫布添加到懸浮框里面去了,這樣我們才能看到對方的視頻畫面嘛,同樣我們是在Service的oncreate這個生命周期完成這個操作的,這里視頻畫布的添加方式使用的網易云信的SDK,具體的添加方式視不同的SDK而定,代碼如下所示:
/**
  * 初始化預覽窗口
  */
 private void initSurface() {
  if (smallRender == null) {
   smallRender = new AVChatSurfaceViewRenderer(getApplicationContext());
  }

  addIntoSmallSizePreviewLayout(smallRender);
 }

 /**
  * 添加surfaceview到smallSizePreviewLayout
  */
 private void addIntoSmallSizePreviewLayout(SurfaceView surfaceView) {
  if (surfaceView.getParent() != null) {
   ((ViewGroup) surfaceView.getParent()).removeView(surfaceView);
  }

  smallSizePreviewLayout.addView(surfaceView);
  surfaceView.setZOrderMediaOverlay(true);
 }
e. 我們上面說到要將服務service的綁定與解綁與懸浮框的開啟和關閉相結合,所以既然我們在服務的oncreate()方法中開啟了懸浮框,那么就應該在其ondestroy()方法中對懸浮框進行關閉,關閉懸浮框的本質是將相關view給移除掉,接著清除我們的視頻畫布,在服務的ondestroy()方法中執行如下代碼:
@Override
 public void onDestroy() {
  super.onDestroy();
  if (mFloatingLayout != null) {
   // 移除懸浮窗口
   mWindowManager.removeView(mFloatingLayout);
  }

  //清除視頻畫布
  AVChatManager.getInstance().setupRemoteVideoRender(account, null, false, 0);
 }
f. 服務的綁定方式有bindService和startService兩種,使用不同的綁定方式其生命周期也會不一樣,已知我們需要讓懸浮框在視頻通話activity finish掉的時候也順便關掉,那么理所當然我們就應該采用bind方式來啟動服務,讓他的生命周期跟隨他的開啟者,也即是跟隨開啟它的activity生命周期。
intent = new Intent(this, FloatVideoWindowService.class);//開啟服務顯示懸浮框
bindService(intent, mVideoServiceConnection, Context.BIND_AUTO_CREATE);

ServiceConnection mVideoServiceConnection = new ServiceConnection() {

  @Override
  public void onServiceConnected(ComponentName name, IBinder service) {
   // 獲取服務的操作對象
   FloatVideoWindowService.MyBinder binder = (FloatVideoWindowService.MyBinder) service;
   binder.getService();
  }

  @Override
  public void onServiceDisconnected(ComponentName name) {
  }
 };
三、完整的流程
現在我們將上面所說的給串聯起來,思路會更加清晰一點,假設現在我正在進行視頻通話,點擊視頻最小化按鈕,我們應該按順序執行如下步驟:(如果你姿勢對的話,現在應該是會出現個懸浮框了)
public void startVideoService() {
   moveTaskToBack(true);//最小化Activity
   intent = new Intent(this, FloatVideoWindowService.class);//開啟服務顯示懸浮框
   bindService(intent, mVideoServiceConnection, Context.BIND_AUTO_CREATE);
 }
當我們點擊懸浮框的時候,可以使用startActivity(intent)來再次打開我們的activity,這時候視頻通話activity會回調onRestart()方法,我們在onRestart()生命周期里面unbind解綁掉懸浮框服務,并且重新設置新的視頻畫布到activity上
@Override
 protected void onRestart() {
  super.onRestart();
  unbindService(mVideoServiceConnection);//不顯示懸浮框

  //從懸浮窗進來后重新設置畫布(判斷是不是接通了)
  if (isCallEstablished) {
   //如果接通,先清除所有畫布
   avChatUI.clearAllSurfaceView(avChatUI.getAccount());
   //延遲重新加載遠端和本地的視頻畫布
   mHandler.postDelayed(new Runnable() {
    @Override
    public void run() {
     avChatUI.initAllSurfaceView(avChatUI.getAccount());

    }
   }, 800);
  } else {
   //如果沒接通,直接初始化所有畫布
   avChatUI.initLargeSurfaceView(IMCache.getAccount());
  }
 }
以上是“Android如何實現通話最小化懸浮框效果”這篇文章的所有內容,感謝各位的閱讀!希望分享的內容對大家有幫助,更多相關知識,歡迎關注億速云行業資訊頻道!
免責聲明:本站發布的內容(圖片、視頻和文字)以原創、轉載和分享為主,文章觀點不代表本網站立場,如果涉及侵權請聯系站長郵箱:is@yisu.com進行舉報,并提供相關證據,一經查實,將立刻刪除涉嫌侵權內容。