您好,登錄后才能下訂單哦!
您好,登錄后才能下訂單哦!
這篇文章主要介紹了Android如何實現自定義webView頭部進度加載效果,具有一定借鑒價值,感興趣的朋友可以參考下,希望大家閱讀完這篇文章之后大有收獲,下面讓小編帶著大家一起了解一下。
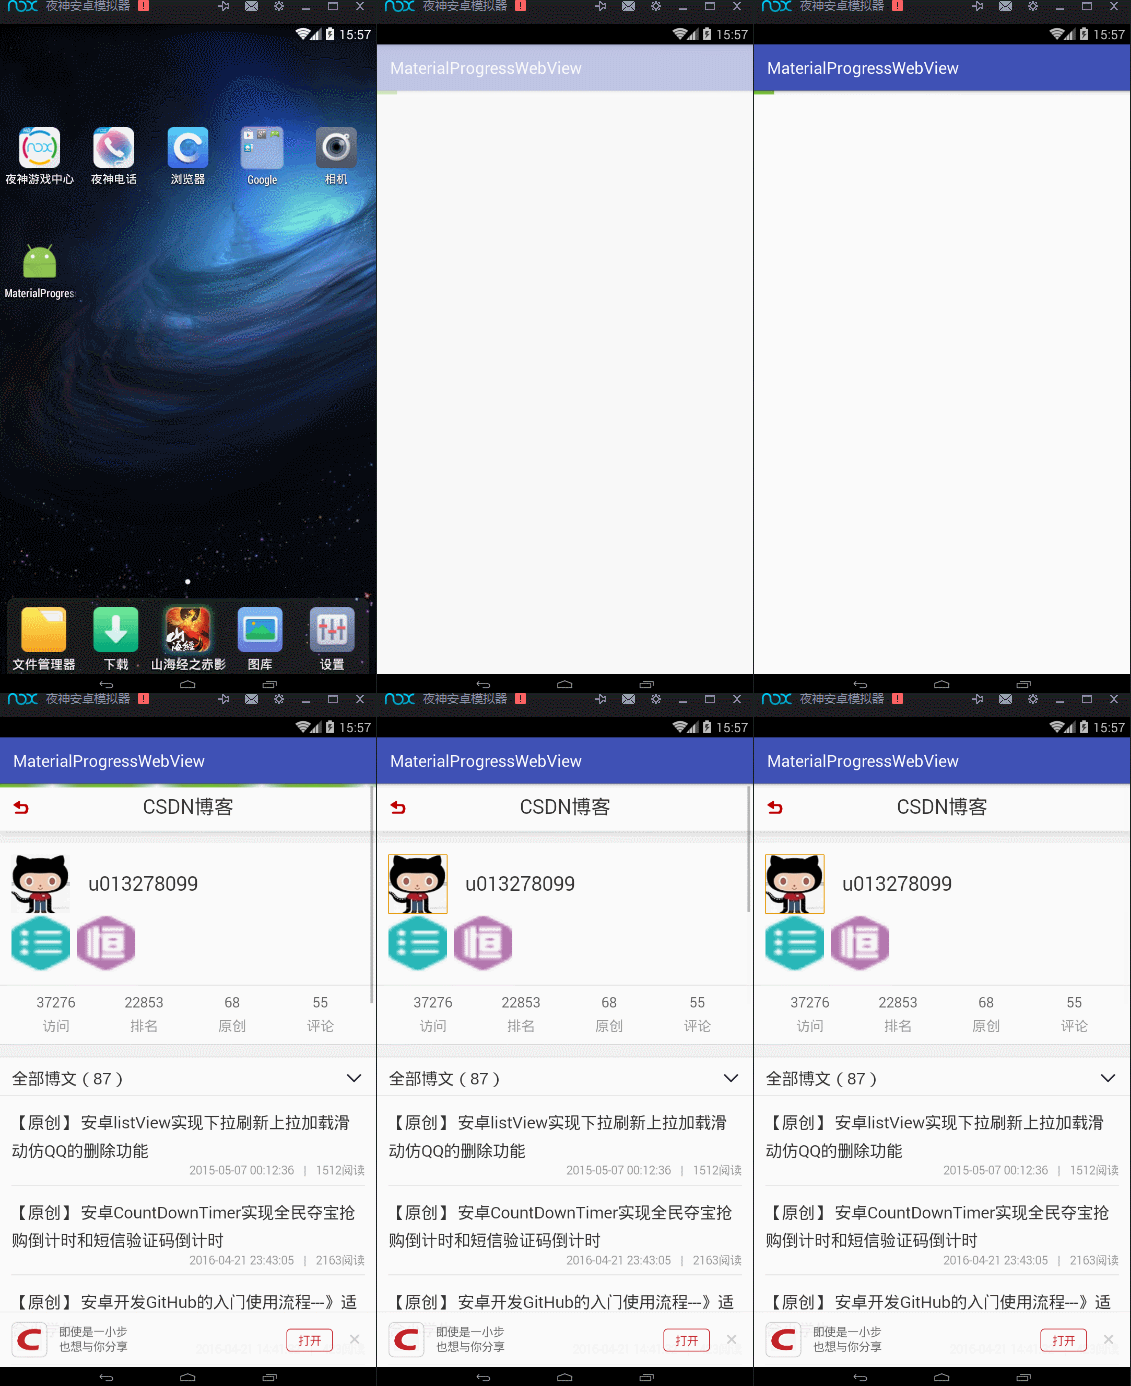
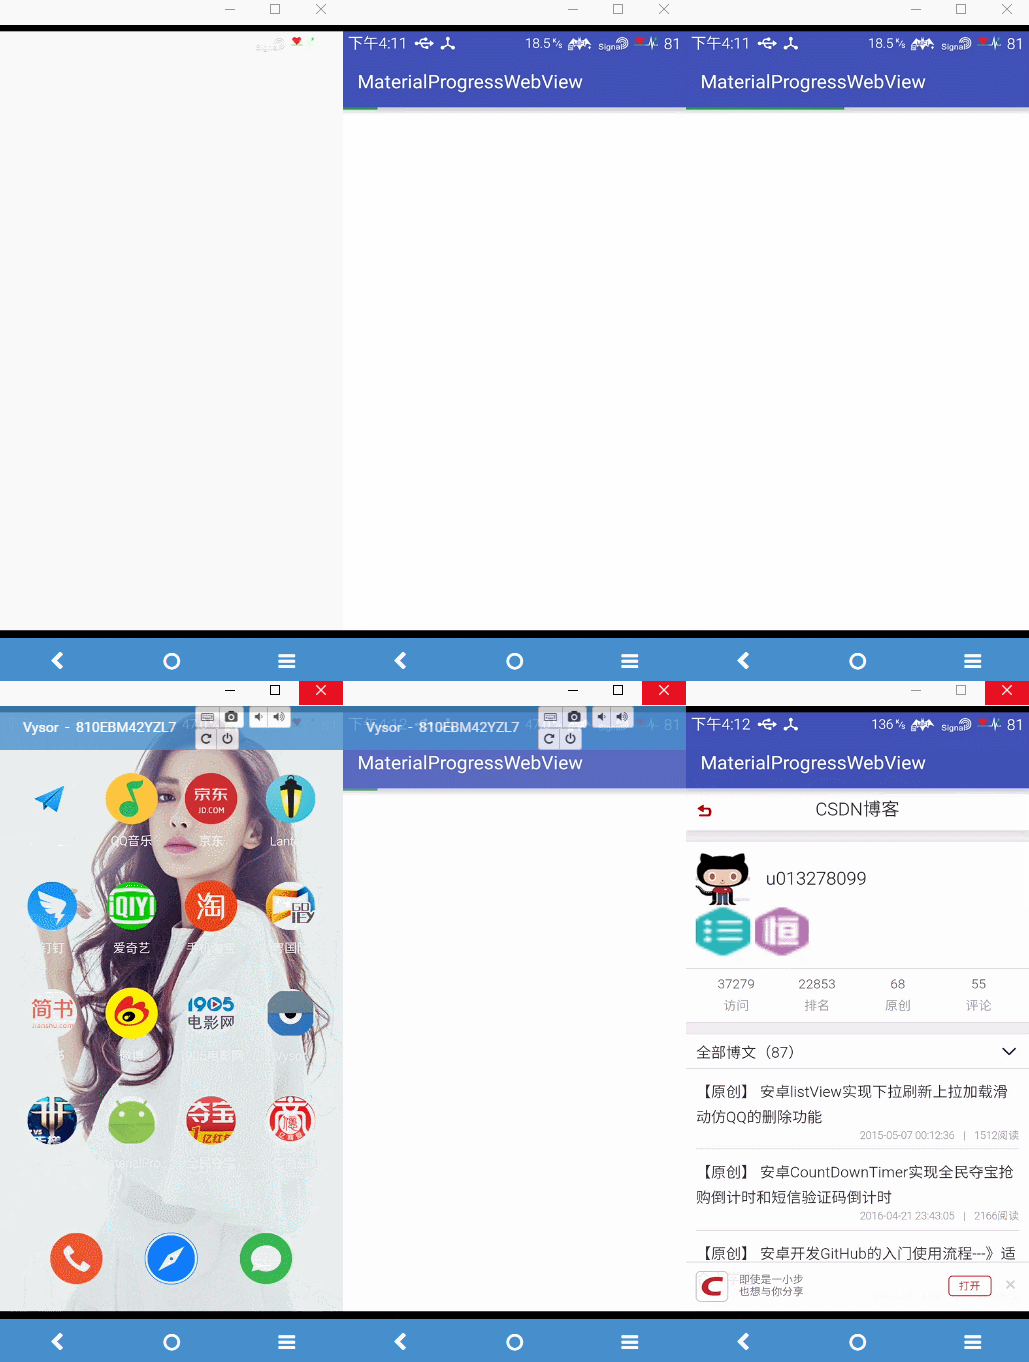
效果圖:
1. 顏色漸變加載進度條(夜神模擬器)

綠色加載進度條(魅藍note2)

看圖說話:
上圖是不是加載網頁的時候會有一個進度條在橫向加載,比以前網速不好的時候是一片空白給人的感覺友好多了是不,然后效果還不錯。
實現思路
就是自己畫一條進度線(大家應該都會吧)然后加載到WebView的上面,開始進度條是隱藏的,進度線初始值為1,然后為了效果好一點,初始少于10的進度都讓它加載到10的位置,等進度到100的時候0.2秒后隱藏。
請記得添加網絡權限:
<uses-permission android:name="android.permission.INTERNET" />
說多了都是淚 ,快吃晚飯了,直接代碼說話:
代碼講解
步驟一:我們先來話進度線
#WebViewProgressBar.java
package com.losileeya.materialprogresswebview.widget;
import android.content.Context;
import android.graphics.Canvas;
import android.graphics.Paint;
import android.util.AttributeSet;
import android.view.View;
import com.losileeya.materialprogresswebview.R;
/**
 * User: Losileeya (847457332@qq.com)
 * Date: 2016-04-24
 * Time: 14:43
 * 類描述:自定義進度條
 *
 * @version :
 */
public class WebViewProgressBar extends View {
  private int progress = 1;//進度默認為1
  private final static int HEIGHT = 5;//進度條高度為5
  private Paint paint;//進度條的畫筆
 // 漸變顏色數組
 private final static int colors[] = new int[]{0xFF7AD237, 0xFF8AC14A, 0x35B056 }; //int類型顏色值格式:0x+透明值+顏色的rgb值
  public WebViewProgressBar(Context context) {
    this (context,null);
  }
  public WebViewProgressBar(Context context, AttributeSet attrs) {
    this(context, attrs,0);
  }
  public WebViewProgressBar(Context context, AttributeSet attrs, int defStyleAttr) {
    super(context, attrs, defStyleAttr);
    initPaint(context);
  }
  private void initPaint(Context context) {
    //顏色漸變從colors[0]到colors[2],透明度從0到1
//    LinearGradient shader = new LinearGradient(
//        0, 0,
//        100, HEIGHT,
//        colors,
//        new float[]{0 , 0.5f, 1.0f},
//        Shader.TileMode.MIRROR);
    paint=new Paint(Paint.DITHER_FLAG);
    paint.setStyle(Paint.Style.STROKE);// 填充方式為描邊
    paint.setStrokeWidth(HEIGHT);//設置畫筆的寬度
    paint.setAntiAlias(true);// 抗鋸齒
    paint.setDither(true);// 使用抖動效果
paint.setColor(context.getResources().getColor(R.color.primary_light));//畫筆設置顏色
//    paint.setShader(shader);//畫筆設置漸變
  }
  /**
   * 設置進度
   * @param progress 進度值
   */
  public void setProgress(int progress){
    this.progress = progress;
    invalidate();//刷新畫筆
  }
  @Override
  protected void onDraw(Canvas canvas) {
   canvas.drawRect(0, 0, getWidth() * progress / 100, HEIGHT, paint);//畫矩形從(0.0)開始到(progress,height)的區域
  }
}
上面代碼的功能就是畫一條線(顏色可漸變也可不變色),暴露設置進度的方法給使用者,然后調用 invalidate()刷新進度。
注意:使用漸變時數組的長度和透明度數組長度必須一致,否則會報錯的
步驟二:自定義封裝webView
#ProgressWebView.java
package com.losileeya.materialprogresswebview.widget;
import android.content.Context;
import android.graphics.Bitmap;
import android.os.Handler;
import android.util.AttributeSet;
import android.view.View;
import android.view.ViewGroup;
import android.webkit.WebChromeClient;
import android.webkit.WebSettings;
import android.webkit.WebView;
import android.webkit.WebViewClient;
/**
 * User: Losileeya (847457332@qq.com)
 * Date: 2016-04-24
 * Time: 14:42
 * 類描述:自定義帶進度加載條的webView
 *
 * @version :
 */
public class ProgressWebView extends WebView {
  private WebViewProgressBar progressBar;//進度條的矩形(進度線)
  private Handler handler;
  private WebView mWebView;
  public ProgressWebView(Context context, AttributeSet attrs) {
    super(context, attrs);
    //實例化進度條
    progressBar = new WebViewProgressBar(context);
    //設置進度條的size
    progressBar.setLayoutParams(new ViewGroup.LayoutParams
        (ViewGroup.LayoutParams.MATCH_PARENT, ViewGroup.LayoutParams.WRAP_CONTENT));
    //剛開始時候進度條不可見
    progressBar.setVisibility(GONE);
    //把進度條添加到webView里面
    addView(progressBar);
    //初始化handle
    handler = new Handler();
    mWebView = this;
    initSettings();
  }
  private void initSettings() {
    // 初始化設置
    WebSettings mSettings = this.getSettings();
    mSettings.setJavaScriptEnabled(true);//開啟javascript
    mSettings.setDomStorageEnabled(true);//開啟DOM
    mSettings.setDefaultTextEncodingName("utf-8");//設置字符編碼
    //設置web頁面
    mSettings.setAllowFileAccess(true);//設置支持文件流
    mSettings.setSupportZoom(true);// 支持縮放
    mSettings.setBuiltInZoomControls(true);// 支持縮放
    mSettings.setUseWideViewPort(true);// 調整到適合webview大小
    mSettings.setLoadWithOverviewMode(true);// 調整到適合webview大小
    mSettings.setDefaultZoom(WebSettings.ZoomDensity.FAR);// 屏幕自適應網頁,如果沒有這個,在低分辨率的手機上顯示可能會異常
    mSettings.setRenderPriority(WebSettings.RenderPriority.HIGH);
    //提高網頁加載速度,暫時阻塞圖片加載,然后網頁加載好了,在進行加載圖片
    mSettings.setBlockNetworkImage(true);
    mSettings.setAppCacheEnabled(true);//開啟緩存機制
    setWebViewClient(new MyWebClient());
    setWebChromeClient(new MyWebChromeClient());
  }
  /**
   * 自定義WebChromeClient
   */
  private class MyWebChromeClient extends WebChromeClient {
    /**
     * 進度改變的回掉
     *
     * @param view    WebView
     * @param newProgress 新進度
     */
    @Override
    public void onProgressChanged(WebView view, int newProgress) {
      if (newProgress == 100) {
        progressBar.setProgress(100);
        handler.postDelayed(runnable, 200);//0.2秒后隱藏進度條
      } else if (progressBar.getVisibility() == GONE) {
        progressBar.setVisibility(VISIBLE);
      }
      //設置初始進度10,這樣會顯得效果真一點,總不能從1開始吧
      if (newProgress < 10) {
        newProgress = 10;
      }
      //不斷更新進度
      progressBar.setProgress(newProgress);
      super.onProgressChanged(view, newProgress);
    }
  }
  private class MyWebClient extends WebViewClient {
    /**
     * 加載過程中 攔截加載的地址url
     *
     * @param view
     * @param url 被攔截的url
     * @return
     */
    @Override
    public boolean shouldOverrideUrlLoading(WebView view, String url) {
      mWebView.loadUrl(url);
      return true;
    }
    /**
     * 頁面加載過程中,加載資源回調的方法
     *
     * @param view
     * @param url
     */
    @Override
    public void onLoadResource(WebView view, String url) {
      super.onLoadResource(view, url);
    }
    /**
     * 頁面加載完成回調的方法
     *
     * @param view
     * @param url
     */
    @Override
    public void onPageFinished(WebView view, String url) {
      super.onPageFinished(view, url);
      // 關閉圖片加載阻塞
      view.getSettings().setBlockNetworkImage(false);
    }
    /**
     * 頁面開始加載調用的方法
     *
     * @param view
     * @param url
     * @param favicon
     */
    @Override
    public void onPageStarted(WebView view, String url, Bitmap favicon) {
      super.onPageStarted(view, url, favicon);
    }
    @Override
    public void onReceivedError(WebView view, int errorCode, String description, String failingUrl) {
      super.onReceivedError(view, errorCode, description, failingUrl);
    }
    @Override
    public void onScaleChanged(WebView view, float oldScale, float newScale) {
      super.onScaleChanged(view, oldScale, newScale);
      ProgressWebView.this.requestFocus();
      ProgressWebView.this.requestFocusFromTouch();
    }
  }
  /**
  *刷新界面(此處為加載完成后進度消失)
  */
  private Runnable runnable = new Runnable() {
    @Override
    public void run() {
      progressBar.setVisibility(View.GONE);
    }
  };
}
上面的代碼就是把進度線加到webView里面,然后自定義WebChromeClient通過重寫onProgressChanged()方法調用 progressBar.setProgress(newProgress)來更新進度,進度到100時再隱藏,是不是思路很清晰,其他的就是一些webView的設置和封裝這里都有清楚的注釋,自己去看。
使用ProgressWebView加載網頁
布局使用:
#activity_main.xml
<?xml version="1.0" encoding="utf-8"?>
<com.losileeya.materialprogresswebview.widget.ProgressWebView
 xmlns:android="http://schemas.android.com/apk/res/android"
  android:id="@+id/webView"
  android:layout_width="match_parent"
  android:layout_height="match_parent">
</com.losileeya.materialprogresswebview.widget.ProgressWebView>
布局看起來是不是很清爽,對了,要的就是之效果:
實際使用也很簡單:
#MainActivity.java
package com.losileeya.materialprogresswebview;
import android.os.Bundle;
import android.support.v7.app.AppCompatActivity;
import com.losileeya.materialprogresswebview.widget.ProgressWebView;
public class MainActivity extends AppCompatActivity {
  //ProgressWebView
  private ProgressWebView mWebView;
  @Override
  protected void onCreate(Bundle savedInstanceState) {
    super.onCreate(savedInstanceState);
    setContentView(R.layout.activity_main);
    mWebView = (ProgressWebView) findViewById(R.id.webView);//findViewById webView
    mWebView.loadUrl("http://blog.csdn.net/u013278099/");//加載網址
    mWebView.setFocusable(true);//設置有焦點
    mWebView.setFocusableInTouchMode(true);//設置可觸摸
  }
}
感謝你能夠認真閱讀完這篇文章,希望小編分享的“Android如何實現自定義webView頭部進度加載效果”這篇文章對大家有幫助,同時也希望大家多多支持億速云,關注億速云行業資訊頻道,更多相關知識等著你來學習!
免責聲明:本站發布的內容(圖片、視頻和文字)以原創、轉載和分享為主,文章觀點不代表本網站立場,如果涉及侵權請聯系站長郵箱:is@yisu.com進行舉報,并提供相關證據,一經查實,將立刻刪除涉嫌侵權內容。