溫馨提示×
您好,登錄后才能下訂單哦!
點擊 登錄注冊 即表示同意《億速云用戶服務條款》
您好,登錄后才能下訂單哦!
小編給大家分享一下Android如何實現顏色選取圓盤,相信大部分人都還不怎么了解,因此分享這篇文章給大家參考一下,希望大家閱讀完這篇文章后大有收獲,下面讓我們一起去了解一下吧!
具體內容如下
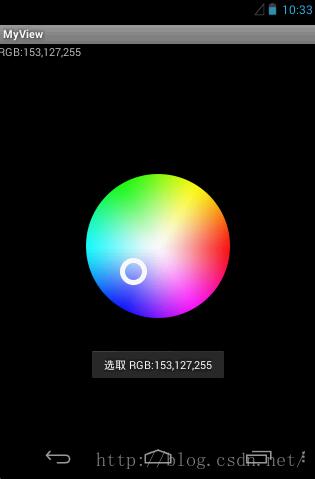
先看效果圖

xml布局
<?xml version="1.0" encoding="utf-8"?>
<LinearLayout xmlns:android="http://schemas.android.com/apk/res/android"
 android:orientation="vertical"
 android:layout_width="fill_parent"
 android:layout_height="fill_parent"
 >
<TextView
 android:layout_width="fill_parent"
 android:layout_height="wrap_content"
 android:text="@string/hello"
 android:id="@+id/tv_rgb"/>
<RelativeLayout android:id="@+id/relativeLayout1" android:layout_height="fill_parent" android:layout_width="fill_parent">

 <com.myview.ColorPickerView
  android:id="@+id/cpv"
  android:layout_width="230dp"
  android:layout_height="230dp"
  android:layout_centerInParent="true"
  android:scaleType="center"
  android:src="@drawable/rgb" />

</RelativeLayout>
</LinearLayout>
ColorPickerView顏色選取圓盤
package com.myview;

import android.annotation.SuppressLint;
import android.content.Context;
import android.graphics.Bitmap;
import android.graphics.BitmapFactory;
import android.graphics.Canvas;
import android.graphics.Color;
import android.graphics.Paint;
import android.graphics.PointF;
import android.graphics.drawable.BitmapDrawable;
import android.util.AttributeSet;
import android.view.MotionEvent;
import android.widget.ImageView;

public class ColorPickerView extends ImageView {
 Context context;
 private Bitmap iconBitMap;
 float iconRadius;// 吸管圓的半徑
 float iconCenterX;
 float iconCenterY;
 PointF iconPoint;// 點擊位置坐標

 public ColorPickerView(Context context) {
  this(context, null);
 }

 public ColorPickerView(Context context, AttributeSet attrs, int defStyle) {
  super(context, attrs, defStyle);
  this.context = context;
  init();
 }

 public ColorPickerView(Context context, AttributeSet attrs) {
  this(context, attrs, 0);
  init();
 }

 Paint mBitmapPaint;
 Bitmap imageBitmap;
 float viewRadius;// 整個view半徑
 float radius;// 圖片半徑

 /**
  * 初始化畫筆
  */
 private void init() {
  iconBitMap = BitmapFactory.decodeResource(context.getResources(),
    R.drawable.pickup);// 吸管的圖片
  iconRadius = iconBitMap.getWidth() / 2;// 吸管的圖片一半

  mBitmapPaint = new Paint();
  iconPoint = new PointF();

  imageBitmap = ((BitmapDrawable) getDrawable()).getBitmap();
  radius = imageBitmap.getHeight() / 2;// 圖片半徑

  // // 初始化
  iconPoint.x = radius;
  iconPoint.y = radius;

 }

 @Override
 protected void onMeasure(int widthMeasureSpec, int heightMeasureSpec) {
  // TODO Auto-generated method stub
  super.onMeasure(widthMeasureSpec, heightMeasureSpec);
 }

 Canvas canvas;

 @Override
 protected void onDraw(Canvas canvas) {
  // TODO Auto-generated method stub
  super.onDraw(canvas);
  this.canvas = canvas;

  viewRadius = this.getWidth() / 2;// 整個view半徑

  canvas.drawBitmap(iconBitMap, iconPoint.x - iconRadius, iconPoint.y
    - iconRadius, mBitmapPaint);
 }

 @SuppressLint("ClickableViewAccessibility")
 @Override
 public boolean onTouchEvent(MotionEvent event) {
  float x = event.getX();
  float y = event.getY();
  int pixel;
  int r;
  int g;
  int b;
  switch (event.getAction()) {
  case MotionEvent.ACTION_MOVE:
   proofLeft(x, y);
   pixel = getImagePixel(iconPoint.x, iconPoint.y);
   r = Color.red(pixel);
   g = Color.green(pixel);
   b = Color.blue(pixel);
   if (mChangedListener != null) {
    mChangedListener.onMoveColor(r, g, b);
   }
   if (isMove) {
    isMove = !isMove;
    invalidate();
   }
   break;
  case MotionEvent.ACTION_UP:
   pixel = getImagePixel(iconPoint.x, iconPoint.y);
   r = Color.red(pixel);
   g = Color.green(pixel);
   b = Color.blue(pixel);
   if (mChangedListener != null) {
    mChangedListener.onColorChanged(r, g, b);
   }
   break;

  default:
   break;
  }
  return true;
 }

 public int getImagePixel(float x, float y) {

  Bitmap bitmap = imageBitmap;
  // 為了防止越界
  int intX = (int) x;
  int intY = (int) y;
  if (intX < 0)
   intX = 0;
  if (intY < 0)
   intY = 0;
  if (intX >= bitmap.getWidth()) {
   intX = bitmap.getWidth() - 1;
  }
  if (intY >= bitmap.getHeight()) {
   intY = bitmap.getHeight() - 1;
  }
  int pixel = bitmap.getPixel(intX, intY);
  return pixel;

 }

 /**
  * R = sqrt(x * x + y * y)
  * point.x = x * r / R + r
  * point.y = y * r / R + r
  */
 private void proofLeft(float x, float y) {

  float h = x - viewRadius; // 取xy點和圓點 的三角形寬
  float w = y - viewRadius;// 取xy點和圓點 的三角形長
  float h3 = h * h;
  float w2 = w * w;
  float distance = (float) Math.sqrt((h3 + w2)); // 勾股定理求 斜邊距離
  if (distance > radius) { // 如果斜邊距離大于半徑,則取點和圓最近的一個點為x,y
   float maxX = x - viewRadius;
   float maxY = y - viewRadius;
   x = ((radius * maxX) / distance) + viewRadius; // 通過三角形一邊平行原理求出x,y
   y = ((radius * maxY) / distance) + viewRadius;
  }
  iconPoint.x = x;
  iconPoint.y = y;

  isMove = true;
 }

 boolean isMove;

 public void setOnColorChangedListenner(OnColorChangedListener l) {
  this.mChangedListener = l;
 }

 private OnColorChangedListener mChangedListener;

 // 內部接口 回調顏色 rgb值
 public interface OnColorChangedListener {
  // 手指抬起,確定顏色回調
  void onColorChanged(int r, int g, int b);

  // 移動時顏色回調
  void onMoveColor(int r, int g, int b);
 }
}
MyViewActivity主界面
package com.myview;

import com.myview.ColorPickerView.OnColorChangedListener;

import android.app.Activity;
import android.os.Bundle;
import android.widget.TextView;
import android.widget.Toast;

public class MyViewActivity extends Activity {

 TextView tv_rgb;

 /** Called when the activity is first created. */
 @Override
 public void onCreate(Bundle savedInstanceState) {
  super.onCreate(savedInstanceState);
  setContentView(R.layout.main);

  tv_rgb=(TextView)this.findViewById(R.id.tv_rgb);

  ColorPickerView cpv=(ColorPickerView)this.findViewById(R.id.cpv);
  cpv.setOnColorChangedListenner(new OnColorChangedListener() {
   /**
    * 手指抬起,選定顏色時
    */
   @Override
   public void onColorChanged(int r, int g, int b) {
    if(r==0 && g==0 && b==0){
     return;
    }
    Toast.makeText(MyViewActivity.this, "選取 RGB:"+r+","+g+","+b, Toast.LENGTH_SHORT).show();
   }

   /**
    * 顏色移動的時候
    */
   @Override
   public void onMoveColor(int r, int g, int b) {
    if(r==0 && g==0 && b==0){
     return;
    }
    tv_rgb.setText("RGB:"+r+","+g+","+b);
   }
  });
 }
}
以上是“Android如何實現顏色選取圓盤”這篇文章的所有內容,感謝各位的閱讀!相信大家都有了一定的了解,希望分享的內容對大家有所幫助,如果還想學習更多知識,歡迎關注億速云行業資訊頻道!
免責聲明:本站發布的內容(圖片、視頻和文字)以原創、轉載和分享為主,文章觀點不代表本網站立場,如果涉及侵權請聯系站長郵箱:is@yisu.com進行舉報,并提供相關證據,一經查實,將立刻刪除涉嫌侵權內容。