您好,登錄后才能下訂單哦!
您好,登錄后才能下訂單哦!
這篇文章主要介紹了Android實現藍牙聊天功能的方,具有一定借鑒價值,感興趣的朋友可以參考下,希望大家閱讀完這篇文章之后大有收獲,下面讓小編帶著大家一起了解一下。
藍牙,時下最流行的智能設備傳輸數據的方式之一,通過手機app和智能設備進行連接,獲取設備上的測量數據,我們生活中隨處可見的比如藍牙智能手環,藍牙電子秤,藍牙心電測量設備等等。
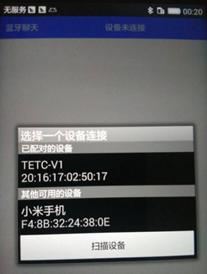
先貼出上篇的一些demo;

當點擊圖上的兩個列表中的任何一個列表,執行如下代碼:
mBtAdapter.cancelDiscovery();
String info = ((TextView) v).getText().toString();
String address = info.substring(info.length() - 17);
Intent intent = new Intent();
intent.putExtra(EXTRA_DEVICE_ADDRESS, address);
setResult(Activity.RESULT_OK, intent);
finish();
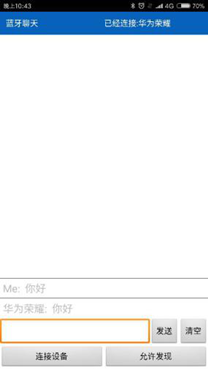
此藍牙聊天工具最后實現的效果是這樣的:

將回到聊天主界面:
public void onActivityResult(int requestCode, int resultCode, Intent data) {
 LogUtils.getInstance().e(getClass(), "onActivityResult " + resultCode);
 switch (requestCode) {
 case REQUEST_CONNECT_DEVICE:
 // 當DeviceListActivity返回與設備連接的消息
 if (resultCode == Activity.RESULT_OK) {
 // 連接設備的MAC地址
 String address = data.getExtras().getString(
 DeviceListActivity.EXTRA_DEVICE_ADDRESS);
 // 得到藍牙對象
 BluetoothDevice device = mBluetoothAdapter.getRemoteDevice(address);
 // 開始連接設備
 mChatService.connect(device);
 }
 break;
 case REQUEST_ENABLE_BT:
 // 判斷藍牙是否啟用
 if (resultCode == Activity.RESULT_OK) {
 // 建立連接
 setupChat();
 } else {
 LogUtils.getInstance().e(getClass(), "藍牙未啟用");
 Toast.makeText(this, R.string.bt_not_enabled_leaving,
 Toast.LENGTH_SHORT).show();
 finish();
 }
 }
}
在此,我將重點介紹下BluetoothChatService類中的連接流程;
因為藍牙聊天是兩個手機之間進行通訊,所以他們互為主機和從機,主要思路以及步驟如下:
1.開一個線程獲取socket去連接藍牙;
2.開一個線程獲監聽藍牙傳入的連接,如果連接被接受的話,再開啟第三個線程去處理所有傳入和傳出的數據;
public synchronized void connect(BluetoothDevice device) {
 if (mState == STATE_CONNECTING) {
 if (mConnectThread != null) {
 mConnectThread.cancel();
 mConnectThread = null;
 }
 }
 if (mConnectedThread != null) {
 mConnectedThread.cancel();
 mConnectedThread = null;
 }
 mConnectThread = new ConnectThread(device);
 mConnectThread.start();
 setState(STATE_CONNECTING);
}
開線程去連接
/**
 * @description:藍牙連接線程
 * @author:zzq
 * @time: 2016-8-6 下午1:18:41
 */
private class ConnectThread extends Thread {
private final BluetoothSocket mmSocket;
private final BluetoothDevice mmDevice;
 public ConnectThread(BluetoothDevice device) {
 mmDevice = device;
 BluetoothSocket tmp = null;
 try {
 tmp = device.createRfcommSocketToServiceRecord(MY_UUID);
 } catch (IOException e) {
 LogUtils.getInstance().e(getClass(), "socket獲取失敗:" + e);
 }
 mmSocket = tmp;
 }
 public void run() {
 LogUtils.getInstance().e(getClass(), "開始mConnectThread");
 setName("ConnectThread");
 // mAdapter.cancelDiscovery();
 try {
 mmSocket.connect();
 } catch (IOException e) {
 // 連接失敗,更新ui
 connectionFailed();
 try {
 mmSocket.close();
 } catch (IOException e2) {
 LogUtils.getInstance().e(getClass(), "關閉連接失敗" + e2);
 }
 // 開啟聊天接收線程
 startChat();
 return;
 }
 synchronized (BluetoothChatService.this) {
 mConnectThread = null;
 }
 connected(mmSocket, mmDevice);
 }
 public void cancel() {
 try {
 mmSocket.close();
 } catch (IOException e) {
 LogUtils.getInstance().e(getClass(), "關閉連接失敗" + e);
 }
 }
}
/**
* 監聽傳入的連接
*/
private class AcceptThread extends Thread {
private final BluetoothServerSocket mmServerSocket;
public AcceptThread() {
BluetoothServerSocket tmp = null;
try {
tmp = mAdapter.listenUsingRfcommWithServiceRecord(NAME, MY_UUID);
} catch (IOException e) {
LogUtils.getInstance().e(getClass(), "--獲取socket失敗:" + e);
}
mmServerSocket = tmp;
}
public void run() {
setName("AcceptThread");
BluetoothSocket socket = null;
while (mState != STATE_CONNECTED) {
LogUtils.getInstance().e(getClass(), "----accept-循環執行中-");
try {
socket = mmServerSocket.accept();
} catch (IOException e) {
LogUtils.getInstance().e(getClass(), "accept() 失敗" + e);
break;
}
// 如果連接被接受
if (socket != null) {
synchronized (BluetoothChatService.this) {
switch (mState) {
case STATE_LISTEN:
case STATE_CONNECTING:
// 開始連接線程
connected(socket, socket.getRemoteDevice());
break;
case STATE_NONE:
case STATE_CONNECTED:
// 沒有準備好或已經連接
try {
socket.close();
} catch (IOException e) {
LogUtils.getInstance().e(getClass(),"不能關閉這些連接" + e);
}
break;
}
}
}
}
LogUtils.getInstance().e(getClass(), "結束mAcceptThread");
}
public void cancel() {
LogUtils.getInstance().e(getClass(), "取消 " + this);
try {
mmServerSocket.close();
} catch (IOException e) {
LogUtils.getInstance().e(getClass(), "關閉失敗" + e);
}
}
}
/**
* 連接成功后的線程 處理所有傳入和傳出的傳輸
*/
private class ConnectedThread extends Thread {
private final BluetoothSocket mmSocket;
private final InputStream mmInStream;
private final OutputStream mmOutStream;
public ConnectedThread(BluetoothSocket socket) {
mmSocket = socket;
InputStream tmpIn = null;
OutputStream tmpOut = null;
// 得到BluetoothSocket輸入和輸出流
try {
tmpIn = socket.getInputStream();
tmpOut = socket.getOutputStream();
} catch (IOException e) {
LogUtils.getInstance().e(getClass(),"temp sockets not created" + e);
}
mmInStream = tmpIn;
mmOutStream = tmpOut;
}
public void run() {
int bytes;
String str1 = "";
// 循環監聽消息
while (true) {
try {
byte[] buffer = new byte[256];
bytes = mmInStream.read(buffer);
String readStr = new String(buffer, 0, bytes);// 字節數組直接轉換成字符串
String str = bytes2HexString(buffer).replaceAll("00", "").trim();
if (bytes > 0) {// 將讀取到的消息發到主線程
mHandler.obtainMessage(BluetoothChatActivity.MESSAGE_READ, bytes, -1,buffer).sendToTarget();
} else {
LogUtils.getInstance().e(getClass(),"disconnected");
connectionLost();
if (mState != STATE_NONE) {
LogUtils.getInstance().e(getClass(), "disconnected");
startChat();
}
break;
}
} catch (IOException e) {
LogUtils.getInstance().e(getClass(), "disconnected" + e);
connectionLost();
if (mState != STATE_NONE) {
// 在重新啟動監聽模式啟動該服務
startChat();
}
break;
}
}
}
/**
* 寫入OutStream連接
*
* @param buffer
* 要寫的字節
*/
public void write(byte[] buffer) {
try {
mmOutStream.write(buffer);
// 把消息傳給UI
mHandler.obtainMessage(BluetoothChatActivity.MESSAGE_WRITE, -1,-1, buffer).sendToTarget();
} catch (IOException e) {
LogUtils.getInstance().e(getClass(),
"Exception during write:" + e);
}
}
public void cancel() {
try {
mmSocket.close();
} catch (IOException e) {
LogUtils.getInstance().e(getClass(),"close() of connect socket failed:" + e);
}
}
}大概的流程就是上面三個線程里面所展現的,當然具體情況,根據項目來,比如藍牙協議協議解析這塊的根據協議定義的方式來進行解析;
代碼中牽扯的到的藍牙連接狀態的改變,用到的handle,直接把狀態發送至activity,通知activity更新;
 /**
 * 無法連接,通知Activity
 */
private void connectionFailed() {
 setState(STATE_LISTEN);
 Message msg = mHandler.obtainMessage(BluetoothChatActivity.MESSAGE_TOAST);
 Bundle bundle = new Bundle();
 bundle.putString(BluetoothChatActivity.TOAST, "無法連接設備");
 msg.setData(bundle);
 mHandler.sendMessage(msg);
}
/**
 * 設備斷開連接,通知Activity
 */
private void connectionLost() {
 Message msg = mHandler.obtainMessage(BluetoothChatActivity.MESSAGE_TOAST);
 Bundle bundle = new Bundle();
 bundle.putString(BluetoothChatActivity.TOAST, "設備斷開連接");
 msg.setData(bundle);
 mHandler.sendMessage(msg);
}
當點擊發送按鈕時,將文本輸入框中的文字發送數據的方法:
private void sendMessage(String message) {
 if (mChatService.getState() != BluetoothChatService.STATE_CONNECTED) {
 Toast.makeText(this, R.string.not_connected,Toast.LENGTH_SHORT).show();
 return;
}
 if (message.length() > 0) {
 byte[] send = message.getBytes();
 mChatService.write(send);
 }
}
//調用BluetoothChatService類中的write進行數據發送
public void write(byte[] out) {
 ConnectedThread r;
 synchronized (this) {
 if (mState != STATE_CONNECTED)
 return;
 r = mConnectedThread;
 }
 r.write(out);
}
如此,藍牙聊天的流程就是這樣,如果退出聊天的時候,停止所有線程;
public synchronized void stop() {
 LogUtils.getInstance().e(getClass(), "---stop()");
 setState(STATE_NONE);
 if (mConnectThread != null) {
 mConnectThread.cancel();
 mConnectThread = null;
}
 if (mConnectedThread != null) {
 mConnectedThread.cancel();
 mConnectedThread = null;
}
 if (mAcceptThread != null) {
 mAcceptThread.cancel();
 mAcceptThread = null;
 }
}
感謝你能夠認真閱讀完這篇文章,希望小編分享的“Android實現藍牙聊天功能的方”這篇文章對大家有幫助,同時也希望大家多多支持億速云,關注億速云行業資訊頻道,更多相關知識等著你來學習!
免責聲明:本站發布的內容(圖片、視頻和文字)以原創、轉載和分享為主,文章觀點不代表本網站立場,如果涉及侵權請聯系站長郵箱:is@yisu.com進行舉報,并提供相關證據,一經查實,將立刻刪除涉嫌侵權內容。