您好,登錄后才能下訂單哦!
您好,登錄后才能下訂單哦!
這篇文章主要介紹了怎么使用Java實現在線語音識別,具有一定借鑒價值,感興趣的朋友可以參考下,希望大家閱讀完這篇文章之后大有收獲,下面讓小編帶著大家一起了解一下。
具體內容如下
利用訊飛開發平臺作為第三方庫
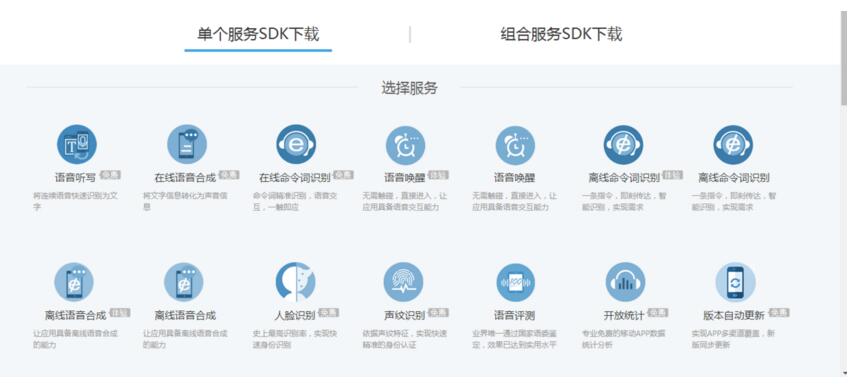
首先需要在訊飛開發平臺下載SDK,網址為,訊飛開發平臺,這些SDK 下載都是免費的,當然你需要先注冊。在SDK 中不僅包含相應的jar包,還有一些相應的demo,可以供你參考學習

在我們下載下來第一個SDK 之后就可以進行開發了,訊飛的SDK 給我們提供了詳盡而強大的函數支持,下面我就從代碼的角度來進行一些解釋。
代碼
package myVoice;
import java.awt.Button;
import java.awt.Font;
import java.awt.Frame;
import java.awt.GridLayout;
import java.awt.Panel;
import java.awt.TextArea;
import java.awt.event.ActionEvent;
import java.awt.event.ActionListener;
import java.lang.reflect.Parameter;
import java.util.ArrayList;
import javax.swing.ImageIcon;
import javax.swing.JFrame;
import javax.swing.JLabel;
import com.iflytek.cloud.speech.RecognizerListener;
import com.iflytek.cloud.speech.RecognizerResult;
import com.iflytek.cloud.speech.SpeechError;
import com.iflytek.cloud.speech.SpeechRecognizer;
import com.iflytek.cloud.speech.SpeechUtility;
import com.iflytek.util.DebugLog;
import com.iflytek.util.JsonParser;
import com.iflytek.util.Version;

public class VoiceSpeech extends Frame implements ActionListener {
Button startBtn;
Button stopBtn;
TextArea textArea;

// 語音聽寫對象

SpeechRecognizer speechRecognize;
private static final String DEF_FONT_NAME = "宋體";
private static final int DEF_FONT_STYLE = Font.BOLD;
private static final int DEF_FONT_SIZE = 30;
private static final int TEXT_COUNT = 100;

public VoiceSpeech() {
// 初始化聽寫對象
speechRecognize = SpeechRecognizer.createRecognizer();
// 設置組件
startBtn = new Button("start");
stopBtn = new Button("stop");
textArea = new TextArea();
Panel btnPanel = new Panel();
Panel textPanel = new Panel();
// Button startBtn = new Button("開始");

//添加監聽器
startBtn.addActionListener(this);
stopBtn.addActionListener(this);
btnPanel.add(startBtn);
btnPanel.add(stopBtn);
textPanel.add(textArea);
add(btnPanel);
add(textPanel);

// 設置窗體
setLayout(new GridLayout(2, 1));
setSize(400, 300);
setTitle("語音識別");
setLocation(200, 200);
setVisible(true);

}

public void actionPerformed(ActionEvent e) {
if (e.getSource() == startBtn) {
textArea.setText("*************你說的是:");
if (!speechRecognize.isListening())
speechRecognize.startListening(recognizerListener);

else

speechRecognize.stopListening();
} else if (e.getSource() == stopBtn) {
speechRecognize.stopListening();

}

}

/**
* 聽寫監聽器
*/

private RecognizerListener recognizerListener = new RecognizerListener() {
public void onBeginOfSpeech() {

// DebugLog.Log( "onBeginOfSpeech enter" );
// ((JLabel) jbtnRecognizer.getComponent(0)).setText("聽寫中...");
// jbtnRecognizer.setEnabled(false);

}

public void onEndOfSpeech() {
DebugLog.Log("onEndOfSpeech enter");

}

/**
* 獲取聽寫結果. 獲取RecognizerResult類型的識別結果,并對結果進行累加,顯示到Area里
*/

public void onResult(RecognizerResult results, boolean islast) {
DebugLog.Log("onResult enter");

// 如果要解析json結果,請考本項目示例的 com.iflytek.util.JsonParser類
String text =

JsonParser.parseIatResult(results.getResultString());

// String text = results.getResultString();
// JsonParser json = new JsonParser();
//  String newTest = json.parseIatResult(text);
//  textArea.setText(newTest);

textArea.append(text);
text = textArea.getText();
if (null != text) {
int n = text.length() / TEXT_COUNT + 1;
int fontSize = Math.max(10, DEF_FONT_SIZE - 2 * n);
DebugLog.Log("onResult new font size=" + fontSize);
int style = n > 1 ? Font.PLAIN : DEF_FONT_SIZE;
Font newFont = new Font(DEF_FONT_NAME, style, fontSize);
textArea.setFont(newFont);

}

if (islast) {

iatSpeechInitUI();

}

}

public void onVolumeChanged(int volume) {
DebugLog.Log("onVolumeChanged enter");

if (volume == 0)
volume = 1;
else if (volume >= 6)
volume = 6;

// labelWav.setIcon(new ImageIcon("res/mic_0" + volume + ".png"));

}

public void onError(SpeechError error) {
DebugLog.Log("onError enter");
if (null != error) {
DebugLog.Log("onError Code:" + error.getErrorCode());
textArea.setText(error.getErrorDescription(true));
iatSpeechInitUI();

}

}

public void onEvent(int eventType, int arg1, int agr2, String msg) {
DebugLog.Log("onEvent enter");

}

};

/**
* 聽寫結束,恢復初始狀態
*/

public void iatSpeechInitUI() {

// labelWav.setIcon(new ImageIcon("res/mic_01.png"));
// jbtnRecognizer.setEnabled(true);
// ((JLabel) jbtnRecognizer.getComponent(0)).setText("開始聽寫");

}

public static void main(String[] args) {

// 初始化
StringBuffer param = new StringBuffer();
param.append( "appid=" + Version.getAppid() );
// param.append( ","+SpeechConstant.LIB_NAME_32+"=myMscName" );
SpeechUtility.createUtility( param.toString() );
VoiceSpeech t = new VoiceSpeech();

}

}
代碼解析
1.SpeechRecognizer類,語音識別類,語音識別,包括聽寫、語法識別功能。本類使用單例,調用者使用本類的對象,只需要通過createRecognizer()創建 一次對象后,便可一直使用該對象,直到通過調用destroy()進行單例對象銷毀。調 用者可通過getRecognizer()獲取當前已經創建的單例。我們在一開始導包,把相應的類導入,然后聲明語音識別類,然后在VoiceSpeech類的構造器中初始化。
2.在SpeechRecognizer類中有很多有關語音識別的方法,
(1)startListening方法,開始進行語音識別,其方法的參數是一個回調函數,這個方法是另一個類RecognizerListener聲明的實例,在其匿名內部類中重寫關鍵的方法,借此到底我們想要的結果,我們在onResult方法中重寫,把識別的結果通過json解析之后(識別的結果默認是json格式),把它依次添加到文本欄上面,之后我們對文本欄的內容進行文字字體大小等的設定
(2)stopListening方法,等錄音結束之后,調用該方法,把錄音結果通過網絡傳輸給訊飛遠程識別平臺進行解析,解析完成之后,把解析結果傳送過來
3.在main方法中先要進行SpeechUtility.createUtility,這是訊飛SDK的初始化,相當于遠程連接訊飛識別平臺,因為Java現在還不支持離線識別,所以在進行識別方法調用之前,必須連接訊飛開發平臺,這個方法的作用正是如此,其參數就是不同的識別版本
4.因為很多方法都是訊飛提供的,所以我們需要導入相應的包
具體如下
import com.iflytek.cloud.speech.RecognizerListener;
import com.iflytek.cloud.speech.RecognizerResult;
import com.iflytek.cloud.speech.SpeechError;
import com.iflytek.cloud.speech.SpeechRecognizer;
import com.iflytek.cloud.speech.SpeechUtility;
import com.iflytek.util.DebugLog;
import com.iflytek.util.JsonParser;//json解析類
import com.iflytek.util.Version;//版本類
這些在SDK 中都有
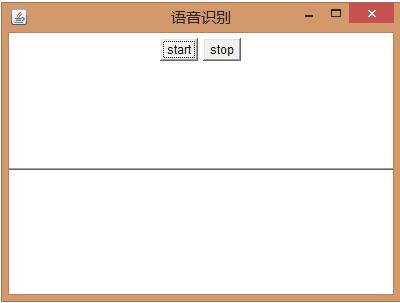
最終的結果
ps:因為只是注重識別功能,所以界面很丑。

感謝你能夠認真閱讀完這篇文章,希望小編分享的“怎么使用Java實現在線語音識別”這篇文章對大家有幫助,同時也希望大家多多支持億速云,關注億速云行業資訊頻道,更多相關知識等著你來學習!
免責聲明:本站發布的內容(圖片、視頻和文字)以原創、轉載和分享為主,文章觀點不代表本網站立場,如果涉及侵權請聯系站長郵箱:is@yisu.com進行舉報,并提供相關證據,一經查實,將立刻刪除涉嫌侵權內容。