您好,登錄后才能下訂單哦!
您好,登錄后才能下訂單哦!
Spring中XML schema擴展機制的原理是什么?相信很多沒有經驗的人對此束手無策,為此本文總結了問題出現的原因和解決方法,通過這篇文章希望你能解決這個問題。
自定義 XML 擴展
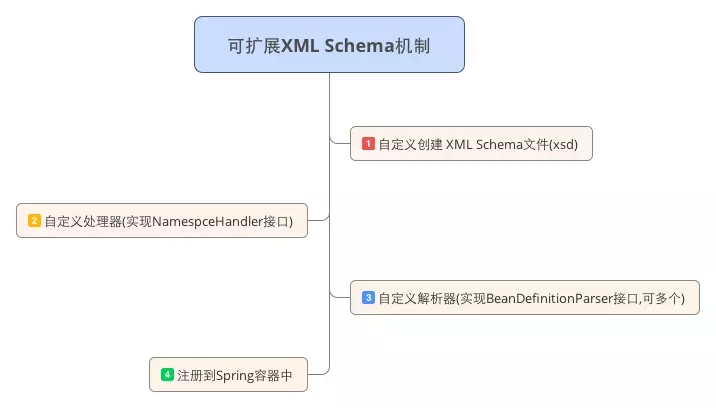
為了搞懂 Spring 的 XML 擴展機制,最直接的方式便是實現一個自定義的擴展。實現的步驟也非常簡單,分為四步:

編寫一個 XML schema 文件描述的你節點元素。
編寫一個 NamespaceHandler 的實現類
編寫一個或者多個 BeanDefinitionParser 的實現 (關鍵步驟).
注冊上述的 schema 和 handler。
我們的目的便是想要實現一個 kirito XML schema,我們的項目中可以自定義 kirito.xml,在其中會以 kirito 為標簽來定義不同的類,并在最終的測試代碼中驗證這些聲明在 kirito.xml 的類是否被 Spring 成功加載。大概像這樣,是不是和 dubbo.xml 的格式很像呢?

動手實現
有了明確的目標,我們逐步開展自己的工作。
1 編寫kirito.xsd
resources/META-INF/kirito.xsd
<?xml version="1.0" encoding="UTF-8"?>
<xsd:schema xmlns="http://www.cnkirito.moe/schema/kirito"
   xmlns:xsd="http://www.w3.org/2001/XMLSchema"
   xmlns:beans="http://www.springframework.org/schema/beans"
   targetNamespace="http://www.cnkirito.moe/schema/kirito"> ①

 <xsd:import namespace="http://www.springframework.org/schema/beans"/>

 <xsd:element name="application"> ②
  <xsd:complexType>
   <xsd:complexContent>
    <xsd:extension base="beans:identifiedType">
     <xsd:attribute name="name" type="xsd:string" use="required"/>
    </xsd:extension>
   </xsd:complexContent>
  </xsd:complexType>
 </xsd:element>

 <xsd:element name="service"> ②
  <xsd:complexType>
   <xsd:complexContent>
    <xsd:extension base="beans:identifiedType">
     <xsd:attribute name="name" type="xsd:string" use="required"/>
    </xsd:extension>
   </xsd:complexContent>
  </xsd:complexType>
 </xsd:element>


</xsd:schema>
① 注意這里的 targetNamespace="http://www.cnkirito.moe/schema/kirito" 這便是之后 kirito 標簽的關鍵點。
② kirito.xsd 定義了兩個元素: application 和 service,出于簡單考慮,都只有一個 name 字段。
schema 的意義在于它可以和 eclipse/IDEA 這樣智能化的集成開發環境形成很好的搭配,在編輯 XML 的過程中,用戶可以獲得告警和提示。 如果配置得當,可以使用自動完成功能讓用戶在事先定義好的枚舉類型中進行選擇。
2 編寫KiritoNamespaceHandler
public class KiritoNamespaceHandler extends NamespaceHandlerSupport {

 @Override
 public void init() {
  super.registerBeanDefinitionParser("application", new KiritoBeanDefinitionParser(ApplicationConfig.class));
  super.registerBeanDefinitionParser("service", new KiritoBeanDefinitionParser(ServiceBean.class));
 }
}
完成 schema 之后,還需要一個 NamespaceHandler 來幫助 Spring 解析 XML 中不同命名空間的各類元素。
<kirito:application name="kirito"/>
<dubbo:application name="dubbo"/>
<motan:application name="motan"/>
不同的命名空間需要不同的 NamespaceHandler 來處理,在今天的示例中,我們使用 KiritoNamespaceHandler 來解析 kirito 命名空間。KiritoNamespaceHandler 繼承自 NamespaceHandlerSupport 類,并在其 init() 方法中注冊了兩個 BeanDefinitionParser ,用于解析 kirito 命名空間/kirito.xsd 約束中定義的兩個元素:application,service。BeanDefinitionParser 是下一步的主角,我們暫且跳過,將重心放在父類 NamespaceHandlerSupport 之上。
public interface NamespaceHandler {
 void init();
 BeanDefinition parse(Element element, ParserContext parserContext);
 BeanDefinitionHolder decorate(Node source, BeanDefinitionHolder definition, ParserContext parserContext);
}
NamespaceHandlerSupport 是 NamespaceHandler 命名空間處理器的抽象實現,我粗略看了NamespaceHandler 的幾個實現類,parse 和 decorate 方法可以完成元素節點的組裝并通過 ParserContext 注冊到 Ioc 容器中,但實際我們并沒有調用這兩個方法,而是通過 init() 方法注冊 BeanDefinitionParser 來完成解析節點以及注冊 Bean 的工作,所以對于 NamespaceHandler,我們主要關心 init 中注冊的兩個 BeanDefinitionParser 即可。
3 編寫KiritoBeanDefinitionParser
在文章開始我們便標記到 BeanDefinitionParser 是最為關鍵的一環,每一個 BeanDefinitionParser 實現類都負責一個映射,將一個 XML 節點解析成 IOC 容器中的一個實體類。
public class KiritoBeanDefinitionParser implements BeanDefinitionParser {

 private final Class<?> beanClass;

 public KiritoBeanDefinitionParser(Class<?> beanClass) {
  this.beanClass = beanClass;
 }

 private static BeanDefinition parse(Element element, ParserContext parserContext, Class<?> beanClass) {
  RootBeanDefinition beanDefinition = new RootBeanDefinition();
  beanDefinition.setBeanClass(beanClass);
  beanDefinition.setLazyInit(false);
  String name = element.getAttribute("name");
  beanDefinition.getPropertyValues().addPropertyValue("name", name);
  parserContext.getRegistry().registerBeanDefinition(name, beanDefinition);
  return beanDefinition;
 }

 @Override
 public BeanDefinition parse(Element element, ParserContext parserContext) {
  return parse(element, parserContext, beanClass);
 }
}
由于我們的實體類是非常簡單的,所以不存在很復雜的解析代碼,而實際項目中,往往需要大量的解析步驟。parse 方法會解析一個個 XML 中的元素,使用 RootBeanDefinition 組裝成對象,并最終通過 parserContext 注冊到 IOC 容器中。
至此,我們便完成了 XML 文件中定義的對象到 IOC 容器的映射。
4 注冊schema和handler
最后一步還需要通知 Spring,告知其自定義 schema 的所在之處以及對應的處理器。
resources/META-INF/spring.handlers
http\://www.cnkirito.moe/schema/kirito=moe.cnkirito.sample.xsd.KiritoNamespaceHandler
resources/META-INF/spring.schemas
http\://www.cnkirito.moe/schema/kirito/kirito.xsd=META-INF/kirito.xsd
沒有太多可以說的,需要遵守 Spring 的約定。
至此一個自定義的 XML schema 便擴展完成了,隨后來驗證一下。
驗證擴展
我們首先定義好 kirito.xml
<?xml version="1.0" encoding="UTF-8"?>

<beans xmlns="http://www.springframework.org/schema/beans"
  xmlns:xsi="http://www.w3.org/2001/XMLSchema-instance"
  xmlns:kirito="http://www.cnkirito.moe/schema/kirito"
  xsi:schemaLocation=" http://www.springframework.org/schema/beans
        http://www.springframework.org/schema/beans/spring-beans.xsd
        http://www.cnkirito.moe/schema/kirito
        http://www.cnkirito.moe/schema/kirito/kirito.xsd">

 <kirito:application name="kirito-demo-application"/>

 <kirito:service name="kirito-demo-service"/>

</beans>
使用 Spring 去加載它,并驗證 IOC 容器中是否存在注冊成功的 Bean。
@SpringBootApplication
@ImportResource(locations = {"classpath:kirito.xml"})
public class XmlSchemaAuthoringSampleApplication {

 public static void main(String[] args) {
  ConfigurableApplicationContext applicationContext = SpringApplication.run(XmlSchemaAuthoringSampleApplication.class, args);
  ServiceBean serviceBean = applicationContext.getBean(ServiceBean.class);
  System.out.println(serviceBean.getName());
  ApplicationConfig applicationConfig = applicationContext.getBean(ApplicationConfig.class);
  System.out.println(applicationConfig.getName());
 }
}
觀察控制臺的輸出:
kirito-demo-service
kirito-demo-application
一個基礎的基于 XML schema 的擴展便完成了。
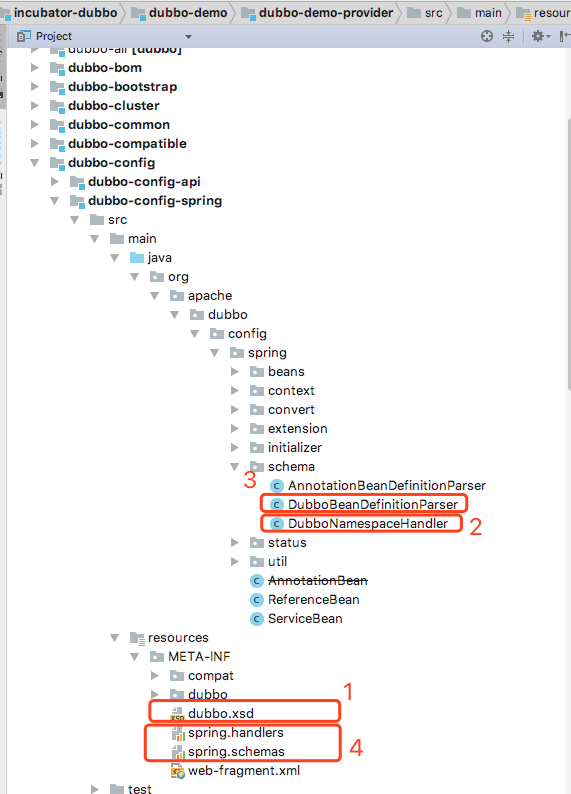
Dubbo中的XML schema擴展
最后我們以 Dubbo 為例,看看一個成熟的 XML schema 擴展是如何被應用的。

看完上述內容,你們掌握Spring中XML schema擴展機制的原理是什么的方法了嗎?如果還想學到更多技能或想了解更多相關內容,歡迎關注億速云行業資訊頻道,感謝各位的閱讀!
免責聲明:本站發布的內容(圖片、視頻和文字)以原創、轉載和分享為主,文章觀點不代表本網站立場,如果涉及侵權請聯系站長郵箱:is@yisu.com進行舉報,并提供相關證據,一經查實,將立刻刪除涉嫌侵權內容。