您好,登錄后才能下訂單哦!
您好,登錄后才能下訂單哦!
這篇文章將為大家詳細講解有關如何在Spring Boot中自定義starter,文章內容質量較高,因此小編分享給大家做個參考,希望大家閱讀完這篇文章后對相關知識有一定的了解。
創建一個用maven構建的springboot項目

pom文件配置如下:
<?xml version="1.0" encoding="UTF-8"?>
<project xmlns="http://maven.apache.org/POM/4.0.0" xmlns:xsi="http://www.w3.org/2001/XMLSchema-instance"
  xsi:schemaLocation="http://maven.apache.org/POM/4.0.0 http://maven.apache.org/xsd/maven-4.0.0.xsd">
  <modelVersion>4.0.0</modelVersion>

  <groupId>com.xjw.springboot</groupId>
  <artifactId>hellostarter</artifactId>
  <version>0.0.1-SNAPSHOT</version>
  <packaging>jar</packaging>

  <name>hello-spring-boot-starter</name>
  <description>測試自定義starter</description>

  <parent>
    <groupId>org.springframework.boot</groupId>
    <artifactId>spring-boot-starter-parent</artifactId>
    <version>1.5.2.RELEASE</version>
    <relativePath/> <!-- lookup parent from repository -->
  </parent>

  <properties>
    <project.build.sourceEncoding>UTF-8</project.build.sourceEncoding>
    <project.reporting.outputEncoding>UTF-8</project.reporting.outputEncoding>
    <java.version>1.8</java.version>
  </properties>

  <dependencies>
    <dependency>
      <groupId>org.springframework.boot</groupId>
      <artifactId>spring-boot-starter</artifactId>
    </dependency>

    <dependency>
      <groupId>org.springframework.boot</groupId>
      <artifactId>spring-boot-starter-test</artifactId>
      <scope>test</scope>
    </dependency>
    <dependency>
      <groupId>org.springframework.boot</groupId>
      <artifactId>spring-boot-configuration-processor</artifactId>
      <optional>true</optional>
    </dependency>
  </dependencies>

  <build>
    <plugins>
      <plugin>
        <groupId>org.springframework.boot</groupId>
        <artifactId>spring-boot-maven-plugin</artifactId>
      </plugin>
    </plugins>
  </build>


</project>
定義一個pojo用來接收properties中配置的信息
package com.xjw;

import org.springframework.boot.context.properties.ConfigurationProperties;

@ConfigurationProperties(prefix = "hello")
public class HelloServiceProperteis {

  private String msg;

  public String getMsg() {
    return msg;
  }

  public void setMsg(String msg) {
    this.msg = msg;
  }

}
@ConfigurationProperties:用來標識這個pojo是一個用來接收指定前綴的資源配置值
prefix:表示在配置文件中配置項前綴[/code]
編寫一個Service用來對外提供服務
package com.xjw;

public class HelloService {

  private String msg;

  public String sayHello() {
    return "Hello " + msg;
  }

  public String getMsg() {
    return msg;
  }

  public void setMsg(String msg) {
    this.msg = msg;
  }

}
配置一個pojo用來讀取上面配置的HelloServiceProperteis
package com.xjw;

import org.springframework.beans.factory.annotation.Autowired;
import org.springframework.boot.autoconfigure.condition.ConditionalOnClass;
import org.springframework.boot.autoconfigure.condition.ConditionalOnMissingBean;
import org.springframework.boot.autoconfigure.condition.ConditionalOnProperty;
import org.springframework.boot.context.properties.EnableConfigurationProperties;
import org.springframework.context.annotation.Bean;
import org.springframework.context.annotation.Configuration;

@Configuration
@EnableConfigurationProperties(value = HelloServiceProperteis.class)
@ConditionalOnClass(HelloService.class)
@ConditionalOnProperty(prefix = "hello", value = "enable", matchIfMissing = true)
public class HelloAutoConfiguration {

  @Autowired
  private HelloServiceProperteis helloServiceProperteis;

  @Bean
  @ConditionalOnMissingBean(HelloService.class)
  public HelloService helloService() {
    HelloService helloService = new HelloService();
    helloService.setMsg(helloServiceProperteis.getMsg());
    return helloService;
  }
}
@Configuration:標識此類為一個spring配置類
@EnableConfigurationProperties(value = HelloServiceProperteis.class):啟動配置文件,value用來指定我們要啟用的配置類,可以有多個,多個時我們可以這么寫value={xxProperties1.class,xxProperteis2.class....}
@ConditionalOnClass(HelloService.class):表示當classPath下存在HelloService.class文件時改配置文件類才有效
@ConditionalOnProperty(prefix = "hello", value = "enable", matchIfMissing = true):表示只有我們的配置文件是否配置了以hello為前綴的資源項值,并且在該資源項值為enable,如果沒有配置我們默認設置為enable[/code]
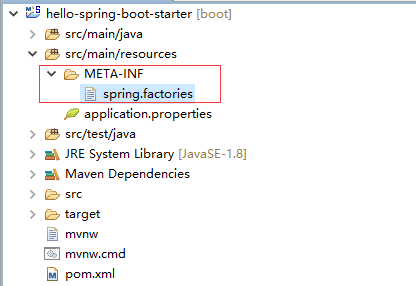
最后在src/main/resources 文件夾下新建文件夾 META-INF,在新建的META-INF文件夾下新建spring.factories

在新建的spring.factories文件中配置自動啟動類為我們之前編寫的HelloAutoConfiguration 類
org.springframework.boot.autoconfigure.EnableAutoConfiguration=com.xjw.HelloAutoConfiguration

然后就可以在其他的spring-boot項目中使用我們剛剛新建的starter了,我們來測試一下
在新建一個spring-boot項目,pom.xml配置如下:
<?xml version="1.0" encoding="UTF-8"?>
<project xmlns="http://maven.apache.org/POM/4.0.0" xmlns:xsi="http://www.w3.org/2001/XMLSchema-instance"
  xsi:schemaLocation="http://maven.apache.org/POM/4.0.0 http://maven.apache.org/xsd/maven-4.0.0.xsd">
  <modelVersion>4.0.0</modelVersion>

  <groupId>com.xjw.springboot</groupId>
  <artifactId>hellostarter.test</artifactId>
  <version>0.0.1-SNAPSHOT</version>
  <packaging>jar</packaging>

  <name>hello-spring-boot-starter-test</name>
  <description>測試自定義starter</description>

  <parent>
    <groupId>org.springframework.boot</groupId>
    <artifactId>spring-boot-starter-parent</artifactId>
    <version>1.5.2.RELEASE</version>
    <relativePath /> <!-- lookup parent from repository -->
  </parent>

  <properties>
    <project.build.sourceEncoding>UTF-8</project.build.sourceEncoding>
    <project.reporting.outputEncoding>UTF-8</project.reporting.outputEncoding>
    <java.version>1.8</java.version>
  </properties>

  <dependencies>
    <dependency>
      <groupId>org.springframework.boot</groupId>
      <artifactId>spring-boot-starter-web</artifactId>
    </dependency>

    <dependency>
      <groupId>org.springframework.boot</groupId>
      <artifactId>spring-boot-starter-test</artifactId>
      <scope>test</scope>
    </dependency>

    <dependency>
      <groupId>com.xjw.springboot</groupId>
      <artifactId>hellostarter</artifactId>
      <version>0.0.1-SNAPSHOT</version>
    </dependency>
    <dependency>
      <groupId>org.springframework.boot</groupId>
      <artifactId>spring-boot-devtools</artifactId>
    </dependency>
  </dependencies>

  <build>
    <plugins>
      <plugin>
        <groupId>org.springframework.boot</groupId>
        <artifactId>spring-boot-maven-plugin</artifactId>
      </plugin>
    </plugins>
  </build>


</project>
然后我們直接在咋們的啟動類中中嘗試使用以下我們上面定義的starter提供的HelloService:
package com.xjw;

import org.springframework.beans.factory.annotation.Autowired;
import org.springframework.boot.SpringApplication;
import org.springframework.boot.autoconfigure.SpringBootApplication;
import org.springframework.web.bind.annotation.RequestMapping;
import org.springframework.web.bind.annotation.RestController;

@RestController
@SpringBootApplication
public class HelloSpringBootStarterTestApplication {

  @Autowired
  private HelloService helloService;

  @RequestMapping("/")
  public String index() {
    return helloService.sayHello();
  }

  public static void main(String[] args) {
    SpringApplication.run(HelloSpringBootStarterTestApplication.class, args);
  }
}
接著我們修改測試項目中的application.properteis,加入如下配置:
debug=true
server.port=8888

#hello=enable
hello.msg=測試starter
最后啟動項目,觀察控制臺輸出的內容中依賴的starter,從Positive matches下我們可以看到有這么一句:
HelloAutoConfiguration matched:
- @ConditionalOnClass found required class 'com.xjw.HelloService'; @ConditionalOnMissingClass did not find unwanted class (OnClassCondition)
- @ConditionalOnProperty (hello.enable) matched (OnPropertyCondition)
或者我們打開項目依賴樹也能找到我們的starter ,這說明spring已經自動的啟動了我們的starter了,打開瀏覽器輸入地址:http://localhost:8888/將會看到如下結果

關于如何在Spring Boot中自定義starter就分享到這里了,希望以上內容可以對大家有一定的幫助,可以學到更多知識。如果覺得文章不錯,可以把它分享出去讓更多的人看到。
免責聲明:本站發布的內容(圖片、視頻和文字)以原創、轉載和分享為主,文章觀點不代表本網站立場,如果涉及侵權請聯系站長郵箱:is@yisu.com進行舉報,并提供相關證據,一經查實,將立刻刪除涉嫌侵權內容。