您好,登錄后才能下訂單哦!
您好,登錄后才能下訂單哦!
小編給大家分享一下Android studio3.6中JNI教程之helloworld的思路分析,相信大部分人都還不怎么了解,因此分享這篇文章給大家參考一下,希望大家閱讀完這篇文章后大有收獲,下面讓我們一起去了解一下吧!
jdk環境變量配置:
path中增加下面2個路徑,也就是android studio的路徑,android有自帶的jdk。
E:\Android\Android Studio\jre\bin
E:\Android\Android Studio\bin
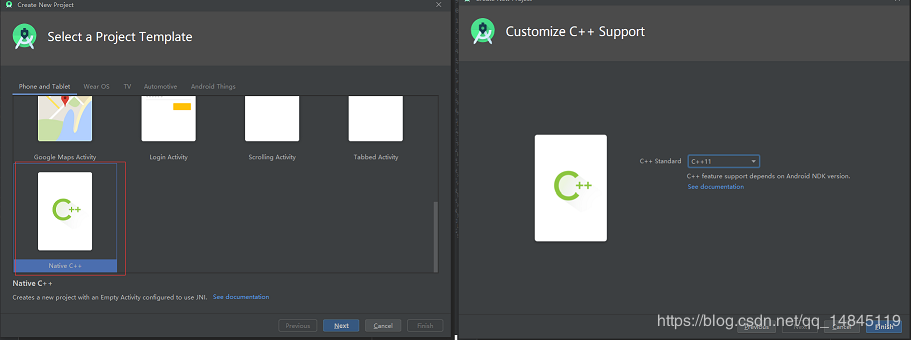
新建工程:
一定要選擇Native c++類型,最后要選c++11支持。

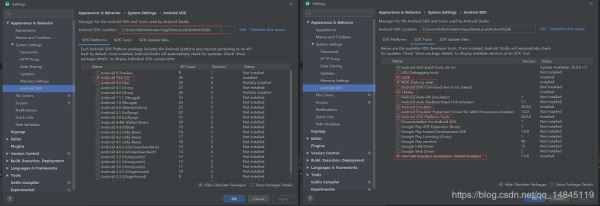
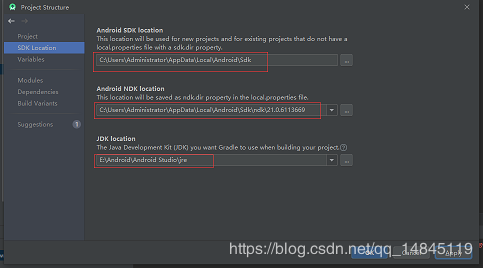
SDK設置:
File->Settings

File->Project Structure

首先確定工程的目錄結構,然后嘗試運行一下工程,使用模擬器,確保工程沒問題,

在MainActivity的同級目錄,新建一個hello.java,然后做一個簡單的實現,
package com.example.myapplication;

public class hello {
 public native int add(int i, int j);
}
使用android studio自帶的Terminal進入該hello.java所在目錄,執行,
javac hello.java
Terminal下回到app/src/main所在目錄,執行,
javah -d jni -classpath ./java com.example.myapplication.hello
此時,會在main目錄下面生成一個和cpp,java同級的目錄jni。
在該目錄結構里面新建hello.cpp。
將com_example_myapplication_hello.h中的內容復制進hello.cpp中,并且進行方法的實現,
#include <jni.h>
/* Header for class com_example_myapplication_hello */

#ifndef _Included_com_example_myapplication_hello
#define _Included_com_example_myapplication_hello
#ifdef __cplusplus
extern "C" {
#endif
/*
 * Class: com_example_myapplication_hello
 * Method: add
 * Signature: (II)I
 */

#include "com_example_myapplication_hello.h"

JNIEXPORT jint JNICALL Java_com_example_myapplication_hello_add
 (JNIEnv *, jobject, jint i, jint j){return i+j;}

#ifdef __cplusplus
}
#endif
#endif將com_example_myapplication_hello.h,hello.cpp這連個文件復制到cpp所在的目錄,
然后修改CMakeLists.txt,增加,
add_library( # Sets the name of the library.
 hello

 # Sets the library as a shared library.
 SHARED

 # Provides a relative path to your source file(s).
 hello.cpp )
修改target_link_libraries如下,
target_link_libraries( # Specifies the target library.
  native-lib
  hello
  # Links the target library to the log library
  # included in the NDK.
  ${log-lib} )
修改hello.java的調用方式,
package com.example.myapplication;

public class hello {

 static {
 System.loadLibrary("hello");
 }
 public native int add(int i, int j);
}修改MainActivity.java中的onCreate函數,
protected void onCreate(Bundle savedInstanceState) {
 super.onCreate(savedInstanceState);
 setContentView(R.layout.activity_main);

 // Example of a call to a native method
 TextView tv = findViewById(R.id.sample_text);
 //tv.setText(stringFromJNI());
 tv.setText("hello 9+10= " + new hello().add(9, 10));
}然后,rebuild project,沒有錯誤后,然后run app。
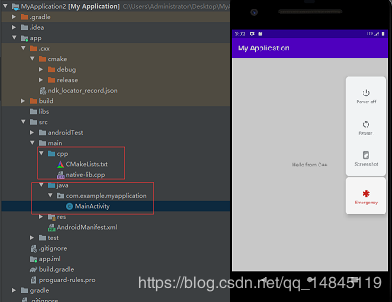
最終程序整體目錄結構,以及運行效果,

JNI的整體流程思路:
Java先定義一個類,類中定義一個需要c++來實現的方法.通過javah生成需要c++實現的.h的c++頭文件實現.h的c++頭文件中定義的方法Cmake編譯運行
以上是“Android studio3.6中JNI教程之helloworld的思路分析”這篇文章的所有內容,感謝各位的閱讀!相信大家都有了一定的了解,希望分享的內容對大家有所幫助,如果還想學習更多知識,歡迎關注億速云行業資訊頻道!
免責聲明:本站發布的內容(圖片、視頻和文字)以原創、轉載和分享為主,文章觀點不代表本網站立場,如果涉及侵權請聯系站長郵箱:is@yisu.com進行舉報,并提供相關證據,一經查實,將立刻刪除涉嫌侵權內容。