溫馨提示×
您好,登錄后才能下訂單哦!
點擊 登錄注冊 即表示同意《億速云用戶服務條款》
您好,登錄后才能下訂單哦!
本文實例講述了Spring實戰之屬性覆蓋占位符配置器用法。分享給大家供大家參考,具體如下:
一 配置文件
<?xml version="1.0" encoding="GBK"?>
<beans xmlns:xsi="http://www.w3.org/2001/XMLSchema-instance"
   xmlns="http://www.springframework.org/schema/beans"
   xsi:schemaLocation="http://www.springframework.org/schema/beans
   http://www.springframework.org/schema/beans/spring-beans-4.0.xsd">
   <!-- PropertyOverrideConfigurer是一個容器后處理器,它會讀取
   屬性文件信息,并用這些信息設置覆蓋Spring配置文件的數據 -->
   <bean class=
   "org.springframework.beans.factory.config.PropertyOverrideConfigurer">
      <property name="locations">
        <list>
           <value>dbconn.properties</value>
           <!-- 如果有多個屬性文件,依次在下面列出來 -->
        </list>
      </property>
   </bean>
   <!-- 定義數據源Bean,使用C3P0數據源實現,
      配置該Bean時沒有指定任何信息,但Properties文件里的
      信息將會直接覆蓋該Bean的屬性值 -->
   <bean id="dataSource" class="com.mchange.v2.c3p0.ComboPooledDataSource"
      destroy-method="close"/>
</beans>
二 屬性文件
dataSource.driverClass=com.mysql.jdbc.Driver
dataSource.jdbcUrl=jdbc:mysql://localhost:3306/spring
dataSource.user=root
dataSource.password=32147
三 測試類
package lee;
import javax.sql.DataSource;
import java.sql.*;
import org.springframework.context.*;
import org.springframework.context.support.*;
public class BeanTest
{
  public static void main(String[] args)throws Exception
  {
    ApplicationContext ctx = new
      ClassPathXmlApplicationContext("beans.xml");
    DataSource ds = (DataSource)ctx.getBean("dataSource");
    Connection conn = ds.getConnection();
    PreparedStatement pstmt = conn.prepareStatement(
      "insert into news_inf value(null , ? , ?)");
    pstmt.setString(1 , "瘋狂Java講義3");
    pstmt.setString(2 , "瘋狂iOS講義3");
    pstmt.executeUpdate();
    pstmt.close();
    conn.close();
  }
}
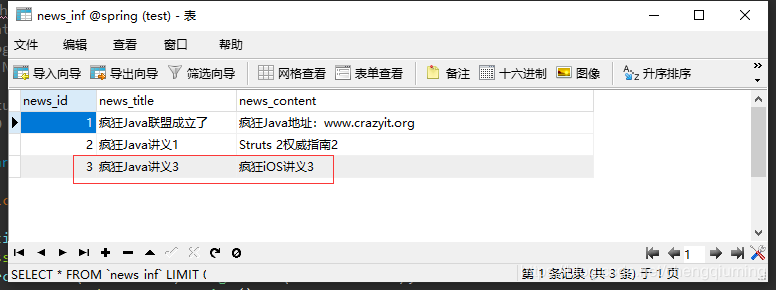
四 測試結果

更多關于java相關內容感興趣的讀者可查看本站專題:《Spring框架入門與進階教程》、《Java數據結構與算法教程》、《Java操作DOM節點技巧總結》、《Java文件與目錄操作技巧匯總》和《Java緩存操作技巧匯總》
希望本文所述對大家java程序設計有所幫助。
免責聲明:本站發布的內容(圖片、視頻和文字)以原創、轉載和分享為主,文章觀點不代表本網站立場,如果涉及侵權請聯系站長郵箱:is@yisu.com進行舉報,并提供相關證據,一經查實,將立刻刪除涉嫌侵權內容。