溫馨提示×
您好,登錄后才能下訂單哦!
點擊 登錄注冊 即表示同意《億速云用戶服務條款》
您好,登錄后才能下訂單哦!
怎么在SpringBoot中實現一個異步任務?相信很多沒有經驗的人對此束手無策,為此本文總結了問題出現的原因和解決方法,通過這篇文章希望你能解決這個問題。
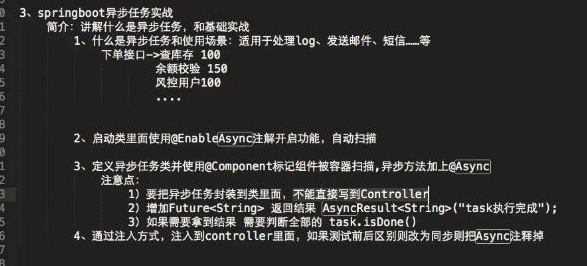
步驟,如圖所示:

1.添加異步任務業務類
package top.ytheng.demo.task;

import java.util.concurrent.Future;

import org.springframework.scheduling.annotation.Async;
import org.springframework.scheduling.annotation.AsyncResult;
import org.springframework.stereotype.Component;

//異步任務業務類
@Component
//標記此類是異步類,也可在方法中標記
//不加,則類里面的方法為同步執行
@Async
public class AsyncTask {

  public void task1() throws InterruptedException {
    long begin = System.currentTimeMillis();
    Thread.sleep(1000);
    long end = System.currentTimeMillis();
    System.out.println("任務1耗時:" + (end - begin));
  }

  public void task2() throws InterruptedException {
    long begin = System.currentTimeMillis();
    Thread.sleep(2000);
    long end = System.currentTimeMillis();
    System.out.println("任務2耗時:" + (end - begin));
  }

  public void task3() throws InterruptedException {
    long begin = System.currentTimeMillis();
    Thread.sleep(3000);
    long end = System.currentTimeMillis();
    System.out.println("任務3耗時:" + (end - begin));
  }

  //測試拿到返回結果
  public Future<String> task4() throws InterruptedException {
    long begin = System.currentTimeMillis();
    Thread.sleep(1000);
    long end = System.currentTimeMillis();
    System.out.println("任務4耗時:" + (end - begin));
    return new AsyncResult<String>("任務4");
  }

  public Future<String> task5() throws InterruptedException {
    long begin = System.currentTimeMillis();
    Thread.sleep(2000);
    long end = System.currentTimeMillis();
    System.out.println("任務5耗時:" + (end - begin));
    return new AsyncResult<String>("任務5");
  }

  public Future<String> task6() throws InterruptedException {
    long begin = System.currentTimeMillis();
    Thread.sleep(3000);
    long end = System.currentTimeMillis();
    System.out.println("任務6耗時:" + (end - begin));
    return new AsyncResult<String>("任務6");
  }
}
2.添加測試控制器
package top.ytheng.demo.controller;

import java.util.concurrent.ExecutionException;
import java.util.concurrent.Future;

import org.springframework.beans.factory.annotation.Autowired;
import org.springframework.web.bind.annotation.GetMapping;
import org.springframework.web.bind.annotation.RequestMapping;
import org.springframework.web.bind.annotation.RestController;

import top.ytheng.demo.task.AsyncTask;

@RestController
@RequestMapping("api/v1/async")
public class TaskController {

  @Autowired
  private AsyncTask asyncTask;

  @GetMapping("/test")
  public Object test() throws InterruptedException, ExecutionException {
    long begin = System.currentTimeMillis();
    //asyncTask.task1();
    //asyncTask.task2();
    //asyncTask.task3();
    Future<String> result1 = asyncTask.task4();
    Future<String> result2 = asyncTask.task5();
    Future<String> result3 = asyncTask.task6();
    System.out.println("返回結果:" + result1.get() + "," + result2.get() + "," + result3.get());
    for(;;) {
      if(result1.isDone() && result2.isDone() && result3.isDone()) {
        break;
      }
    }
    long end = System.currentTimeMillis();
    long total = end - begin;
    System.out.println("總耗時:" + total);
    return "總耗時:" + total;
  }
}
3.添加啟動類
package top.ytheng.demo;

import org.mybatis.spring.annotation.MapperScan;
import org.springframework.scheduling.annotation.EnableAsync;
import org.springframework.scheduling.annotation.EnableScheduling;

import org.springframework.boot.autoconfigure.SpringBootApplication;
import org.springframework.boot.web.servlet.ServletComponentScan;

@SpringBootApplication //等于下面3個
//@SpringBootConfiguration
//@EnableAutoConfiguration
//@ComponentScan
//攔截器用到
@ServletComponentScan
//MyBatis用到
@MapperScan("top.ytheng.demo.mapper")
//定時使用(開啟定時任務)
@EnableScheduling
//開啟異步任務
@EnableAsync
public class DemoApplication {

  public static void main(String[] args) {
    SpringApplication.run(DemoApplication.class, args);
  }
}
4.右鍵項目Run As啟動,訪問url
http://localhost:8080/api/v1/async/test
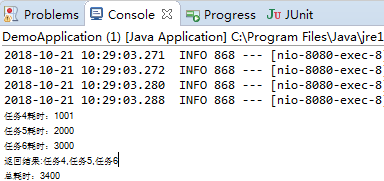
結果:

看完上述內容,你們掌握怎么在SpringBoot中實現一個異步任務的方法了嗎?如果還想學到更多技能或想了解更多相關內容,歡迎關注億速云行業資訊頻道,感謝各位的閱讀!
免責聲明:本站發布的內容(圖片、視頻和文字)以原創、轉載和分享為主,文章觀點不代表本網站立場,如果涉及侵權請聯系站長郵箱:is@yisu.com進行舉報,并提供相關證據,一經查實,將立刻刪除涉嫌侵權內容。