溫馨提示×
您好,登錄后才能下訂單哦!
點擊 登錄注冊 即表示同意《億速云用戶服務條款》
您好,登錄后才能下訂單哦!
這篇文章主要介紹C#如何實現圖片切割、切圖、裁剪,文中介紹的非常詳細,具有一定的參考價值,感興趣的小伙伴們一定要看完!
具體內容如下
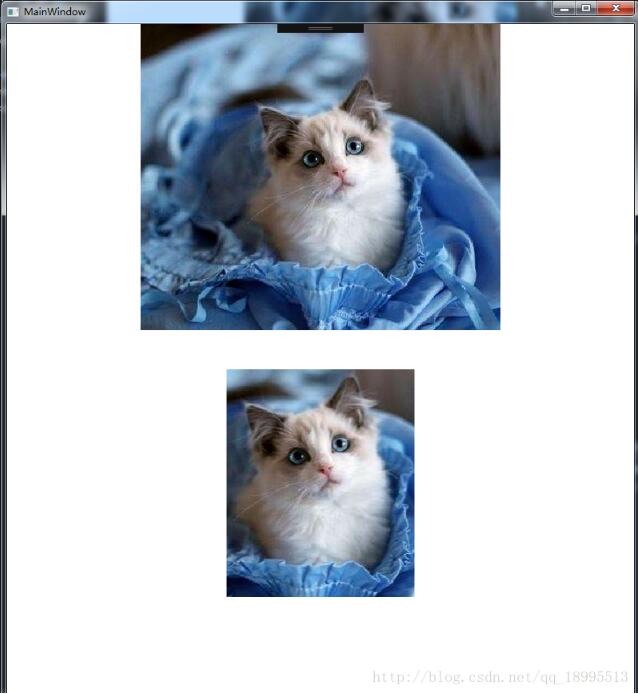
前臺準備兩個Image控件。上面是顯示原圖,下面顯示切割后的效果。
<StackPanel Orientation="Vertical">
 <Image Width="450" Height="383" Source="C:\Users\Administrator\Documents\Visual Studio 2015\Projects\SplitPic\SplitPic\Images\1.jpg"/>
 <Image x:Name="img" Stretch="None" Width="450" Height="383" />
</StackPanel>
對應的后臺代碼:
public partial class MainWindow : Window
{
 public MainWindow()
 {
 InitializeComponent();

 // 設置原圖
 img.Source = new BitmapImage(new Uri(@"Images/1.jpg", UriKind.Relative));

 // 切割圖片
 ImageSource imageSource = img.Source;
 Bitmap bitmap = SystemUtils.ImageSourceToBitmap(imageSource);
 BitmapSource bitmapSource = SystemUtils.BitmapToBitmapImage(bitmap);
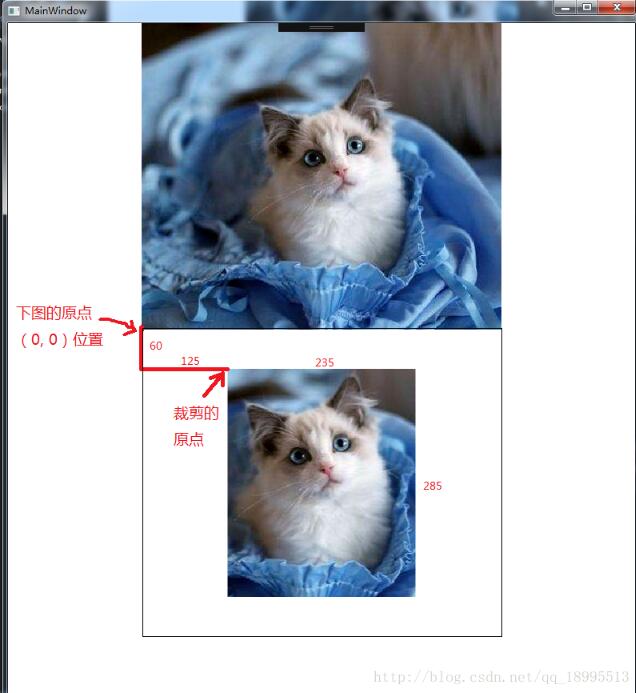
 BitmapSource newBitmapSource = SystemUtils.CutImage(bitmapSource, new Int32Rect(125, 60, 235, 285));

 // 使用切割后的圖源
 img.Source = newBitmapSource;
 }

}


// 圖像工具類
public static class SystemUtils
{
 /// <summary>
 /// 切圖
 /// </summary>
 /// <param name="bitmapSource">圖源</param>
 /// <param name="cut">切割區域</param>
 /// <returns></returns>
 public static BitmapSource CutImage(BitmapSource bitmapSource, Int32Rect cut)
 {
 //計算Stride
 var stride = bitmapSource.Format.BitsPerPixel * cut.Width / 8;
 //聲明字節數組
 byte[] data = new byte[cut.Height * stride];
 //調用CopyPixels
 bitmapSource.CopyPixels(cut, data, stride, 0);

 return BitmapSource.Create(cut.Width, cut.Height, 0, 0, PixelFormats.Bgr32, null, data, stride);
 }

 // ImageSource --> Bitmap
 public static System.Drawing.Bitmap ImageSourceToBitmap(ImageSource imageSource)
 {
 BitmapSource m = (BitmapSource)imageSource;

 System.Drawing.Bitmap bmp = new System.Drawing.Bitmap(m.PixelWidth, m.PixelHeight, System.Drawing.Imaging.PixelFormat.Format32bppPArgb);

 System.Drawing.Imaging.BitmapData data = bmp.LockBits(
 new System.Drawing.Rectangle(System.Drawing.Point.Empty, bmp.Size), System.Drawing.Imaging.ImageLockMode.WriteOnly, System.Drawing.Imaging.PixelFormat.Format32bppPArgb);

 m.CopyPixels(Int32Rect.Empty, data.Scan0, data.Height * data.Stride, data.Stride); bmp.UnlockBits(data);

 return bmp;
 }

 // Bitmap --> BitmapImage
 public static BitmapImage BitmapToBitmapImage(Bitmap bitmap)
 {
 using (MemoryStream stream = new MemoryStream())
 {
  bitmap.Save(stream, ImageFormat.Bmp);

  stream.Position = 0;
  BitmapImage result = new BitmapImage();
  result.BeginInit();
  // According to MSDN, "The default OnDemand cache option retains access to the stream until the image is needed."
  // Force the bitmap to load right now so we can dispose the stream.
  result.CacheOption = BitmapCacheOption.OnLoad;
  result.StreamSource = stream;
  result.EndInit();
  result.Freeze();

  return result;
 }
 }
}
運行后的效果如下:

補充:關于剪裁的位置和區域的填寫說明,如下圖。

C#是一個簡單、通用、面向對象的編程語言,它由微軟Microsoft開發,繼承了C和C++強大功能,并且去掉了一些它們的復雜特性,C#綜合了VB簡單的可視化操作和C++的高運行效率,以其強大的操作能力、優雅的語法風格、創新的語言特性和便捷的面向組件編程從而成為.NET開發的首選語言,但它不適用于編寫時間急迫或性能非常高的代碼,因為C#缺乏性能極高的應用程序所需要的關鍵功能。
以上是“C#如何實現圖片切割、切圖、裁剪”這篇文章的所有內容,感謝各位的閱讀!希望分享的內容對大家有幫助,更多相關知識,歡迎關注億速云行業資訊頻道!
免責聲明:本站發布的內容(圖片、視頻和文字)以原創、轉載和分享為主,文章觀點不代表本網站立場,如果涉及侵權請聯系站長郵箱:is@yisu.com進行舉報,并提供相關證據,一經查實,將立刻刪除涉嫌侵權內容。