溫馨提示×
您好,登錄后才能下訂單哦!
點擊 登錄注冊 即表示同意《億速云用戶服務條款》
您好,登錄后才能下訂單哦!
這篇文章給大家介紹toast怎么在vue.js中使用,內容非常詳細,感興趣的小伙伴們可以參考借鑒,希望對大家能有所幫助。
1.首先引入
import { Toast } from 'vant'寫個小列子
綁定一個click事件

2.寫事件
在methods寫方法
showToast() {
    this.$toast({
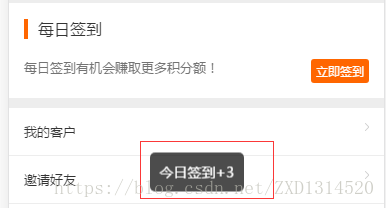
     message: "今日簽到+3",
     })
  },
3.效果圖如下

一個簡單的toast提示成就好了
下面通過實例代碼看下vue 中使用 Toast彈框
import { ToastPlugin,ConfirmPlugin,AlertPlugin} from 'vux'
Vue.use(ToastPlugin)
Vue.use(ConfirmPlugin)
Vue.use(AlertPlugin)
//公用的彈窗(全局變量)
Vue.prototype.showToast = function( showPositionValue,type,text,width="10em"){
 this.$vux.toast.show({
 showPositionValue: false,
 text: text,
 type: type,
 width: width,
 position: 'middle'
 })
}
//公用alert confirm
const Message = {};
Message.install = () => {
 const msg = {
   alert: config => {
   let def = {
    title:'提示',
    content:'系統異常,請重新登錄后再試!',
    buttonText:'確定'
   }
   if(typeof config === 'string' || typeof config === 'number'){
  Vue.$vux.alert.show(Object.assign(def,{content:config}));
 }else{
  Vue.$vux.alert.show(Object.assign(def,config));
 }
},
 confirm: config => {
  let isConfirm = false;
  let def = {
    title:'提示',
    content:'系統異常,請重新登錄后再試!',
    confirmText:'確定',
    cancelText:'取消',
    onConfirm:() =>{
    isConfirm = true;
 }
 }
  if(typeof config === 'string' || typeof config === 'number'){
   Vue.$vux.confirm.show(Object.assign(def,{content:config}));
  }else{
   Vue.$vux.confirm.show(Object.assign(def,config));
  }
 /*return new Promise((resolve,reject) => {
  if(isConfirm){
  resolve();
  }
  })*/
 },
}
 Object.entries(msg).forEach(([method,fn]) => {
  Vue.prototype[method] = fn;
})
}
Vue.use(Message)
//使用例子
_this.confirm({
 title:'提示',
 content: '確定要關閉訂單',
 onConfirm() {
  console.log('取消訂單了');
 }
});
關于toast怎么在vue.js中使用就分享到這里了,希望以上內容可以對大家有一定的幫助,可以學到更多知識。如果覺得文章不錯,可以把它分享出去讓更多的人看到。
免責聲明:本站發布的內容(圖片、視頻和文字)以原創、轉載和分享為主,文章觀點不代表本網站立場,如果涉及侵權請聯系站長郵箱:is@yisu.com進行舉報,并提供相關證據,一經查實,將立刻刪除涉嫌侵權內容。