您好,登錄后才能下訂單哦!
您好,登錄后才能下訂單哦!
官網地址:https://dev.mysql.com/downloads/mysql/
我這里是RHEL6.5的系統,因此選擇RedHat 6 x86,64bit操作系統---下載第一個RPM Bundle即可--mysql-8.0.11-1.el6.x86_64.rpm-bundle.tar。
目前MySQL8.0.11社區版提供了多種多樣的安裝方式,但是并未發現針對Linux Generic安裝包包含的mysql_secure_installation的安裝說明。
因此這里使用推薦的RPM安裝:
一、mysql-8.0.11-1.el6.x86_64.rpm-bundle.tar解壓后有如下7個文件:
-rw-r--r-- 1 root root 28987588 Apr 9 01:06 mysql-community-client-8.0.11-1.el6.x86_64.rpm
-rw-r--r-- 1 root root  672184 Apr 9 01:06 mysql-community-common-8.0.11-1.el6.x86_64.rpm
-rw-r--r-- 1 root root  4443296 Apr 9 01:06 mysql-community-devel-8.0.11-1.el6.x86_64.rpm
-rw-r--r-- 1 root root  2579460 Apr 9 01:06 mysql-community-libs-8.0.11-1.el6.x86_64.rpm
-rw-r--r-- 1 root root  1902676 Apr 9 01:06 mysql-community-libs-compat-8.0.11-1.el6.x86_64.rpm
-rw-r--r-- 1 root root 395918848 Apr 9 01:07 mysql-community-server-8.0.11-1.el6.x86_64.rpm
-rw-r--r-- 1 root root 49092596 Apr 9 01:07 mysql-community-test-8.0.11-1.el6.x86_64.rpm
然后創建mysql用戶:
useradd mysql
passwd mysql
二、安裝順序為:(建議裝之前先把之前的mysql相關包全部卸載,rpm -e --nodeps <包名>即可)
[root@python ~]# rpm -ivh mysql-community-common-8.0.11-1.el6.x86_64.rpm
warning: mysql-community-common-8.0.11-1.el6.x86_64.rpm: Header V3 DSA/SHA1 Signature, key ID 5072e1f5: NOKEY
Preparing...        ########################################### [100%]
  1:mysql-community-common ########################################### [100%]
[root@python ~]# rpm -ivh mysql-community-libs-8.0.11-1.el6.x86_64.rpm
warning: mysql-community-libs-8.0.11-1.el6.x86_64.rpm: Header V3 DSA/SHA1 Signature, key ID 5072e1f5: NOKEY
Preparing...        ########################################### [100%]
  1:mysql-community-libs  ########################################### [100%]
[root@python ~]# rpm -ivh mysql-community-libs-compat-8.0.11-1.el6.x86_64.rpm
warning: mysql-community-libs-compat-8.0.11-1.el6.x86_64.rpm: Header V3 DSA/SHA1 Signature, key ID 5072e1f5: NOKEY
Preparing...        ########################################### [100%]
  file /usr/lib64/mysql/libmysqlclient.so.16.0.0 from install of mysql-community-libs-compat-8.0.11-1.el6.x86_64 conflicts with file from package mysql-libs-5.1.73-8.0.1.el6_8.x86_64
  file /usr/lib64/mysql/libmysqlclient_r.so.16.0.0 from install of mysql-community-libs-compat-8.0.11-1.el6.x86_64 conflicts with file from package mysql-libs-5.1.73-8.0.1.el6_8.x86_64
[root@python ~]# rpm -e --nodeps mysql-libs-5.1.73-8.0.1.el6_8.x86_64
[root@python ~]# rpm -ivh mysql-community-libs-compat-8.0.11-1.el6.x86_64.rpm
warning: mysql-community-libs-compat-8.0.11-1.el6.x86_64.rpm: Header V3 DSA/SHA1 Signature, key ID 5072e1f5: NOKEY
Preparing...        ########################################### [100%]
  1:mysql-community-libs-co########################################### [100%]
[root@python ~]# rpm -ivh mysql-community-server-8.0.11-1.el6.x86_64.rpm
warning: mysql-community-server-8.0.11-1.el6.x86_64.rpm: Header V3 DSA/SHA1 Signature, key ID 5072e1f5: NOKEY
error: Failed dependencies:
  mysql-community-client(x86-64) >= 8.0.0 is needed by mysql-community-server-8.0.11-1.el6.x86_64
[root@python ~]# rpm -ivh mysql-community-client-8.0.11-1.el6.x86_64.rpm
warning: mysql-community-client-8.0.11-1.el6.x86_64.rpm: Header V3 DSA/SHA1 Signature, key ID 5072e1f5: NOKEY
Preparing...        ########################################### [100%]
  1:mysql-community-client ########################################### [100%]
[root@python ~]# rpm -ivh mysql-community-server-8.0.11-1.el6.x86_64.rpm
warning: mysql-community-server-8.0.11-1.el6.x86_64.rpm: Header V3 DSA/SHA1 Signature, key ID 5072e1f5: NOKEY
Preparing...        ########################################### [100%]
  1:mysql-community-server ########################################### [100%]
[root@python ~]# rpm -ivh mysql-community-devel-8.0.11-1.el6.x86_64.rpm
warning: mysql-community-devel-8.0.11-1.el6.x86_64.rpm: Header V3 DSA/SHA1 Signature, key ID 5072e1f5: NOKEY
Preparing...        ########################################### [100%]
  1:mysql-community-devel ########################################### [100%]
^[[A[root@python ~]# rpm -ivh mysql-community-test-8.0.11-1.el6.x86_64.rpm
warning: mysql-community-test-8.0.11-1.el6.x86_64.rpm: Header V3 DSA/SHA1 Signature, key ID 5072e1f5: NOKEY
error: Failed dependencies:
  perl(JSON) is needed by mysql-community-test-8.0.11-1.el6.x86_64
--懶的去裝perl了,因此測試套件就不裝了。
三、安裝完畢后相關信息如下:
[root@python ~]# mysql -V
mysql Ver 8.0.11 for Linux on x86_64 (MySQL Community Server - GPL)
[root@python ~]# ll /etc/init.d/mysqld
-rwxr-xr-x 1 root root 7166 Apr 8 16:21 /etc/init.d/mysqld
[root@python ~]# ll /etc/my.cnf --配置文件位置
-rw-r--r-- 1 root root 1188 Apr 8 16:21 /etc/my.cnf
默認的datadir是在/var/lib/mysql/,可以通過修改my.cnf修改,啟動命令如下:
[root@python ~]# service mysqld start
Initializing MySQL database:                [ OK ]
Starting mysqld:
[ OK ]
四、發現沒密碼不能登錄,于是添加skip-grant-tables到my.cnf,重啟進去重置密碼
mysql> alter user root@'localhost' identified by 'mysql';
ERROR 1290 (HY000): The MySQL server is running with the --skip-grant-tables option so it cannot execute this statement
mysql> exit
Bye
居然不能改。。。于是:
mysql> delete from mysql.user where user='root';
Query OK, 1 row affected (0.10 sec)
mysql> flush privileges;
Query OK, 0 rows affected (0.00 sec)
mysql> create user root@'localhost' identified by 'mysql';
ERROR 1819 (HY000): Your password does not satisfy the current policy requirements
還是不能改,查看密碼復雜度要求:
mysql> show variables like '%pass%';
+----------------------------------------------+-----------------+
| Variable_name                | Value      |
+----------------------------------------------+-----------------+
| caching_sha2_password_auto_generate_rsa_keys | ON       |
| caching_sha2_password_private_key_path    | private_key.pem |
| caching_sha2_password_public_key_path    | public_key.pem |
| default_password_lifetime          | 0        |
| disconnect_on_expired_password        | ON       |
| mysql_native_password_proxy_users      | OFF       |
| password_history               | 0        |
| password_reuse_interval           | 0        |
| report_password               |         |
| sha256_password_auto_generate_rsa_keys    | ON       |
| sha256_password_private_key_path       | private_key.pem |
| sha256_password_proxy_users         | OFF       |
| sha256_password_public_key_path       | public_key.pem |
| validate_password.check_user_name      | ON       |
| validate_password.dictionary_file      |         |
| validate_password.length           | 8        |
| validate_password.mixed_case_count      | 1        |
| validate_password.number_count        | 1        |
| validate_password.policy           | MEDIUM     |
| validate_password.special_char_count     | 1        |
+----------------------------------------------+-----------------+
查看官網https://dev.mysql.com/doc/refman/8.0/en/validate-password-options-variables.html#sysvar_validate_password.policy
發現此值有3個,如下所示:

于是設置為0,然后將validate_password.length設置為4,表示最少需要4字符。之所以設置為4是因為這個參數的值不能小于如下公式的計算結果:
validate_password.number_count
+ validate_password.special_char_count
+ (2 * validate_password.mixed_case_count)
于是繼續創建用戶,MySQL8.0取消了直接grant創建用戶的語法,只能先create user再grant,因此創建root如下:
mysql> create user root@'localhost' identified by 'mysql';
ERROR 1396 (HY000): Operation CREATE USER failed for 'root'@'localhost'
mysql> FLUSH PRIVILEGES;
Query OK, 0 rows affected (0.00 sec)
mysql> create user root@'localhost' identified by 'mysql';
ERROR 1396 (HY000): Operation CREATE USER failed for 'root'@'localhost'
尼瑪...什么玩意兒?
于是去逛了一圈stackoverflow,都說這是一個BUG,于是操作如下:
mysql> drop user root@'localhost';  --是的沒錯,雖然沒有root@'localhost'用戶,但你還是要刪一遍。
Query OK, 0 rows affected (0.05 sec)
mysql> FLUSH PRIVILEGES;
Query OK, 0 rows affected (0.01 sec)
mysql> create user root@'localhost' identified by 'mysql';
Query OK, 0 rows affected (0.03 sec)
mysql> grant all on *.* to root@'localhost' with grant option;
Query OK, 0 rows affected (0.03 sec)
終于改完密碼了...去掉參數文件的skip-grant-tables參數,service mysqld restart重啟服務。
五、終于設置好密碼了,建一個測試用戶leo,然后嘗試遠程連接下吧:
$ mysql -uleo -pmysql -h292.168.1.193
mysql: [Warning] Using a password on the command line interface can be insecure.
ERROR 2059 (HY000): Authentication plugin 'caching_sha2_password' cannot be loaded: /usr/lib/mysql/plugin/caching_sha2_password.so: cannot open shared object file: No such file or directory
我這5.7的mysql工具都連不上,這就尷尬了,查看認證相關參數:
mysql> show variables like '%auth%';
+-------------------------------+-----------------------+
| Variable_name         | Value         |
+-------------------------------+-----------------------+
| default_authentication_plugin | caching_sha2_password |
+-------------------------------+-----------------------+
1 row in set (0.02 sec)
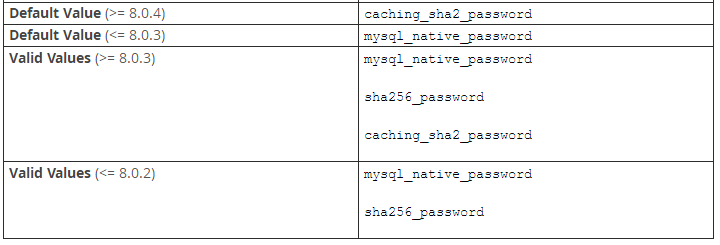
查看官網發現此值的取值如下:

官網還說此值影響create user不顯式指定auth plugin時密碼的默認加密算法,臥槽...那豈不是說我之前創建的leo用戶使用的是默認的caching_sha2_password認證,查看一下:
mysql> select user,host,plugin from mysql.user;
+------------------+-----------+-----------------------+
| user       | host   | plugin        |
+------------------+-----------+-----------------------+
| leo       | %     | caching_sha2_password |
| mysql.infoschema | localhost | mysql_native_password |
| mysql.session  | localhost | mysql_native_password |
| mysql.sys    | localhost | mysql_native_password |
| root       | localhost | caching_sha2_password |
+------------------+-----------+-----------------------+
完了,全TM完了......
顯然不能直接update plugin,因為這可能導致加密的密碼無法被正確解密,你所有的密碼都會變異,因此除root@'localhost'外全部刪掉重建。
首先需要在my.cnf里添加:default_authentication_plugin=mysql_native_password,然后service mysqld restart重啟服務:
mysql> drop user leo;
Query OK, 0 rows affected (0.10 sec)
mysql> flush privileges;
Query OK, 0 rows affected (0.00 sec)
mysql> create user leo identified by 'mysql';
Query OK, 0 rows affected (0.02 sec)
mysql> grant all on *.* to leo;
Query OK, 0 rows affected (0.08 sec)

$mysql -V
mysql Ver 14.14 Distrib 5.7.20, for Linux (x86_64) using EditLine wrapper
$ mysql -uleo -pmysql -h292.168.1.193
mysql: [Warning] Using a password on the command line interface can be insecure.
Welcome to the MySQL monitor. Commands end with ; or \g.
Your MySQL connection id is 16
Server version: 8.0.11 MySQL Community Server - GPL
Copyright (c) 2000, 2017, Oracle and/or its affiliates. All rights reserved.
Oracle is a registered trademark of Oracle Corporation and/or its
affiliates. Other names may be trademarks of their respective
owners.
Type 'help;' or '\h' for help. Type '\c' to clear the current input statement.
mysql>
至此遠程連接正常。
總結
以上所述是小編給大家介紹的MySql 8.0.11安裝配置教程,希望對大家有所幫助,如果大家有任何疑問請給我留言,小編會及時回復大家的。在此也非常感謝大家對億速云網站的支持!
免責聲明:本站發布的內容(圖片、視頻和文字)以原創、轉載和分享為主,文章觀點不代表本網站立場,如果涉及侵權請聯系站長郵箱:is@yisu.com進行舉報,并提供相關證據,一經查實,將立刻刪除涉嫌侵權內容。