溫馨提示×
您好,登錄后才能下訂單哦!
點擊 登錄注冊 即表示同意《億速云用戶服務條款》
您好,登錄后才能下訂單哦!
前言
總結一下最近看的關于opencv圖像幾何變換的一些筆記.
這是原圖:

1.平移
import cv2
import numpy as np

img = cv2.imread("image0.jpg", 1)
imgInfo = img.shape
height = imgInfo[0]
width = imgInfo[1]
mode = imgInfo[2]

dst = np.zeros(imgInfo, np.uint8)

for i in range( height ):
  for j in range( width - 100 ):
    dst[i, j + 100] = img[i, j]

cv2.imshow('image', dst)
cv2.waitKey(0)
demo很簡單,就是將圖像向右平移了100個像素.如圖:

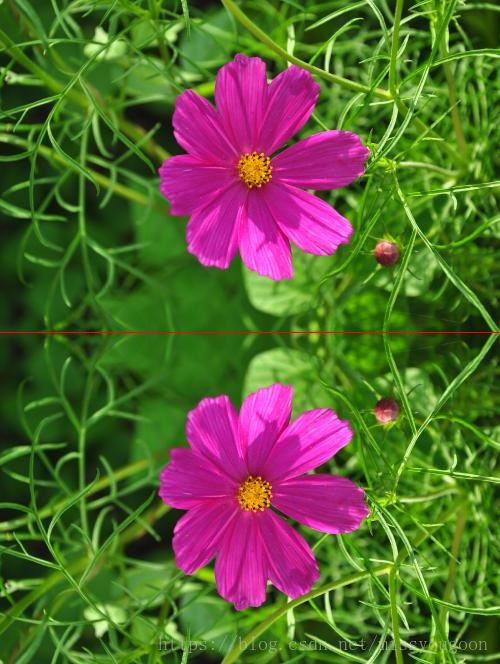
2.鏡像
import cv2
import numpy as np


img = cv2.imread('image0.jpg', 1)
cv2.imshow('src', img)
imgInfo = img.shape
height= imgInfo[0]
width = imgInfo[1]
deep = imgInfo[2]

dst = np.zeros([height*2, width, deep], np.uint8)

for i in range( height ):
  for j in range( width ):
    dst[i,j] = img[i,j]
    dst[height*2-i-1,j] = img[i,j]

for i in range(width):
  dst[height, i] = (0, 0, 255)
cv2.imshow('image', dst)
cv2.waitKey(0)
demo生成一個如下效果:

3.縮放
import cv2
img = cv2.imread("image0.jpg", 1)
imgInfo = img.shape
print( imgInfo )
height = imgInfo[0]
width = imgInfo[1]
mode = imgInfo[2]

# 1 放大 縮小 2 等比例 非等比例
dstHeight = int(height * 0.5)
dstWeight = int(width * 0.5)

# 最近鄰域插值 雙線性插值 像素關系重采樣 立方插值
dst = cv2.resize(img, (dstWeight,dstHeight))
print(dst.shape)
cv2.imshow('image', dst)
cv2.waitKey(0)
使用resize直接進行縮放操作,同時還可以使用鄰域插值法進行縮放,代碼如下:
# 1 info 2 空白模板 3 重新計算x, y
import cv2
import numpy as np
img = cv2.imread('image0.jpg', 1)
imgInfo = img.shape # 先高度,后寬度
height = imgInfo[0]
width = imgInfo[1]
dstHeight = int(height/2)
dstWidth = int(width/2)

dstImage = np.zeros([dstHeight, dstWidth, 3], np.uint8)
for i in range( dstHeight ):
  for j in range(dstWidth):
    iNew = i * ( height * 1.0 / dstHeight )
    jNew = j * ( width * 1.0 / dstWidth )

    dstImage[i,j] = img[int(iNew),int(jNew)]

cv2.imshow('image', dstImage)
cv2.waitKey(0)
4.旋轉
import cv2

img = cv2.imread('image0.jpg', 1)
cv2.imshow('src', img)
imgInfo = img.shape
height= imgInfo[0]
width = imgInfo[1]
deep = imgInfo[2]

# 定義一個旋轉矩陣
matRotate = cv2.getRotationMatrix2D((height*0.5, width*0.5), 45, 0.7) # mat rotate 1 center 2 angle 3 縮放系數

dst = cv2.warpAffine(img, matRotate, (height, width))

cv2.imshow('image',dst)
cv2.waitKey(0)
旋轉需要先定義一個旋轉矩陣,cv2.getRotationMatrix2D(),參數1:需要旋轉的中心點.參數2:需要旋轉的角度.參數三:需要縮放的比例.效果如下圖:

5.仿射
import cv2
import numpy as np

img = cv2.imread('image0.jpg', 1)
cv2.imshow('src', img)
imgInfo = img.shape
height= imgInfo[0]
width = imgInfo[1]
deep = imgInfo[2]
# src 3 -> dst 3 (左上角, 左下角,右上角)
matSrc = np.float32([[0,0],[0,height-1],[width-1, 0]]) # 需要注意的是 行列 和 坐標 是不一致的
matDst = np.float32([[50,50],[100, height-50],[width-200,100]])

matAffine = cv2.getAffineTransform(matSrc,matDst) #mat 1 src 2 dst 形成組合矩陣
dst = cv2.warpAffine(img, matAffine,(height, width))
cv2.imshow('image',dst)
cv2.waitKey(0)
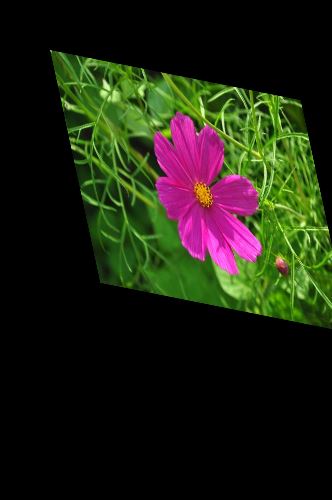
需要確定圖像矩陣的三個點坐標,及(左上角, 左下角,右上角).定義兩個矩陣,matSrc 為原圖的三個點坐標,matDst為進行仿射的三個點坐標,通過cv2.getAffineTransform()形成組合矩陣.效果如下:

以上就是本文的全部內容,希望對大家的學習有所幫助,也希望大家多多支持億速云。
免責聲明:本站發布的內容(圖片、視頻和文字)以原創、轉載和分享為主,文章觀點不代表本網站立場,如果涉及侵權請聯系站長郵箱:is@yisu.com進行舉報,并提供相關證據,一經查實,將立刻刪除涉嫌侵權內容。