您好,登錄后才能下訂單哦!
您好,登錄后才能下訂單哦!
new Date()的月份是從0開始的。
下面表達式是:2018年6月1日
new Date(2018, 5, 1);

下面表達式是:2018年5月1日
new Date(2018, 4, 1);
或
new Date(2018, 5-1, 1);

下面表達式是:2018年5月31日(得到上個月的最后一天)
new Date(2018, 5 , 0);
日的參數可以是0,也可以是負數,表示上個月底的那一天。

下面表達式是:2018年7月01日
new Date(2018, 5, 31);
lApp.vue父組件:
<template>
 <div>
 <MonthView :year="year" :month="month"></MonthView>
 </div>
</template>
<script>
 import MonthView from "./components/MonthView.vue";
 export default {
 data(){
 return {
 year : 2018 ,
 month : 8 ,
 }
 },
 components : {
 MonthView
 },
 methods : {
 }
 }
</script>
lMonthView.vue子組件
<template>
<div>
 月視圖{{year}} {{month}}
 {{arr}}
 </div>
</template>
<script>
 export default {
 props : ["year" , "month"],
 computed : {
 arr(){
 //計算日歷的數組:三要素
 //本月1號星期幾
 var this1DayWeek = new Date(this.year, this.month - 1, 1).getDay();
 // 本月有幾天
 var thisMonthDay = new Date(this.year, this.month, 0).getDate();
 // 上月有多少天
 var prevMonthDay = new Date(this.year, this.month - 1, 0).getDate();

 console.log(benyue1haoxingqiji)
 console.log(benyueyoujitian)
 console.log(shangyueduoshaotian)
 }
 }
 }
</script>
l顯示在頁面:
<template>
 <div>
 <table>
 <tr v-for="i in 6">
 <td v-for="j in arr.slice((i-1) * 7, i * 7)">
  {{j}}
 </td>
 </tr>
 </table>
 </div>
</template>
<script>
 export default {
 props:["year","month"],
 computed : {
 arr(){
 var _arr = []; //存儲42天的數組

 // 計算日歷的數組:三要素
 //本月1號星期幾,根據星期幾得到上個月剩余天數
 var this1DayWeek = new Date(this.year, this.month-1, 1).getDay();
 //上個月有多少天
 var prevMonthDay = new Date(this.year, this.month-1, 0).getDate();
 //本月有幾天
 var thisMonthDay = new Date(this.year, this.month, 0).getDate();

 //用本月1號星期幾,推斷出上月的剩余天數
 for(var i = 0; i < this1DayWeek;i++){
  _arr.unshift(prevMonthDay - i)
 }

 //循環本月天數(累加),從數組末尾插入
 for(var i = 1; i <= thisMonthDay;i++){
  _arr.push(i)
 }

 //補充下月的天數(滿42天為止)
 var i = 1;
 while(_arr.length != 42){
  _arr.push(i++);
 }

 return _arr;
 }
 }
 }
</script>
l顯示農歷,安裝插件:
npm install solarlunar --save
<template>
 <div>
 <h2>月視圖 {{year}}年{{month}}月</h2>
 <table>
 <tr>
 <th>日</th>
 <th>一</th>
 <th>二</th>
 <th>三</th>
 <th>四</th>
 <th>五</th>
 <th>六</th>
 </tr>
 <tr v-for="i in 6">
 <td v-for="j in arr.slice((i-1) * 7, i * 7)">
  <p class="p1">{{j.d}}</p>
  <p class="p2">{{j.n}}</p>
 </td>
 </tr>
 </table>
 </div>
</template>
<script>
 import solarLunar from 'solarLunar';
 export default {
 props:["year","month"],
 computed : {
 arr(){
 var _arr = []; //存儲42天的數組

 // 計算日歷的數組:三要素
 //本月1號星期幾,根據星期幾得到上個月剩余天數
 var this1DayWeek = new Date(this.year, this.month-1, 1).getDay();
 //上個月有多少天
 var prevMonthDay = new Date(this.year, this.month-1, 0).getDate();
 //本月有幾天
 var thisMonthDay = new Date(this.year, this.month, 0).getDate();

 //用本月1號星期幾,推斷出上月的剩余天數
 for(var i = 0; i < this1DayWeek;i++){
  _arr.unshift({
  d: prevMonthDay - i,
  n: solarLunar.solar2lunar(this.year, this.month-1, prevMonthDay - i).dayCn
  })
 }

 //循環本月天數,累加,從數組末尾插入
 for(var i = 1; i <= thisMonthDay;i++){
  _arr.push({
  d: i,
  n: solarLunar.solar2lunar(this.year, this.month, i).dayCn
  })
 }

 //補充下個月的天數(滿42天為止)
 var i = 1;
 while(_arr.length != 42){
  _arr.push({
  d : i,
  n : solarLunar.solar2lunar(this.year, this.month+1, i).dayCn
  });
  i++;
 }
 console.log(_arr)
 return _arr;
 }
 }
 }
</script>
下面做“換月換年”業務:
App.vue父組件
<template>
 <div>
 <MonthChooser
 :year="year"
 :month="month"
 :setYear="setYear"
 :setMonth="setMonth"
 >
 </MonthChooser>
 <MonthView :year="year" :month="month"></MonthView>
 </div>
</template>
<script>
 import MonthView from "./components/MonthView.vue";
 import MonthChooser from "./components/MonthChooser.vue";
 export default {
 data(){
 return{
 year :2018,
 month:8,
 }
 },
 components :{
 MonthView,
 MonthChooser
 },
 methods : {
 setYear(year){
 this.year = year; //設置年
 },
 setMonth(month){
 this.month = month; //設置月
 }
 }
 }
</script>
MonthChooser.vue切換年月組件
<template>
 <div>
 <h2>
 <button @click="goPrev()">-</button>
 <a href="###">{{year}}</a> 年{{month}}月
 <button @click="goNext()">+</button>
 </h2>
 </div>
</template>
<script>
 export default {
 props:["year","month","setYear","setMonth"],
 methods :{
 goNext(){
  if(this.month < 12){
  // 如果月份小于12,可以加月
  this.setMonth(this.month + 1)
  }else{
  // 否則就加年,并且重設下年為1月
  this.setMonth(1)
  this.setYear(this.year + 1)
  }
 },
 goPrev(){
  if(this.month > 1){
  // 如果月份大于1月,可以減月
  this.setMonth(this.month - 1)
  }else{
  // 否則就減年,并且重設上年為12月
  this.setMonth(12); //重設為12月
  this.setYear(this.year - 1); //減年
  }
 }
 }
 }
</script>
切換年代視圖組件:
lApp.vue父組件
<template>
 <div>
 <MonthChooser
 :year="year"
 :month="month"
 :setYear="setYear"
 :setMonth="setMonth"
 ></MonthChooser>
 <MonthView :year="year" :month="month"></MonthView>
 <DecadeView :year="year" :setYear="setYear"></DecadeView>
 </div>
</template>
<script>
 import MonthView from "./components/MonthView.vue";
 import MonthChooser from "./components/MonthChooser.vue";
 import DecadeView from "./components/DecadeView.vue";
 export default {
 data(){
 return {
 ...
 }
 },
 components : {
 MonthView,
 MonthChooser,
 DecadeView
 },
 methods : {
 ...
 }
 }
</script>
lDecadeView.vue子組件
<template>
 <div>
 <table>
 <tr v-for="i in 10">
 <!-- <td v-for="j in arr.slice((i-1) * 3, i * 3)"> -->
 <td v-for="j in 3" :class="{'cur':year == showYear(i, j)}"
@click="setYear(showYear(i, j))"
>
  {{showYear(i, j)}}
 </td>
 </tr>
 </table>
 </div>
</template>
<script>
 export default {
 props : ["year"],
 computed : {
 arr(){
 var _arr = [];
 //計算年份的頭
 var tou = this.year - this.year % 10 - 10;
 //從得到的年份的頭開始循環 + 30
 for(var i = tou ; i < tou + 30;i++){
  _arr.push(i);
 }
 return _arr;
 }
 },
 methods : {
 showYear(i , j){
 return this.arr[(j - 1) * 10 + (i - 1)]
 }
 }
 }
</script>
<style>
 .cur{color:red;font-weight:bold;}
</style>
【以下開始完善整個項目】:
切換視圖:App.vue父組件
<template>
 <div>
 <MonthChooser
 :year="year"
 :month="month"
 :setYear="setYear"
 :setMonth="setMonth"
 :setView="setView"
 v-if="view == 'month'"
 ></MonthChooser>
 <MonthView :year="year" :month="month" v-if="view == 'month'"></MonthView>

 <DecadeChooser
 :year="year"
 :month="month"
 :setYear="setYear"
 :setMonth="setMonth"
 :setView="setView"
 v-if="view=='decade'"
 ></DecadeChooser>
 <DecadeView
 :year="year"
 :setYear="setYear"
 v-if="view == 'decade'"
 :setView="setView"
 ></DecadeView>
 </div>
</template>
<script>
 import MonthView from "./components/MonthView.vue";
 import MonthChooser from "./components/MonthChooser.vue";
 import DecadeChooser from "./components/DecadeChooser.vue";
 import DecadeView from "./components/DecadeView.vue";
 export default {
 data(){
 return {
 year : 2018 ,
 month : 5 ,
 view : "month"
 }
 },
 components : {
 MonthView,
 MonthChooser,
 DecadeView,
 DecadeChooser
 },
 methods : {
 ...
 setView(view){
 this.view = view; //設置視圖切換
 }
 }
 }
</script>
DecadeChooser.vue年視圖按鈕組件:
<template>
 <div>
 <h2>
 <button @click="goPrev()">-</button>
 {{year}}年<a href="javascript:;" @click="setView('month')">{{month}}月</a>
 <button @click="goNext()">+</button>
 </h2>
 </div>
</template>
<script>
 export default{
 props : ["year", "month" , "setYear","setView"],
 methods : {
 goNext(){
 this.setYear(this.year + 1)
 },
 goPrev(){
 if(this.year <= 1970) return;
 this.setYear(this.year - 1)
 }
 }
 }
</script>
MonthChooser.vue月視圖按鈕組件:
<template>
 <div>
 <h2>
 <button @click="goPrev()">-</button>
 <a href="javascript:;" @click="setView('decade')">{{year}}</a>年{{month}}月
 <button @click="goNext()">+</button>
 </h2>
 </div>
</template>
<script>
 export default{
 props : ["year", "month" , "setYear", "setMonth","setView"],
 methods : {
 goNext(){
 ...
 },
 goPrev(){
 ...
 }
 }
 }
</script>
DecadeView.vue年份視圖組件:
<template>
 <div>
 <table>
 <tr v-for="i in 10">
 <td
  v-for="j in 3"
  :class="{'cur' : year == showYear(i , j)}"
  @click="tdClick(i,j)"
 >
  {{showYear(i , j)}}
 </td>
 </tr>
 </table>
 </div>
</template>
<script>
 export default {
 props : ["year","setYear","setView"],
 computed : {
 arr(){
 ...
 }
 },
 methods : {
 showYear(i , j){
 return this.arr[(j - 1) * 10 + (i - 1)]
 },
 tdClick(i , j){
 this.setYear(this.showYear(i , j)); //切換年份
 this.setView("month"); //切換年份后,回到月視圖
 }
 }
 }
</script>
MonthView.vue月視圖早已完善。
餓了么UI:http://element-cn.eleme.io/
iviewUI :https://www.iviewui.com/
2.1餓了么UI
以餓了么UI為例
安裝依賴:
npm install --save element-ui
在main.js中配置eleUI組件:
在引入 Element 時,可以傳入一個全局配置對象。該對象目前僅支持 size 字段,用于改變組件的默認尺寸。按照引入 Element 的方式,具體操作如下:
import Vue from "vue";
import App from "./App.vue";
import ElementUI from 'element-ui';
//import 'element-ui/lib/theme-chalk/index.css'; //樣式在index.html頁面引入
// Vue.use(ElementUI);
Vue.use(ElementUI, { size: 'small' });

new Vue({
 el : "#app" ,
 render: (h) => h(App)
});
然后就可以在.vue組件中直接使用了。
2.2 iviewui
npm install iview --save
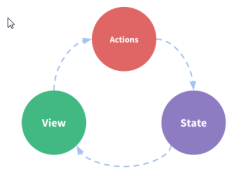
以下是一個表示“單向數據流”理念的極簡示意:

當我們的應用遇到多個組件共享狀態時,單向數據流的簡潔性很容易被破壞:
多個視圖依賴于同一狀態。
來自不同視圖的行為需要變更同一狀態。
對于問題1:傳參的方法對于多層嵌套的組件將會非常繁瑣,并且對于兄弟組件間的狀態傳遞無能為力。
對于問題2:我們經常會采用父子組件直接引用或者通過事件來變更和同步狀態的多份拷貝。以上的這些模式非常脆弱,通常會導致無法維護的代碼。
因此,我們為什么不把組件的共享狀態抽取出來,以一個全局單例模式管理呢?在這種模式下,我們的組件樹構成了一個巨大的“視圖”,不管在樹的哪個位置,任何組件都能獲取狀態或者觸發行為!
另外,通過定義和隔離狀態管理中的各種概念并強制遵守一定的規則,我們的代碼將會變得更結構化且易維護。
這就是 Vuex 背后的基本思想,借鑒了 Flux、Redux、和 The Elm Architecture。與其他模式不同的是,Vuex 是專門為 Vue.js 設計的狀態管理庫,以利用 Vue.js 的細粒度數據響應機制來進行高效的狀態更新。
之前我們做的日歷組件將數據放到了App.vue最大父組件上,并且還有:year、:month、:setYear、:setMonth等一系列的參數傳遞操作。
但是vuex就是將數據放到了全局store中。
不用vuex也能做項目,只不過數據管理起來很不方便。
官網:https://vuex.vuejs.org/zh-cn/
安裝vuex:
npm install --save vuex
什么是vuex?
Vuex 是一個專為 Vue.js 應用程序開發的狀態管理模式。它采用集中式存儲管理應用的所有組件的狀態,并以相應的規則保證狀態以一種可預測的方式發生變化。
簡單說:vuex就是一個狀態管理容器,說白了就是將數據單獨存放出去。
4.2 state(全局倉庫)
什么是“狀態管理模式”?
每個Vuex應用的核心就是store(倉庫)。store就是一個容器,它包含著你項目中大部分的狀態 (state)。
Vuex 和單純的全局對象有以下兩點不同:
Vuex的狀態存儲是響應式的。當 Vue 組件從 store 中讀取狀態的時候,若 store 中的狀態發生變化,那么相應的組件也會相應地得到高效更新變化。
你不能直接改變store中的狀態。改變store中的狀態的唯一途徑就是通過commit提交mutation。這樣使得我們可以方便地跟蹤每一個狀態的變化,從而讓我們能夠實現一些工具幫助我們更好地了解我們的應用。
在main.js創建一個全局倉庫(store),讓我們從一個簡單的Vue計數器開始:
import Vue from 'vue';
import Vuex from 'vuex'; //引入Vuex包
import App from './App.vue';
Vue.use(Vuex); //將vuex安裝到vue中

//創建一個倉庫,并且存放一些全局數據(存放四大天王選項)
const store = new Vuex.Store({
 state : {
 a : 100
 }
})

new Vue({
 el : "#app",
 store, //將store注入到全局中
 render : (h)=> h(App)
})
Vuex通過store選項,提供了一種機制將狀態從根組件“注入”到每一個子組件中(需要調用Vue.use(Vuex))
通過在根實例中注冊store選項,該store實例會注入到根組件下的所有子組件中,并且組件能通過this.$store訪問。
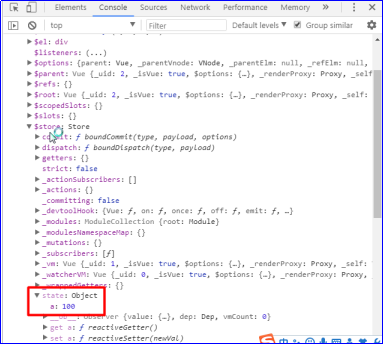
在App.vue中的生命周期中輸出this,能看到vue實例化對象的全局有$store這個對象
<template>
 <div>
 <h2>全局倉庫state對象的a值:{{$store.state.a}}</h2>
 </div>
</template>
<script>
 export default {
 created(){
  console.log(this)
  console.log(this.$store.state.a)
 }
 }
</script>

之前做的日歷組件將數據放到了App.vue最大父組件上,并且還有:year、:month、:setYear、:setMonth等一系列的參數傳遞操作。
但是Vuex就是將數據放到了全局store中,注意:
不管項目有多大,store只有一個
只要配置正確,組件內部可以使用$store即可訪問store的全局數據
改變 store 中的狀態(數據)的唯一途徑就是通過commit()函數提交 mutation。
以下的描述來自于官方:https://vuex.vuejs.org/zh/guide/
再次強調,我們通過提交 mutation 的方式,而非直接改變 store.state.a,是因為我們想要更明確地追蹤到狀態的變化。這個簡單的約定能夠讓你的意圖更加明顯,這樣你在閱讀代碼的時候能更容易地解讀應用內部的狀態改變。此外,這樣也讓我們有機會去實現一些能記錄每次狀態改變,保存狀態快照的調試工具。有了它,我們甚至可以實現如時間穿梭般的調試體驗。
由于 store 中的狀態是響應式的,在組件中調用 store 中的狀態簡單到僅需要在計算屬性中返回即可。觸發變化也僅僅是在組件的 methods 中提交 mutation。
4.3 mutations
更改 Vuex 的 store 中的狀態的唯一方法是提交 mutation。Vuex中的mutation非常類似于事件:每個 mutation都有一個字符串的 事件類型(type)和一個回調函數 (handler)。這個回調函數就是我們實際進行狀態更改的地方,并且它會接受 state 作為第一個參數:
你不能直接調用一個mutation handler。這個選項更像是事件注冊:當觸發一個type類型為JIA的 mutation時,調用此函數。要喚醒一個mutation函數,你需要以相應的type調用store.commit()方法:
main.js
import Vue from 'vue';
import Vuex from 'vuex'; //引入Vuex包
import App from './App.vue';
Vue.use(Vuex); //將vuex安裝到vue中

//創建一個倉庫,并且存放一些全局數據(存放四大選項)
const store = new Vuex.Store({
 state : {
 a : 100
 },
 mutations : {
 // 這里的函數只能通過commit()觸發,其他操作是無法影響的
 JIA(state){
  state.a++
 },
 MINUS(state){
  state.a--
 }
 }
})
App.vue
<template>
 <div>
 <h2>全局倉庫state對象的a:{{$store.state.a}}</h2>
 <button @click="add()">+</button>
 <button @click="minus()">-</button>
 </div>
</template>
<script>
export default {
 methods:{
 add(){
  // this.$store.state.a++ //不允許直接改全局的state數據
  this.$store.commit("JIA");
 },
 minus(){
  this.$store.commit("MINUS");
 }
 }
};
</script>
>[/code]
Vuex自帶一個日志插件(vue-logger)用于調試:
import createLogger from 'vuex/dist/logger'

const store = new Vuex.Store({
 plugins: [createLogger()]
})
總結:
只有mutations中可以改變state,其他任何方式都不能改state的值
組件想要改變store中的state,只能通過commit()發出一條命令。
提交載荷(Payload)
你可以向 store.commit() 傳入額外的參數,即 mutation 的 載荷(payload),在大多數情況下,載荷應該是一個對象,這樣可以包含多個字段并且記錄的 mutation 會更易讀:
main.js
import Vue from 'vue';
import Vuex from 'vuex'; //引入Vuex包
import App from './App.vue';
import createLogger from 'vuex/dist/logger';

Vue.use(Vuex); //將vuex安裝到vue中

//創建一個倉庫,并且存放一些全局數據(存放四大選項)
const store = new Vuex.Store({
 state : {
 a : 100
 },
 mutations : {
 // 這里的函數只能通過commit()觸發,其他操作是無法影響的
 JIA(state,payload){
  state.a += payload.n
 },
 MINUS(state, payload){
  state.a -= payload.n
 }
 },
 plugins: [createLogger()]
})
App.vue
<template>
 <div>
 <h2>全局倉庫state對象的a:{{$store.state.a}}</h2>
 <button @click="add()">+</button>
 <button @click="minus()">-</button>
 <button @click="add(2)">+</button>
 <input type="text" ref="txt">
 <button @click="addUser()">加用戶輸入的數</button>
 </div>
</template>
<script>
export default {
 methods:{
 add(n=1){
  // this.$store.state.a++ //不允許直接改全局的state數據
  // this.$store.commit("JIA", 8);
  this.$store.commit("JIA", {n});
 },
 minus(){
  this.$store.commit("MINUS", {n : 10});
 },
 addUser(){
  this.$store.commit("JIA", {n : Number(this.$refs.txt.value)});
 }
 }
};
</script>
記住一條重要的原則:mutations必須是同步函數
4.4 actions
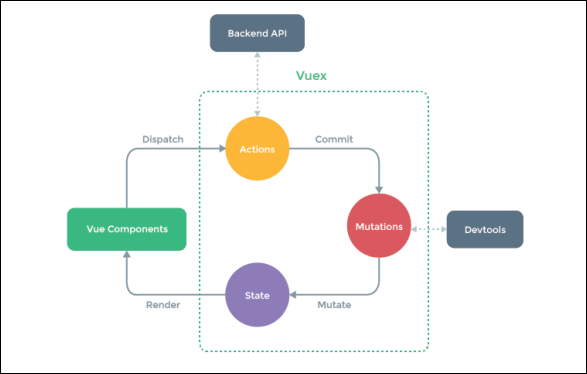
上面說過mutation 中不能寫異步語句,為了處理異步操作,我們來看一看action
action 類似于 mutation,不同在于:
action 提交的是 mutation,而不是直接變更狀態。
action 可以包含任意異步操作。
action 要通過 store.dispatch() 方法觸發
注意:涉及到異步Ajax請求數據,案例必須運行在服務器端(127.0.0.1)
新建一個data文件夾,創建txt文件。使用ajax 異步讀取文本文件中數據:
App.vue父組件:
<script>
 export default {
 methods:{
  add(){
  this.$store.dispatch("JIA");
  }
 }
 }
</script>
main.js
const store = new Vuex.Store({
 state : {
 a : 100
 },
 mutations : {
 JIA(state,payload){
  console.log("只有commit命令能觸發我")
  state.a += payload.n
 }
 },
 actions : {
 async JIA({commit}){
  // console.log("只有dispatch命令能觸發我,這里可以寫異步語句")
  var data = await fetch('../data/1.txt').then(data=>data.json())
  //action提交的是mutation,而不是直接更改狀態,
  //請求成功返回的數據需要通過commit命令mutations去修改state中的數據
       // context.commit("JIA", {n: data})
  // this.commit("JIA", {n: data})
  commit("JIA", {n:data})
 }
 },
 plugins: [createLogger()]
})
actions中的函數,天生自帶默認參數

一些概念:
action 函數接受一個與store實例具有相同方法和屬性context對象,因此你可以調用 context.commit 提交一個 mutation,或者通過 context.state 和 context.getters 來獲取 state 和 getters。當我們在之后介紹到 Modules 時,你就知道 context 對象為什么不是 store 實例本身了。
實踐中,會經常用到ES2015的 參數解構 來簡化代碼(特別是我們需要調用commit很多次的時候):
actions:{
 async JIA({commit}){
 var data = await fetch("../data/1.txt").then(data=>data.json());
 commit("JIA",data)
 }
},
action 通過 store.dispatch() 方法觸發:
methods:{
 add(){
 this.$store.dispatch("JIA")
 }
}
乍一眼看上去感覺多此一舉,我們直接分發 mutation 豈不更方便?實際上并非如此,還記得 mutation 必須同步執行這個限制么?Action 就不受約束!我們可以在 action 內部執行異步操作:
actions支持同樣的載荷方式和對象方式進行分發:
vuex單向數據流動的圖示:

使用 Vuex 并不意味著你需要將所有的狀態放入Vuex。雖然將所有的狀態放到 Vuex 會使狀態變化更顯式和易調試,但也會使代碼變得冗長和不直觀。如果有些狀態嚴格屬于單個組件,最好還是作為組件的局部狀態。你應該根據你的應用開發需要進行權衡和確定。
4.5 getters
有時候我們需要從 store 中的 state 中派生出一些狀態,例如對列表進行過濾并計數:
computed: {
 arr() {
 return this.$store.state.todos.filter(todo => todo.done).length
 }
}
在Vuex中,getter類似于組件中的computed,表示state的一些計算后的值。
如果有多個組件需要用到此屬性,我們要么復制這個函數,或者抽取到一個共享函數然后在多處導入它——無論哪種方式都不是很理想。
Vuex 允許我們在 store 中定義“getter”(可以認為是 store 的計算屬性)。就像computed計算屬性一樣,getter 的返回值會根據它的依賴被緩存起來,且只有當它的依賴值發生了改變才會被重新計算。
Getter 接受 state 作為其第一個參數:
main.js
import Vue from 'vue';
import Vuex from 'vuex'; //引入Vuex包
import App from './App.vue';
import createLogger from 'vuex/dist/logger'; //調試工具

Vue.use(Vuex); //將Vuex安裝到全局

//創建一個倉庫,并且存放以一些全局數據(存放四大選項)
const store = new Vuex.Store({
 state:{
 a:100,
 students:[
  {name:"小明",sex:"男"},
  {name:"小紅",sex:"女"},
  {name:"小剛",sex:"男"},
  {name:"小花",sex:"女"},
  {name:"小黑",sex:"男"}
 ]
 },
 getters:{
 //得到所有男生
 nan(state){
  return state.students.filter((item)=>{
  return item.sex == '男';
  })
 },
 //得到所有女生
 nv(state){
  return state.students.filter((item)=>{
  return item.sex == '女';
  })
 },
 //得到男生和女生的個數,getter也可以接受getter作為第二個參數
 nanCount(state,getters){
  return getters.nan.length;
 },
 nvCount(state,getters){
  return getters.nv.length;
 }
 },
 plugins: [createLogger()]
})

new Vue({
 el:"#app",
 store, //將store注入到全局
 render:(h)=> h(App)
})
App.vue父組件:
<template>
 <div>
 <h2>{{students}}</h2>
 <h3>男生:{{$store.getters.nanCount}}個</h3>
 <h3>女生:{{$store.getters.nvCount}}個</h3>
 <button @click="nan">查看男生</button>
 <button @click="nv">查看女生</button>
 <button @click="all">查看全部</button>
 </div>
</template>
<script>
export default {
 data(){
 return {
  isState:'all'
 }
 },
 computed:{
 students(){
  if(this.isState == 'all'){
  return this.$store.state.students;
  }else if(this.isState == 'nan'){
  return this.$store.getters.nan;
  }else if(this.isState == 'nv'){
  return this.$store.getters.nv
  }
 }
 },
 methods:{
 nan(){
  this.isState = 'nan'
 },
 nv(){
  this.isState = 'nv'
 },
 all(){
  this.isState = 'all'
 }
 }

}
</script>
在介紹state中我們了解到,在Store倉庫里,state就是用來存放數據,若是對數據進行處理輸出,比如數據要過濾,一般我們可以寫到computed中。但是如果很多組件都使用這個過濾后的數據,比如餅狀圖組件和曲線圖組件,我們是否可以把這個數據抽提出來共享?這就是getters存在的意義。官網說的很清楚,getters是store的計算屬性。
getters 可以對State進行計算操作。雖然在組件內也可以做,但是getters可以在多組件之間復用如果一個狀態只在一個組件內使用,是可以不用getters
getters上簡單來說就是存放一些公共函數供組件調用。getters 會暴露為 $store.getters 對象,也就是說可以通過 $store.getters[屬性]來進行相應的調用。
4.6vuex的命名空間
目錄結構:
│ package.json
│ webpack.config.js
│
└─www
 │ index.html
 │
 └─app
 │ App.vue
 │ main.js
 │
 ├─components
 └─store
  │ index.js
  │
  ├─counter
  │ store.js
  │
  └─taobao
   store.js
./package.json:
{
 "name": "vue_study",
 "version": "1.0.0",
 "description": "",
 "main": "webpack.config.js",
 "scripts": {
 "test": "echo \"Error: no test specified\" && exit 1",
 "dev": "webpack-dev-server --content-base ./www --port 8080"
 },
 "keywords": [],
 "author": "",
 "license": "ISC",
 "dependencies": {
 "vue": "^2.5.17",
 "vuex": "^3.0.1"
 },
 "devDependencies": {
 "css-loader": "^1.0.1",
 "style-loader": "^0.23.1",
 "vue-loader": "^15.4.2",
 "vue-style-loader": "^4.1.2",
 "vue-template-compiler": "^2.5.17",
 "webpack": "^4.9.1",
 "webpack-cli": "^3.1.2"
 }
}
./webpack.config.js:
const path = require('path');
const VueLoaderPlugin = require('vue-loader/lib/plugin');

module.exports = {
 //程序的入口文件
 entry: "./www/app/main.js",

 //程序的出口(打包的文件)
 output: {
  //打包文件輸出的路徑
  path: path.resolve(__dirname, "./www/dist"),
  //打包文件的名稱
  filename: 'all.js',
  publicPath: "/public" //這是對webpack-dev-server的配置,配置虛擬路徑
 },
 //監聽文件的變化(自動打包)
 watch: true,
 mode: "development",
 //配置webpack模塊插件
 module: {
  //關于模塊的配置規則
  rules: [{
    // 模塊規則(配置 loader、解析器等選項)
    test: /\.js?$/, //解析的時候匹配js文件
    //翻譯什么文件夾中的文件
    include: [path.resolve(__dirname, "www/app")],
    //不翻譯什么文件夾中的文件
    exclude: [path.resolve(__dirname, "node_modules")],
    // loader:"babel-loader",
    //配置翻譯語法
    // options:{
    //  presets:["es2015","es2016"]
    // }
   },
   {
    test: /\.vue$/,
    loader: 'vue-loader',
    include: [path.resolve(__dirname, "www/app")],
    exclude: [path.resolve(__dirname, "node_modules")],
    options: {
     loaders: {
      js: 'babel-loader!eslint-loader'
     }
    }
   },
   {
    test: /\.css$/,
    include: [path.resolve(__dirname, "www/app")],
    exclude: [path.resolve(__dirname, "node_modules")],
    use: ['vue-style-loader', 'css-loader'],
   },
   {
    test: /\.styl(us)?$/,
    use: [
    'vue-style-loader',
    'css-loader',
    'stylus-loader'
    ]
   }
  ]
 },
 resolve: {
  alias: {
   'vue$': 'vue/dist/vue.esm.js' // 用 webpack 1 時需用 'vue/dist/vue.common.js'
  }
 },
 //最新版webpack需要引入此插件
 plugins: [
  new VueLoaderPlugin()
 ],
 //webpack設置代理跨越
 devServer: {
  proxy: {
   '/api': {
    target: 'http://127.0.0.1:3000', //設置你調用的接口域名和端口
    //這里理解成/api代理target中的地址,后面組件中調用接口要使用/api代替
    pathRewrite: { '^/api': '' }
   }
  }
 }
}
./www/index.html:
<!DOCTYPE html>
<html lang="en">
<head>
 <meta charset="UTF-8" />
 <title>Document</title>
</head>
<body>
 <div id="app"></div>
</body>
<script type="text/javascript" src="public/all.js"></script>
</html>
./www/app/App.vue:
<template>
 <div>
  <h2>counter的{{$store.state.counterStore.a}}</h2>
  <h2>taobao的{{$store.state.taobaoStore.a}}</h2>
  <button @click="add">觸發counter的ADD</button>
 </div>
</template>
<script>
  export default {
  methods:{
   add(){
    //根據命名空間發出異步
    this.$store.dispatch("counterStore/ADD")
   }
  }
  }
</script>
./www/app/main.js:[
import Vue from "vue";
import App from "./App.vue";
import store from "./store";

new Vue({
 el: "#app",
 store,//引入store文件夾中的index.js
 render: (h) => h(App)
})
./www/app/store/index.js:
import Vue from "vue";
import Vuex from "vuex";
import counterStore from "./counter/store.js";//引入counter的store
import taobaoStore from "./taobao/store.js";//引入taobao的store
import createLogger from 'vuex/dist/logger';

Vue.use(Vuex);

export default new Vuex.Store({
 modules: {//放入modules
  counterStore,
  taobaoStore
 },
 plugins : [createLogger()]
})
./www/app/store/counter/store.js:
export default {
 namespaced: true, //命名空間
 state : {
  a:100
 },
 mutations : {
  ADD(state,payload){
   state.a++//上面的state
  }
 },
 actions : {
  ADD({commit}){
   commit("ADD")//調用上面mutations的ADD
  }
 }
}
./www/app/store/taobao/store.js:
export default {
 namespaced: true,//開啟命名空間跟上面一樣的用法
 state : {
  a:200
 },
 mutations : {},
 actions : {}
}
五、配置虛擬服務器
一般情況下,一個應用的數據都需要等待后端接口人員開發完對應的接口才可以獲取到,這樣子的效率有點低。最好是我們可以自己模擬接口數據,進行頁面的數據填充,打通所有關節,之后等接口開發好了,改下接口地址就好了。
所以,作為前端和客戶端開發人員,在后端還沒有給出對應的api接口時,我們無法做測試。
這時,我們可以使用json-server快速搭建一個測試的api接口,能在幾十秒之內搭建好。
json-server 它能模擬“數據庫”,提供了一套簡單的API(RESTFUL)接口。
在開發過程中,前后端不論是否分離,接口多半是滯后于頁面開發的。所以建立一個RESTFUL風格的API接口,給前端頁面提供虛擬的數據,是非常有必要的。
因為它足夠簡單,寫少量數據,即可使用。
也因為它足夠強大,支持CORS和JSONP跨域請求,支持GET, POST, PUT, PATCH 和 DELETE 方法,更提供了一系列的查詢方法,如limit,order等。下面將詳細介紹 json-server 的使用。
https://github.com/typicode/json-server
總結
以上所述是小編給大家介紹的Vue中UI組件庫之Vuex與虛擬服務器初識 ,希望對大家有所幫助,如果大家有任何疑問請給我留言,小編會及時回復大家的。在此也非常感謝大家對億速云網站的支持!
如果你覺得本文對你有幫助,歡迎轉載,煩請注明出處,謝謝!
免責聲明:本站發布的內容(圖片、視頻和文字)以原創、轉載和分享為主,文章觀點不代表本網站立場,如果涉及侵權請聯系站長郵箱:is@yisu.com進行舉報,并提供相關證據,一經查實,將立刻刪除涉嫌侵權內容。