您好,登錄后才能下訂單哦!
您好,登錄后才能下訂單哦!
怎么在python中實現支付寶支付?針對這個問題,這篇文章詳細介紹了相對應的分析和解答,希望可以幫助更多想解決這個問題的小伙伴找到更簡單易行的方法。
1、簡單易用,與C/C++、Java、C# 等傳統語言相比,Python對代碼格式的要求沒有那么嚴格;2、Python屬于開源的,所有人都可以看到源代碼,并且可以被移植在許多平臺上使用;3、Python面向對象,能夠支持面向過程編程,也支持面向對象編程;4、Python是一種解釋性語言,Python寫的程序不需要編譯成二進制代碼,可以直接從源代碼運行程序;5、Python功能強大,擁有的模塊眾多,基本能夠實現所有的常見功能。
設置應用公鑰
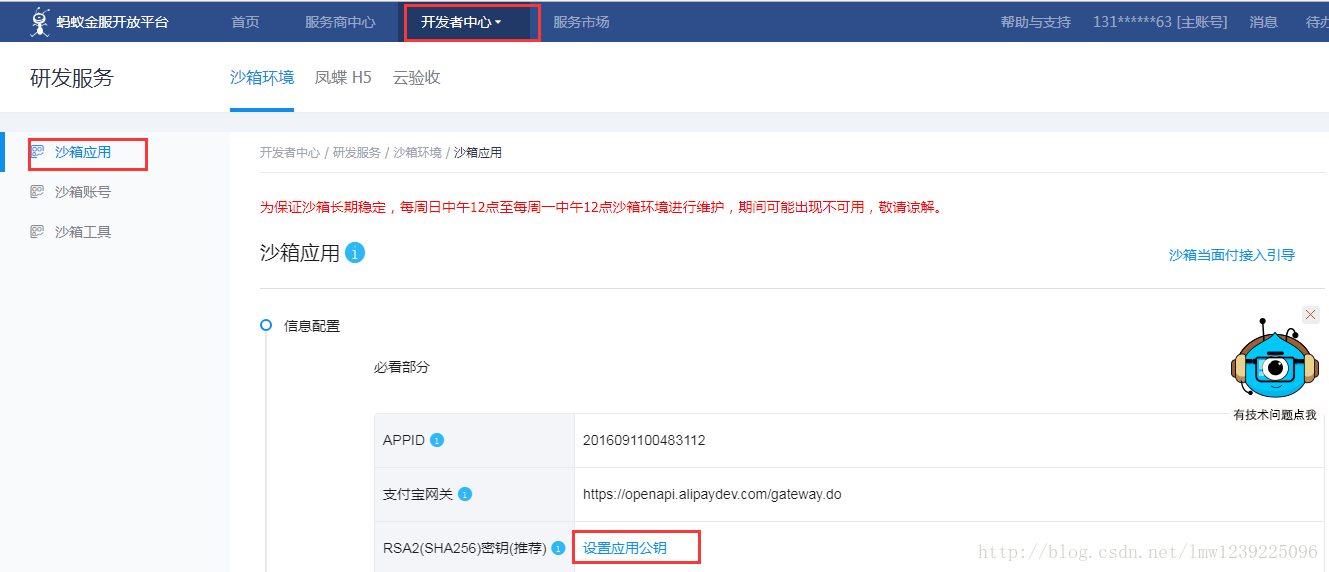
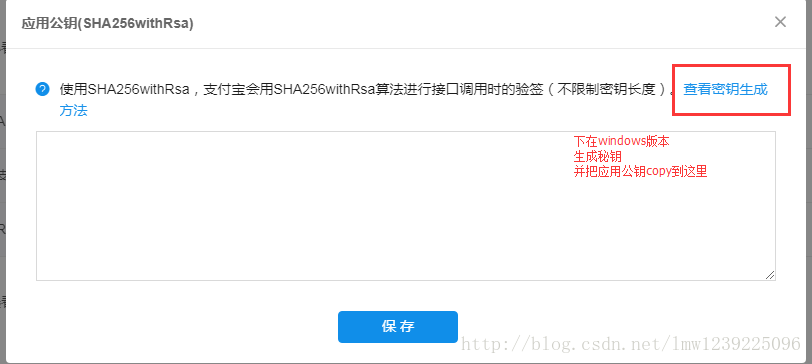

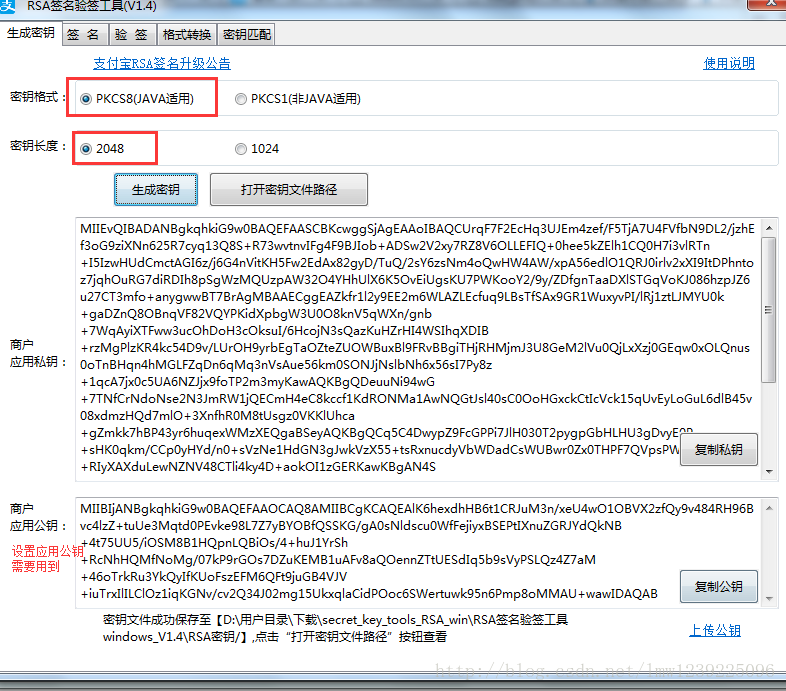
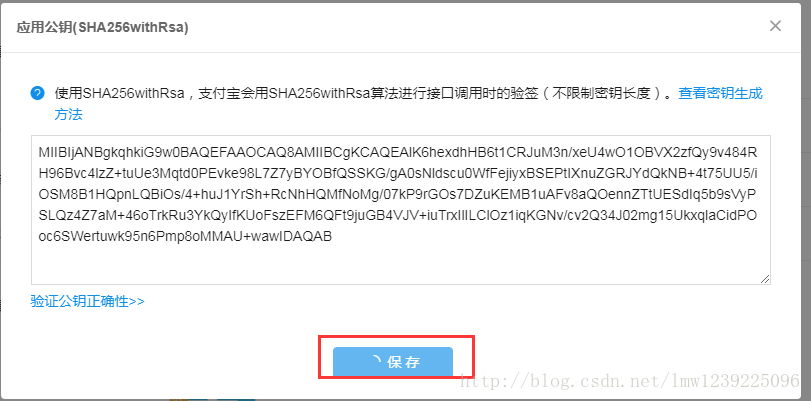
三、代碼實現
1、項目結構:
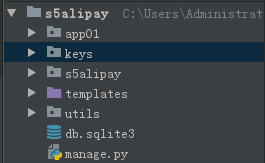
2、把生成的 應用私鑰 和 支付寶的公鑰 放入keys目錄下:
注意:
支付寶公鑰
商戶私鑰
--- 配置商戶應用私鑰--copy到key目錄下


--- 配置支付寶公鑰--進入網頁-->查看支付寶公鑰-->把公鑰放到key目錄下
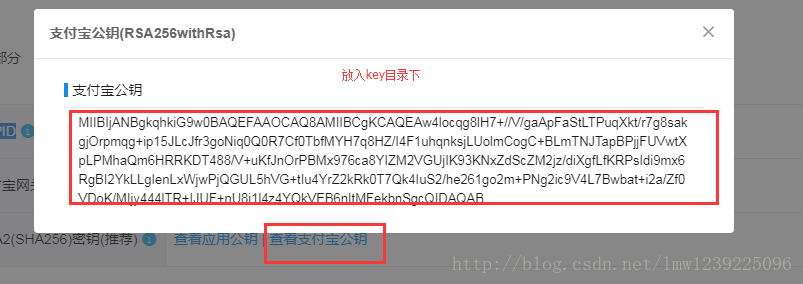
但是要做修改:

alipay_public_2048.txt
 -----BEGIN PUBLIC KEY----- # 加上這行
 支付寶的公鑰
 -----END PUBLIC KEY----- # 同上

app_private_2048.txt
 -----BEGIN PUBLIC KEY----- #同上
 應用的私鑰
 -----END PUBLIC KEY----- # 同上
3、pay.py 這是從git上找到的支付寶支付接口(PC端支付接口)

in pay.py
from datetime import datetime
from Crypto.PublicKey import RSA
from Crypto.Signature import PKCS1_v1_5
from Crypto.Hash import SHA256
from urllib.parse import quote_plus
from urllib.parse import urlparse, parse_qs
from base64 import decodebytes, encodebytes
import json

class AliPay(object):
 """
 支付寶支付接口(PC端支付接口)
 """

 def __init__(self, appid, app_notify_url, app_private_key_path,
  alipay_public_key_path, return_url, debug=False):
 self.appid = appid
 self.app_notify_url = app_notify_url
 self.app_private_key_path = app_private_key_path
 self.app_private_key = None
 self.return_url = return_url
 with open(self.app_private_key_path) as fp:
 self.app_private_key = RSA.importKey(fp.read())
 self.alipay_public_key_path = alipay_public_key_path
 with open(self.alipay_public_key_path) as fp:
 self.alipay_public_key = RSA.importKey(fp.read())

 if debug is True:
 self.__gateway = "https://openapi.alipaydev.com/gateway.do"
 else:
 self.__gateway = "https://openapi.alipay.com/gateway.do"

 def direct_pay(self, subject, out_trade_no, total_amount, return_url=None, **kwargs):
 biz_content = {
 "subject": subject,
 "out_trade_no": out_trade_no,
 "total_amount": total_amount,
 "product_code": "FAST_INSTANT_TRADE_PAY",
 # "qr_pay_mode":4
 }

 biz_content.update(kwargs)
 data = self.build_body("alipay.trade.page.pay", biz_content, self.return_url)
 return self.sign_data(data)

 def build_body(self, method, biz_content, return_url=None):
 data = {
 "app_id": self.appid,
 "method": method,
 "charset": "utf-8",
 "sign_type": "RSA2",
 "timestamp": datetime.now().strftime("%Y-%m-%d %H:%M:%S"),
 "version": "1.0",
 "biz_content": biz_content
 }

 if return_url is not None:
 data["notify_url"] = self.app_notify_url
 data["return_url"] = self.return_url

 return data

 def sign_data(self, data):
 data.pop("sign", None)
 # 排序后的字符串
 unsigned_items = self.ordered_data(data)
 unsigned_string = "&".join("{0}={1}".format(k, v) for k, v in unsigned_items)
 sign = self.sign(unsigned_string.encode("utf-8"))
 # ordered_items = self.ordered_data(data)
 quoted_string = "&".join("{0}={1}".format(k, quote_plus(v)) for k, v in unsigned_items)

 # 獲得最終的訂單信息字符串
 signed_string = quoted_string + "&sign=" + quote_plus(sign)
 return signed_string

 def ordered_data(self, data):
 complex_keys = []
 for key, value in data.items():
 if isinstance(value, dict):
 complex_keys.append(key)

 # 將字典類型的數據dump出來
 for key in complex_keys:
 data[key] = json.dumps(data[key], separators=(',', ':'))

 return sorted([(k, v) for k, v in data.items()])

 def sign(self, unsigned_string):
 # 開始計算簽名
 key = self.app_private_key
 signer = PKCS1_v1_5.new(key)
 signature = signer.sign(SHA256.new(unsigned_string))
 # base64 編碼,轉換為unicode表示并移除回車
 sign = encodebytes(signature).decode("utf8").replace("\n", "")
 return sign

 def _verify(self, raw_content, signature):
 # 開始計算簽名
 key = self.alipay_public_key
 signer = PKCS1_v1_5.new(key)
 digest = SHA256.new()
 digest.update(raw_content.encode("utf8"))
 if signer.verify(digest, decodebytes(signature.encode("utf8"))):
 return True
 return False

 def verify(self, data, signature):
 if "sign_type" in data:
 sign_type = data.pop("sign_type")
 # 排序后的字符串
 unsigned_items = self.ordered_data(data)
 message = "&".join(u"{}={}".format(k, v) for k, v in unsigned_items)
 return self._verify(message, signature)
3、路由設置
in urls.py
urlpatterns = [
 url(r'^admin/', admin.site.urls),
 url(r'^page1/', views.page1),
 url(r'^index/', views.index),
 url(r'^page2/', views.page2),
 ]
4、視圖設置
in view.py
from django.shortcuts import render, redirect, HttpResponse
 from utils.pay import AliPay
 import json
 import time


 def get_ali_object():
 # 沙箱環境地址:https://openhome.alipay.com/platform/appDaily.htm?tab=info
 app_id = "2016091100486897" # APPID (沙箱應用)

 # 支付完成后,支付偷偷向這里地址發送一個post請求,識別公網IP,如果是 192.168.20.13局域網IP ,支付寶找不到,def page2()
 # 接收不到這個請求
 notify_url = "http://47.94.172.250:8804/page2/"

 # 支付完成后,跳轉的地址。
 return_url = "http://47.94.172.250:8804/page2/"

 merchant_private_key_path = "keys/app_private_2048.txt" # 應用私鑰
 alipay_public_key_path = "keys/alipay_public_2048.txt" # 支付寶公鑰

 alipay = AliPay(
 appid=app_id,
 app_notify_url=notify_url,
 return_url=return_url,
 app_private_key_path=merchant_private_key_path,
 alipay_public_key_path=alipay_public_key_path, # 支付寶的公鑰,驗證支付寶回傳消息使用,不是你自己的公鑰
 debug=True, # 默認False,
 )
 return alipay

 def index(request):
 return render(request,'index.html')

 def page1(request):
 # 根據當前用戶的配置,生成URL,并跳轉。
 money = float(request.POST.get('money'))

 alipay = get_ali_object()

 # 生成支付的url
 query_params = alipay.direct_pay(
 subject="充氣式趙俊明", # 商品簡單描述
 out_trade_no="x2" + str(time.time()), # 用戶購買的商品訂單號(每次不一樣) 20180301073422891
 total_amount=money, # 交易金額(單位: 元 保留倆位小數)
 )

 pay_url = "https://openapi.alipaydev.com/gateway.do?{0}".format(query_params) # 支付寶網關地址(沙箱應用)

 return redirect(pay_url)


 def page2(request):
 alipay = get_ali_object()
 if request.method == "POST":
 # 檢測是否支付成功
 # 去請求體中獲取所有返回的數據:狀態/訂單號
 from urllib.parse import parse_qs
 # name&age=123....
 body_str = request.body.decode('utf-8')
 post_data = parse_qs(body_str)

 post_dict = {}
 for k, v in post_data.items():
 post_dict[k] = v[0]

 # post_dict有10key: 9 ,1
 sign = post_dict.pop('sign', None)
 status = alipay.verify(post_dict, sign)
 print('------------------開始------------------')
 print('POST驗證', status)
 print(post_dict)
 out_trade_no = post_dict['out_trade_no']

 # 修改訂單狀態
 # models.Order.objects.filter(trade_no=out_trade_no).update(status=2)
 print('------------------結束------------------')
 # 修改訂單狀態:獲取訂單號
 return HttpResponse('POST返回')

 else:
 params = request.GET.dict()
 sign = params.pop('sign', None)
 status = alipay.verify(params, sign)
 print('==================開始==================')
 print('GET驗證', status)
 print('==================結束==================')
 return HttpResponse('支付成功')
5、模板
in index.html
<!DOCTYPE html>
<html lang="en">
<head>
 <meta charset="UTF-8">
 <title>Title</title>
 <link rel="stylesheet" href="dist/css/bootstrap.css" rel="external nofollow" >
</head>
<body>
 <form action="/page1/" method="POST">
 {% csrf_token %}
 <input type="text" name="money">
 <input type="submit" value="去支付" />
 </form>
<script></script>
</body>
</html>
6、當你全部設置完,代碼只需修改三個地方
git項目地址
(1)、修改APPID
-- 這是你賬號的APPID

-- in views.py
def get_ali_object():
app_id = 'xxxxxxx' #你的賬號APPID
================================

(2)、換上你的支付寶公鑰
(3)、換上你的應用私鑰
關于怎么在python中實現支付寶支付問題的解答就分享到這里了,希望以上內容可以對大家有一定的幫助,如果你還有很多疑惑沒有解開,可以關注億速云行業資訊頻道了解更多相關知識。
免責聲明:本站發布的內容(圖片、視頻和文字)以原創、轉載和分享為主,文章觀點不代表本網站立場,如果涉及侵權請聯系站長郵箱:is@yisu.com進行舉報,并提供相關證據,一經查實,將立刻刪除涉嫌侵權內容。