您好,登錄后才能下訂單哦!
您好,登錄后才能下訂單哦!
這篇文章主要講解了如何用云開發Cloudbase實現小程序多圖片內容安全監測,內容清晰明了,對此有興趣的小伙伴可以學習一下,相信大家閱讀完之后會有幫助。
前言
相比于文本的安全檢測,圖片的安全檢測要稍微略復雜一些,當您讀完本篇,將get到
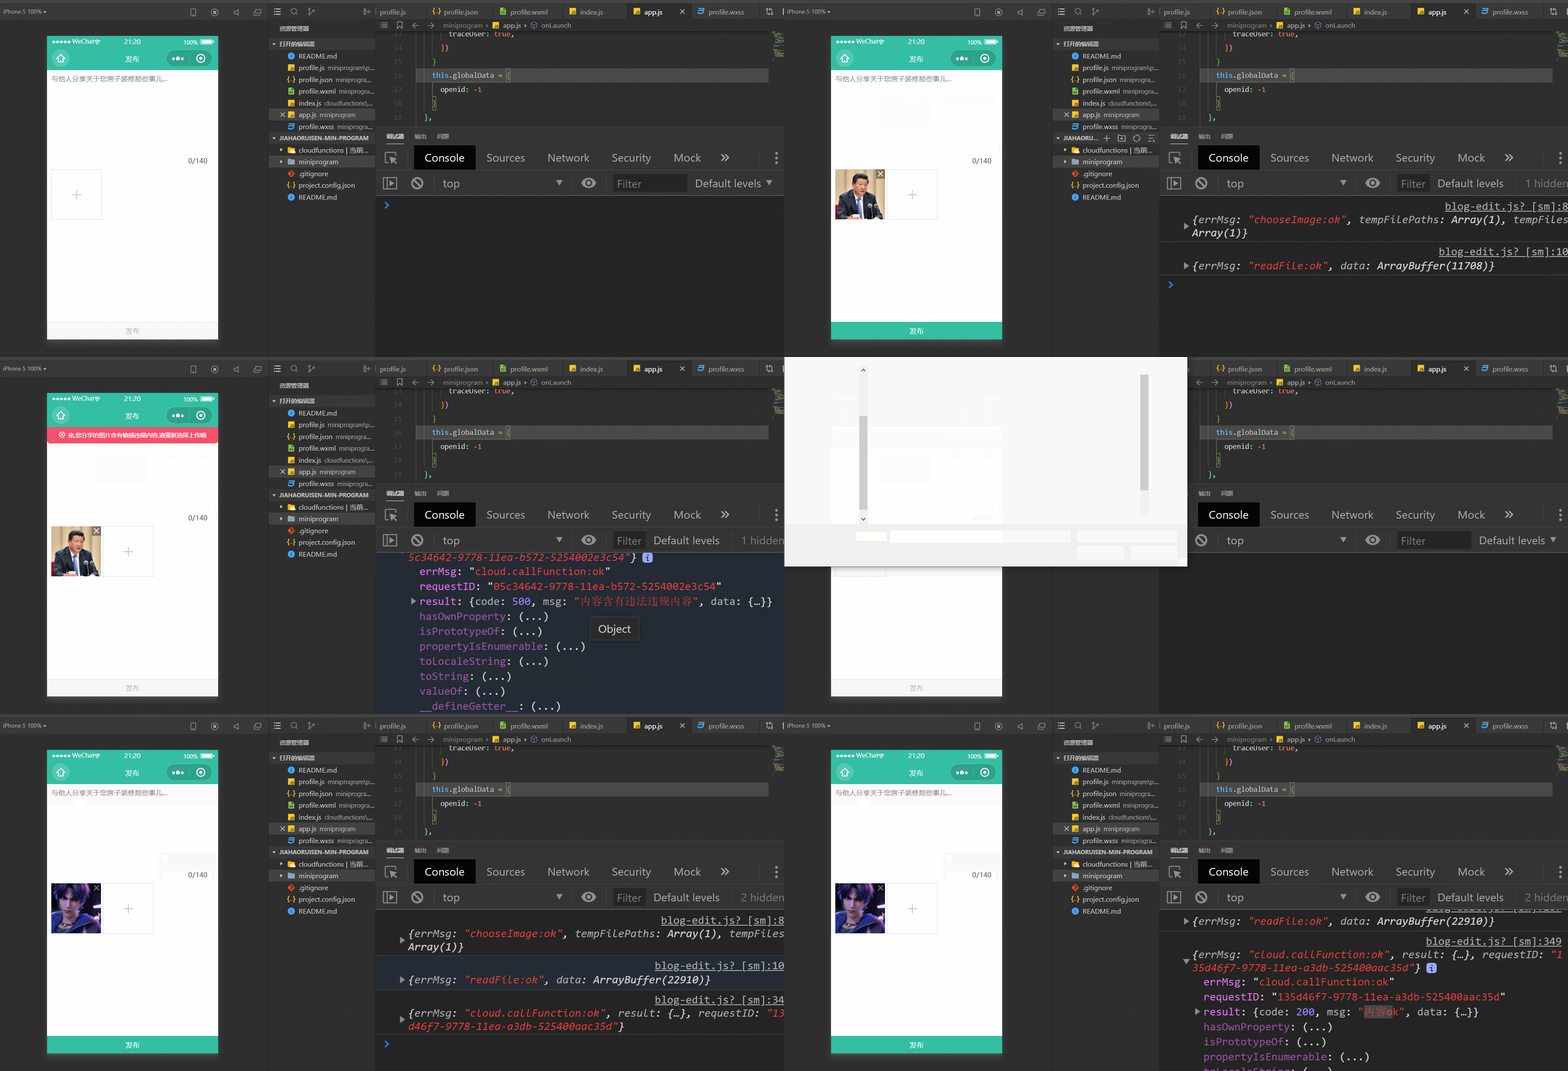
示例效果
當用戶上傳敏感違規圖片時,禁止用戶上傳發布,并且做出相對應的用戶友好提示
應用場景
通常,在校驗一張圖片是否含有違法違規內容相比于文本安全的校驗,同樣重要,有如下應用
圖片智能鑒黃:涉及拍照的工具類應用(如美拍,識圖類應用)用戶拍照上傳檢測;電商類商品上架圖片檢測;媒體類用戶文章里的圖片檢測等敏感人臉識別:用戶頭像;媒體類用戶文章里的圖片檢測;社交類用戶上傳的圖片檢測等,凡是有用戶自發生產內容的都應當提前做檢測
解決圖片的安全手段
在小程序開發中,提供了兩種方式
HTTPS 調用的請求接口地止
https://api.weixin.qq.com/wxa/img_sec_check?access_token=ACCESS_TOKEN
檢測圖片審核,根據官方文檔得知,需要兩個必傳的參數:分別是:access_token(接口調用憑證),media(要檢測的圖片文件)
對于HTTPS調用方式,愿意折騰的小伙伴可以參考文本內容安全檢測(上篇)的處理方式,處理大同小異,本篇主要以云開發的云調用為主
功能實現:小程序端邏輯
對于wxml與wxss,大家可以自行任意修改,本文重點在于圖片安全的校驗
<view class="image-list">
<!-- 顯示圖片 -->
 <block wx:for="{{images}}" wx:key="*this"><view class="image-wrap">
 <image class="image" src="{{item}}" mode="aspectFill" bind:tap="onPreviewImage" data-imgsrc="{{item}}"></image><i class="iconfont icon-shanchu" bind:tap="onDelImage" data-index="{{index}}"></i></view>
 </block>
 <!-- 選擇圖片 -->
 <view class="image-wrap selectphoto" hidden="{{!selectPhoto}}" bind:tap="onChooseImage"><i class="iconfont icon-add"></i></view>
 </view>
 <view class="footer"><button class="send-btn" bind:tap="send">發布</button>
 </view>
對應的wxss代碼
.footer {
 display: flex;
 align-items: center;
 width: 100%;
 box-sizing: border-box;
 background: #34bfa3;
}

.send-btn {
 width: 100%;
 color: #fff;
 font-size: 32rpx;
 background: #34bfa3;
}

button {
 border-radius: 0rpx;
}

button::after {
 border-radius: 0rpx !important;
}

/* 圖片樣式 */
.image-list {
 display: flex;
 flex-wrap: wrap;
 margin-top: 20rpx;
}

.image-wrap {
 width: 220rpx;
 height: 220rpx;
 margin-right: 10rpx;
 margin-bottom: 10rpx;
 position: relative;
 overflow: hidden;
 text-align: center;
}

.image {
 width: 100%;
 height: 100%;
}

.icon-shanchu {
 position: absolute;
 top: 0;
 right: 0;
 width: 40rpx;
 height: 40rpx;
 background-color: #000;
 opacity: 0.4;
 color: #fff;
 text-align: center;
 line-height: 40rpx;
 font-size: 38rpx;
 font-weight: bolder;
}

.selectphoto {
 border: 2rpx dashed #cbd1d7;
 position: relative;
}

.icon-add {
 position: absolute;
 top: 50%;
 left: 50%;
 transform: translate(-50%, -50%);
 color: #cbd1d7;
 font-size: 60rpx;
}
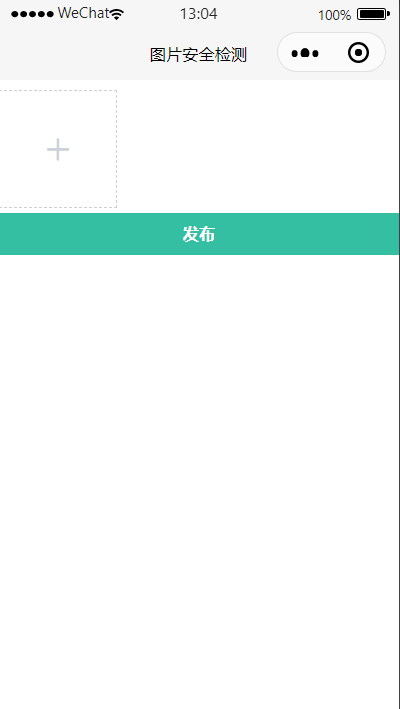
最終呈現的UI,由于只是用于圖片檢測演示,UI方面可忽略,如下所示
對應的JS代碼
/* * 涉及到的API:wx.chooseImage 從本地相冊選擇圖片或使用相機拍照 *(https://developers.weixin.qq.com/miniprogram/dev/api/media/image/wx.chooseImage.html) * * */// 最大上傳圖片數量 const MAX_IMG_NUM = 9; const db = wx.cloud.database(); // 初始化云數據庫 Page({ /** * 頁面的初始數據 */ data: { images: [], // 把上傳的圖片存放在一個數組對象里面 selectPhoto: true, // 添加+icon元素是否顯示 }, /** * 生命周期函數--監聽頁面加載 */ onLoad: function (options) { }, // 選擇圖片 onChooseImage() { // 還能再選幾張圖片,初始值設置最大的數量-當前的圖片的長度 let max = MAX_IMG_NUM - this.data.images.length; wx.chooseImage({ count: max, // count表示最多可以選擇的圖片張數 sizeType: ['original', 'compressed'], // 所選的圖片的尺寸 sourceType: ['album', 'camera'], // 選擇圖片的來源 success: (res) => { // 接口調用成功的回調函數console.log(res) this.setData({ // tempFilePath可以作為img標簽的src屬性顯示圖片,下面是將后添加的圖片與之前的圖片給追加起來 images: this.data.images.concat(res.tempFilePaths) }) // 還能再選幾張圖片 max = MAX_IMG_NUM - this.data.images.length this.setData({ selectPhoto: max <= 0 ? false : true // 當超過9張時,加號隱藏 }) }, }) }, // 點擊右上方刪除圖標,刪除圖片操作 onDelImage(event) { const index = event.target.dataset.index; // 點擊刪除當前圖片,用splice方法,刪除一張,從數組中移除一個 this.data.images.splice(index, 1) this.setData({ images: this.data.images }) // 當添加的圖片達到設置最大的數量時,添加按鈕隱藏,不讓新添加圖片 if (this.data.images.length == MAX_IMG_NUM - 1) { this.setData({ selectPhoto: true, }) } }, })
最終實現的前端UI效果如下所是:

您現在看到的效果,沒有任何云函數代碼,只是前端的純靜態展示,對于一些涉嫌敏感圖片,是有必要進行做過濾處理的
功能實現:云函數側邏輯
在cloudfunctions目錄文件夾下創建云函數imgSecCheck
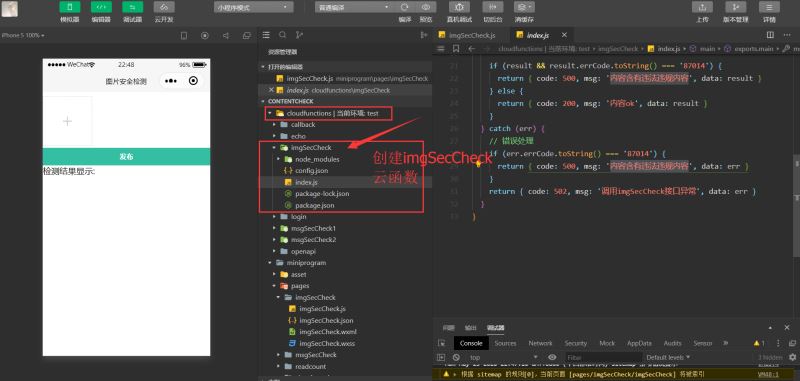
并在該目錄下創建config.json,配置參數如下所示
{
 "permissions": {
 "openapi": [
 "security.imgSecCheck"
 ]
 }
}
配置完后,在主入口index.js中,如下所示,通過security.imgSecCheck接口,并傳入media對象
// 云函數入口文件
const cloud = require('wx-server-sdk');
cloud.init({
 env: cloud.DYNAMIC_CURRENT_ENV
})

// 云函數入口函數
exports.main = async (event, context) => {
 const wxContext = cloud.getWXContext()
 try {
 const result = await cloud.openapi.security.imgSecCheck({
 media: {
 contentType: 'image/png',
 value: Buffer.from(event.img) // 這里必須要將小程序端傳過來的進行Buffer轉化,否則就會報錯,接口異常
 }

 })

 if (result && result.errCode.toString() === '87014') {
 return { code: 500, msg: '內容含有違法違規內容', data: result }
 } else {
 return { code: 200, msg: '內容ok', data: result }
 }
 } catch (err) {
 // 錯誤處理
 if (err.errCode.toString() === '87014') {
 return { code: 500, msg: '內容含有違法違規內容', data: err }
 }
 return { code: 502, msg: '調用imgSecCheck接口異常', data: err }
 }
}
您會發現在云函數端,就這么幾行代碼,就完成了圖片安全校驗
而在小程序端,代碼如下所示
// miniprogram/pages/imgSecCheck/imgSecCheck.js
// 最大上傳圖片數量
const MAX_IMG_NUM = 9;
const db = wx.cloud.database()
Page({
/**
* 頁面的初始數據
*/
data: {
images: [],
selectPhoto: true, // 添加圖片元素是否顯示
},
/**
* 生命周期函數--監聽頁面加載
*/
onLoad: function (options) {
},
// 選擇圖片
onChooseImage() {
// const that = this; // 如果下面用了箭頭函數,那么這行代碼是不需要的,直接用this就可以了的// 還能再選幾張圖片,初始值設置最大的數量-當前的圖片的長度
let max = MAX_IMG_NUM - this.data.images.length;
wx.chooseImage({
count: max,
sizeType: ['original', 'compressed'],
sourceType: ['album', 'camera'],
success: (res) => { // 這里若不是箭頭函數,那么下面的this.setData的this要換成that上面的臨時變量,作用域的問題,不清楚的,可以看下this指向相關的知識
console.log(res)
// tempFilePath可以作為img標簽的src屬性顯示圖片
const tempFiles = res.tempFiles;
this.setData({
images: this.data.images.concat(res.tempFilePaths)
})
// 在選擇圖片時,對本地臨時存儲的圖片,這個時候,進行圖片的校驗,當然你放在最后點擊發布時,進行校驗也是可以的,只不過是一個前置校驗和后置校驗的問題,我個人傾向于在選擇圖片時就進行校驗的,選擇一些照片時,就應該在選擇時階段做安全判斷的, 小程序端請求云函數方式// 圖片轉化buffer后,調用云函數
console.log(tempFiles);
tempFiles.forEach(items => {
console.log(items);
// 圖片轉化buffer后,調用云函數
wx.getFileSystemManager().readFile({
filePath: items.path,
success: res => {
console.log(res);
wx.cloud.callFunction({ // 小程序端請求imgSecCheck云函數,并傳遞img參數進行檢驗
name: 'imgSecCheck',
data: {
img: res.data
}
})
.then(res => {
console.log(res);
let { errCode } = res.result.data;
switch(errCode) {
case 87014:
this.setData({
resultText: '內容含有違法違規內容'
})
break;
case 0:
this.setData({
resultText: '內容OK'
})
break;
default:
break;
}
})
.catch(err => {
console.error(err);
})
},
fail: err => {
console.error(err);
}
})
})
// 還能再選幾張圖片
max = MAX_IMG_NUM - this.data.images.length
this.setData({
selectPhoto: max <= 0 ? false : true // 當超過9張時,加號隱藏
})
},
})
},
// 刪除圖片
onDelImage(event) {
const index = event.target.dataset.index;
// 點擊刪除當前圖片,用splice方法,刪除一張,從數組中移除一個
this.data.images.splice(index, 1);
this.setData({
images: this.data.images
})
// 當添加的圖片達到設置最大的數量時,添加按鈕隱藏,不讓新添加圖片
if (this.data.images.length == MAX_IMG_NUM - 1) {
this.setData({
selectPhoto: true,
})
}
},
})示例效果如下所示:
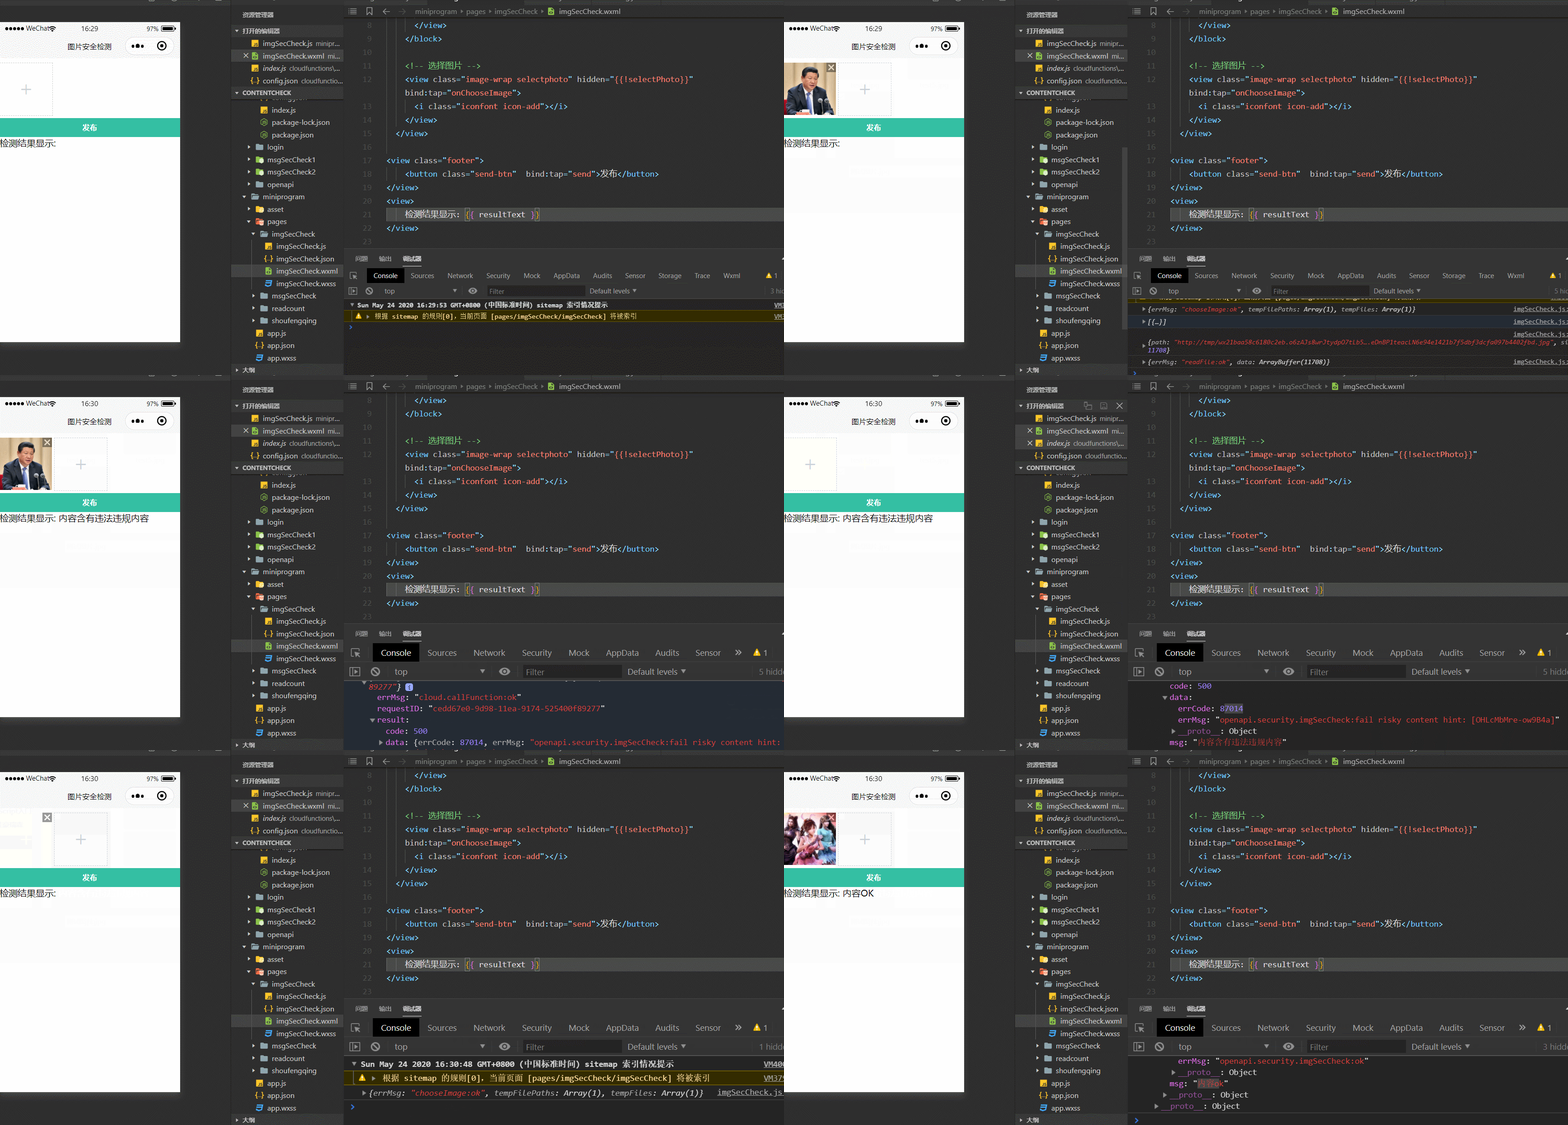
至此,關于圖片安全檢測就已經完成了,您只需要根據檢測的結果,做一些友好的用戶提示,或者做一些自己的業務邏輯判斷即可
常見問題
如何對上傳的圖片大小進行限制
有時候,您需要對用戶上傳圖片的大小進行限制,限制用戶任意上傳超大圖片,那怎么處理呢,在微信小程序里面,主要借助的是wx.chooseImage這個接口成功返回后臨時路徑的res.tempFiles中的size大小判斷即可進行處理

具體實例代碼如下所示
// 選擇圖片
onChooseImage() {
// 還能再選幾張圖片,初始值設置最大的數量-當前的圖片的長度
let max = MAX_IMG_NUM - this.data.images.length;
wx.chooseImage({
count: max,
sizeType: ['original', 'compressed'],
sourceType: ['album', 'camera'],
success: (res) => {
console.log(res)
const tempFiles = res.tempFiles;
this.setData({
images: this.data.images.concat(res.tempFilePaths) // tempFilePath可以作為img標簽的src屬性顯示圖片
})
// 在選擇圖片時,對本地臨時存儲的圖片,這個時候,進行圖片的校驗,當然你放在最后點擊發布時,進行校驗也是可以的,只不過是一個前置校驗和后置校驗的問題,我個人傾向于在選擇圖片時就進行校驗的,選擇一些照片時,就應該在選擇時階段做安全判斷的, 小程序端請求云函數方式// 圖片轉化buffer后,調用云函數
console.log(tempFiles);
tempFiles.forEach(items => {
if (items && items.size > 1 * (1024 * 1024)) { // 限制圖片的大小
wx.showToast({
icon: 'none',
title: '上傳的圖片超過1M,禁止用戶上傳',
duration: 4000
})
// 超過1M的圖片,禁止用戶上傳
}
console.log(items);
// 圖片轉化buffer后,調用云函數
wx.getFileSystemManager().readFile({
filePath: items.path,
success: res => {
console.log(res);
wx.cloud.callFunction({ // 請求調用云函數imgSecCheck
name: 'imgSecCheck',
data: {
img: res.data
}
})
.then(res => {
console.log(res);
let { errCode } = res.result.data;
switch(errCode) {
case 87014:
this.setData({
resultText: '內容含有違法違規內容'
})
break;
case 0:
this.setData({
resultText: '內容OK'
})
break;
default:
break;
}
})
.catch(err => {
console.error(err);
})
},
fail: err => {
console.error(err);
}
})
})
// 還能再選幾張圖片
max = MAX_IMG_NUM - this.data.images.length
this.setData({
selectPhoto: max <= 0 ? false : true // 當超過9張時,加號隱藏
})
},
})
},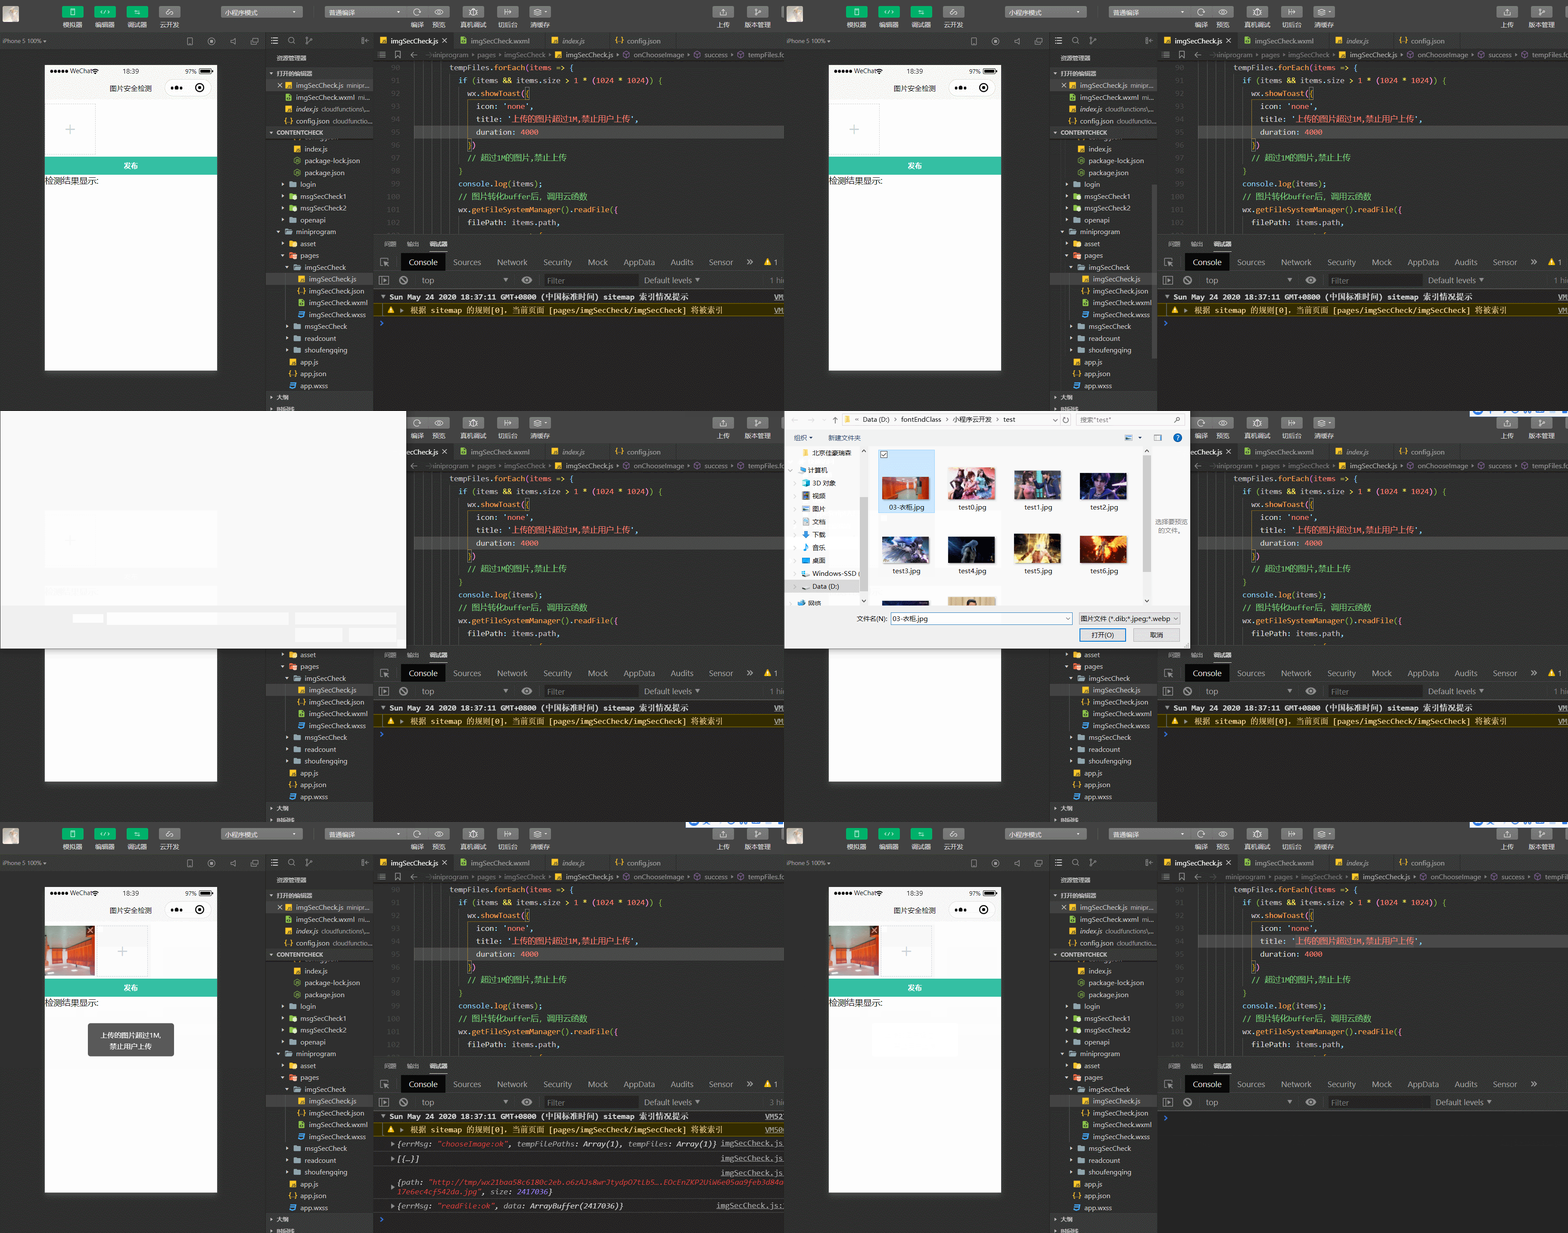
注意: 使用微信官方的圖片內容安全接口進行校驗,限制圖片大小限制:1M,否則的話就會報錯

也就是說,對于超過1M大小的違規圖片,微信官方提供的這個圖片安全接口是無法進行校驗的
這個根據自己的業務而定,在小程序端對用戶上傳圖片的大小進行限制如果您覺得微信官方提供的圖片安全接口滿足不了自己的業務需求,那么可以選擇一些其他的圖片內容安全校驗的接口的
這個圖片安全校驗是非常有必要的,用戶一旦上傳非法圖片,一旦通過網絡進行傳播,產生了社會影響,平臺是有責任的,這種前車之鑒是有的
如何解決多圖上傳覆蓋的問題
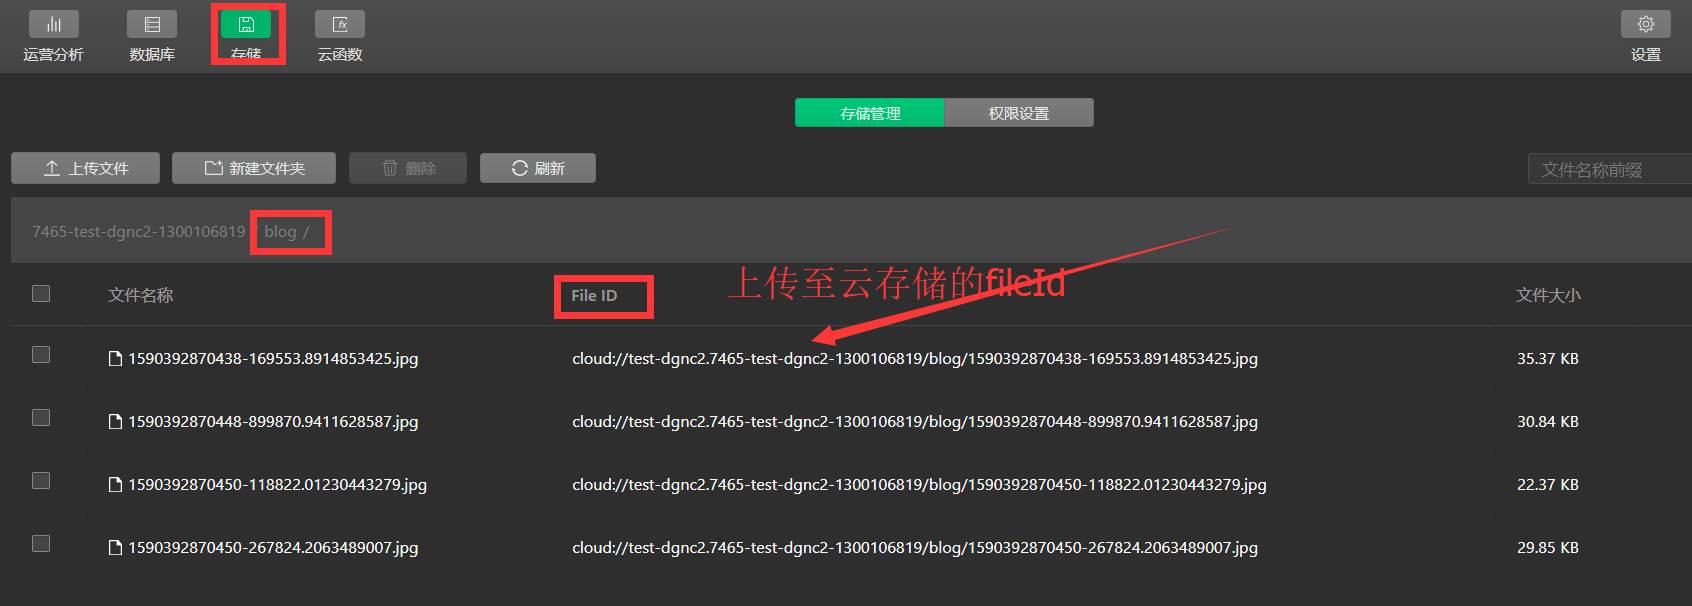
對于上傳圖片來說,這個wx.cloud.uploadFileAPI接口只能上傳一張圖片,但是很多時候,是需要上傳多張圖片到云存儲當中的,當點擊發布的時候,我們是希望將多張圖片都上傳到云存儲當中去的
這個API雖然只能每次上傳一張,但您可以循環遍歷多張圖片,然后一張一張的上傳的
在cloudPath上傳文件的參數當中,它的值:需要注意:文件的名稱
那如何保證上傳的圖片不被覆蓋,文件不重名的情況下就不會被覆蓋
而在選擇圖片的時候,不應該上傳,因為用戶可能有刪除等操作,如果直接上傳的話會造成資源的浪費
而應該在點發布按鈕的時候,才執行上傳操作,文件不重名覆蓋的示例代碼如下所示
 let promiseArr = []
 let fileIds = [] // 將圖片的fileId存放到一個數組中
 let imgLength = this.data.images.length;
 // 圖片上傳
 for (let i = 0; i < imgLength; i++) {
 let p = new Promise((resolve, reject) => {
 let item = this.data.images[i]
  // 文件擴展名
  let suffix = /\.\w+$/.exec(item)[0]; // 取文件后拓展名
  wx.cloud.uploadFile({ // 利用官方提供的上傳接口
  cloudPath: 'blog/' + Date.now() + '-' + Math.random() * 1000000 + suffix, // 云存儲路徑,您也可以使用es6中的模板字符串進行拼接的
  filePath: item, // 要上傳文件資源的路徑
  success: (res) => {
  console.log(res);
  console.log(res.fileID)
  fileIds = fileIds.concat(res.fileID) // 將新上傳的與之前上傳的給拼接起來
  resolve()
  },
  fail: (err) => {
  console.error(err)
  reject()
  }
  })
 })
 promiseArr.push(p)
 }
 // 存入到云數據庫,其中這個Promise.all(),等待里面所有的任務都執行之后,在去執行后面的任務,也就是等待上傳所有的圖片上傳完后,才能把相對應的數據存到數據庫當中,具體與promise相關問題,可自行查漏
 Promise.all(promiseArr).then((res) => {
  db.collection('blog').add({ // 查找blog集合,將img,時間等數據添加到這個集合當中
  data: {
  img: fileIds,
  createTime: db.serverDate(), // 服務端的時間
  }
  }).then((res) => {
  console.log(res);
  this._hideToastTip();
  this._successTip();
  })
 })
 .catch((err) => {
  // 發布失敗console.error(err);
 })
上面通過利用當前時間+隨機數的方式進行了一個區分,規避了上傳文件同名的問題
因為這個上傳接口,一次性只能上傳一張圖片,所以需要循環遍歷圖片,然后一張張的上傳
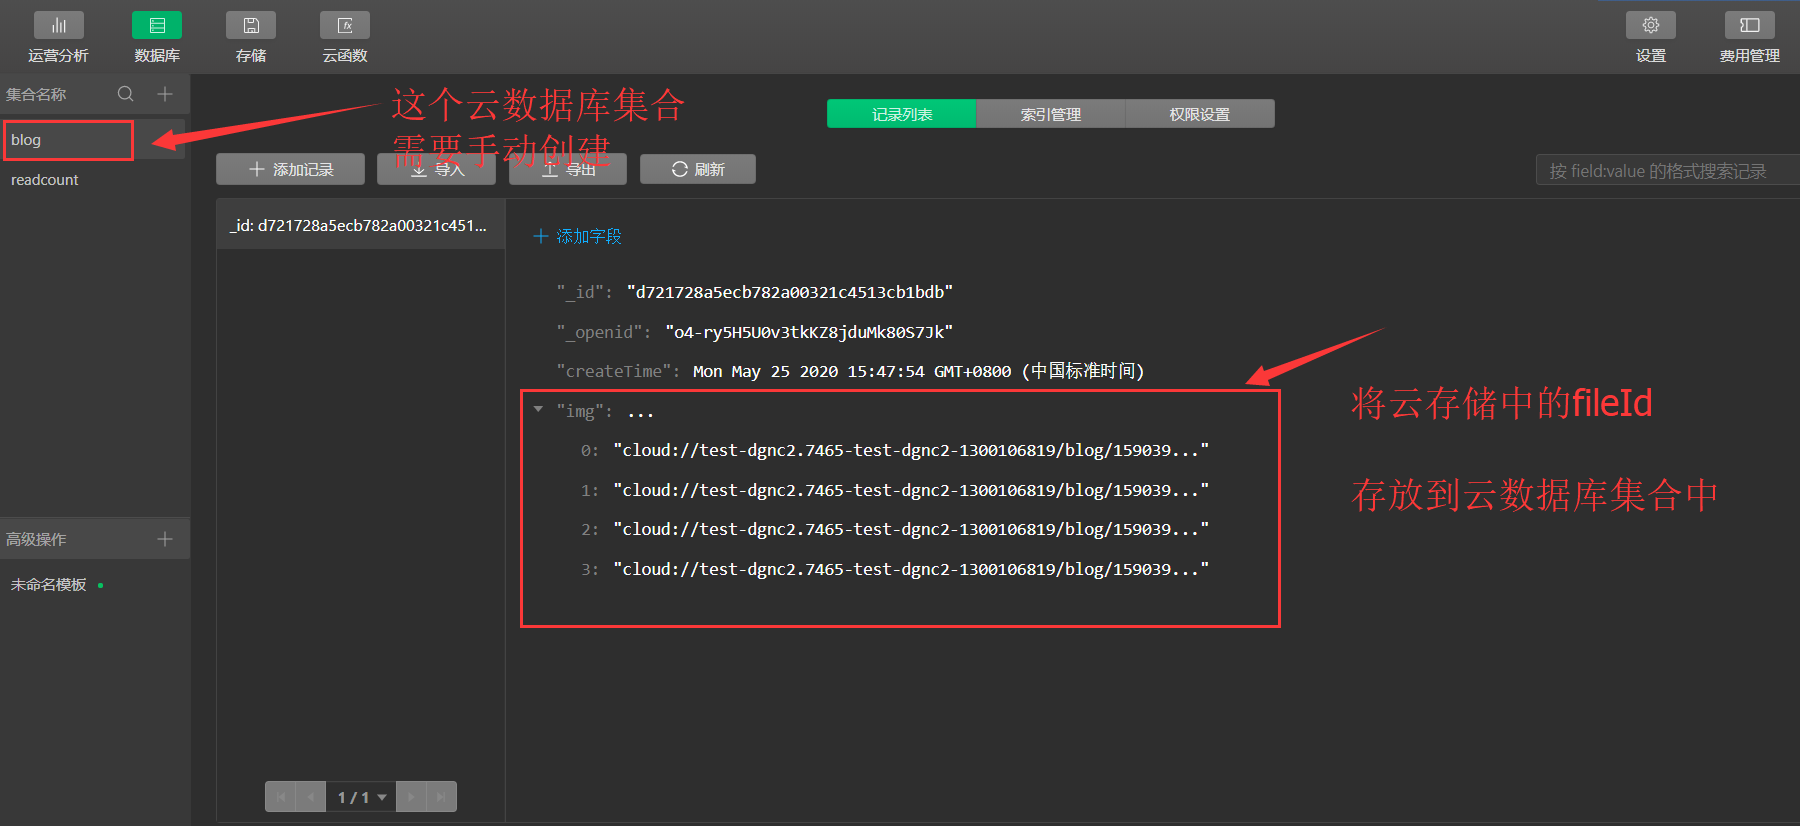
一個是上傳到云存儲中,另一個是添加到云數據庫集合當中,要分別注意下這兩個操作,云數據庫中的圖片是從云存儲中拿到的,然后再添加到云數據庫當中去的
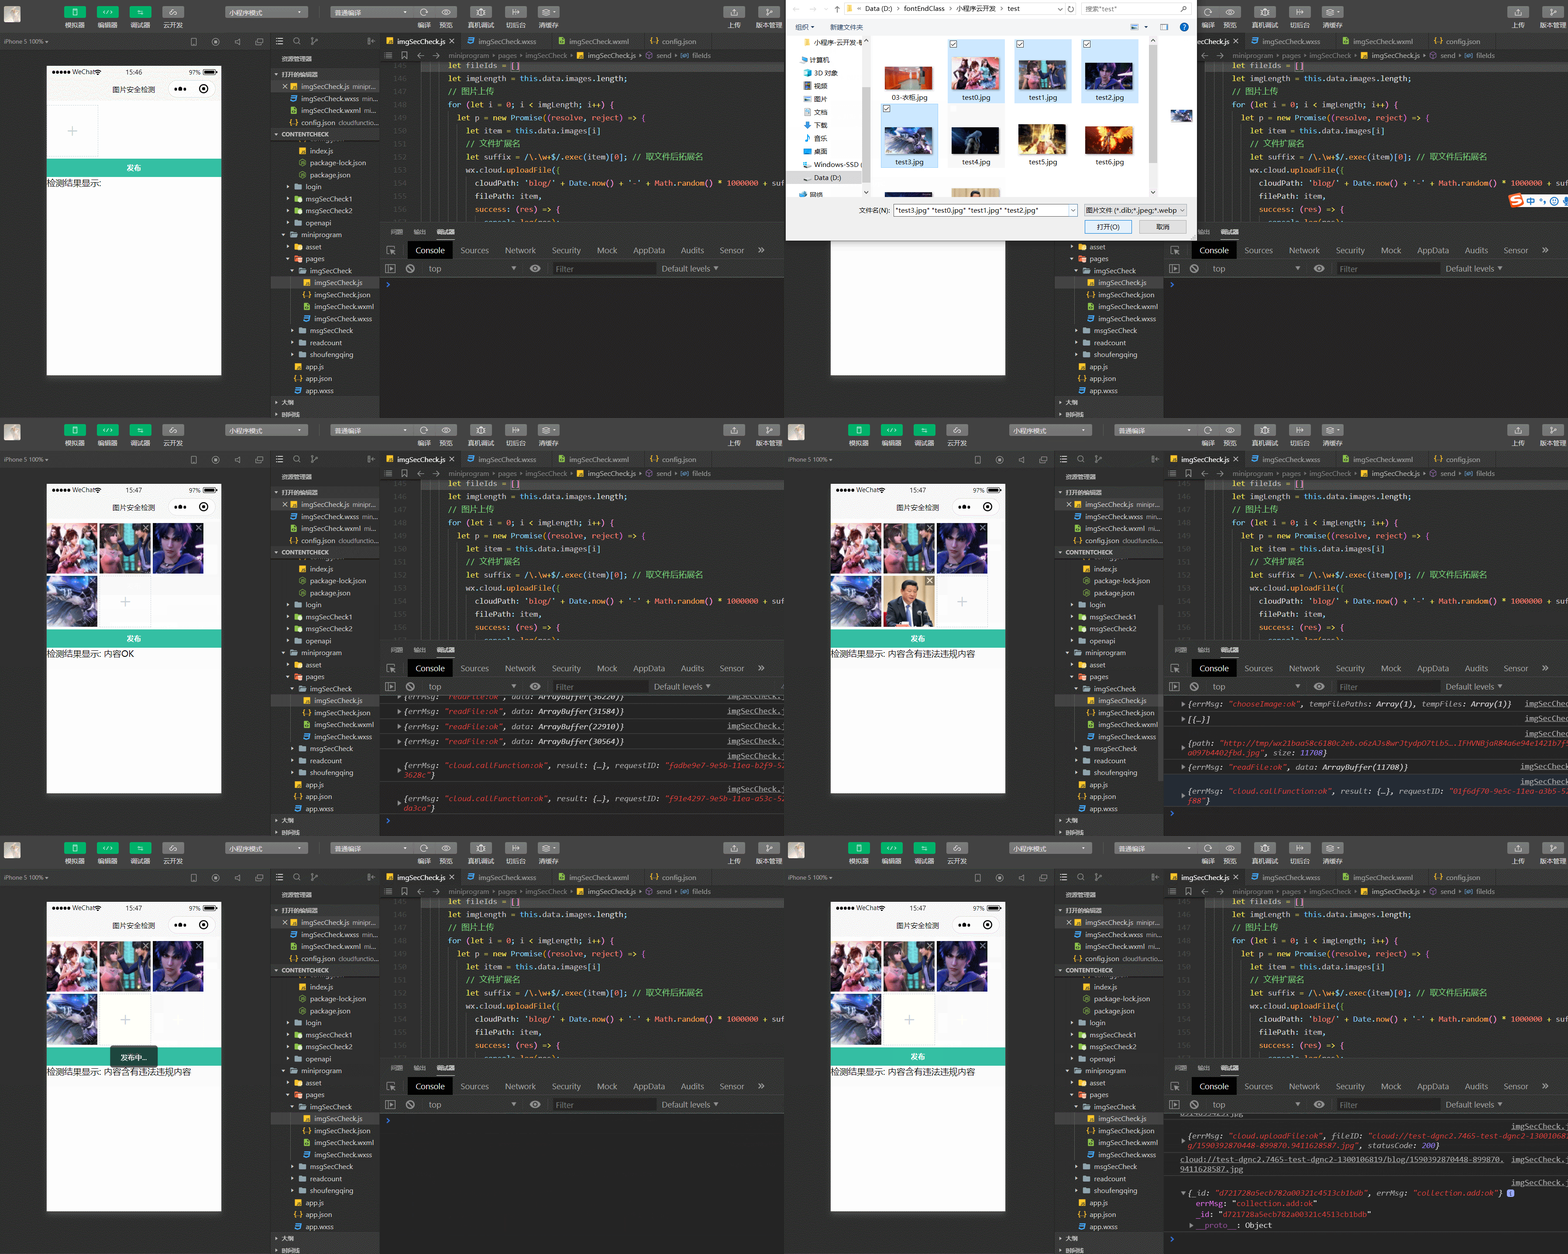
示例效果如下所示:
將上傳的圖片存儲到云數據庫中
注意:添加數據到云數據庫中,需要手動創建集合,不然是無法上傳不到云數據庫當中的,會報錯
至此,關于敏感圖片的檢測,以及多圖片的上傳到這里就已經完成了
如下是完整的小程序端邏輯示例代碼
// miniprogram/pages/imgSecCheck/imgSecCheck.js
// 最大上傳圖片數量
const MAX_IMG_NUM = 9;
const db = wx.cloud.database()
Page({
/**
* 頁面的初始數據
*/
data: {
images: [],
selectPhoto: true, // 添加圖片元素是否顯示
},
/**
* 生命周期函數--監聽頁面加載
*/
onLoad: function (options) {
},
// 選擇圖片
onChooseImage() {
// 還能再選幾張圖片,初始值設置最大的數量-當前的圖片的長度
let max = MAX_IMG_NUM - this.data.images.length;
wx.chooseImage({
count: max,
sizeType: ['original', 'compressed'],
sourceType: ['album', 'camera'],
success: (res) => {
console.log(res)
const tempFiles = res.tempFiles;
this.setData({
images: this.data.images.concat(res.tempFilePaths) // tempFilePath可以作為img標簽的src屬性顯示圖片
})
// 在選擇圖片時,對本地臨時存儲的圖片,這個時候,進行圖片的校驗,當然你放在最后點擊發布時,進行校驗也是可以的,只不過是一個前置校驗和后置校驗的問題,我個人傾向于在選擇圖片時就進行校驗的,選擇一些照片時,就應該在選擇時階段做安全判斷的, 小程序端請求云函數方式
// 圖片轉化buffer后,調用云函數
console.log(tempFiles);
tempFiles.forEach(items => {
if (items && items.size > 1 * (1024 * 1024)) {
wx.showToast({
icon: 'none',
title: '上傳的圖片超過1M,禁止用戶上傳',
duration: 4000
})
// 超過1M的圖片,禁止上傳
}
console.log(items);
// 圖片轉化buffer后,調用云函數
wx.getFileSystemManager().readFile({
filePath: items.path,
success: res => {
console.log(res);
this._checkImgSafe(res.data); // 檢測圖片安全校驗
},
fail: err => {
console.error(err);
}
})
})
// 還能再選幾張圖片
max = MAX_IMG_NUM - this.data.images.length
this.setData({
selectPhoto: max <= 0 ? false : true // 當超過9張時,加號隱藏
})
},
})
},
// 刪除圖片
onDelImage(event) {
const index = event.target.dataset.index;
// 點擊刪除當前圖片,用splice方法,刪除一張,從數組中移除一個
this.data.images.splice(index, 1);
this.setData({
images: this.data.images
})
// 當添加的圖片達到設置最大的數量時,添加按鈕隱藏,不讓新添加圖片
if (this.data.images.length == MAX_IMG_NUM - 1) {
this.setData({
selectPhoto: true,
})
}
},
// 點擊發布按鈕,將圖片上傳到云數據庫當中
send() {
const images = this.data.images.length;
if (images) {
this._showToastTip();
let promiseArr = []
let fileIds = []
let imgLength = this.data.images.length;
// 圖片上傳
for (let i = 0; i < imgLength; i++) {
let p = new Promise((resolve, reject) => {
let item = this.data.images[i]
// 文件擴展名
let suffix = /\.\w+$/.exec(item)[0]; // 取文件后拓展名
wx.cloud.uploadFile({ // 上傳圖片至云存儲,循環遍歷,一張張的上傳
cloudPath: 'blog/' + Date.now() + '-' + Math.random() * 1000000 + suffix,
filePath: item,
success: (res) => {
console.log(res);
console.log(res.fileID)
fileIds = fileIds.concat(res.fileID)
resolve()
},
fail: (err) => {
console.error(err)
reject()
}
})
})
promiseArr.push(p)
}
// 存入到云數據庫
Promise.all(promiseArr).then((res) => {
db.collection('blog').add({ // 查找blog集合,將數據添加到這個集合當中
data: {
img: fileIds,
createTime: db.serverDate(), // 服務端的時間
}
}).then((res) => {
console.log(res);
this._hideToastTip();
this._successTip();
})
})
.catch((err) => {
// 發布失敗
console.error(err);
})
} else {
wx.showToast({
icon: 'none',
title: '沒有選擇任何圖片,發布不了',
})
}
},
// 校驗圖片的安全
_checkImgSafe(data) {
wx.cloud.callFunction({
name: 'imgSecCheck',
data: {
img: data
}
})
.then(res => {
console.log(res);
let {
errCode
} = res.result.data;
switch (errCode) {
case 87014:
this.setData({
resultText: '內容含有違法違規內容'
})
break;
case 0:
this.setData({
resultText: '內容OK'
})
break;
default:
break;
}
})
.catch(err => {
console.error(err);
})
},
_showToastTip() {
wx.showToast({
icon: 'none',
title: '發布中...',
})
},
_hideToastTip() {
wx.hideLoading();
},
_successTip() {
wx.showToast({
icon: 'none',
title: '發布成功',
})
},
})完整的示例wxml,如下所示
<view class="image-list">
<!-- 顯示圖片 -->
<block wx:for="{{images}}" wx:key="*this">
 <view class="image-wrap"><image class="image" src="{{item}}" mode="aspectFill" bind:tap="onPreviewImage" data-imgsrc="{{item}}"></image><i class="iconfont icon-shanchu" bind:tap="onDelImage" data-index="{{index}}"></i>
 </view>
</block>
<!-- 選擇圖片 -->
<view class="image-wrap selectphoto" hidden="{{!selectPhoto}}" bind:tap="onChooseImage"><i class="iconfont icon-add"></i></view>
</view>
<view class="footer">
 <button class="send-btn" bind:tap="send">發布</button>
</view>
<view>
 檢測結果顯示: {{ resultText }}
</view>
您可以根據自己的業務邏輯需要,一旦檢測到圖片違規時,禁用按鈕狀態,或者給一些用戶提示,都是可以的,在發布之前或者點擊發布時,進行圖片內容安全的校驗都可以,一旦發現圖片有違規時,就不讓繼續后面的操作的
看完上述內容,是不是對如何用云開發Cloudbase實現小程序多圖片內容安全監測有進一步的了解,如果還想學習更多內容,歡迎關注億速云行業資訊頻道。
免責聲明:本站發布的內容(圖片、視頻和文字)以原創、轉載和分享為主,文章觀點不代表本網站立場,如果涉及侵權請聯系站長郵箱:is@yisu.com進行舉報,并提供相關證據,一經查實,將立刻刪除涉嫌侵權內容。