您好,登錄后才能下訂單哦!
您好,登錄后才能下訂單哦!
一、Prometheus介紹
Prometheus 是一套開源的系統監控和報警框架,靈感源自 Google 的 Borgmon 監控系統。2012 年,SoundCloud 的 Google 前員工創造了 Prometheus,并作為社區開源項目進行開發。2015 年,該項目正式發布。2016 年,Prometheus 加入云原生計算基金會(Cloud Native Computing Foundation),成為受歡迎度僅次于 Kubernetes 的項目。
二、Prometheus 具有以下特性
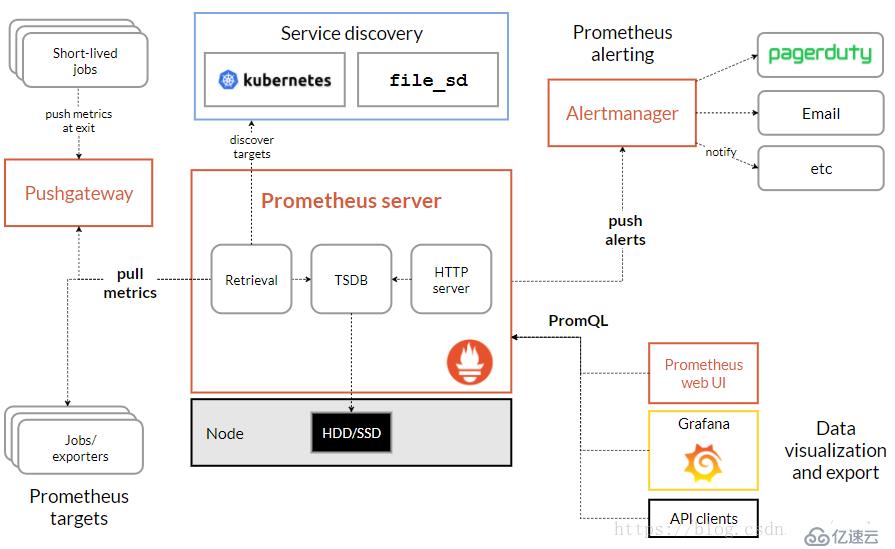
三、架構
prometheus是一個用Go編寫的時序數據庫,可以支持多種語言客戶端
四、模塊介紹
Prometheus Server
Prometheus Server 是監控系統的服務端,服務端通過服務發現的方式,抓取被監控服務的指標,或者通過 pushgateway 的間接抓取,抓取到指標數據后,通過特定的存儲引擎進行存儲,同時暴露一個 HTTP 服務,提供用 PromQL 來進行數據查詢。注意,Prometheus 是定時采樣數據,而不是全量數據。
Exporter
Prometheus 需要服務暴露 http 接口,如果服務本身沒有,我們不需要改造服務,可以通過 exporter 來間接獲取。Exporter 就充當了 Prometheus 采集的目標,而由各個 exporter 去直接獲取指標。目前大多數的服務都有現成的 exporter,我們不需要重復造輪子,拿來用即可,如 MySQL,MongoDB 等,可以參考這里。
為什么要有兩種模式呢?我們來比較一下這兩種模式的特點。
1、Pull 模式:Prometheus 主動抓取的方式,可以由 Prometheus 服務端控制抓取的頻率,簡單清晰,控制權在 Prometheus 服務端。通過服務發現機制,可以自動接入新服務,去掉下線的服務,無需任何人工干預。對于各種常見的服務,官方或社區有大量 Exporter 來提供指標采集接口,基本無需開發。是官方推薦的方式。
2、Push 模式:由服務端主動上報至 Push Gateway,采集最小粒度由服務端決定,等于 Push Gateway 充當了中介的角色,收集各個服務主動上報的指標,然后再由 Prometheus 來采集。但是這樣就存在了 Push Gateway 這個性能單點,而且 Push Gateway 也要處理持久化問題,不然宕機也會丟失部分數據。同時需要服務端提供主動上報的功能,可能涉及一些開發改動。不是首選的方式,但是在一些場景下很適用。例如,一些臨時性的任務,存在時間可能非常短,如果采用 Pull 模式,可能抓取不到數據。
Alert Manager
Alert Manager 是 Prometheus 的報警組件,當 Prometheus 服務端發現報警時,推送 alert 到 Alert Manager,再由 Alert Manager 發送到通知端,如 Email,Slack,微信,釘釘等。Alert Manager 根據相關規則提供了報警的分組、聚合、抑制、沉默等功能。
五、下載
下載地址:https://prometheus.io/download/
下載server
wget -c https://github.com/prometheus/prometheus/releases/download/v2.15.0/prometheus-2.15.0.linux-amd64.tar.gz
下載node
wget -c https://github.com/prometheus/node_exporter/releases/download/v0.18.1/node_exporter-0.18.1.linux-amd64.tar.gz

六、配置說明
配置文件:prometheus.yml
# my global config
global:
  scrape_interval:     15s # Set the scrape interval to every 15 seconds. Default is every 1 minute.
  evaluation_interval: 15s # Evaluate rules every 15 seconds. The default is every 1 minute.
  # scrape_timeout is set to the global default (10s).

# Alertmanager configuration          #報警監控配置
alerting:
  alertmanagers:
  - static_configs:
    - targets:
      # - alertmanager:9093

# Load rules once and periodically evaluate them according to the global 'evaluation_interval'.
rule_files:
  # - "first_rules.yml"
  # - "second_rules.yml"

# A scrape configuration containing exactly one endpoint to scrape:
# Here it's Prometheus itself.
scrape_configs:
  # The job name is added as a label `job=<job_name>` to any timeseries scraped from this config.
  - job_name: 'prometheus'

    # metrics_path defaults to '/metrics'
    # scheme defaults to 'http'.

    static_configs:
    - targets: ['localhost:9090']
說明:
global:全局配置,其中scrape_interval表示抓取一次數據的間隔時間,evaluationinterval:表示進行告警規則檢測的間隔時間;
alerting:告警管理器(Alertmanager)的配置,需要安裝Alertmanager;
rulefiles:告警規則有哪些;
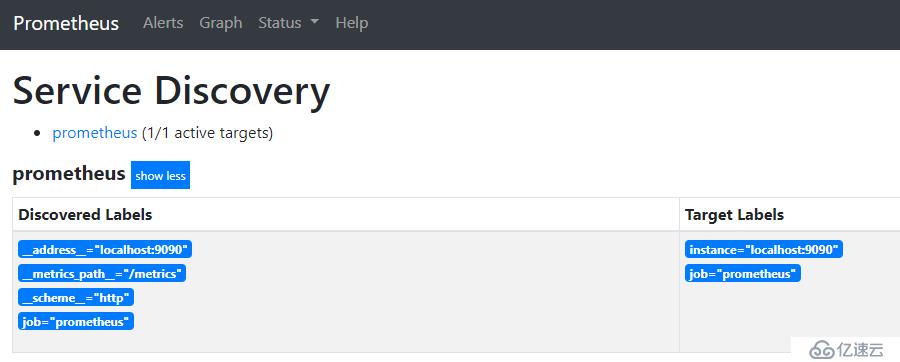
scrapeconfigs:抓取監控信息的目標。一個job_name就是一個目標,其targets就是采集信息的IP和端口。這里默認監控了Prometheus自己,可以通過修改這里來修改Prometheus的監控端口。Prometheus的每個exporter都會是一個目標,它們可以上報不同的監控信息,比如機器狀態,或者mysql性能等等,不同語言sdk也會是一個目標,它們會上報你自定義的業務監控信息。
七、部署
部署流程:
1、在監控服務器上安裝prometheus
2、在被監控環境上安裝exporte
1、server啟動方法:./prometheus --config.file=/data/prometheus-2.15.0.linux-amd64/prometheus.yml
2、node啟動方法:nohup ./node_exporter &
3、將應用添加到系統服務
vim /etc/systemd/system/prometheus.service
[unit]
Description=Prometheus Monitoring System
Documentation=Prometheus Monitoring System

[Service]
ExecStart=/data/prometheus/prometheus \
  --config.file=/data/prometheus/prometheus.yml \
  --web.listen-address=:9090
##此處文件路徑請對照安裝目錄

[Install]
WantedBy=multi-user.target
然后就可以通過systemctl start|stop|status|enable promethues.service進行管理了
八、訪問
http://127.0.0.1:9090
參考鏈接:prometheus安裝
免責聲明:本站發布的內容(圖片、視頻和文字)以原創、轉載和分享為主,文章觀點不代表本網站立場,如果涉及侵權請聯系站長郵箱:is@yisu.com進行舉報,并提供相關證據,一經查實,將立刻刪除涉嫌侵權內容。