您好,登錄后才能下訂單哦!
您好,登錄后才能下訂單哦!
Android library #1 on GitHub. UIL aims to provide a powerful, flexible and highly customizable instrument for image loading, caching and displaying. It provides a lot of configuration options and good control over the image loading and caching process.根據Github上面的注釋,ImageLoader是一個強大的,靈活的,高度可定制化的圖片加載,緩存已經展示的框架。它提供了大量的可配置選項,可以很好的控制圖片的加載和緩存進度。
https://github.com/nostra13/Android-Universal-Image-Loader
| 類名 | 意義 |
|---|---|
| ImageLoader | ImageLoader的主要操作入口類,比如初始化,請求加載圖片。 |
| ImageLoaderEngine | ImageLoader的發動機,包含幾個Executor線程池,可以執行各種任務,有些Executor可以在configuration中配置。 |
| ImageViewAware | 傳入圖片控件ImageView的包裝,對ImageView弱引用(防止內存泄漏),封裝了一些方法,可以更加方便的操作ImageView,比如獲取寬高,設置圖片顯示等。 |
| DisplayImageOptions | 請求顯示圖片時的參數,比如默認圖片,失敗圖片,是否使用內存緩存等等 |
| ImageLoadingListener | 圖片加載的監聽器,比如onLoadingStarted,onLoadingComplete |
| MemoryCache | MemoryCache是圖片內存緩存的一個接口,包括多種實現機制,比如Lru, FIFO, LargestLimited等 |
| DiskCache | 圖片磁盤緩存接口,包括多種緩存命名算法,比如md5,hashcode等 |
| ImageLoadingInfo | 內存中沒有找到圖片,準備去其他地方找圖片的時候,為了便于操作封裝的對象,比如圖片uri,memorykey, imageLoadinglistener,progressListener, loadFromUriLock |
| LoadedFrom | 枚舉類型,表明圖片從哪里獲取,包括3種類型 NETWORK(網絡), DISC_CACHE(磁盤,sd卡), MEMORY_CACHE(內存) |
| ImageLoaderConfiguration | 非常重要的對象,在Application中初始化,包含了MemoryCache,DiskCache,ImageDownloader,ImageDecoder等 |
| ImageDownloader | 圖片下載接口,有些實現子類,比如BaseImageDownloader,SlowNetworkImageDownloader,NetworkDeniedImageDownloader |
| BaseImageDownloader | 基本的圖片下載類,支持網絡,assets, content, drawable等圖片獲取 |
| SlowNetworkImageDownloader | 底網速下圖片獲取 |
| BitmapDisplayer | 圖片顯示抽象類,包括各種圖片顯示效果,比如最普通的顯示圖片,圓角圖片顯示等 |

| 包名 | 作用 |
|---|---|
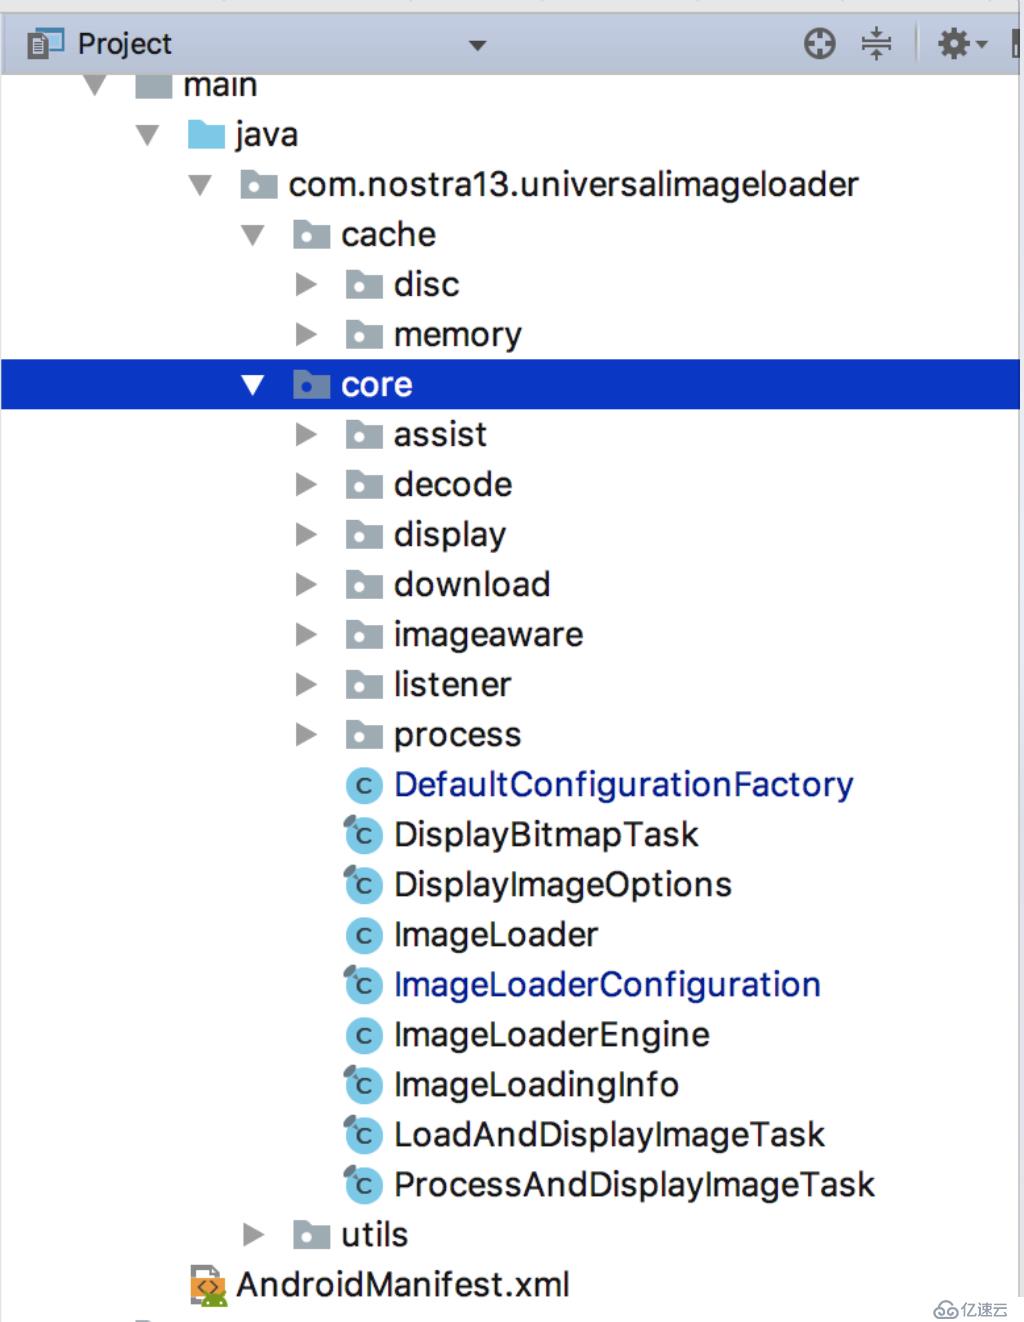
| com.nostra13.universalimageloader.cache.disc | 磁盤緩存命名和存儲的算法實現,比如md5和hashcode名稱,限制使用時間存儲等 |
| com.nostra13.universalimageloader.cache.memory | 內存緩存算法的實現類,包括先進先出,Lru等算法 |
| com.nostra13.universalimageloader.core | ImageLoader的核心代碼和主要工作流程類,比如ImageLoader,ImageLoaderConfiguration,ImageLoaderEngine等。 |
| com.nostra13.universalimageloader.core.assist | 輔助類, |
| com.nostra13.universalimageloader.core.decode | 解碼,比如從磁盤文件解碼成Bitmap |
| com.nostra13.universalimageloader.core.display | 圖片顯示效果類,比如圓角,淡入效果等 |
| com.nostra13.universalimageloader.core.download | 圖片下載類,支持網絡下載圖片,文件讀取圖片,assets圖片,drawable,已經contentProvider讀取圖片 |
| com.nostra13.universalimageloader.core.imageaware | ImageView的封裝,提供了對ImageView的便捷操作,比如獲取ImageView高度寬度,是否被回收等 |
| com.nostra13.universalimageloader.core.listener | 監聽器,包括圖片加載監聽,加載進度監聽,列表滑動監聽 |
| com.nostra13.universalimageloader.core.process | 外放給調用者處理圖片的能力,獲取到圖片之后,在顯示之前,調用者可以設置此監聽器,處理圖片,比如切割圖片。 |
| com.nostra13.universalimageloader.utils | 工具類 |

https://www.cnblogs.com/yimi-yangguang/p/5715350.html
public class MyApplication extends Application {

    @Override
    public void onCreate() {
        super.onCreate();

        ImageLoaderConfiguration config = new ImageLoaderConfiguration.Builder(this)
                .memoryCacheExtraOptions(480, 800) // default = device screen ,默認為屏幕寬高 dimensions,內存緩存的最大寬高
                .diskCacheExtraOptions(480, 800, null)//磁盤緩存最大寬高,默認不限制
                .threadPriority(Thread.NORM_PRIORITY - 2) // default //線程優先級
                .denyCacheImageMultipleSizesInMemory() //阻止內存中多尺寸緩存
                .memoryCacheSize(2 * 1024 * 1024) //配置緩存大小
                .memoryCacheSizePercentage(13) // default //緩存百分比
                .diskCacheSize(50 * 1024 * 1024) //磁盤緩存大小,只在使用默認緩存有效
                .diskCacheFileCount(100)  //磁盤緩存文件數,只在使用默認緩存有效
                .writeDebugLogs() //打印調試日志
                .build();
       ImageLoader.getInstance().init(config);//初始化
   }
}public class MainActivity extends AppCompatActivity {
@Override
protected void onCreate(Bundle savedInstanceState) {
super.onCreate(savedInstanceState);
setContentView(R.layout.activity_main);
ImageView imageView = findViewById(R.id.img_test);
ImageLoader imageLoader = ImageLoader.getInstance();
DisplayImageOptions options = new DisplayImageOptions.Builder()
.showImageOnLoading(R.drawable.ic_launcher_background) // resource or drawable
.showImageForEmptyUri(R.drawable.ic_launcher_background) // resource or drawable
.showImageOnFail(R.drawable.ic_launcher_background) // resource or drawable
.resetViewBeforeLoading(false) // default
.delayBeforeLoading(1000)
.postProcessor(new BitmapProcessor() {
@Override
public Bitmap process(Bitmap bitmap) {
Log.d("sandy", "process bitmap...");
return bitmap;
}
})
.showImageOnLoading(R.drawable.ic_launcher_foreground)
.cacheInMemory(false) // default
.cacheOnDisk(false) // default
.considerExifParams(false) // default
.imageScaleType(ImageScaleType.IN_SAMPLE_POWER_OF_2) // default
.bitmapConfig(Bitmap.Config.ARGB_8888) // default
.build();
imageLoader.displayImage("http://img3.imgtn.bdimg.com/it/u=2200166214,500725521&fm=27&gp=0.jpg",
imageView, options, new ImageLoadingListener() {
@Override
public void onLoadingStarted(String imageUri, View view) {
Log.d("sandy", "onLoadingStarted imageUri: " + imageUri);
}
@Override
public void onLoadingFailed(String imageUri, View view, FailReason failReason) {
Log.d("sandy", "onLoadingFailed imageUri: " + imageUri
+ " failReason: " + failReason);
}
@Override
public void onLoadingComplete(String imageUri, View view, Bitmap loadedImage) {
Log.d("sandy", "onLoadingComplete imageUri: " + imageUri);
}
@Override
public void onLoadingCancelled(String imageUri, View view) {
Log.d("sandy", "onLoadingCancelled imageUri: " + imageUri);
}
}, new ImageLoadingProgressListener(){
@Override
public void onProgressUpdate(String imageUri, View view, int current, int total) {
Log.d("sandy", "onProgressUpdate current: " + current + " total: " + total);
}
});
}
}按照上面的使用方法,進行ImageLoader的源代碼分析,首先看Application的onCreate里面ImageLoader的代碼。
ImageLoaderConfiguration config = new ImageLoaderConfiguration.Builder(this)
                .memoryCacheExtraOptions(480, 800) // default = device screen ,默認為屏幕寬高 dimensions,內存緩存的最大寬高
                .diskCacheExtraOptions(480, 800, null)//磁盤緩存最大寬高,默認不限制
                .threadPriority(Thread.NORM_PRIORITY - 2) // default //線程優先級
                .denyCacheImageMultipleSizesInMemory() //阻止內存中多尺寸緩存
                .memoryCacheSize(2 * 1024 * 1024) //配置緩存大小
                .memoryCacheSizePercentage(13) // default //緩存百分比
                .diskCacheSize(50 * 1024 * 1024) //磁盤緩存大小,只在使用默認緩存有效
                .diskCacheFileCount(100)  //磁盤緩存文件數,只在使用默認緩存有效
                .writeDebugLogs() //打印調試日志
                .build();
這是一個典型的構造者模式,構造者模式一般適用于屬性比較多的場景。
在設置完各種屬性后,最后來看看build方法。
/** Builds configured {@link ImageLoaderConfiguration} object */
public ImageLoaderConfiguration build() {
   initEmptyFieldsWithDefaultValues();
   return new ImageLoaderConfiguration(this);
}
首先會調用initEmptyFieldsWithDefaultValues,如果用戶沒有設置一些屬性,那么就會為他們初始化默認值。
private void initEmptyFieldsWithDefaultValues() {
            if (taskExecutor == null) {
                taskExecutor = DefaultConfigurationFactory
                        .createExecutor(threadPoolSize, threadPriority, tasksProcessingType);
            } else {
                customExecutor = true;
            }
            if (taskExecutorForCachedImages == null) {
                taskExecutorForCachedImages = DefaultConfigurationFactory
                        .createExecutor(threadPoolSize, threadPriority, tasksProcessingType);
            } else {
                customExecutorForCachedImages = true;
            }
            if (diskCache == null) {
                if (diskCacheFileNameGenerator == null) {
                    diskCacheFileNameGenerator = DefaultConfigurationFactory.createFileNameGenerator();
                }
                diskCache = DefaultConfigurationFactory
                        .createDiskCache(context, diskCacheFileNameGenerator, diskCacheSize, diskCacheFileCount);
            }
            if (memoryCache == null) {
                memoryCache = DefaultConfigurationFactory.createMemoryCache(context, memoryCacheSize);
            }
            if (denyCacheImageMultipleSizesInMemory) {
                memoryCache = new FuzzyKeyMemoryCache(memoryCache, MemoryCacheUtils.createFuzzyKeyComparator());
            }
            if (downloader == null) {
                downloader = DefaultConfigurationFactory.createImageDownloader(context);
            }
            if (decoder == null) {
                decoder = DefaultConfigurationFactory.createImageDecoder(writeLogs);
            }
            if (defaultDisplayImageOptions == null) {
                defaultDisplayImageOptions = DisplayImageOptions.createSimple();
            }
        }
最后build方法可以產生出一個ImageLoaderConfiguration對象
return new ImageLoaderConfiguration(this);得到ImageLoaderConfiguration這個配置對象后,接下來就會利用它來初始化ImageLoader
ImageLoader.getInstance().init(config);//初始化 繼續往下分析,首先看ImageLoader.getInstance()
ImageLoader imageLoader = ImageLoader.getInstance();繼續看ImageLoader.getInstance()方法
/** Returns singleton class instance */
    public static ImageLoader getInstance() {
        if (instance == null) {
            synchronized (ImageLoader.class) {
                if (instance == null) {
                    instance = new ImageLoader();
                }
            }
        }
        return instance;
    }
getInstance可以看出是一個單例模式,而且是做了效率優化(兩層if判斷,第一層可以過濾大部分訪問,從而減少進入synchronized鎖的次數)。
/**
     * Initializes ImageLoader instance with configuration.<br />
     * If configurations was set before ( {@link #isInited()} == true) then this method does nothing.<br />
     * To force initialization with new configuration you should {@linkplain #destroy() destroy ImageLoader} at first.
     *
     * @param configuration {@linkplain ImageLoaderConfiguration ImageLoader configuration}
     * @throws IllegalArgumentException if <b>configuration</b> parameter is null
     */
    public synchronized void init(ImageLoaderConfiguration configuration) {
        if (configuration == null) {
            throw new IllegalArgumentException(ERROR_INIT_CONFIG_WITH_NULL);
        }
        if (this.configuration == null) {
            L.d(LOG_INIT_CONFIG);
            engine = new ImageLoaderEngine(configuration);
            this.configuration = configuration;
        } else {
            L.w(WARNING_RE_INIT_CONFIG);
        }
    }
根據注釋,我們利用傳入的configuration對象初始化ImageLoader,如果這個configuration之前已經被設置過(isInit=true),那么就不會發生什么。
如果想用現在的configuration替換之前的configuration對象,那么需要先調用ImageLoader.destory()方法進行銷毀。
如果一些正常的話,就出產生一個ImageLoaderEngine對象,
private Executor taskExecutor;
private Executor taskExecutorForCachedImages;
private Executor taskDistributor;

ImageLoaderEngine(ImageLoaderConfiguration configuration) {
        this.configuration = configuration;

        taskExecutor = configuration.taskExecutor;
        taskExecutorForCachedImages = configuration.taskExecutorForCachedImages;

        taskDistributor = DefaultConfigurationFactory.createTaskDistributor();
    }
ImageLoaderEngine把傳入的configuration保存起來,然后包含了幾個Executor,用來執行各種異步任務,所以叫做Engine,發動機。
其中taskExecutor和taskExecutorForCachedImages是從configuration里面傳進來的,那換句話就是說,是可以我們在configuration中配置的,然后自己也創建了一個taskDistributor 這個Executor。
這樣Application里面初始化流程久分析完成了,接下來看Activity里面怎么使用ImageLoader
先繼續貼一段請求加載圖片的代碼,在Activity的onCreate里面。
首先
protected void onCreate(Bundle savedInstanceState) {
            super.onCreate(savedInstanceState);
            setContentView(R.layout.activity_main);
            ImageView imageView = findViewById(R.id.img_test);
            ImageLoader imageLoader = ImageLoader.getInstance();
            DisplayImageOptions options = new DisplayImageOptions.Builder()
                    .showImageOnLoading(R.drawable.ic_launcher_background) // resource or drawable
                    .showImageForEmptyUri(R.drawable.ic_launcher_background) // resource or drawable
                    .showImageOnFail(R.drawable.ic_launcher_background) // resource or drawable
                    .resetViewBeforeLoading(false)  // default
                    .delayBeforeLoading(1000)
                    .postProcessor(new BitmapProcessor() {
                        @Override
                        public Bitmap process(Bitmap bitmap) {
                            Log.d("sandy", "process bitmap...");
                            return bitmap;
                        }
                    })
                    .showImageOnLoading(R.drawable.ic_launcher_foreground)
    //                .displayer(new RoundedBitmapDisplayer(5))
                    .cacheInMemory(false) // default
                    .cacheOnDisk(false) // default
                    .considerExifParams(false) // default
                    .imageScaleType(ImageScaleType.IN_SAMPLE_POWER_OF_2) // default
                    .bitmapConfig(Bitmap.Config.ARGB_8888) // default
                    .build();

            imageLoader.displayImage("http://img3.imgtn.bdimg.com/it/u=2200166214,500725521&fm=27&gp=0.jpg",
                    imageView, options, new ImageLoadingListener() {
                        @Override
                        public void onLoadingStarted(String imageUri, View view) {
                            Log.d("sandy", "onLoadingStarted imageUri: " + imageUri);
                        }

                        @Override
                        public void onLoadingFailed(String imageUri, View view, FailReason failReason) {
                            Log.d("sandy", "onLoadingFailed imageUri: " + imageUri
                            + " failReason: " + failReason);
                        }

                        @Override
                        public void onLoadingComplete(String imageUri, View view, Bitmap loadedImage) {
                            Log.d("sandy", "onLoadingComplete imageUri: " + imageUri);
                        }

                        @Override
                        public void onLoadingCancelled(String imageUri, View view) {
                            Log.d("sandy", "onLoadingCancelled imageUri: " + imageUri);
                        }
                    }, new ImageLoadingProgressListener(){
                        @Override
                        public void onProgressUpdate(String imageUri, View view, int current, int total) {
                            Log.d("sandy", "onProgressUpdate current: " + current + " total: " + total);
                        }
                    });
        }
DisplayImageOptions圖片展示參數,你可以不指定,也可以指定,表示一些展示的參數,比如默認圖片(在網絡圖片還沒有加載出來之前顯示),加載失敗圖片,是否從內存加載,這些后面再分析,不涉及流程的分析。
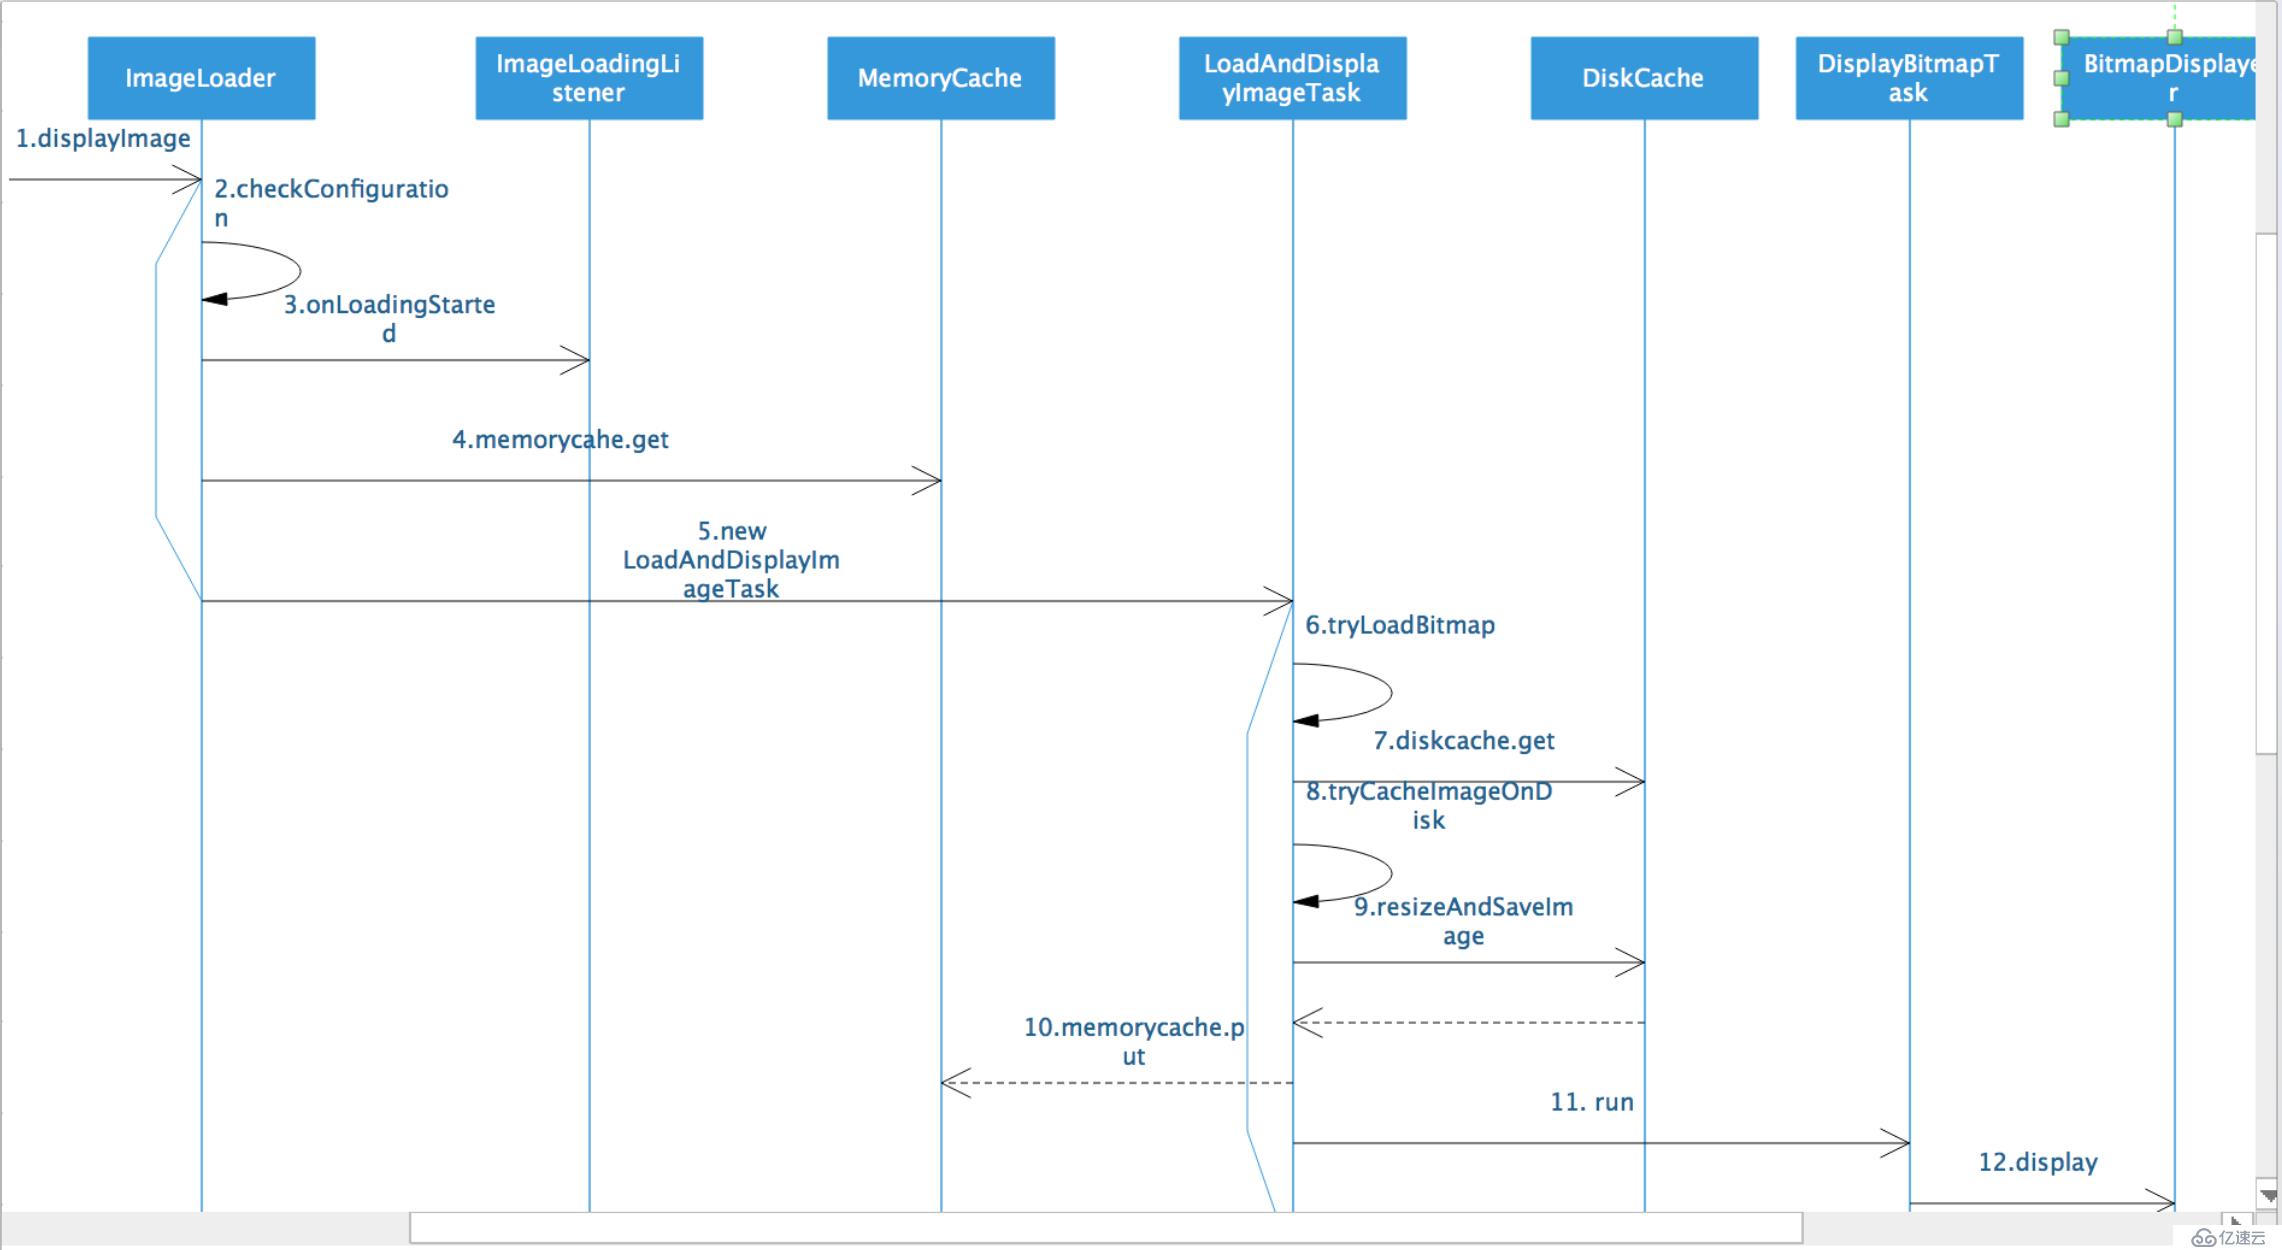
所以繼續看ImageLoader.displayImage(xxx)方法
public void displayImage(String uri, ImageView imageView, DisplayImageOptions options,
            ImageLoadingListener listener, ImageLoadingProgressListener progressListener) {
        displayImage(uri, new ImageViewAware(imageView), options, listener, progressListener);
    }

public void displayImage(String uri, ImageAware imageAware, DisplayImageOptions options,
            ImageLoadingListener listener, ImageLoadingProgressListener progressListener) {
        displayImage(uri, imageAware, options, null, listener, progressListener);
    }

public void displayImage(String uri, ImageAware imageAware, DisplayImageOptions options,
            ImageSize targetSize, ImageLoadingListener listener, ImageLoadingProgressListener progressListener) {
        checkConfiguration();
        if (imageAware == null) {
            throw new IllegalArgumentException(ERROR_WRONG_ARGUMENTS);
        }
        if (listener == null) {
            listener = defaultListener;
        }
        if (options == null) {
            options = configuration.defaultDisplayImageOptions;
        }

        if (TextUtils.isEmpty(uri)) {
            engine.cancelDisplayTaskFor(imageAware);
            listener.onLoadingStarted(uri, imageAware.getWrappedView());
            if (options.shouldShowImageForEmptyUri()) {
                imageAware.setImageDrawable(options.getImageForEmptyUri(configuration.resources));
            } else {
                imageAware.setImageDrawable(null);
            }
            listener.onLoadingComplete(uri, imageAware.getWrappedView(), null);
            return;
        }

        if (targetSize == null) {
            targetSize = ImageSizeUtils.defineTargetSizeForView(imageAware, configuration.getMaxImageSize());
        }
        String memoryCacheKey = MemoryCacheUtils.generateKey(uri, targetSize);
        engine.prepareDisplayTaskFor(imageAware, memoryCacheKey);

        listener.onLoadingStarted(uri, imageAware.getWrappedView());

        Bitmap bmp = configuration.memoryCache.get(memoryCacheKey);
        if (bmp != null && !bmp.isRecycled()) {
            L.d(LOG_LOAD_IMAGE_FROM_MEMORY_CACHE, memoryCacheKey);

            if (options.shouldPostProcess()) {
                ImageLoadingInfo imageLoadingInfo = new ImageLoadingInfo(uri, imageAware, targetSize, memoryCacheKey,
                        options, listener, progressListener, engine.getLockForUri(uri));
                ProcessAndDisplayImageTask displayTask = new ProcessAndDisplayImageTask(engine, bmp, imageLoadingInfo,
                        defineHandler(options));
                if (options.isSyncLoading()) {
                    displayTask.run();
                } else {
                    engine.submit(displayTask);
                }
            } else {
                options.getDisplayer().display(bmp, imageAware, LoadedFrom.MEMORY_CACHE);
                listener.onLoadingComplete(uri, imageAware.getWrappedView(), bmp);
            }
        } else {
            if (options.shouldShowImageOnLoading()) {
                imageAware.setImageDrawable(options.getImageOnLoading(configuration.resources));
            } else if (options.isResetViewBeforeLoading()) {
                imageAware.setImageDrawable(null);
            }

            ImageLoadingInfo imageLoadingInfo = new ImageLoadingInfo(uri, imageAware, targetSize, memoryCacheKey,
                    options, listener, progressListener, engine.getLockForUri(uri));
            LoadAndDisplayImageTask displayTask = new LoadAndDisplayImageTask(engine, imageLoadingInfo,
                    defineHandler(options));
            if (options.isSyncLoading()) {
                displayTask.run();
            } else {
                engine.submit(displayTask);
            }
        }
}在displayImage的時候,會使用ImageView對象,初始化一個ImageViewAware對象。
new ImageViewAware(imageView)ImageViewAware的繼承關系如下:
里面主要是做了一個View的弱引用,可以訪問傳入的ImageView的一些屬性,比如高度寬度,設置顯示圖片等等。
protected Reference<View> viewRef;之所以搞出一個ImageViewAware,是因為ImageLoader想方便操作傳入的ImageView對象。
下面來看displayImage(xx)里面具體的內容
public void displayImage(String uri, ImageAware imageAware, DisplayImageOptions options,
      ImageSize targetSize, ImageLoadingListener listener, ImageLoadingProgressListener progressListener) {
   checkConfiguration();
   if (imageAware == null) {
      throw new IllegalArgumentException(ERROR_WRONG_ARGUMENTS);
   }
   if (listener == null) {
      listener = defaultListener;
   }
   if (options == null) {
      options = configuration.defaultDisplayImageOptions;
   }

   ...
}

private void checkConfiguration() {
   if (configuration == null) {
      throw new IllegalStateException(ERROR_NOT_INIT);
   }
}
首先會檢查configuration,checkConfiguration,如果configuration==null,那么就會報錯。也就是說如果沒有調用之前我們說的ImageLoader.init(),初始化如下.
public synchronized void init(ImageLoaderConfiguration configuration) {
        if (configuration == null) {
            throw new IllegalArgumentException(ERROR_INIT_CONFIG_WITH_NULL);
        }
        if (this.configuration == null) {
            L.d(LOG_INIT_CONFIG);
            engine = new ImageLoaderEngine(configuration);
            this.configuration = configuration;
        } else {
            L.w(WARNING_RE_INIT_CONFIG);
        }
    }
然后imageAware是否null,如果null,那么就報錯
接著檢查,listener, options是否為null,如果是null,那么設置為default值。
繼續往下面看代碼
如果傳入的圖片地址是null,那么將走下面的的分支
if (TextUtils.isEmpty(uri)) {
   engine.cancelDisplayTaskFor(imageAware);
   listener.onLoadingStarted(uri, imageAware.getWrappedView());
   if (options.shouldShowImageForEmptyUri()) {
      imageAware.setImageDrawable(options.getImageForEmptyUri(configuration.resources));
   } else {
      imageAware.setImageDrawable(null);
   }
   listener.onLoadingComplete(uri, imageAware.getWrappedView(), null);
   return;
}
上面這段代碼做了下面幾件事
if (targetSize == null) {
            targetSize = ImageSizeUtils.defineTargetSizeForView(imageAware, configuration.getMaxImageSize());
        }

public static ImageSize defineTargetSizeForView(ImageAware imageAware, ImageSize maxImageSize) {
        int width = imageAware.getWidth();
        if (width <= 0) width = maxImageSize.getWidth();

        int height = imageAware.getHeight();
        if (height <= 0) height = maxImageSize.getHeight();

        return new ImageSize(width, height);
    }
根據傳入的ImageView獲取高度和寬度,如果沒有寬度和高度,就用最大的寬度和高度。
private static final String URI_AND_SIZE_SEPARATOR = "_";
private static final String WIDTH_AND_HEIGHT_SEPARATOR = "x";

String memoryCacheKey = MemoryCacheUtils.generateKey(uri, targetSize);

public static String generateKey(String imageUri, ImageSize targetSize) {
        return new StringBuilder(imageUri).append(URI_AND_SIZE_SEPARATOR).append(targetSize.getWidth()).append(WIDTH_AND_HEIGHT_SEPARATOR).append(targetSize.getHeight()).toString();
    }
產生Image Key的方式是: 圖片URL_圖片寬度x圖片高度
engine.prepareDisplayTaskFor(imageAware, memoryCacheKey);

void prepareDisplayTaskFor(ImageAware imageAware, String memoryCacheKey) {
        cacheKeysForImageAwares.put(imageAware.getId(), memoryCacheKey);
}listener.onLoadingStarted(uri, imageAware.getWrappedView());Bitmap bmp = configuration.memoryCache.get(memoryCacheKey);
final MemoryCache memoryCache;
public interface MemoryCache {
/**
* Puts value into cache by key
*
* @return <b>true</b> - if value was put into cache successfully, <b>false</b> - if value was <b>not</b> put into
* cache
*/
boolean put(String key, Bitmap value);
/** Returns value by key. If there is no value for key then null will be returned. */
Bitmap get(String key);
/** Removes item by key */
Bitmap remove(String key);
/** Returns all keys of cache */
Collection<String> keys();
/** Remove all items from cache */
void clear();
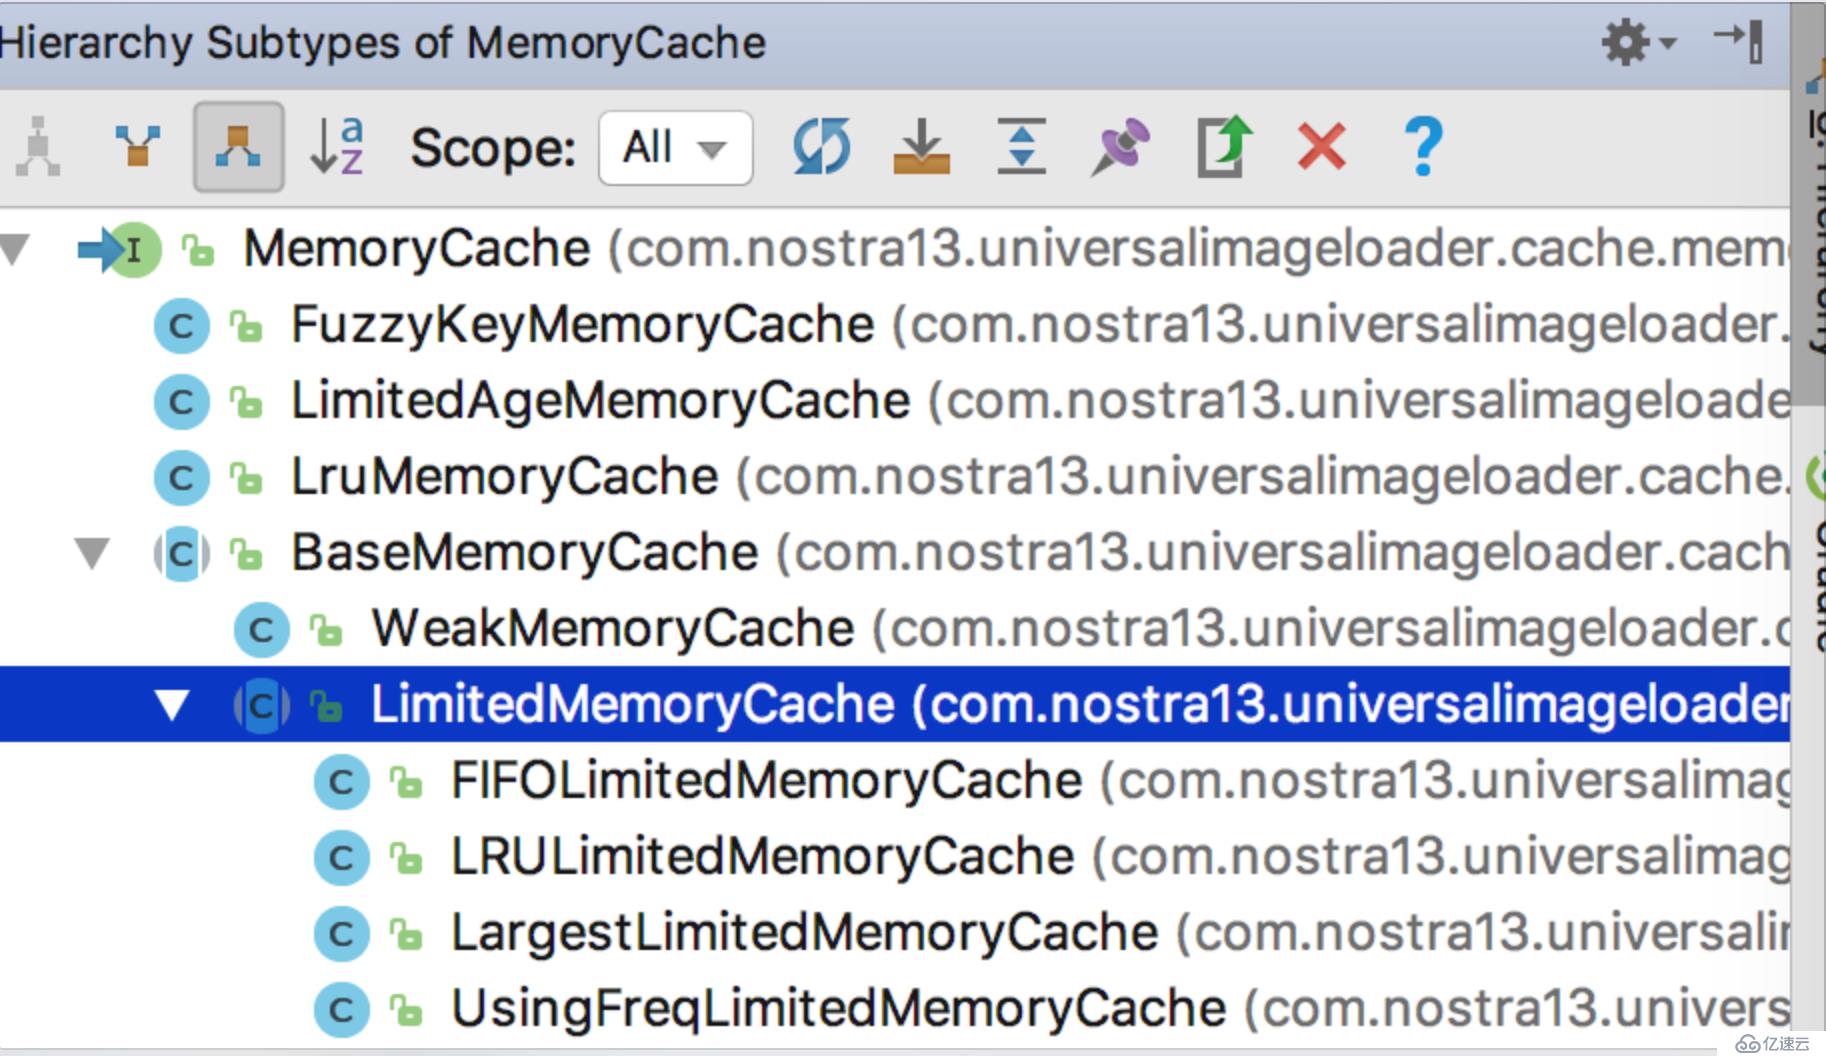
}MemoryCache是圖片內存緩存的一個接口,包括多種實現機制,比如Lru, FIFO, LargestLimited等,如下圖:

具體緩存算法可以后續分析
if (bmp != null && !bmp.isRecycled()) {
            L.d(LOG_LOAD_IMAGE_FROM_MEMORY_CACHE, memoryCacheKey);

            if (options.shouldPostProcess()) {
                ImageLoadingInfo imageLoadingInfo = new ImageLoadingInfo(uri, imageAware, targetSize, memoryCacheKey,
                        options, listener, progressListener, engine.getLockForUri(uri));
                ProcessAndDisplayImageTask displayTask = new ProcessAndDisplayImageTask(engine, bmp, imageLoadingInfo,
                        defineHandler(options));
                if (options.isSyncLoading()) {
                    displayTask.run();
                } else {
                    engine.submit(displayTask);
                }
            } else {
                options.getDisplayer().display(bmp, imageAware, LoadedFrom.MEMORY_CACHE);
                listener.onLoadingComplete(uri, imageAware.getWrappedView(), bmp);
            }
        }
如果從內存里面獲取到了圖片,那么就準備顯示,又分成兩種情況,看業務需不需要重新處理圖片,如果圖片顯示選項設置了shouldPostProcess,就像
DisplayImageOptions options = new DisplayImageOptions.Builder()
                .postProcessor(new BitmapProcessor() {
                    @Override
                    public Bitmap process(Bitmap bitmap) {
                        Log.d("sandy", "process bitmap...");
                        return bitmap;
                    }
                })
那么就產生一個ProcessAndDisplayImageTask
final class ProcessAndDisplayImageTask implements Runnable {
    ...
    @Override
    public void run() {
        L.d(LOG_POSTPROCESS_IMAGE, imageLoadingInfo.memoryCacheKey);

        //獲取圖片顯示選項中的processor對象
        BitmapProcessor processor = imageLoadingInfo.options.getPostProcessor();
        //回調processor.process來處理圖片
        Bitmap processedBitmap = processor.process(bitmap);
        DisplayBitmapTask displayBitmapTask = new DisplayBitmapTask(processedBitmap, imageLoadingInfo, engine,
                LoadedFrom.MEMORY_CACHE);
        LoadAndDisplayImageTask.runTask(displayBitmapTask, imageLoadingInfo.options.isSyncLoading(), handler, engine);
    }
}
在ProcessAndDisplayImageTask里面首先獲取到BitmapProcessor
BitmapProcessor processor = imageLoadingInfo.options.getPostProcessor();然后回調processor.process方法()
Bitmap processedBitmap = processor.process(bitmap);然后新建一個DisplayBitmapTask對象,用來顯示圖片和回調listener的回調方法,如下:
final class DisplayBitmapTask implements Runnable {
    @Override
    public void run() {
        if (imageAware.isCollected()) {
            L.d(LOG_TASK_CANCELLED_IMAGEAWARE_COLLECTED, memoryCacheKey);
            listener.onLoadingCancelled(imageUri, imageAware.getWrappedView());
        } else if (isViewWasReused()) {
            L.d(LOG_TASK_CANCELLED_IMAGEAWARE_REUSED, memoryCacheKey);
            listener.onLoadingCancelled(imageUri, imageAware.getWrappedView());
        } else {
            L.d(LOG_DISPLAY_IMAGE_IN_IMAGEAWARE, loadedFrom, memoryCacheKey);
            displayer.display(bitmap, imageAware, loadedFrom);
            engine.cancelDisplayTaskFor(imageAware);
            listener.onLoadingComplete(imageUri, imageAware.getWrappedView(), bitmap);
        }
    }
}
那如果使用者不需要自己另外處理圖片,那么就直接顯示好了。
if (options.shouldPostProcess()) {
    ...
} else {
    options.getDisplayer().display(bmp, imageAware, LoadedFrom.MEMORY_CACHE);
    listener.onLoadingComplete(uri, imageAware.getWrappedView(), bmp);
}如果內存中沒有獲取到圖片,比如第一次加載圖片,那該怎么辦呢?
if (bmp != null && !bmp.isRecycled()) {
            ...
        } else {
            if (options.shouldShowImageOnLoading()) {
                imageAware.setImageDrawable(options.getImageOnLoading(configuration.resources));
            } else if (options.isResetViewBeforeLoading()) {
                imageAware.setImageDrawable(null);
            }

            ImageLoadingInfo imageLoadingInfo = new ImageLoadingInfo(uri, imageAware, targetSize, memoryCacheKey,
                    options, listener, progressListener, engine.getLockForUri(uri));
            LoadAndDisplayImageTask displayTask = new LoadAndDisplayImageTask(engine, imageLoadingInfo,
                    defineHandler(options));
            if (options.isSyncLoading()) {
                displayTask.run();
            } else {
                engine.submit(displayTask);
            }
}final class LoadAndDisplayImageTask implements Runnable, IoUtils.CopyListener {
@Override
public void run() {
if (waitIfPaused()) return;
if (delayIfNeed()) return;
ReentrantLock loadFromUriLock = imageLoadingInfo.loadFromUriLock;
L.d(LOG_START_DISPLAY_IMAGE_TASK, memoryCacheKey);
if (loadFromUriLock.isLocked()) {
L.d(LOG_WAITING_FOR_IMAGE_LOADED, memoryCacheKey);
}
loadFromUriLock.lock();
Bitmap bmp;
try {
checkTaskNotActual();
bmp = configuration.memoryCache.get(memoryCacheKey);
if (bmp == null || bmp.isRecycled()) {
bmp = tryLoadBitmap();
if (bmp == null) return; // listener callback already was fired
checkTaskNotActual();
checkTaskInterrupted();
if (options.shouldPreProcess()) {
L.d(LOG_PREPROCESS_IMAGE, memoryCacheKey);
bmp = options.getPreProcessor().process(bmp);
if (bmp == null) {
L.e(ERROR_PRE_PROCESSOR_NULL, memoryCacheKey);
}
}
if (bmp != null && options.isCacheInMemory()) {
L.d(LOG_CACHE_IMAGE_IN_MEMORY, memoryCacheKey);
configuration.memoryCache.put(memoryCacheKey, bmp);
}
} else {
loadedFrom = LoadedFrom.MEMORY_CACHE;
L.d(LOG_GET_IMAGE_FROM_MEMORY_CACHE_AFTER_WAITING, memoryCacheKey);
}
if (bmp != null && options.shouldPostProcess()) {
L.d(LOG_POSTPROCESS_IMAGE, memoryCacheKey);
bmp = options.getPostProcessor().process(bmp);
if (bmp == null) {
L.e(ERROR_POST_PROCESSOR_NULL, memoryCacheKey);
}
}
checkTaskNotActual();
checkTaskInterrupted();
} catch (TaskCancelledException e) {
fireCancelEvent();
return;
} finally {
loadFromUriLock.unlock();
}
DisplayBitmapTask displayBitmapTask = new DisplayBitmapTask(bmp, imageLoadingInfo, engine, loadedFrom);
runTask(displayBitmapTask, syncLoading, handler, engine);
}
}if (waitIfPaused()) return;if (delayIfNeed()) return;
private boolean delayIfNeed() {
if (options.shouldDelayBeforeLoading()) {
L.d(LOG_DELAY_BEFORE_LOADING, options.getDelayBeforeLoading(), memoryCacheKey);
try {
Thread.sleep(options.getDelayBeforeLoading());
} catch (InterruptedException e) {
L.e(LOG_TASK_INTERRUPTED, memoryCacheKey);
return true;
}
return isTaskNotActual();
}
return false;
}loadFromUriLock.lock();loadFromUriLock是ImageLoader里面和uri關聯的,所以這里鎖的話意味著同一個uri,一個時間只能有一個請求。
ReentrantLock getLockForUri(String uri) {
        ReentrantLock lock = uriLocks.get(uri);
        if (lock == null) {
            lock = new ReentrantLock();
            uriLocks.put(uri, lock);
        }
        return lock;
}try {
checkTaskNotActual();
...
} catch (TaskCancelledException e) {
fireCancelEvent();
return;
} finally {
loadFromUriLock.unlock();
}
private void checkTaskNotActual() throws TaskCancelledException {
checkViewCollected();
checkViewReused();
}如果ImageView已經被回收,那就沒必要去請求圖片加載了,直接拋異常,然后catch住,結束task任務
private void checkViewCollected() throws TaskCancelledException {
   if (isViewCollected()) {
      throw new TaskCancelledException();//會被上面的catch捕獲
   }
}bmp = configuration.memoryCache.get(memoryCacheKey);那為什么需要再次從內存里面讀取圖片呢,還記得上面這個鎖嗎?如果是同一個url,發起兩個請求,那么就會鎖住一個,第二個請求形成等待,在等待完成后,那么正常的話就會從內存里面讀取到圖片,不要從網絡上再次請求。
if (bmp == null || bmp.isRecycled()) {
   ...
} else {
   loadedFrom = LoadedFrom.MEMORY_CACHE;
   L.d(LOG_GET_IMAGE_FROM_MEMORY_CACHE_AFTER_WAITING, memoryCacheKey);
}
我們先不分析if分支,if分支是從內存中沒有獲取到圖片,先看else
else里面沒有做什么事情,只是簡單的打印了一下日志(經過等待從內存中獲取圖片成功),然后把獲取的類型設置成LoadedFrom.MEMORY_CACHE。
LoadedFrom包括3種類型,網絡,磁盤,內存。可以參考文章最開始的概念介紹。
如果從內存里面沒有獲取到圖片,那就走if分支,也就是bmp == null || bmp.isRecycled()
if (bmp == null || bmp.isRecycled()) {
   bmp = tryLoadBitmap();
   if (bmp == null) return; // listener callback already was fired

   checkTaskNotActual();
   checkTaskInterrupted();

   if (options.shouldPreProcess()) {
      L.d(LOG_PREPROCESS_IMAGE, memoryCacheKey);
      bmp = options.getPreProcessor().process(bmp);
      if (bmp == null) {
         L.e(ERROR_PRE_PROCESSOR_NULL, memoryCacheKey);
      }
   }

   if (bmp != null && options.isCacheInMemory()) {
      L.d(LOG_CACHE_IMAGE_IN_MEMORY, memoryCacheKey);
      configuration.memoryCache.put(memoryCacheKey, bmp);
   }
} else {
   ...
}
首先就會看到 bmp = tryLoadBitmap(); 嘗試獲取Bitmap,這個方法包含的東西很多,我們可以待會再講。我們先看if分支后面的邏輯。
如果沒有獲取到bmp,比如指定的Uri是錯誤,那么就直接返回。
接下來繼續判斷ImageView是否被回收以及線程是否被中斷,如果都通過之后,那么就判斷是否需要處理圖片,如果需要,那么就回調processor.process(bmp)來處理圖片。
bmp = options.getPreProcessor().process(bmp);最后,判斷bmp != null以及是否需要存入內存(調用的地方可以設置是否需要存入內存),如果需要的話(一般都需要),那么就會存入內存緩存。
存入內存緩存后,那么下次就可以從內存中獲取了圖片了。
那接下來分析tryLoadBitmap()
先來大概說下思路,首先會去磁盤上獲取圖片,如果沒有則從網絡獲取,獲取完畢后,會存入磁盤,下面來看代碼。
private Bitmap tryLoadBitmap() throws TaskCancelledException {
   Bitmap bitmap = null;
   try {
      File imageFile = configuration.diskCache.get(uri);
      if (imageFile != null && imageFile.exists() && imageFile.length() > 0) {
         L.d(LOG_LOAD_IMAGE_FROM_DISK_CACHE, memoryCacheKey);
         loadedFrom = LoadedFrom.DISC_CACHE;

         checkTaskNotActual();
         bitmap = decodeImage(Scheme.FILE.wrap(imageFile.getAbsolutePath()));
      }
      if (bitmap == null || bitmap.getWidth() <= 0 || bitmap.getHeight() <= 0) {
         L.d(LOG_LOAD_IMAGE_FROM_NETWORK, memoryCacheKey);
         loadedFrom = LoadedFrom.NETWORK;

         String imageUriForDecoding = uri;
         if (options.isCacheOnDisk() && tryCacheImageOnDisk()) {
            imageFile = configuration.diskCache.get(uri);
            if (imageFile != null) {
               imageUriForDecoding = Scheme.FILE.wrap(imageFile.getAbsolutePath());
            }
         }

         checkTaskNotActual();
         bitmap = decodeImage(imageUriForDecoding);

         if (bitmap == null || bitmap.getWidth() <= 0 || bitmap.getHeight() <= 0) {
            fireFailEvent(FailType.DECODING_ERROR, null);
         }
      }
   } catch (IllegalStateException e) {
      fireFailEvent(FailType.NETWORK_DENIED, null);
   } catch (TaskCancelledException e) {
      throw e;
   } catch (IOException e) {
      L.e(e);
      fireFailEvent(FailType.IO_ERROR, e);
   } catch (OutOfMemoryError e) {
      L.e(e);
      fireFailEvent(FailType.OUT_OF_MEMORY, e);
   } catch (Throwable e) {
      L.e(e);
      fireFailEvent(FailType.UNKNOWN, e);
   }
   return bitmap;
}
首先是嘗試從磁盤獲取
File imageFile = configuration.diskCache.get(uri);如果獲取到了,那么讀取這個文件,讀出Bitmap,同時把類型標記成從磁盤讀取。
if (imageFile != null && imageFile.exists() && imageFile.length() > 0) {
   L.d(LOG_LOAD_IMAGE_FROM_DISK_CACHE, memoryCacheKey);
   loadedFrom = LoadedFrom.DISC_CACHE;

   checkTaskNotActual();
   bitmap = decodeImage(Scheme.FILE.wrap(imageFile.getAbsolutePath()));
}
如果從磁盤上面獲取是失敗,獲取磁盤上面沒有這個文件,那么bitmap == null
于是,就會從網絡上嘗試獲取圖片,如下:
if (bitmap == null || bitmap.getWidth() <= 0 || bitmap.getHeight() <= 0) {
   L.d(LOG_LOAD_IMAGE_FROM_NETWORK, memoryCacheKey);
   loadedFrom = LoadedFrom.NETWORK;

   String imageUriForDecoding = uri;
   if (options.isCacheOnDisk() && tryCacheImageOnDisk()) {
      imageFile = configuration.diskCache.get(uri);
      if (imageFile != null) {
         imageUriForDecoding = Scheme.FILE.wrap(imageFile.getAbsolutePath());
      }
   }

   checkTaskNotActual();
   bitmap = decodeImage(imageUriForDecoding);

   if (bitmap == null || bitmap.getWidth() <= 0 || bitmap.getHeight() <= 0) {
      fireFailEvent(FailType.DECODING_ERROR, null);
   }
}/** @return <b>true</b> - if image was downloaded successfully; <b>false</b> - otherwise */
private boolean tryCacheImageOnDisk() throws TaskCancelledException {
L.d(LOG_CACHE_IMAGE_ON_DISK, memoryCacheKey);
boolean loaded;
try {
loaded = downloadImage();
if (loaded) {
int width = configuration.maxImageWidthForDiskCache;
int height = configuration.maxImageHeightForDiskCache;
if (width > 0 || height > 0) {
L.d(LOG_RESIZE_CACHED_IMAGE_FILE, memoryCacheKey);
resizeAndSaveImage(width, height); // TODO : process boolean result
}
}
} catch (IOException e) {
L.e(e);
loaded = false;
}
return loaded;
}
private boolean downloadImage() throws IOException {
InputStream is = getDownloader().getStream(uri, options.getExtraForDownloader());
if (is == null) {
L.e(ERROR_NO_IMAGE_STREAM, memoryCacheKey);
return false;
} else {
try {
return configuration.diskCache.save(uri, is, this);
} finally {
IoUtils.closeSilently(is);
}
}
}那從網絡下載圖片并存入磁盤和內存的代碼就分析完了,最后回到上面LoadAndDisplayImageTask.run方法,看看后面的代碼。
if (bmp != null && options.shouldPostProcess()) {
   L.d(LOG_POSTPROCESS_IMAGE, memoryCacheKey);
   bmp = options.getPostProcessor().process(bmp);
   if (bmp == null) {
      L.e(ERROR_POST_PROCESSOR_NULL, memoryCacheKey);
   }
}
圖片已經拿到了,所以如果需要回調處理圖片的話,現在回調一次。
DisplayBitmapTask displayBitmapTask = new DisplayBitmapTask(bmp, imageLoadingInfo, engine, loadedFrom);
runTask(displayBitmapTask, syncLoading, handler, engine);
創建了一個 DisplayBitmapTask來顯示圖片
final class DisplayBitmapTask implements Runnable {
    private final BitmapDisplayer displayer;
    ...

   @Override
   public void run() {
      if (imageAware.isCollected()) {
         L.d(LOG_TASK_CANCELLED_IMAGEAWARE_COLLECTED, memoryCacheKey);
         listener.onLoadingCancelled(imageUri, imageAware.getWrappedView());
      } else if (isViewWasReused()) {
         L.d(LOG_TASK_CANCELLED_IMAGEAWARE_REUSED, memoryCacheKey);
         listener.onLoadingCancelled(imageUri, imageAware.getWrappedView());
      } else {
         L.d(LOG_DISPLAY_IMAGE_IN_IMAGEAWARE, loadedFrom, memoryCacheKey);
         displayer.display(bitmap, imageAware, loadedFrom);
         engine.cancelDisplayTaskFor(imageAware);
         listener.onLoadingComplete(imageUri, imageAware.getWrappedView(), bitmap);
      }
   }
}
顯示圖片的時候又封裝了一個displayer, displayer封裝了圖片顯示的效果,比如圓角之類的 。
免責聲明:本站發布的內容(圖片、視頻和文字)以原創、轉載和分享為主,文章觀點不代表本網站立場,如果涉及侵權請聯系站長郵箱:is@yisu.com進行舉報,并提供相關證據,一經查實,將立刻刪除涉嫌侵權內容。