溫馨提示×
您好,登錄后才能下訂單哦!
點擊 登錄注冊 即表示同意《億速云用戶服務條款》
您好,登錄后才能下訂單哦!
UMEditor配置
最近項目中需要用到富文本客戶端。確定使用umeditor。首先在官網下載相應文件
http://ueditor.baidu.com/website/download.html
筆者選擇的jsp版本的。
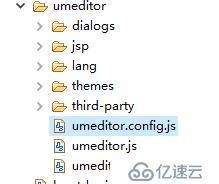
目錄結構如下


下面講講配置整合的經過。
引入相應js 及css。要注意順序。
jquery.min.js
third-party/template.min.js
umeditor.min.js
umeditor.config.js
themes/default/css/umeditor.min.css
頁面定義div
<div type="text/plain"id="career" name="career"  Readonly="true">
    <script type="text/javascript">
        mini.parse();
        var um = UM.getEditor('career');
 </script>
整合完畢

umeditor.config.js是相應的配置文件,里面的說明比較全面。筆者需要自定義國際化和圖片存儲路徑
寫了兩個js
  function getPath () {
//根路徑
        varpathName=location.pathname;
       var host = 'http://'+location.host;
        returnhost+pathName.substring(0,pathName.substr(1).indexOf('/')+1);
 }

function getLanguage() {
     var language =getCookie("language");
     if(null ==language|| ""==language){
       language = navigator.browserLanguage?navigator.browserLanguage:navigator.language;
     }
     language =language.substring(0,2);
      if(language!="zh"){
        language ="en";
      }else{
        language ="zh-cn";
      }
     return language;
}在umeditor.config.js 配置時進行引用
,p_w_picpathPath: getPath()+"/"     //是取圖片時的路徑
,lang: getLanguage()
,p_w_picpathUrl:URL+"jsp/p_w_picpathUp.jsp"             //圖片上傳提交地址
p_w_picpathUrl 這個參數是p_w_picpathUp.jsp 所在路徑,如果配置不對上傳圖片會404(可以不改)
本人將圖片另放一個自定義目錄
首先修改p_w_picpathUp.jsp 中上傳路徑
注意要引入
<%@ page import="com.manage.common.util.Uploader" %>
注意自己的路徑

默認是upload
修改setSavePath("img/upload") 中參數即可
同時還需修改Uploader.java 中獲取絕對路徑的方法
 private String getPhysicalPath(String path) {

       /*String servletPath =this.request.getServletPath();
       String realPath =this.request.getSession().getServletContext()
              .getRealPath(servletPath);
       return new File(realPath).getParent() +"/" +path;*/

       returnthis.request.getSession().getServletContext().getRealPath("/") + "/" + path;
        }
自此完成配置圖片上傳自定義位置
免責聲明:本站發布的內容(圖片、視頻和文字)以原創、轉載和分享為主,文章觀點不代表本網站立場,如果涉及侵權請聯系站長郵箱:is@yisu.com進行舉報,并提供相關證據,一經查實,將立刻刪除涉嫌侵權內容。