您好,登錄后才能下訂單哦!
您好,登錄后才能下訂單哦!
md5在crypto/md5包中,md5包提供了New和Sum方法。
func New() hash.Hash
func Sum(data []byte) [Size]byte
hash.Hash繼承了io.Writer,因此可以將其當成一個輸入流進行內容的更新。
type Writer interface {
   Write(p []byte) (n int, err error)
}
Write方法將p中的內容讀入后存入到hash.Hash,最后在Sum方法通過內部函數checkSum計算出其校驗和。
Sum函數是對hash.Hash對象內部存儲的內容進行校驗和計算然后將其追加到data的后面形成一個新的byte切片。通常將data置為nil。
Sum方法返回一個Size大小的byte數組,對于MD5返回一個128bit的16字節byte數組。
package main

import (
   "crypto/md5"
   "fmt"
   "io"
   "os"
)

func MD5FromWriter() {
   h := md5.New()
   io.WriteString(h, "The fog is getting thicker!")
   io.WriteString(h, "And Leon's getting laaarger!")
   fmt.Printf("%x\n", h.Sum(nil))
   // Output: e2c569be17396eca2a2e3c11578123ed
}

func MD5FromSum() {
   data := []byte("These pretzels are making me thirsty.")
   fmt.Printf("%x\n", md5.Sum(data))
   // Output: b0804ec967f48520697662a204f5fe72
}

func MD5FromFile() {
   f, err := os.Open("file.txt")
   if err != nil {
      fmt.Println("Open file failded")
   }
   defer f.Close()

   h := md5.New()
   if _, err := io.Copy(h, f); err != nil {
      fmt.Println("Copy failed")
   }
   fmt.Printf("%x\n", h.Sum(nil))
}

func main() {
   MD5FromWriter()
   MD5FromSum()
   MD5FromFile()
}SHA-256算法輸入報文的最大長度不超過2^64 bit,輸入按512-bit分組進行處理,輸出一個256-bit的報文摘要。
sha256支持根據輸入生成SHA256和SHA224的報文摘要,主要方法如下:
func New() hash.Hash
func New224() hash.Hash
func Sum256(data []byte) [Size]byte
func Sum224(data []byte) (sum224 [Size224]byte)package main
import (
"crypto/sha256"
"fmt"
"io"
"os"
)
func SHA256FromSum256() {
sum := sha256.Sum256([]byte("hello world\n"))
fmt.Printf("%x\n", sum)
// Output: a948904f2f0f479b8f8197694b30184b0d2ed1c1cd2a1ec0fb85d299a192a447
}
func SHA256FromWriter() {
h := sha256.New()
h.Write([]byte("hello world\n"))
fmt.Printf("%x\n", h.Sum(nil))
// Output: a948904f2f0f479b8f8197694b30184b0d2ed1c1cd2a1ec0fb85d299a192a447
}
func SHA256FromFile() {
f, err := os.Open("file.txt")
if err != nil {
fmt.Println("Open file failed.")
}
defer f.Close()
h := sha256.New()
if _, err := io.Copy(h, f); err != nil {
fmt.Println("Copy file failed.")
}
fmt.Printf("%x\n", h.Sum(nil))
}
func main() {
SHA256FromSum256()
SHA256FromWriter()
SHA256FromFile()
}TLS(Transport Layer Security,傳輸層安全協議)及其前身SSL(Secure Sockets Layer,安全套接層)是一種安全協議,目的是為互聯網通信提供安全及數據完整性保障。
Go語言tls包實現了tls 1.2的功能,可以滿足日常的應用。x509包提供證書管理的相關操作。
SSL包含記錄層(Record Layer)和傳輸層,記錄層協議確定了傳輸層數據的封裝格式。傳輸層安全協議使用X.509認證,利用非對稱加密演算來對通信方做身份認證,然后交換對稱密鑰作為會談密鑰(Session key)。會談密鑰用來將通信兩方交換的數據做加密,保證兩個應用間通信的保密性和可靠性,使客戶與服務器應用之間的通信不被***者竊聽。
生成服務端密鑰:openssl genrsa -out key.pem 2048
生成服務端證書:openssl req -new -x509 -key key.pem -out cert.pem -days 3650
生成客戶端密鑰:openssl genrsa -out client.key 2048
生成客戶端密鑰:openssl req -new -x509 -key client.key -out client.pem -days 3650
每個節點(不管是客戶端還是服務端)都有一個證書文件和key文件,用來互相加密解密;證書里包含public key,key文件里包含private key,證書與key文件構成一對密鑰對,是互為加解密的。
根證書是所有節點公用的,不管是客戶端還是服務端,都要先注冊根證書(通常根證書注冊是注冊到操作系統信任的根證書數據庫里),以示根證書是可信的, 然后當需要驗證對方的證書時,因為待驗證的證書是通過根證書簽名的,由于信任根證書,所以也可以信任對方的證書。
如果需要實現雙向認證,那么每一端都需要三個文件:{node}.cer: PEM certificate
己方證書文件,將會被發給對方,讓對方認證。{node}.key: PEM RSA private key
己方private key文件,用來解密經己方證書(包含己方public key)加密的內容,加密過程一般是由對方實施的。ca.cer: PEM certificate
根證書文件,用來驗證對方發過來的證書文件,所有由同一個根證書簽名的證書都應該能驗證通過。
func Server(conn net.Conn, config *Config) *Conn
服務器返回一個新的TLS服務器端連接,使用conn作為底層傳輸。配置配置必須非零,并且必須包含至少一個證書或者設置GetCertificate。
func Client(conn net.Conn, config *Config) *Conn
func NewListener(inner net.Listener, config *Config) net.Listener
NewListener創建一個 Listener,它接受來自內部 Listener 的連接并將每個連接包裝在 Server 中。配置必須非零,并且必須包含至少一個證書或者設置 GetCertificate。func Listen(network, laddr string, config *Config) (net.Listener, error)
Listen 會使用 net.Listen 創建一個 TLS 偵聽器來接受給定網絡地址上的連接。配置配置必須非零,并且必須包含至少一個證書或者設置 GetCertificate。func DialWithDialer(dialer *net.Dialer, network, addr string, config *Config) (*Conn, error)
DialWithDialer 使用 dialer.Dial 連接到給定的網絡地址,然后啟動TLS handshake,返回生成的 TLS 連接。撥號程序中給出的任何超時或截止日期都適用于連接和 TLS handshake。
DialWithDialer 將零配置解釋為等同于零配置;請參閱 Config 的文檔以了解默認值。func Dial(network, addr string, config *Config) (*Conn, error)
撥號使用 net.Dial 連接到給定的網絡地址,然后啟動 TLS handshake,返回生成的 TLS 連接。撥號將零配置解釋為等同于零配置;請參閱 Config 的文檔以了解默認值。func LoadX509KeyPair(certFile, keyFile string) (Certificate, error)
LoadX509KeyPair讀取并解析來自一對文件的證書(公鑰)/私鑰對。證書和私鑰文件必須包含PEM編碼數據。證書文件可能包含leaf證書后的中間證書以形成證書鏈。成功返回時,Certificate.Leaf 將為零,因為不會保留解析的證書形式。func X509KeyPair(certPEMBlock, keyPEMBlock []byte) (Certificate, error)
X509KeyPair從一對PEM編碼數據中解析公鑰/私鑰對。成功返回時,Certificate.Leaf將為零,因為不會保留解析的證書形式。
生成服務端密鑰:openssl genrsa -out key.pem 2048
生成服務端證書:openssl req -new -x509 -key key.pem -out cert.pem -days 3650
私鑰和證書存放在config/server目錄下。
服務端代碼server.go:
package main

import (
   "bufio"
   "crypto/tls"
   "fmt"
   "net"
)

func main() {
   cert, err := tls.LoadX509KeyPair("../config/server/cert.pem", "../config/server/key.pem")
   if err != nil {
      fmt.Println(err)
      return
   }
   config := &tls.Config{Certificates: []tls.Certificate{cert}}
   ln, err := tls.Listen("tcp", ":1443", config)
   if err != nil {
      fmt.Println(err)
      return
   }
   defer ln.Close()
   for {
      conn, err := ln.Accept()
      if err != nil {
         fmt.Println(err)
         continue
      }
      go handleConn(conn)
   }
}
func handleConn(conn net.Conn) {
   defer conn.Close()
   r := bufio.NewReader(conn)
   for {
      msg, err := r.ReadString('\n')
      if err != nil {
         fmt.Println(err)
         return
      }
      println(msg)
      n, err := conn.Write([]byte(msg))
      if err != nil {
         fmt.Println(n, err)
         return
      }
   }
}
客戶端代碼client.go:
package main

import (
   "crypto/tls"
   "fmt"
)

func main() {
   conf := &tls.Config{
      InsecureSkipVerify: true,
   }
   conn, err := tls.Dial("tcp", "127.0.0.1:1443", conf)
   if err != nil {
      fmt.Println(err)
      return
   }
   defer conn.Close()
   n, err := conn.Write([]byte("hello world\n"))
   if err != nil {
      fmt.Println(n, err)
      return
   }
   buf := make([]byte, 100)
   n, err = conn.Read(buf)
   if err != nil {
      fmt.Println(n, err)
      return
   }
   println(string(buf[:n]))
}
InsecureSkipVerify如果設置為true,則不會校驗證書以及證書中的主機名和服務器主機名是否一致。
生成服務端密鑰:openssl genrsa -out key.pem 2048
生成服務端證書:openssl req -new -x509 -key key.pem -out cert.pem -days 3650
私鑰和證書存放在config/server目錄下。
生成客戶端密鑰:openssl genrsa -out client.key 2048
生成客戶端密鑰:openssl req -new -x509 -key client.key -out client.pem -days 3650
私鑰和證書存放在config/client目錄下。
服務端客戶端雙向認證時,服務端需要驗證客戶端的真實性,需要服務端和客戶端進行一點額外的配置。
服務端server.go代碼:
package main

import (
   "bufio"
   "crypto/tls"
   "crypto/x509"
   "fmt"
   "io/ioutil"
   "net"
)

func main() {
   cert, err := tls.LoadX509KeyPair("../config/server/cert.pem", "../config/server/key.pem")
   if err != nil {
      fmt.Println(err)
      return
   }
   certBytes, err := ioutil.ReadFile("../config/client/client.pem")
   if err != nil {
      panic("Unable to read cert.pem")
   }
   clientCertPool := x509.NewCertPool()
   ok := clientCertPool.AppendCertsFromPEM(certBytes)
   if !ok {
      panic("failed to parse root certificate")
   }
   config := &tls.Config{
      Certificates: []tls.Certificate{cert},
      ClientAuth:   tls.RequireAndVerifyClientCert,
      ClientCAs:    clientCertPool,
   }
   ln, err := tls.Listen("tcp", ":1443", config)
   if err != nil {
      fmt.Println(err)
      return
   }
   defer ln.Close()
   for {
      conn, err := ln.Accept()
      if err != nil {
         fmt.Println(err)
         continue
      }
      go handleConn(conn)
   }
}
func handleConn(conn net.Conn) {
   defer conn.Close()
   r := bufio.NewReader(conn)
   for {
      msg, err := r.ReadString('\n')
      if err != nil {
         fmt.Println(err)
         return
      }
      println(msg)
      n, err := conn.Write([]byte(msg))
      if err != nil {
         fmt.Println(n, err)
         return
      }
   }
}
客戶端client.go代碼:
package main

import (
   "crypto/tls"
   "crypto/x509"
   "fmt"
   "io/ioutil"
)

func main() {
   cert, err := tls.LoadX509KeyPair("../config/client/client.pem", "../config/client/client.key")
   if err != nil {
      fmt.Println(err)
      return
   }
   certBytes, err := ioutil.ReadFile("../config/client/client.pem")
   if err != nil {
      fmt.Println(err)
   }
   clientCertPool := x509.NewCertPool()
   ok := clientCertPool.AppendCertsFromPEM(certBytes)
   if !ok {
      fmt.Println("failed to parse root certificate")
   }
   conf := &tls.Config{
      RootCAs:            clientCertPool,
      Certificates:       []tls.Certificate{cert},
      InsecureSkipVerify: true,
   }

   conn, err := tls.Dial("tcp", "127.0.0.1:1443", conf)
   if err != nil {
      fmt.Println(err)
      return
   }
   defer conn.Close()
   n, err := conn.Write([]byte("hello world\n"))
   if err != nil {
      fmt.Println(n, err)
      return
   }
   buf := make([]byte, 100)
   n, err = conn.Read(buf)
   if err != nil {
      fmt.Println(n, err)
      return
   }
   println(string(buf[:n]))
}x509包提供了證書管理的相關操作。
PKCS(Public-Key Cryptography Standards),即公鑰密碼學標準,是由 RSA 實驗室與其它安全系統開發商為促進公鑰密碼的發展而制訂的一系列標準。
X.509是常見通用的證書格式,所有的證書都符合為公鑰基礎設施PKI(Public Key Infrastructure ) 制定的ITU-T X509國際標準。
PEM格式通常用于數字證書認證機構(Certificate Authorities,CA),擴展名為.pem,.crt,.cer,.key,內容為Base64編碼的ASCII碼文件。
DER格式與PEM不同之處在于其使用二進制而不是Base64編碼的ASCII。擴展名為.der,但也經常使用.cer用作擴展名,所有類型的認證證書和私鑰都可以存儲為DER格式。
PEM編碼轉換為DER編碼:openssl x509 -outform der -in certificate.pem -out certificate.der
DER編碼轉換為PEM編碼:openssl x509 -inform der -in certificate.cer -out certificate.pem
func ParsePKIXPublicKey(derBytes []byte) (pub interface{}, err error)
ParsePKIXPublicKey解析DER編碼的公鑰derBytes,成功返回*rsa.PublicKey,*dsa.PublicKey,*ecdsa.PublicKey類型的公鑰。func MarshalPKIXPublicKey(pub interface{}) ([]byte, error)
MarshalPKIXPublicKey將公鑰pub序列化為DER編碼的PKIX格式func ParsePKCS1PrivateKey(der []byte) (*rsa.PrivateKey, error)
ParsePKCS1PrivateKey對ASN.1 PKCS#1 DER編碼的der進行解析,返回*rsa.PrivateKey私鑰func MarshalPKCS1PrivateKey(key *rsa.PrivateKey) []byte
MarshalPKCS1PrivateKey對key私鑰序列化為ASN.1 DER編碼格式func ParsePKCS1PublicKey(der []byte) (*rsa.PublicKey, error)
ParsePKCS1PublicKey對ASN.1 PKCS#1 DER編碼的der進行解析,返回*rsa.PublicKey公鑰func MarshalPKCS1PublicKey(key *rsa.PublicKey) []byte
MarshalPKCS1PublicKey對key公鑰序列化為ASN.1 DER編碼格式func ParsePKCS8PrivateKey(der []byte) (key interface{}, err error)
ParsePKCS8PrivateKey對PKCS#8格式DER編碼的私鑰進行解析func MarshalPKCS8PrivateKey(key interface{}) ([]byte, error)
MarshalPKCS8PrivateKey將key私鑰序列化為PKCS#8編碼格式,key支持*rsa.PrivateKey,*ecdsa.PublicKey。
pem實現了PEM數據編碼,PEM編碼源于 Privacy Enhanced Mail。目前最常見的PEM編碼用在TLS密鑰和證書中。
type Block struct {
   Type    string            // The type, taken from the preamble (i.e. "RSA PRIVATE KEY").
   Headers map[string]string // Optional headers.
   Bytes   []byte            // The decoded bytes of the contents. Typically a DER encoded ASN.1 structure.
}
Block類型表示PEM編碼結構,編碼格式如下:
-----BEGIN Type-----
Headers
base64-encoded Bytes
-----END Type-----
func Decode(data []byte) (p *Block, rest []byte)
Decode將在data輸入中找到下一個PEM格式化的Block(證書,私鑰等)。返回Block和輸入的其余部分。如果沒有找到PEM數據,則p為nil,并且整個輸入在rest返回。func Encode(out io.Writer, b *Block) error
Encode將b進行編碼,并寫入outfunc EncodeToMemory(b *Block) []byte
將b進行編碼并返回編碼結果
package main

import (
   "crypto/rand"
   "crypto/rsa"
   "crypto/x509"
   "encoding/pem"
   "errors"
   "fmt"
   "io/ioutil"
   "os"
)

//生成RSA私鑰和公鑰,保存到文件中
func GenerateRSAKeyPair(bits int, private string, public string) {
   //GenerateKey函數使用隨機數據生成器random生成一對具有指定字位數的RSA密鑰
   //Reader是一個全局、共享的密碼用強隨機數生成器
   privateKey, err := rsa.GenerateKey(rand.Reader, bits)
   if err != nil {
      panic(err)
   }
   //保存私鑰
   //通過x509標準將得到的RSA私鑰序列化為ASN.1 的 DER編碼字符串
   X509PrivateKey := x509.MarshalPKCS1PrivateKey(privateKey)
   //使用pem格式對x509輸出的內容進行編碼
   //創建文件保存私鑰
   privateFile, err := os.Create(private)
   if err != nil {
      panic(err)
   }
   defer privateFile.Close()
   //構建一個pem.Block結構體對象
   privateBlock := pem.Block{Type: "RSA Private Key", Bytes: X509PrivateKey}
   //將數據保存到文件
   pem.Encode(privateFile, &privateBlock)

   //保存公鑰
   //獲取公鑰的數據
   publicKey := privateKey.PublicKey
   //X509對公鑰編碼
   X509PublicKey, err := x509.MarshalPKIXPublicKey(&publicKey)
   if err != nil {
      panic(err)
   }
   //pem格式編碼
   //創建用于保存公鑰的文件
   publicFile, err := os.Create(public)
   if err != nil {
      panic(err)
   }
   defer publicFile.Close()
   //創建一個pem.Block結構體對象
   publicBlock := pem.Block{Type: "RSA Public Key", Bytes: X509PublicKey}
   //保存到文件
   pem.Encode(publicFile, &publicBlock)
}

func getPrivateKeyLength(private string) (int, error) {
   privateKey, err := ioutil.ReadFile(private)
   if err != nil {
      fmt.Println(err)
   }
   block, _ := pem.Decode(privateKey)
   if block == nil {
      return 0, errors.New("Private RSA Key error")
   }
   priv, err := x509.ParsePKCS1PrivateKey(block.Bytes)
   if err != nil {
      fmt.Println(err)
   }
   return priv.N.BitLen(), nil
}

func getPublicKeyLength(public string) (int, error) {
   publicKey, err := ioutil.ReadFile(public)
   if err != nil {
      fmt.Println(err)
   }
   block, _ := pem.Decode(publicKey)
   if block == nil {
      return 0, errors.New("Public RSA Key error")
   }
   pubInterface, err := x509.ParsePKIXPublicKey(block.Bytes)
   if err != nil {
      return 0, err
   }
   pub := pubInterface.(*rsa.PublicKey)
   return pub.N.BitLen(), nil
}

func main() {
   GenerateRSAKeyPair(2048, "private.pem", "public.pem")
   n, _ := getPrivateKeyLength("private.pem")
   fmt.Println(n)
   n, _ = getPublicKeyLength("public.pem")
   fmt.Println(n)
}1977年,Ron Rivest、Adi Shamir、Leonard Adleman三人在美國公布了一種公鑰加密算法,即RSA公鑰加密算法。RSA是目前最有影響力和最常用的公鑰加密算法,可用于數據加密和數字簽名。
OpenSSL生成私鑰:openssl genrsa -out private.pem 1024
OpenSSL生成公鑰:openssl rsa -in private.pem -pubout -out public.pem
RSA私鑰中包含公鑰,私鑰的數據結構如下:
type PrivateKey struct {
   PublicKey            // public part.
   D         *big.Int   // private exponent
   Primes    []*big.Int // prime factors of N, has >= 2 elements.

   // Precomputed contains precomputed values that speed up private
   // operations, if available.
   Precomputed PrecomputedValues
}func EncryptOAEP(hash hash.Hash, random io.Reader, pub *PublicKey, msg []byte, label []byte) ([]byte, error)
使用RSA-OAEP算法對信息進行加密func DecryptOAEP(hash hash.Hash, random io.Reader, priv *PrivateKey, ciphertext []byte, label []byte) ([]byte, error)
使用RSA-OAEP算法對信息進行解密func GenerateKey(random io.Reader, bits int) (*PrivateKey, error)
生成私鑰func (priv *PrivateKey) Public() crypto.PublicKey
根據私鑰獲取公鑰func (priv *PrivateKey) Sign(rand io.Reader, digest []byte, opts crypto.SignerOpts) ([]byte, error)
生成私鑰的簽名func (priv *PrivateKey) Decrypt(rand io.Reader, ciphertext []byte, opts crypto.DecrypterOpts) (plaintext []byte, err error)
利用私鑰對加密信息進行解密
RSA用于數據加密時,消息發送方利用對方的公鑰進行加密,消息接受方收到密文時使用自己的私鑰進行解密。
package main

import (
   "crypto/rand"
   "crypto/rsa"
   "crypto/x509"
   "encoding/pem"
   "fmt"
   "os"
)

//生成RSA私鑰和公鑰,保存到文件中
func GenerateRSAKeyPair(bits int, private string, public string) {
   //GenerateKey函數使用隨機數據生成器random生成一對具有指定字位數的RSA密鑰
   //Reader是一個全局、共享的密碼用強隨機數生成器
   privateKey, err := rsa.GenerateKey(rand.Reader, bits)
   if err != nil {
      panic(err)
   }
   //保存私鑰
   //通過x509標準將得到的ras私鑰序列化為ASN.1 的 DER編碼字符串
   X509PrivateKey := x509.MarshalPKCS1PrivateKey(privateKey)
   //使用pem格式對x509輸出的內容進行編碼
   //創建文件保存私鑰
   privateFile, err := os.Create(private)
   if err != nil {
      panic(err)
   }
   defer privateFile.Close()
   //構建一個pem.Block結構體對象
   privateBlock := pem.Block{Type: "RSA Private Key", Bytes: X509PrivateKey}
   //將數據保存到文件
   pem.Encode(privateFile, &privateBlock)

   //保存公鑰
   //獲取公鑰的數據
   publicKey := privateKey.PublicKey
   //X509對公鑰編碼
   X509PublicKey, err := x509.MarshalPKIXPublicKey(&publicKey)
   if err != nil {
      panic(err)
   }
   //pem格式編碼
   //創建用于保存公鑰的文件
   publicFile, err := os.Create(public)
   if err != nil {
      panic(err)
   }
   defer publicFile.Close()
   //創建一個pem.Block結構體對象
   publicBlock := pem.Block{Type: "RSA Public Key", Bytes: X509PublicKey}
   //保存到文件
   pem.Encode(publicFile, &publicBlock)
}

//RSA加密
func RSAEncrypt(plainText []byte, path string) []byte {
   //打開文件
   file, err := os.Open(path)
   if err != nil {
      panic(err)
   }
   defer file.Close()
   //讀取文件的內容
   info, _ := file.Stat()
   buf := make([]byte, info.Size())
   file.Read(buf)
   //pem解碼
   block, _ := pem.Decode(buf)
   //x509解碼

   publicKeyInterface, err := x509.ParsePKIXPublicKey(block.Bytes)
   if err != nil {
      panic(err)
   }
   //類型斷言
   publicKey := publicKeyInterface.(*rsa.PublicKey)
   //對明文進行加密
   cipherText, err := rsa.EncryptPKCS1v15(rand.Reader, publicKey, plainText)
   if err != nil {
      panic(err)
   }
   //返回密文
   return cipherText
}

//RSA解密
func RSADecrypt(cipherText []byte, path string) []byte {
   //打開文件
   file, err := os.Open(path)
   if err != nil {
      panic(err)
   }
   defer file.Close()
   //獲取文件內容
   info, _ := file.Stat()
   buf := make([]byte, info.Size())
   file.Read(buf)
   //pem解碼
   block, _ := pem.Decode(buf)
   //X509解碼
   privateKey, err := x509.ParsePKCS1PrivateKey(block.Bytes)
   if err != nil {
      panic(err)
   }
   //對密文進行解密
   plainText, _ := rsa.DecryptPKCS1v15(rand.Reader, privateKey, cipherText)
   //返回明文
   return plainText
}
func main() {
   //生成密鑰對,保存到文件
   GenerateRSAKeyPair(2048, "private.pem", "public.pem")
   message := []byte("hello world")
   //加密
   cipherText := RSAEncrypt(message, "public.pem")
   fmt.Println("Encrypt:", cipherText)
   //解密
   plainText := RSADecrypt(cipherText, "private.pem")
   fmt.Println("DeEncrypt:", string(plainText))
}RSA在用于數字簽名時,發送方通常先對消息生成散列值,再利用私鑰對散列值進行簽名,接收方收到消息及簽名時,也先對消息生成散列值(與發送方使用同種單向散列函數),利用發送方發的公鑰、簽名以及自己生成的散列值進行簽名驗證。
package main

import (
   "crypto"
   "crypto/rand"
   "crypto/rsa"
   "crypto/sha256"
   "crypto/x509"
   "encoding/pem"
   "fmt"
   "os"
)

//生成RSA私鑰和公鑰,保存到文件中
func GenerateRSAKey(bits int, private string, public string) {
   //GenerateKey函數使用隨機數據生成器random生成一對具有指定字位數的RSA密鑰
   //Reader是一個全局、共享的密碼用強隨機數生成器
   privateKey, err := rsa.GenerateKey(rand.Reader, bits)
   if err != nil {
      panic(err)
   }
   //保存私鑰
   //通過x509標準將得到的ras私鑰序列化為ASN.1 的 DER編碼字符串
   X509PrivateKey := x509.MarshalPKCS1PrivateKey(privateKey)
   //使用pem格式對x509輸出的內容進行編碼
   //創建文件保存私鑰
   privateFile, err := os.Create(private)
   if err != nil {
      panic(err)
   }
   defer privateFile.Close()
   //構建一個pem.Block結構體對象
   privateBlock := pem.Block{Type: "RSA Private Key", Bytes: X509PrivateKey}
   //將數據保存到文件
   pem.Encode(privateFile, &privateBlock)

   //保存公鑰
   //獲取公鑰的數據
   publicKey := privateKey.PublicKey
   //X509對公鑰編碼
   X509PublicKey, err := x509.MarshalPKIXPublicKey(&publicKey)
   if err != nil {
      panic(err)
   }
   //pem格式編碼
   //創建用于保存公鑰的文件
   publicFile, err := os.Create(public)
   if err != nil {
      panic(err)
   }
   defer publicFile.Close()
   //創建一個pem.Block結構體對象
   publicBlock := pem.Block{Type: "RSA Public Key", Bytes: X509PublicKey}
   //保存到文件
   pem.Encode(publicFile, &publicBlock)
}

//讀取RSA私鑰
func GetRSAPrivateKey(path string) *rsa.PrivateKey {
   //讀取文件內容
   file, err := os.Open(path)
   if err != nil {
      panic(err)
   }
   defer file.Close()
   info, _ := file.Stat()
   buf := make([]byte, info.Size())
   file.Read(buf)
   //pem解碼
   block, _ := pem.Decode(buf)
   //X509解碼
   privateKey, err := x509.ParsePKCS1PrivateKey(block.Bytes)
   return privateKey
}

//讀取RSA公鑰
func GetRSAPublicKey(path string) *rsa.PublicKey {
   //讀取公鑰內容
   file, err := os.Open(path)
   if err != nil {
      panic(err)
   }
   defer file.Close()
   info, _ := file.Stat()
   buf := make([]byte, info.Size())
   file.Read(buf)
   //pem解碼
   block, _ := pem.Decode(buf)
   //x509解碼
   publicKeyInterface, err := x509.ParsePKIXPublicKey(block.Bytes)
   if err != nil {
      panic(err)
   }
   publicKey := publicKeyInterface.(*rsa.PublicKey)
   return publicKey
}

//對消息的散列值進行數字簽名
func GetSign(msg []byte, path string) []byte {
   //取得私鑰
   privateKey := GetRSAPrivateKey(path)
   //計算散列值
   hash := sha256.New()
   hash.Write(msg)
   bytes := hash.Sum(nil)
   //SignPKCS1v15使用RSA PKCS#1 v1.5規定的RSASSA-PKCS1-V1_5-SIGN簽名方案計算簽名
   sign, err := rsa.SignPKCS1v15(rand.Reader, privateKey, crypto.SHA256, bytes)
   if err != nil {
      panic(sign)
   }
   return sign
}

//驗證數字簽名
func VerifySign(msg []byte, sign []byte, path string) bool {
   //取得公鑰
   publicKey := GetRSAPublicKey(path)
   //計算消息散列值
   hash := sha256.New()
   hash.Write(msg)
   bytes := hash.Sum(nil)
   //驗證數字簽名
   err := rsa.VerifyPKCS1v15(publicKey, crypto.SHA256, bytes, sign)
   return err == nil
}

//測試RSA數字簽名
func main() {
   //生成密鑰文件
   GenerateRSAKey(2048, "private.pem", "public.pem")

   //模擬發送方
   //要發送的消息
   msg := []byte("hello world")
   //生成簽名
   sign := GetSign(msg, "private.pem")

   //模擬接收方
   //接受到的消息
   acceptmsg := []byte("hello world")
   //接受到的簽名
   acceptsign := sign
   //驗證簽名
   ok := VerifySign(acceptmsg, acceptsign, "public.pem")
   if ok {
      fmt.Println("Signature is accepted")
   } else {
      fmt.Println("Signature is not accepted")
   }
}AES(Advanced Encryption Standard),即高級加密標準,是DES的替代標準。AES加密算法經歷了公開選拔,最終在2000年由比利時密碼學家Joan Daemen和Vincent Rijmen設計的Rijndael算法被選中,成為AES標準。
AES算法基于排列和置換運算。排列是對數據重新進行安排,置換是將一個數據單元替換為另一個。AES 使用幾種不同的方法來執行排列和置換運算。 AES是一個迭代的、對稱密鑰分組的密碼,可以使用128、192和256位密鑰,并且用128位(16字節)分組加密和解密數據。
AES是目前比較流行的對稱加密算法,是一種分組密碼(block cipher)算法,AES的分組長度為128比特(16字節),而密鑰長度可以是128比特、192比特或256比特。
func NewCipher(key []byte) (cipher.Block, error)
NewCiphe r創建并返回一個新的cipher.Block。參數是AES密鑰,可以是AES-128,AES-192或AES-256。func cipher.NewCBCEncrypter(b Block, iv []byte) BlockMode
NewCBCEncrypter返回一個BlockMode,使用給定的Block以密碼塊鏈接模式加密。iv的長度必須與塊的塊大小相同。func (x *cbcEncrypter) CryptBlocks(dst, src []byte)
對分組進行加密,dst為輸出參數,src為填充后的分組func cipher.NewCBCDecrypter(b Block, iv []byte) BlockMode
NewCBCDecrypter返回一個BlockMode,使用給定的Block以密碼塊鏈接模式解密。iv的長度必須與Block的塊大小相同,并且必須與用于加密數據的iv相匹配。func (x *cbcDecrypter) CryptBlocks(dst, src []byte)
堆分組進行解密,dst為輸出參數,src為密文,解密后dst需要刪除填充才能得到明文。func cipher.NewCTR(block Block, iv []byte) Stream
NewCTR返回一個Stream,使用計數器模式下的給定Block加密/解密。iv的長度必須與塊的塊大小相同。
type Stream interface {
      XORKeyStream(dst, src []byte)
}
func (x *ctr) XORKeyStream(dst, src []byte)
加解密,src為輸入參數,可以為要加密的明文或要解密的密文,dst為輸出參數。
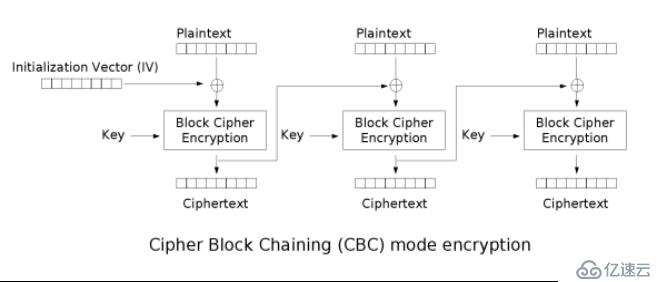
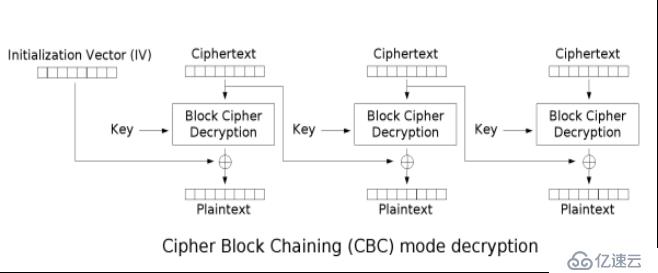
CBC模式(密碼分組鏈接模式)是常用的一種分組密碼的模式。
CBC模式中的第一個分組需要用初始化向量IV(一個隨機的且長度為一個分組長度的比特序列)進行異或操作再進行加密,而后面的每一個分組都要先和前一個分組加密后的密文分組進行異或操作,然后再加密。加密是連續的,不能進行并行操作。

在CBC模式中,每個明文塊先與前一個密文塊進行異或后,再進行加密。因此,每個密文塊都依賴于它前面的所有明文塊。同時,為了保證每條消息的唯一性,在第一個塊中需要使用初始化向量。
CBC是最為常用的工作模式,主要缺點在于加密過程是串行的,無法被并行化,而且消息必須被填充到塊大小的整數倍。解決后一個問題的一種方法是利用密文竊取。
在加密時,明文中的微小改變會導致其后的全部密文塊發生改變,而在解密時,從兩個鄰接的密文塊中即可得到一個明文塊。因此,解密過程可以被并行化,而解密時,密文中一位的改變只會導致其對應的明文塊完全改變和下一個明文塊中對應位發生改變,不會影響到其它明文的內容。
package main

import (
   "bytes"
   "crypto/aes"
   "crypto/cipher"
   "fmt"
)

//對明文進行填充
func Padding(plainText []byte, blockSize int) []byte {
   //計算要填充的長度
   n := blockSize - len(plainText)%blockSize
   //對原來的明文填充n個n
   temp := bytes.Repeat([]byte{byte(n)}, n)
   plainText = append(plainText, temp...)
   return plainText
}

//對密文刪除填充
func UnPadding(cipherText []byte) []byte {
   //取出密文最后一個字節end
   end := cipherText[len(cipherText)-1]
   //刪除填充
   cipherText = cipherText[:len(cipherText)-int(end)]
   return cipherText
}

//AEC加密(CBC模式)
func AESCBCEncrypt(rawData []byte, key []byte, iv []byte) []byte {
   //指定加密算法,返回一個AES算法的Block接口對象
   block, err := aes.NewCipher(key)
   if err != nil {
      panic(err)
   }
   //進行填充
   rawData = Padding(rawData, block.BlockSize())
   //指定分組模式,返回一個BlockMode接口對象
   blockMode := cipher.NewCBCEncrypter(block, iv)
   //加密連續數據庫
   cipherText := make([]byte, len(rawData))
   blockMode.CryptBlocks(cipherText, rawData)
   //返回密文
   return cipherText
}

//AEC解密(CBC模式)
func AESCBCDecrypt(cipherText []byte, key []byte, iv []byte) []byte {
   //指定解密算法,返回一個AES算法的Block接口對象
   block, err := aes.NewCipher(key)
   if err != nil {
      panic(err)
   }
   //指定分組模式,返回一個BlockMode接口對象
   blockMode := cipher.NewCBCDecrypter(block, iv)
   //解密
   plainText := make([]byte, len(cipherText))
   blockMode.CryptBlocks(plainText, cipherText)
   //刪除填充
   plainText = UnPadding(plainText)
   return plainText
}
func main() {
   message := []byte("Hello go!")
   //指定密鑰AES-128,16byte
   key := []byte("1111111111111111")
   //指定初始向量IV,長度和block的塊尺寸一致
   iv := []byte("12345678abcdefgh")
   //加密
   cipherText := AESCBCEncrypt(message, key, iv)
   fmt.Println("Encrypt: ", cipherText)
   //解密
   plainText := AESCBCDecrypt(cipherText, key, iv)
   fmt.Println("Decrypt:", string(plainText))
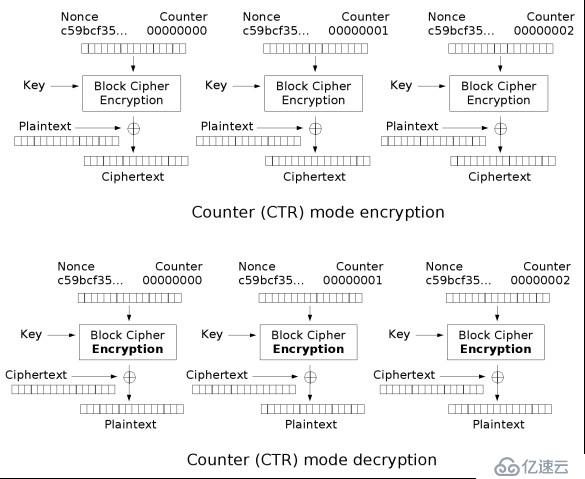
}CTR分組模式每次加密時都會生成一個不同的值來作為計數器的初始值,每個分組對應一個逐次累加的計數器,通過對計數器進行加密來生成密鑰流,再將密鑰流與明文分組進行異或操作得到密文分組。
package main

import (
   "crypto/aes"
   "crypto/cipher"
   "fmt"
)

//AEC加密和解密(CRT模式)
func AECCTRCrypt(text []byte, key []byte, counter []byte) []byte {
   //指定加密、解密算法為AES,返回一個AES的Block接口對象
   block, err := aes.NewCipher(key)
   if err != nil {
      panic(err)
   }
   //指定分組模式
   blockMode := cipher.NewCTR(block, counter)
   //執行加密、解密操作
   message := make([]byte, len(text))
   blockMode.XORKeyStream(message, text)
   //返回明文或密文
   return message
}

func main() {
   message := []byte("Hello go")
   //指定密鑰AES-128,16byte
   key := []byte("1234567812345678")
   //指定計數器,長度必須等于block的塊尺寸
   counter := []byte("12345678abcdefgh")
   //加密
   cipherText := AECCTRCrypt(message, key, counter)
   fmt.Println("Encrypt: ", cipherText)
   //解密
   plainText := AECCTRCrypt(cipherText, key, counter)
   fmt.Println("Decrypt: ", string(plainText))
}hmac 包實現了美國聯邦信息處理標準出版物198中定義的HMAC(Keyed-Hash Message Authentication Code),即加密哈希認證碼。HMAC 是使用密鑰簽署消息的加密散列。接收器通過使用相同的密鑰重新計算它來驗證散列。
func New(h func() hash.Hash, key []byte) hash.Hash
New函數返回一個采用hash.Hash作為底層hash接口、key作為密鑰的HMAC算法的hash接口。func Equal(mac1, mac2 []byte) bool
比較兩個MAC是否相同,而不會泄露對比時間信息。(以規避時間側信道***;指通過計算比較時花費的時間的長短來獲取密碼的信息,用于密碼破解)
func (h *hmac) Sum(in []byte) []byte
func (h *hmac) Write(p []byte) (n int, err error)
hash.Hash繼承了io.Writer,因此可以將其當成一個輸入流進行內容的更新。
type Writer interface {
   Write(p []byte) (n int, err error)
}
Write方法將p中的內容讀入后存入到hash.Hash,最后在Sum方法通過內部函數checkSum計算出其校驗和。
Sum函數是對hash.Hash對象內部存儲的內容進行校驗和計算然后將其追加到data的后面形成一個新的byte切片。通常將data置為nil。
Sum方法返回一個Size大小的byte數組,對于MD5返回一個128bit的16字節byte數組。
package main

import (
   "crypto/hmac"
   "crypto/sha256"
   "fmt"
   "io"
)

func generateHMAC(rawData, key string) string {
   h := hmac.New(sha256.New, []byte(key))
   io.WriteString(h, rawData)
   return fmt.Sprintf("%x", h.Sum(nil))
}

func generateSHA256(s string) string {
   h := sha256.New()
   h.Write([]byte(s))
   return fmt.Sprintf("%x", h.Sum(nil))
}

func main() {
   data := "Hello go"
   key := "123456"
   str := generateHMAC(data, key)
   fmt.Println(str)

   str = generateSHA256(data)
   fmt.Println(str)
}

// output:
// 143543e2c55feb51051dccc99687c6ad215e0dca37127ecce67efc92b1d7f697
// 61c35d7993613995b32d1c5bd6d3bbdbbcf3305bb19a135b99a779a8c782d0f7ECDSA(Elliptic Curve Digital Signature Algorithm)即橢圓曲線數字簽名算法。
ECC(Elliptic Curve Cryptography),即橢圓曲線加密算法,是基于橢圓曲線數學理論實現的一種非對稱加密算法。與RSA算法相比,ECC可以使用更短的密鑰,來實現與RSA相當或更高的安全。據研究,160位ECC加密安全性相當于1024位RSA加密,210位ECC加密安全性相當于2048位RSA加密。
Go語言的ecdsa包目前智能用于數字簽名,使用私鑰加密,使用公鑰做校驗。
type PublicKey struct {
   elliptic.Curve
   X, Y *big.Int
}

type PrivateKey struct {
   PublicKey
   D *big.Int
}ecdsa包的私鑰數據結構中包含公鑰。func GenerateKey(c elliptic.Curve, rand io.Reader) (*PrivateKey, error)
生成ECDSA密鑰對,可用的橢圓曲線為elliptic.P224()、elliptic.P256()、elliptic.P384()、elliptic.P521()func (priv *PrivateKey) Public() crypto.PublicKey
從私鑰獲取公鑰func (priv *PrivateKey) Sign(rand io.Reader, digest []byte, opts crypto.SignerOpts) ([]byte, error)
從私鑰生成簽名func Sign(rand io.Reader, priv *PrivateKey, hash []byte) (r, s *big.Int, err error)
使用私鑰生成簽名。簽名使用私鑰priv來簽名散列。如果散列長度大于私鑰的曲線順序的位長度,則散列將被截斷為該長度。將簽名作為一對整數返回。私鑰的安全性取決于rand的熵。func Verify(pub *PublicKey, hash []byte, r, s *big.Int) bool
利用公鑰進行簽名認證
package main

import (
   "crypto/ecdsa"
   "crypto/elliptic"
   "crypto/rand"
   "crypto/sha1"
   "crypto/x509"
   "encoding/pem"
   "fmt"
   "math/big"
   "os"
)

//生成密鑰對
func generateECCKeyPair(c elliptic.Curve, privateKeyFile string, publicKeyFile string) error {
   //使用ECDSA生成密鑰對
   privateKey, err := ecdsa.GenerateKey(c, rand.Reader)
   if err != nil {
      return err
   }
   //使用509
   private, err := x509.MarshalECPrivateKey(privateKey)
   if err != nil {
      return err
   }
   //pem
   block := pem.Block{
      Type:  "esdsa private key",
      Bytes: private,
   }
   file, err := os.Create(privateKeyFile)
   if err != nil {
      return err
   }
   err = pem.Encode(file, &block)
   if err != nil {
      return err
   }
   file.Close()

   //處理公鑰
   public := privateKey.PublicKey

   //x509序列化
   publicKey, err := x509.MarshalPKIXPublicKey(&public)
   if err != nil {
      return err
   }
   //pem
   public_block := pem.Block{
      Type:  "ecdsa public key",
      Bytes: publicKey,
   }
   file, err = os.Create(publicKeyFile)
   if err != nil {
      return err
   }
   //pem編碼
   err = pem.Encode(file, &public_block)
   if err != nil {
      return err
   }
   return nil
}

//ECC簽名--私鑰
func ECCSignature(sourceData []byte, privateKeyFile string) ([]byte, []byte) {
   //讀取私鑰
   file, err := os.Open(privateKeyFile)
   if err != nil {
      panic(err)
   }
   info, err := file.Stat()
   buf := make([]byte, info.Size())
   file.Read(buf)
   //pem解密
   block, _ := pem.Decode(buf)
   //x509解密
   privateKey, err := x509.ParseECPrivateKey(block.Bytes)
   if err != nil {
      panic(err)
   }
   //哈希運算
   hashText := sha1.Sum(sourceData)
   //數字簽名
   r, s, err := ecdsa.Sign(rand.Reader, privateKey, hashText[:])
   if err != nil {
      panic(err)
   }
   rText, err := r.MarshalText()
   if err != nil {
      panic(err)
   }
   sText, err := s.MarshalText()
   if err != nil {
      panic(err)
   }
   defer file.Close()
   return rText, sText
}

//ECC認證
func ECCVerify(rText, sText, sourceData []byte, publicKeyFilePath string) bool {
   //讀取公鑰文件
   file, err := os.Open(publicKeyFilePath)
   if err != nil {
      panic(err)
   }
   info, err := file.Stat()
   if err != nil {
      panic(err)
   }
   buf := make([]byte, info.Size())
   file.Read(buf)
   //pem解碼
   block, _ := pem.Decode(buf)

   //x509
   publicStream, err := x509.ParsePKIXPublicKey(block.Bytes)
   if err != nil {
      panic(err)
   }
   //接口轉換成公鑰
   publicKey := publicStream.(*ecdsa.PublicKey)
   hashText := sha1.Sum(sourceData)
   var r, s big.Int
   r.UnmarshalText(rText)
   s.UnmarshalText(sText)
   //認證
   res := ecdsa.Verify(publicKey, hashText[:], &r, &s)
   defer file.Close()
   return res
}

func main() {
   generateECCKeyPair(elliptic.P256(), "./private.pem", "./public.pem")
   rawData := []byte("Hello go")
   r, s := ECCSignature(rawData, "./private.pem")
   res := ECCVerify(r, s, rawData, "./public.pem")
   if res {
      fmt.Println("Signature is Accepted")
   }

}免責聲明:本站發布的內容(圖片、視頻和文字)以原創、轉載和分享為主,文章觀點不代表本網站立場,如果涉及侵權請聯系站長郵箱:is@yisu.com進行舉報,并提供相關證據,一經查實,將立刻刪除涉嫌侵權內容。