您好,登錄后才能下訂單哦!
您好,登錄后才能下訂單哦!

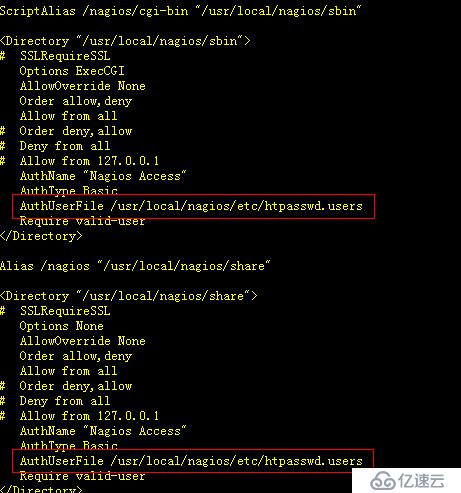
因為要登入nagios的web界面,所以要生成文件而且要指定登入的帳號:
htpasswd -c /usr/local/nagios/etc/htpasswd.users nagiosadmin
這里我們設置的密碼是123456
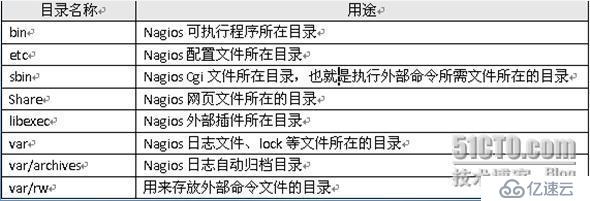
注意:插件版本與nagios版本的關聯并不大
tar zxvf nagios-plugins-1.4.15.tar.gz
cd nagios-plugins-1.4.15
./configure --with-nagios-user=nagios --with-nagios-group=nagios --enable-perl-modules
make && make install
5.安裝nagios的中文漢化插件:
tar xvfj nagios-cn-3.2.0.tar.bz2
cd nagios-cn-3.2.0
./configure
make all
make install
這樣nagios的web界面就是是中文了!!
6.設置apache的配置文件
vi /etc/httpd/conf/httpd.conf +231 //查看是否為apache用戶
vi /etc/httpd/conf/httpd.conf +265 //在下面添加ServerName 127.0.0.1:80
然后找到
DirectoryIndex index.html index.html.var
修改為
DirectoryIndex index.html index.php
接著增加如下內容:
AddType application/x-httpd-php .php
7.啟動apache服務器
service httpd start
8.配置nagios的配置文件:
#添加監控報警接收郵件
vi /usr/local/nagios/etc/objects/contacts.cfg +35
把nagios@localhost改成自己的郵箱fantefei@163.com
#修改nagios 的主配置文件nagios.cfg
#vi /usr/local/nagios/etc/nagios.cfg
去掉這幾行前的#
cfg_file=/usr/local/nagios/etc/contactgroups.cfg //聯系組配置文件路徑
cfg_file=/usr/local/nagios/etc/contacts.cfg //聯系人配置文件路徑
cfg_file=/usr/local/nagios/etc/hostgroups.cfg //主機組配置文件路徑
cfg_file=/usr/local/nagios/etc/hosts.cfg //主機配置文件路徑
cfg_file=/usr/local/nagios/etc/services.cfg //服務配置文件路徑
cfg_file=/usr/local/nagios/etc/timeperiods.cfg //監視時段配置文件路徑
注釋掉就說明不使用這個文件,去掉了注釋就是需要使用這個文件.
改check_external_commands=0 為check_external_commands=1 .
這行的作用是允許在web 界面下執行重啟nagios、停止主機/服務檢查等操作。
把command_check_interval 的值從默認的1改成command_check_inte
rval=10s (根據自己的情況定這個命令檢查時間間隔,不要太長也不要太短)。
主配置文件要改的基本上就是這些。
#修改CGI 腳本控制文件cgi.cfg
vi /usr/local/nagios/etc/objects/cgi.cfg
第二個要修改的配置文件是cgi.cfg,它的作用是控制相關cgi 腳本。先確保use
_authentication=1。曾看過不少的文章,都是建議把use_authentication
的值設置成”0”來取消驗證,這是一個十分糟糕的想法。接下來修改default_u
ser_name=test ,再后面的修改在下表列出:
authorized_for_system_information=nagiosadmin,test
authorized_for_configuration_information=nagiosadmin,test
authorized_for_system_commands=nagiosadmin,test //多個用戶之間用逗號隔開
authorized_for_all_services=nagiosadmin,test
authorized_for_all_hosts=nagiosadmin,test
authorized_for_all_service_commands=nagiosadmin,test
authorized_for_all_host_commands=nagiosadmin,test
那么上述用戶名打那里來的呢?是執行命令/usr/local/apache/bin/htpass
wd /usr/local/nagios/etc/htpasswd test 所生成的,這個要注意,不能
隨便加沒有存在的驗證用戶,為了安全起見,不要添加過多的驗證用戶。
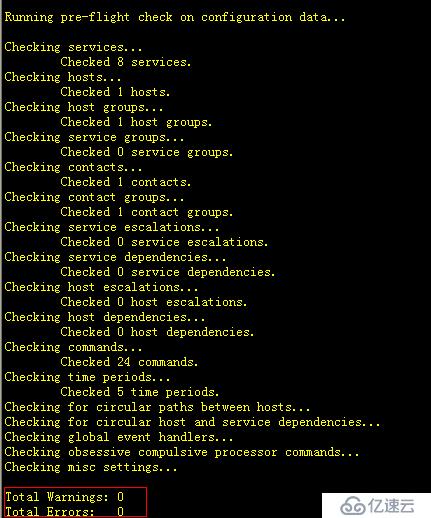
#檢查nagios的配置文件是否正確
/usr/local/nagios/bin/nagios -v /usr/local/nagios/etc/nagios.cfg
如果看到下面的界面證明沒有問題:
9.啟動nagios
service nagios start
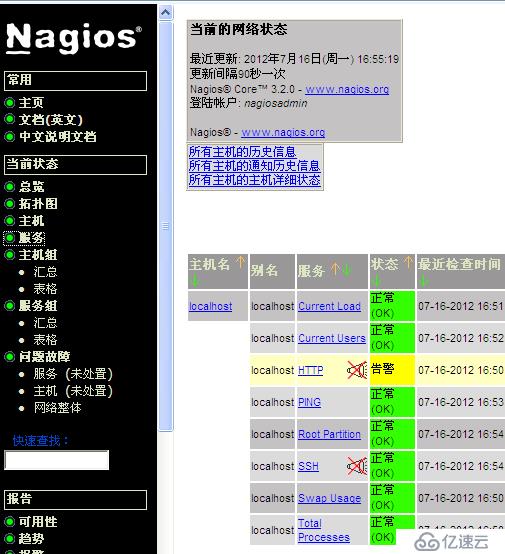
10.現在在瀏覽器里輸入http://127.0.0.1/nagios
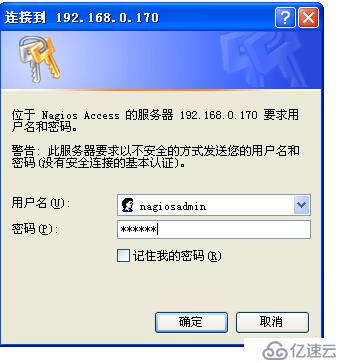
會看到如下的界面就證明啟動成功了:
免責聲明:本站發布的內容(圖片、視頻和文字)以原創、轉載和分享為主,文章觀點不代表本網站立場,如果涉及侵權請聯系站長郵箱:is@yisu.com進行舉報,并提供相關證據,一經查實,將立刻刪除涉嫌侵權內容。