您好,登錄后才能下訂單哦!
您好,登錄后才能下訂單哦!
這篇文章主要介紹iOS如何實現側滑菜單,文中介紹的非常詳細,具有一定的參考價值,感興趣的小伙伴們一定要看完!
首先簡單說一下我實現的原理:需要兩個UIView,一個是放在中間的CenterView,另一個是滑動時左邊顯示出來的LeftView。先把LeftView添加到ViewController中,然后再添加CenterView,這樣CenterView就把LeftView給蓋住了,一開始看到的自然就是CenterView了。因為滑動是在CenterView上進行的,因此需要對CenterView添加手勢識別,滑動時改變CenterView中心點的坐標,這樣被覆蓋住的LeftView就顯示出來了。這個就是實現的基本原理,下面我進行詳細的分析。
我們先看LeftView,為了和CenterView區分,我把它的背景設為紅色,然后中間放了一個按鈕:
LeftView.h
//
//  LeftView.h
//  SlideView
//
//  Created by hejinlai on 13-8-13.
//  Copyright (c) 2013年 yunzhisheng. All rights reserved.
//
#import <UIKit/UIKit.h>
@interface LeftView : UIView
@end
LeftView.m
//
//  LeftView.m
//  SlideView
//
//  Created by hejinlai on 13-8-13.
//  Copyright (c) 2013年 yunzhisheng. All rights reserved.
//
#import "LeftView.h"
@implementation LeftView
- (id)initWithFrame:(CGRect)frame
{
    self = [super initWithFrame:frame];
    if (self) {
        // Initialization code

        self.backgroundColor = [UIColor redColor];


        UIButton *btn = [UIButton buttonWithType:UIButtonTypeRoundedRect];
        btn.frame = CGRectMake(0, 0, 100, 50);
        [btn setTitle:@"LeftView" forState:UIControlStateNormal];
        btn.center = CGPointMake(140, 264);
        [btn addTarget:self action:@selector(onClick:) forControlEvents:UIControlEventTouchUpInside];
        [self addSubview:btn];

    }
    return self;
}
- (void)onClick:(UIButton *)button
{
    NSLog(@"LeftView button pressed!");
}
@end
再來看CenterView,首先聲明了屏幕的中心點坐標和一個手勢識別:
#import <UIKit/UIKit.h>
@interface CenterView : UIView
{
    UIPanGestureRecognizer *panGestureRecognizer;
    float centerX;
    float centerY;
}
@end
在CenterView初始化的時候,計算屏幕中心點坐標,設置背景為綠色,添加左上角按鈕和手勢識別
- (id)initWithFrame:(CGRect)frame
{
    self = [super initWithFrame:frame];
    if (self) {

        CGRect screen = [[UIScreen mainScreen] bounds];
        centerX = screen.size.width / 2;
        centerY = screen.size.height / 2;

        self.backgroundColor = [UIColor greenColor];

        // 左上角按鈕
        UIButton *leftUpBtn = [UIButton buttonWithType:UIButtonTypeRoundedRect];
        leftUpBtn.frame = CGRectMake(10, 10, 40, 40);
        [leftUpBtn addTarget:self action:@selector(buttonPressed:) forControlEvents:UIControlEventTouchUpInside];
        [self addSubview:leftUpBtn];

        panGestureRecognizer = [[UIPanGestureRecognizer alloc] initWithTarget:self action:@selector(handlePan:)];
        [self addGestureRecognizer:panGestureRecognizer];
    }
    return self;
}
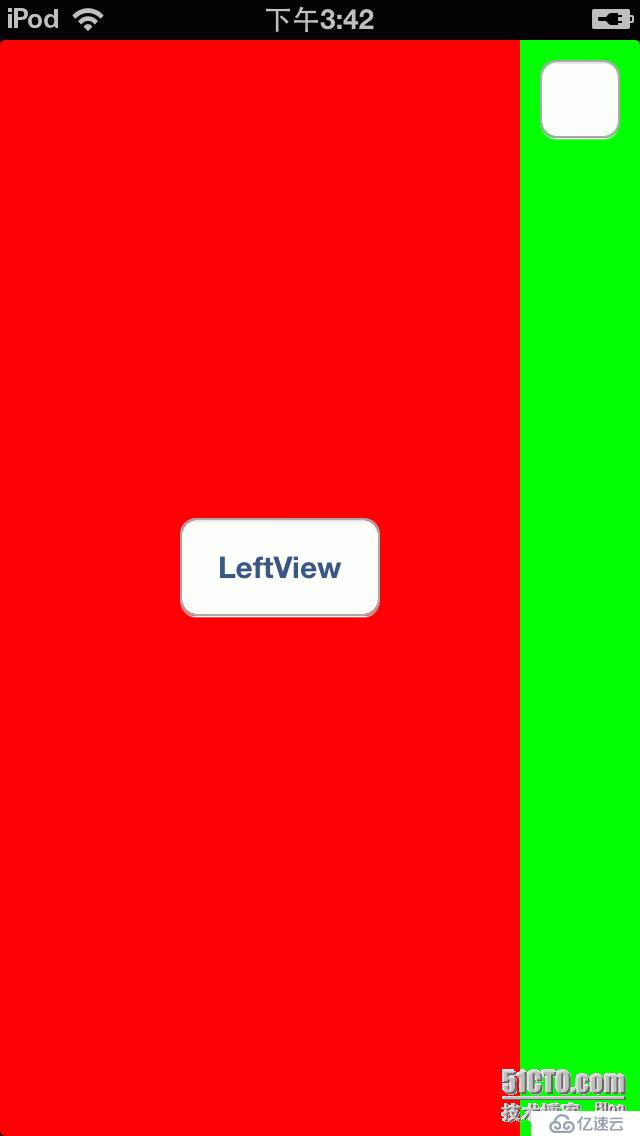
CenterView最終位置實際上有兩個:第一個位置是充滿整個屏幕,此時它的中心點就是屏幕的中心,把LeftView整個遮住;第二個位置是中心點在右邊,而左邊只露出一小部分在屏幕中,這樣底部的LeftView就可以顯示出來。
我把CenterView最右邊的中心點橫坐標的位置設為420,相當于CenterView左邊露出了60大小在屏幕中。還有一個問題是,滑動停止時,CenterView回到第一個位置還是第二個位置?這里我設置了一個邊界值280,如果中心點橫坐標小于280就回到第一個位置,大于280就回到第二個位置,下面是這兩個常量的定義:
#define MAX_CENTER_X 420
#define BOUND_X 280
當然這兩個值可以根據自己的需要進行調整。
CenterView左上角按鈕點擊時,需要在兩個位置之間進行切換,即如果此時是第一個位置要回到第二個位置,第二個位置要回到第一個位置:
- (void)buttonPressed:(UIButton *)button
{
    [UIView animateWithDuration:0.2 animations:^(void){

        if (self.center.x == centerX) {
            self.center = CGPointMake(MAX_CENTER_X, centerY);
        }else if (self.center.x == MAX_CENTER_X){
            self.center = CGPointMake(centerX, centerY);
        }

    }];

}
為了看起來比較平滑,加入了動畫效果。
接下來我們看下滑動時處理的邏輯。首先是計算出滑動后的中心點橫坐標:
CGPoint translation = [recognizer translationInView:self];
    float x = self.center.x + translation.x;
由于CenterView是不能移到左邊的,即CenterView中心點橫坐標最小值為centerX,當中心點坐標小于這個值時,需要重置:
if (x < centerX) {
        x = centerX;
    }
    self.center = CGPointMake(x, centerY);
當滑動結束的時候,需要判斷此時中心點左邊落到那個區域,如果小于邊界值,則回到第一個位置,大于邊界值則回到第二個位置,為了看起來比較平滑,加入了動畫效果:
if (recognizer.state == UIGestureRecognizerStateEnded) {

        [UIView animateWithDuration:0.2 animations:^(void){

            if (x > BOUND_X) {
                self.center = CGPointMake(MAX_CENTER_X, centerY);
            }else{
                self.center = CGPointMake(centerX, centerY);
            }

        }];


    }

    [recognizer setTranslation:CGPointZero inView:self];
最后在ViewController加入這兩個UIVIew,注意先添加LeftView,然后再添加CenterView:
- (void)viewDidLoad
{
    [super viewDidLoad];
    // Do any additional setup after loading the view, typically from a nib.

    CGRect screen = [[UIScreen mainScreen] bounds];
    CGFloat width = screen.size.width;
    CGFloat height = screen.size.height;

    leftView = [[LeftView alloc] init];
    leftView.frame = CGRectMake(0, 0, width, height);
    [self.view addSubview:leftView];

    centerView = [[CenterView alloc] init];
    centerView.frame = CGRectMake(0, 0, width, height);
    [self.view addSubview:centerView];
}
運行結果:

以上是“iOS如何實現側滑菜單”這篇文章的所有內容,感謝各位的閱讀!希望分享的內容對大家有幫助,更多相關知識,歡迎關注億速云行業資訊頻道!
免責聲明:本站發布的內容(圖片、視頻和文字)以原創、轉載和分享為主,文章觀點不代表本網站立場,如果涉及侵權請聯系站長郵箱:is@yisu.com進行舉報,并提供相關證據,一經查實,將立刻刪除涉嫌侵權內容。