您好,登錄后才能下訂單哦!
您好,登錄后才能下訂單哦!
今天小編給大家分享一下spring初始化源碼之關鍵類和擴展接口怎么應用的相關知識點,內容詳細,邏輯清晰,相信大部分人都還太了解這方面的知識,所以分享這篇文章給大家參考一下,希望大家閱讀完這篇文章后有所收獲,下面我們一起來了解一下吧。
該類核心功能:
1、提供注冊、獲取等等與BeanDefinition對象操作相關的方法,BeanDefinition緩存在DefaultListableBeanFactory的beanDefinitionMap變量(ConcurrentHashMap類型)
2、提供創建、注冊、獲取、單例等等跟bean對象操作相關的方法供ApplicationContext使用,bean對象緩存在DefaultSingletonBeanRegistry的singletonObjects 變量(ConcurrentHashMap類型)
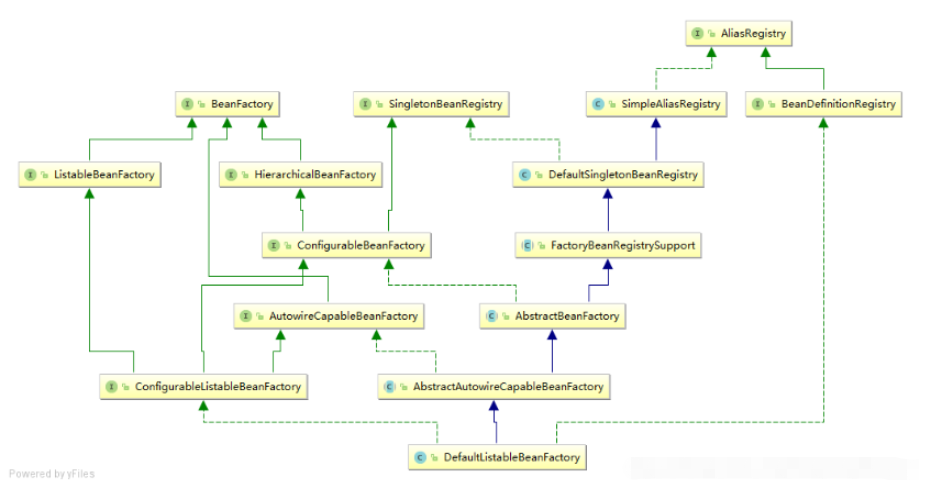
類關系圖如下:

從類圖中看到DefaultListableBeanFactory實現了很多接口,spring 根據該類的功能定義了不同層次的接口。接口核心功能主要分兩類:1、AliasRegistry、BeanDefinitionRegistry接口主要提供BeanDefinition和alias注冊、獲取的方法,2、左半部分*BeanFactory相關接口、SingletonBeanRegistry接口提供對象的創建、緩存和獲取等方法
該類負責分析xml中bean的定義,并解析成BeanDefinition對象,然后調用DefaultListableBeanFactory的注冊方法緩存到DefaultListableBeanFactory中
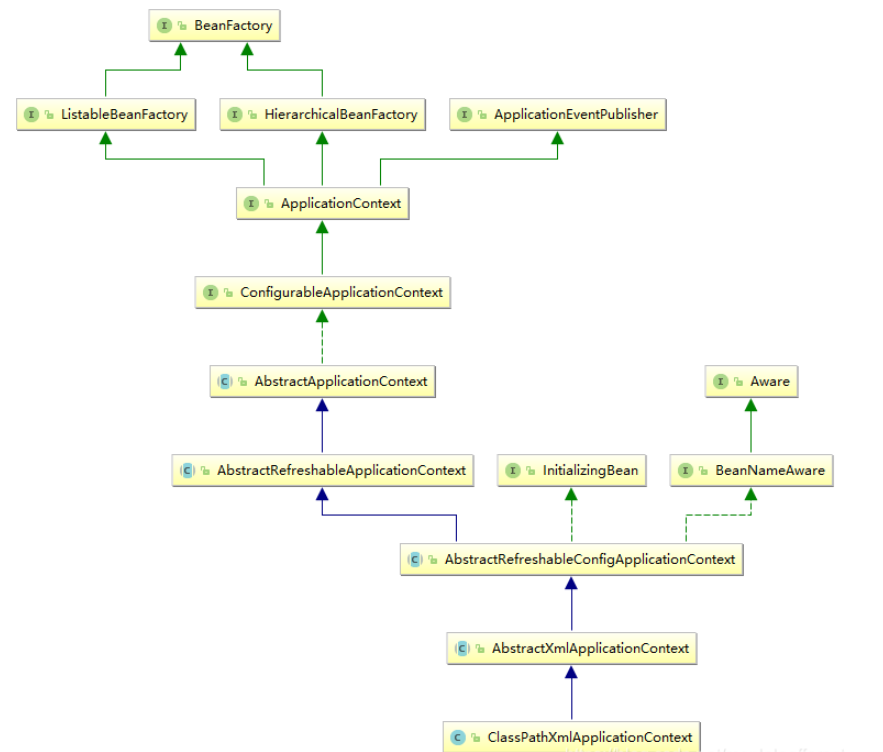
先上類關系圖:

這個就是spring上下文,是spring啟動的入口類,從父類AbstractApplicationContext的refresh()方法中可以看出該類的主要功能:設置springContext.xml路徑、創建DefaultListableBeanFactory、提供對象創建過程中的各種擴展點、事件的注冊和分發等等。
1、BeanNameAware:void setBeanName(String name);
該bean獲取自己在DefaultListableBeanFactory中的id或name ,在spring框架里用的多,我們一般很少用到。
2、BeanFactoryAware:void setBeanFactory(BeanFactory beanFactory)
獲取創建該bean的DefaultListableBeanFactory對象,可以從該對象中回去bean對象,不過絕大多數時候我們是從ApplicationContext中來獲取。
3、ApplicationContextAware:void setApplicationContext(ApplicationContext applicationContext)
獲取該bean所屬的applicationContext,從而可以獲取到該上下文的bean對象。自己寫一個工具類實現該接口然后在配置文件中配置或加上@Component注解,通過這個工具類就很方便的在應用中動態獲取bean對象,這種工具類在很多老的項目中幾乎是一個標配。
4、InitializingBean:void afterPropertiesSet()
spring提供兩中方式來對bean初始化后的擴展,一種是實現InitializingBean接口,一種是使用通過init-method方法指定,spring初始化bean時在執行InitializingBean接口的afterPropertiesSet方法后就緊接著執行init-method指定的方法。使用init-method不會對spring產生依賴因此使用頻率較高,但由于這種方式使用反射方式來調用所以性能上低于直接調用 InitializingBean接口的afterPropertiesSet方法,后面會有相應的代碼分析。
5、指定init-method
用的較多,可以理解為spring在bean對象初始化完后會通過反射的方式來執行該bean中init-method指定的方法。通過在xml文件中的bean標簽配置init-method或在該bean的方法上使用@PostConstruct注解達到效果。
6、BeanFactoryPostProcessor:void postProcessBeanFactory(ConfigurableListableBeanFactory beanFactory)
從后面的代碼分析中我們發現,實現BeanFactoryPostProcessor接口的bean的創建及接口方法的調用時間早于普通bean的創建。實現該接口可以拿到beanFactory對象,然后就看可以在普通bean對象創建之前進行干預調整,PropertyPlaceholderConfigurer類大家應該比較熟悉,該類實現BeanFactoryPostProcessor接口,在postProcessBeanFactory方法中將beanDefinitionMap中所有的BeanDefinition中的含有占位符的值修改為指定屬性文件中的值,這樣在創建對象的時候就能獲取到真實值。
7、BeanPostProcessor:Object postProcessBeforeInitialization(Object bean, String beanName);
BeanPostProcessor:Object postProcessAfterInitialization(Object bean, String beanName);
該接口需要注意與BeanFactoryPostProcessor接口的區別:
BeanFactoryPostProcessor接口:A實現了該接口,spring啟動的時候,在所有普通bean對象創建之前會先創建A對象并調用其postProcessBeanFactory方法,方法參數為beanFactory。
BeanPostProcessor接口:A實現了該接口,spring在創建普通的bean 對象B時,在B對象初始化之前將B對象的實例和beanname作為入參調用A的前置方法postProcessBeforeInitialization,在B對象初始化之后將B對象的實例和beanname作為入參調用A的后置方法postProcessAfterInitialization。由此也可知實現該接口bean的創建時間早于普通bean的創建。
通過實現該接口也可以完成對bean對象的調整,但與BeanFactoryPostProcessor還是有本質的區別,實現BeanFactoryPostProcessor可以理解為對創建的模板的調整,是對BeanDefinition對象的調整,而BeanPostProcessor則是在對象過程中做的臨時的調整,是對創建好的bean對象的調整
使用BeanPostProcessor需要注意:
①、前置、后置方法需要將修改后的bean對象返回這樣getbean時才能獲取到正確的bean對象
②、針對layz的bean對象創建則不會回調該接口的方法
8、ApplicationListener:void onApplicationEvent(E event)
spring上下文啟動完成后回調該接口,比較常用。
1、HelloWorldService bean對象
public class HelloWorldService implements BeanFactoryAware,BeanNameAware,BeanFactoryPostProcessor,
BeanPostProcessor,InitializingBean ,
ApplicationListener<ContextRefreshedEvent>,ApplicationContextAware {
    private String name;
    private AtomicInteger count = new AtomicInteger(1);
    private String getSeq(){
        return count.getAndIncrement()+"->";
    }
    public  HelloWorldService(){
        System.err.println(getSeq()+"HelloWorldService constructor");
    }
    public void initMethod(){
        System.err.println(getSeq()+"init method");
    }
    public void sayHello(){
        System.err.println(getSeq()+name+"say:hello,world");
    }

    public String getName() {
        return name;
    }

    public void setName(String name) {
        this.name = name;
    }
    public void setBeanName(String name) {
        System.err.println(getSeq()+"BeanNameAware.setBeanName:"+name);
    }

    public void setBeanFactory(BeanFactory beanFactory) throws BeansException {
        System.err.println(getSeq()+"BeanFactoryAware.setBeanFactory:"+beanFactory);
    }

    public void setApplicationContext(ApplicationContext applicationContext) throws BeansException {
        System.err.println(getSeq()+"ApplicationContextAware.setApplicationContext:->"+applicationContext);
    }

    public void afterPropertiesSet() {
        System.err.println(getSeq()+"InitializingBean.afterPropertiesSet");
    }

    public void postProcessBeanFactory(ConfigurableListableBeanFactory configurableListableBeanFactory) throws BeansException {
        BeanDefinition beanDefinition = configurableListableBeanFactory.getBeanDefinition("peopleService");
        beanDefinition.getPropertyValues();
        MutablePropertyValues m = beanDefinition.getPropertyValues();
        m.addPropertyValue("content", "i am ok");
        System.err.println(getSeq()+"BeanFactoryPostProcessor.postProcessBeanFactory 將peopleService的content屬性修改為i am ok");
    }

    public Object postProcessBeforeInitialization(Object bean, String beanName) throws BeansException {
        System.err.println(getSeq()+"BeanPostProcessor.postProcessBeforeInitialization->"+beanName);
        return bean;
    }

    public Object postProcessAfterInitialization(Object bean, String beanName) throws BeansException {
        System.err.println(getSeq()+"BeanPostProcessor.postProcessAfterInitialization->"+beanName);
        return bean;
    }

    public void onApplicationEvent(ContextRefreshedEvent event) {
        System.err.println(getSeq()+"ApplicationListener.onApplicationEvent: Refreshed->"+event.getApplicationContext());
    }
}
2 、非lazy的普通bean對象,PeopleService
public class PeopleService{
    private String content="";
    public PeopleService(){
        System.err.println("PeopleService constructor");
    }
    public void say(){
        System.err.println("PeopleService say:["+content+"]");
    }

    public String getContent() {
        return content;
    }

    public void setContent(String content) {
        this.content = content;
    }
}
3、啟動類
public class AppMain {
    public static void main(String[] args) {
        ApplicationContext applicationContext = new ClassPathXmlApplicationContext("applicationContext.xml");
        System.err.println("===============================================");
        HelloWorldService helloWorldService =  applicationContext.getBean("helloWorldService",HelloWorldService.class);
        helloWorldService.sayHello();

        PeopleService peopleService =  applicationContext.getBean("peopleService",PeopleService.class);
        peopleService.say();
    }
}
代碼執行結果:

從輸入結果中我們得到以下信息:
1、HelloWorldService 實現 BeanFactoryPostProcessor接口所以創建時間早于普通非lazy的bean對象PeopleService
2、1-7為HelloWorldService 創建過程輸出的日志,可以看到各擴展接口的執行順序
3、第7步之后開始創建PeopleService對象,創建過程中回調用HelloWorldService(實現了BeanPostProcessor接口) 的前置和后置方法
4、spring上下文啟動完成后發布ContextRefreshedEvent事件,輸出第10步日志
以上就是“spring初始化源碼之關鍵類和擴展接口怎么應用”這篇文章的所有內容,感謝各位的閱讀!相信大家閱讀完這篇文章都有很大的收獲,小編每天都會為大家更新不同的知識,如果還想學習更多的知識,請關注億速云行業資訊頻道。
免責聲明:本站發布的內容(圖片、視頻和文字)以原創、轉載和分享為主,文章觀點不代表本網站立場,如果涉及侵權請聯系站長郵箱:is@yisu.com進行舉報,并提供相關證據,一經查實,將立刻刪除涉嫌侵權內容。