您好,登錄后才能下訂單哦!
您好,登錄后才能下訂單哦!
本篇內容主要講解“vue項目怎么用后端返回的文件流實現docx和pdf文件預覽”,感興趣的朋友不妨來看看。本文介紹的方法操作簡單快捷,實用性強。下面就讓小編來帶大家學習“vue項目怎么用后端返回的文件流實現docx和pdf文件預覽”吧!
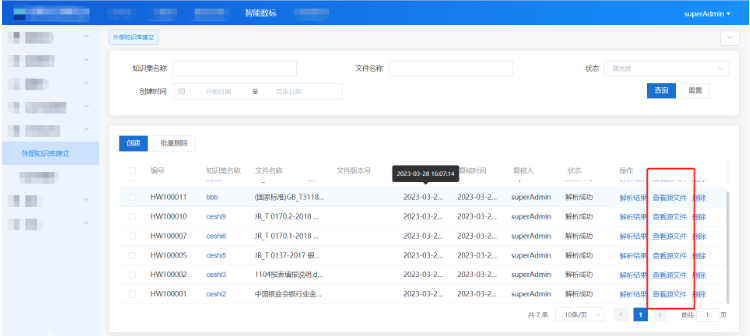
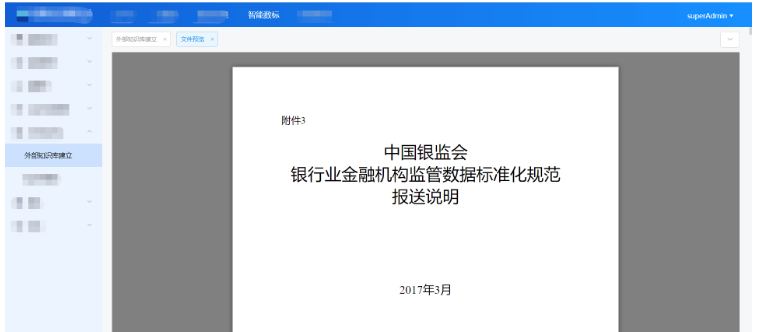
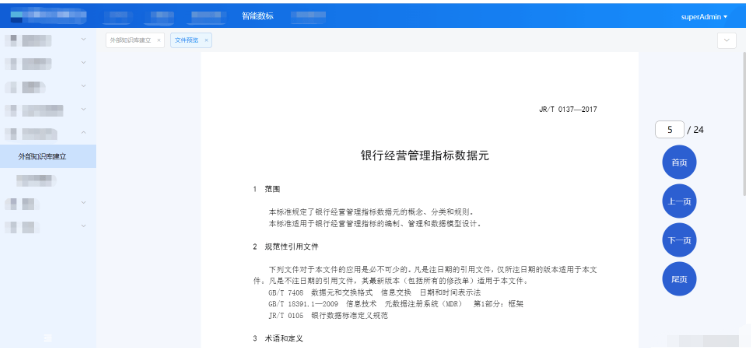
大家先看一下實現的效果,分別是docx文件預覽和pdf文件預覽;
原型是從一個table列表的操作中點擊查看源文件,跳轉到預覽頁面:

docx文件預覽

pdf文件預覽(可實現翻頁功能)

首先安裝docx-preview
npm install docx-preview
點擊【查看源文件】
...
<el-button type="text" @click="clickView(scope.row)">查看源文件</el-button>
...
在點擊事件方法中,首先進行if判斷文件類型,不同的文件類型走不同的邏輯,這里判斷是否為.docx文件,然后進行路由跳轉到文件預覽頁面,把id帶過去;
...
  //查看源文件
   clickView(row){
         if((row.fileName).indexOf('.docx') !== -1){
             this.$router.push({
                 path: "/dataStandar/knowledgeBase/createBase/vuedocx",
                 query: {
                     //要傳的參數
                     id: row.id,
                 },
             });

         }else{
             //這里代碼是pdf文件預覽,此處先省略
             ...
         }


    },
...
vueDocx.vue組件
<template>
    <div ref="file" class="files" ></div>
</template>

<script>

import {
    getSourceFileById, //接口函數返回的文件流
} from '@/api/dataStandar/knowledgeBase/createBase'
import {renderAsync } from "docx-preview"; //引入renderAsync 方法
export default {
  data(){
     return {
        docxOptions: {
            className: "kaimo-docx-666", // string:默認和文檔樣式類的類名/前綴
            inWrapper:  true, // boolean:啟用圍繞文檔內容的包裝器渲染
            ignoreWidth: false, // boolean:禁用頁面的渲染寬度
            ignoreHeight: false, // boolean:禁止渲染頁面高度
            ignoreFonts: false, // boolean:禁用字體渲染
            breakPages: true, // boolean:在分頁符上啟用分頁
            ignoreLastRenderedPageBreak: true, // boolean:在 lastRenderedPageBreak 元素上禁用分頁
            experimental: false, // boolean:啟用實驗功能(制表符停止計算)
            trimXmlDeclaration: true, // boolean:如果為true,解析前會從 xmlTemplate 文檔中移除 xmlTemplate 聲明
            useBase64URL: false, // boolean:如果為true,圖片、字體等會轉為base 64 URL,否則使用URL.createObjectURL
            useMathMLPolyfill: false, // boolean:包括用于 chrome、edge 等的 MathML polyfill。
            showChanges: false, // boolean:啟用文檔更改的實驗性渲染(插入/刪除)
            debug: false, // boolean:啟用額外的日志記錄
        },
     }
  },
  mounted(){
     this.initView()
  },
  methods:{
     initView(){
         var id = this.$route.query.id
         this.loading = this.$loading({
              lock: true,
              text: "正在加載...",
              spinner: 'el-icon-loading',
              background: 'rgba(0, 0, 0, 0.6)'
          });
          getSourceFileById({},id).then(res => {
              let bodyContainer = this.$refs.file
              var data = res.data
              if(res.status == 200){
                  renderAsync(
                   data, // Blob | ArrayBuffer | Uint8Array, 可以是 JSZip.loadAsync 支持的任何類型
                   bodyContainer, // HTMLElement 渲染文檔內容的元素,
                   null, // HTMLElement, 用于呈現文檔樣式、數字、字體的元素。如果為 null,則將使用 bodyContainer。
                   this.docxOptions // 配置
               )
               setTimeout(() => {
                   this.loading.close()
               },1000)
              }
          })
      },
  }
}
</script>

<style>
	.files{
	    padding: 0 20px;
	}
</style>
以上就是docx文件預覽邏輯和代碼,使用比較簡單;
首先安裝vue-pdf
npm install vue-pdf
然后新建一個vuePdf.vue組件,直接復制粘貼使用即可,樣式可以根據自己需求修改,其他不用修改;
<template>
    <div id="container">
      <!-- 上一頁、下一頁 -->
      <div class="right-btn">
        <!-- 輸入頁碼 -->
        <div class="pageNum">
          <input
            v-model.number="currentPage"
            type="number"
            class="inputNumber"
            @input="inputEvent()"
          />
          / {{ pageCount }}
        </div>
        <div @click="changePdfPage('first')" class="turn">首頁</div>
        <!-- 在按鈕不符合條件時禁用 -->
        <div
          @click="changePdfPage('pre')"
          class="turn-btn"
          :
        >
          上一頁
        </div>
        <div
          @click="changePdfPage('next')"
          class="turn-btn"
          :
        >
          下一頁
        </div>
        <div @click="changePdfPage('last')" class="turn">尾頁</div>
      </div>

      <div class="pdfArea">
        <!-- // 不要改動這里的方法和屬性,下次用到復制就直接可以用 -->
        <pdf
          :src="src"
          ref="pdf"
          v-show="loadedRatio === 1"
          :page="currentPage"
          @num-pages="pageCount = $event"
          @progress="loadedRatio = $event"
          @page-loaded="currentPage = $event"
          @loaded="loadPdfHandler"
          @link-clicked="currentPage = $event"

          id="pdfID"
        ></pdf>
      </div>
      <!-- 加載未完成時,展示進度條組件并計算進度 -->
      <div class="progress" v-if="loadedRatio != 1">
        <el-progress
          type="circle"
          :width="70"
          color="#53a7ff"
          :percentage="
            Math.floor(loadedRatio * 100) ? Math.floor(loadedRatio * 100) : 0
          "
        ></el-progress>
        <br />
        <!-- 加載提示語 -->
        <span>{{ remindShow }}</span>
      </div>
    </div>
  </template>

  <script>
import pdf from "vue-pdf";

export default {
  components: {
    pdf,
  },
  data() {
    return {
      // ----- loading -----
      remindText: {
        loading: "加載文件中,文件較大請耐心等待...",
        refresh: "若卡住不動,可刷新頁面重新加載...",
      },
      remindShow: "加載文件中,文件較大請耐心等待...",
      intervalID: "",

      src: "",
      // 當前頁數
      currentPage: 0,
      // 總頁數
      pageCount: 0,
      // 加載進度
      loadedRatio: 0,
    };
  },

  created() {
    // 頁面加載,拿到路由中的url復制給data中的src
    this.src = this.$route.query.url;
    console.log(this.src);
  },
  mounted() {
    // // 更改 loading 文字
    this.intervalID = setInterval(() => {
      this.remindShow === this.remindText.refresh
        ? (this.remindShow = this.remindText.loading)
        : (this.remindShow = this.remindText.refresh);
    }, 4000);
  },
  methods: {
    // 頁面回到頂部
    toTop() {
      document.getElementById("container").scrollTop = 0;
    },
    // 輸入頁碼時校驗
    inputEvent() {
      if (this.currentPage > this.pageCount) {
        // 1. 大于max
        this.currentPage = this.pageCount;
      } else if (this.currentPage < 1) {
        // 2. 小于min
        this.currentPage = 1;
      }
    },
    // 切換頁數
    changePdfPage(val) {
      if (val === "pre" && this.currentPage > 1) {
        // 切換后頁面回到頂部
        this.currentPage--;
        this.toTop();
      } else if (val === "next" && this.currentPage < this.pageCount) {
        this.currentPage++;
        this.toTop();
      } else if (val === "first") {
        this.currentPage = 1;
        this.toTop();
      } else if (val === "last" && this.currentPage < this.pageCount) {
        this.currentPage = this.pageCount;
        this.toTop();
      }
    },

    // pdf加載時
    loadPdfHandler(e) {
      // 加載的時候先加載第一頁
      this.currentPage = 1;
    },
  },
  destroyed() {
    // 在頁面銷毀時記得清空 setInterval
    clearInterval(this.intervalID);
  },
};
</script>

<style scoped>
#container {
  position: absolute !important;
  left: 0;
  right: 0;
  bottom: 0;
  top: 50px;
  background: #f4f7fd;
  overflow: auto;
  font-family: PingFang SC;
  width: 100%;
  display: flex;
  /* justify-content: center; */
  position: relative;
}

/* 右側功能按鈕區 */
.right-btn {
  position: fixed;
  right: 5%;
  bottom: 15%;
  width: 120px;
  display: flex;
  flex-wrap: wrap;
  justify-content: center;
  z-index: 99;
}

.pdfArea {
  width: 900px;
  margin: 0 auto;
}

/* ------------------- 輸入頁碼 ------------------- */
.pageNum {
  margin: 10px 0;
  font-size: 18px;
}

/*在谷歌下移除input[number]的上下箭頭*/
input::-webkit-outer-spin-button,
input::-webkit-inner-spin-button {
  -webkit-appearance: none !important;
  margin: 0;
}

/*在firefox下移除input[number]的上下箭頭*/
input[type="number"] {
  -moz-appearance: textfield;
}

.inputNumber {
  border-radius: 8px;
  border: 1px solid #999999;
  height: 35px;
  font-size: 18px;
  width: 60px;
  text-align: center;
}

.inputNumber:focus {
  border: 1px solid #00aeff;
  background-color: rgba(18, 163, 230, 0.096);
  outline: none;
  transition: 0.2s;
}

/* ------------------- 切換頁碼 ------------------- */
.turn {
  background-color: #164fcc;
  opacity: 0.9;
  color: #ffffff;
  height: 70px;
  width: 70px;
  border-radius: 50%;
  display: flex;
  align-items: center;
  justify-content: center;
  margin: 5px 0;
}

.turn-btn {
  background-color: #164fcc;
  opacity: 0.9;
  color: #ffffff;
  height: 70px;
  width: 70px;
  border-radius: 50%;
  margin: 5px 0;
  display: flex;
  align-items: center;
  justify-content: center;
}

.turn-btn:hover,
.turn:hover {
  transition: 0.3s;
  opacity: 0.5;
  cursor: pointer;
}

/* ------------------- 進度條 ------------------- */
.progress {
  position: absolute;
  right: 50%;
  top: 50%;
  text-align: center;
}

.progress > span {
  color: #199edb;
  font-size: 14px;
}
</style>
點擊【查看源文件】
...
<el-button type="text" @click="clickView(scope.row)">查看源文件</el-button>
...
查看源文件方法
...
  //查看源文件
   clickView(row){
         if((row.fileName).indexOf('.docx') !== -1){
             //這里代碼是docx文件預覽,此處省略
             ...
         }else{
               this.loading = this.$loading({
                    lock: true,
                    text: "正在加載...",
                    spinner: 'el-icon-loading',
                    background: 'rgba(0, 0, 0, 0.6)'
                });
                //接口函數傳入id,返回的文件流
                getSourceFileById({},row.id).then(res => {
                    var data = res.data
                    var binaryData = [];
                    binaryData.push(data);
                    let url = window.URL.createObjectURL(
                        new Blob(binaryData, {
                        type: "application/pdf;charset=utf-8",
                        })
                    );

                    if (url != null && url != undefined && url) {
                        // vue路由跳轉并以問號形式攜帶vue-pdf預覽時所需要的pdf地址
                        this.$router.push({
                            path: "/dataStandar/knowledgeBase/createBase/vuepdf",
                            query: {
                                //要傳的參數
                                url: url,
                            },
                        });
                        this.loading.close()
                    }
                })
         }
    },
...
到此,相信大家對“vue項目怎么用后端返回的文件流實現docx和pdf文件預覽”有了更深的了解,不妨來實際操作一番吧!這里是億速云網站,更多相關內容可以進入相關頻道進行查詢,關注我們,繼續學習!
免責聲明:本站發布的內容(圖片、視頻和文字)以原創、轉載和分享為主,文章觀點不代表本網站立場,如果涉及侵權請聯系站長郵箱:is@yisu.com進行舉報,并提供相關證據,一經查實,將立刻刪除涉嫌侵權內容。