您好,登錄后才能下訂單哦!
您好,登錄后才能下訂單哦!
這篇文章主要介紹“IDEA中怎么引入spring的命名空間”,在日常操作中,相信很多人在IDEA中怎么引入spring的命名空間問題上存在疑惑,小編查閱了各式資料,整理出簡單好用的操作方法,希望對大家解答”IDEA中怎么引入spring的命名空間”的疑惑有所幫助!接下來,請跟著小編一起來學習吧!
我們在寫spring的配置文件的時候,有的時候可能會用到 P 標簽,然后我們發現自己并沒有p標簽啊,那么我們一起來看我是怎么解決的。
首先在我們的xml文件的首部添上這句話:
xmlns:context="http://www.springframework.org/schema/context"
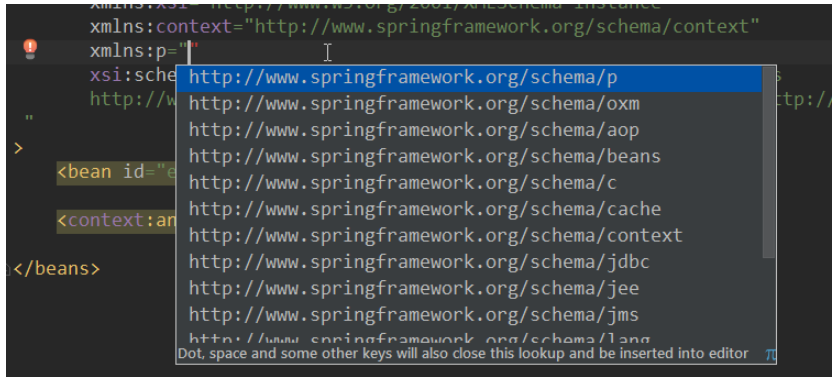
然后我們打出
xmlns:p=
然后就會相應的提示:

還有一點需要注意的就是:
需要注意的是必須在xmlns:context="”這一行的下面打,否則也不會提示,如圖所示位置即可提示,否則可能不提示
最終的代碼:
xmlns="http://www.springframework.org/schema/beans"
       xmlns:xsi="http://www.w3.org/2001/XMLSchema-instance" xmlns:util="http://www.springframework.org/schema/util"
       xmlns:context="http://www.springframework.org/schema/context"
       xmlns:p="http://www.springframework.org/schema/p"
       xsi:schemaLocation="http://www.springframework.org/schema/beans http://www.springframework.org/schema/beans/spring-beans.xsd http://www.springframework.org/schema/util http://www.springframework.org/schema/util/spring-util.xsd">
1.添加spring的依賴包
idea可以直接右擊項目 選擇add frame support,勾選spring即可
2.創建applicationContext.xml
在src的直接子目錄下創建 applicationContext.xml
這里給出一個applicationContext.xml 的實例,以及注釋解釋
<?xml version="1.0" encoding="UTF-8"?> <beans xmlns:xsi="http://www.w3.org/2001/XMLSchema-instance" xmlns="http://www.springframework.org/schema/beans" xmlns:aop="http://www.springframework.org/schema/aop" xmlns:context="http://www.springframework.org/schema/context" xmlns:tx="http://www.springframework.org/schema/tx" xsi:schemaLocation="http://www.springframework.org/schema/beans http://www.springframework.org/schema/beans/spring-beans.xsd http://www.springframework.org/schema/aop http://www.springframework.org/schema/aop/spring-aop.xsd http://www.springframework.org/schema/context http://www.springframework.org/schema/context/spring-context.xsd http://www.springframework.org/schema/tx http://www.springframework.org/schema/tx/spring-tx.xsd"> <!-- 掃描有注解的文件 base-package 包路徑 --> <context:component-scan base-package="service.imp, action, dao.imp"/> <!-- 定義 Autowired 自動注入 bean --> <bean class="org.springframework.beans.factory.annotation.AutowiredAnnotationBeanPostProcessor"/> <!-- 聲明式容器事務管理 ,transaction-manager指定事務管理器為transactionManager --> <bean id="transactionManager" class="org.springframework.orm.hibernate5.HibernateTransactionManager"> <property name="sessionFactory" ref="sessionFactory"/> </bean> <tx:advice id="txAdvice" transaction-manager="transactionManager"> <tx:attributes> <tx:method name="*User"/> <tx:method name="*" propagation="NOT_SUPPORTED" read-only="true"/> </tx:attributes> </tx:advice> <!-- 定義切面,在service包及子包中所有方法中,執行有關的hibernate session的事務操作 --> <aop:config> <!-- 只對業務邏輯層實施事務 --> <aop:pointcut id="serviceOperation" expression="execution( * service..*.*(..))"/> <aop:advisor advice-ref="txAdvice" pointcut-ref="serviceOperation"/> </aop:config> <!-- 配置dataSource --> <bean id="dataSource" class="com.mchange.v2.c3p0.ComboPooledDataSource"> <property name="driverClass" value="com.mysql.jdbc.Driver"/> <property name="jdbcUrl" value="jdbc:mysql://localhost:3306/j2ee?useUnicode=true&characterEncoding=utf-8&autoReconnect=true"/> <property name="user" value="root"/> <property name="password" value="wyy"/> <property name="initialPoolSize" value="5"/> <property name="maxPoolSize" value="10"/> </bean> <!-- 配置sessionFactory --> <bean id="sessionFactory" class="org.springframework.orm.hibernate5.LocalSessionFactoryBean"> <property name="dataSource" ref="dataSource"/> <property name="packagesToScan" value="model"/> <property name="hibernateProperties"> <props> <prop key="hibernate.dialect"> org.hibernate.dialect.MySQL57Dialect</prop> <prop key="hibernate.show_sql">false</prop> <prop key="hibernate.format_sql">true</prop> <prop key="hibernate.hbm2ddl.auto">update</prop> <prop key="hibernate.connection.autocommit">true</prop> </props> </property> </bean> <!-- 配置hibernateTemplate --> <bean id="hibernateTemplate" class="org.springframework.orm.hibernate5.HibernateTemplate"> <property name="sessionFactory" ref="sessionFactory"/> </bean> </beans>
3.給service的實現類添加@Service注解 給dao的實現類添加@Repository注解 將生命周期管理交給spring
注意所有交給spring管理的類,不能new出實例,只能用spring注入。
4.所有使用到service和dao的地方,均使用@Autowired注解注入。
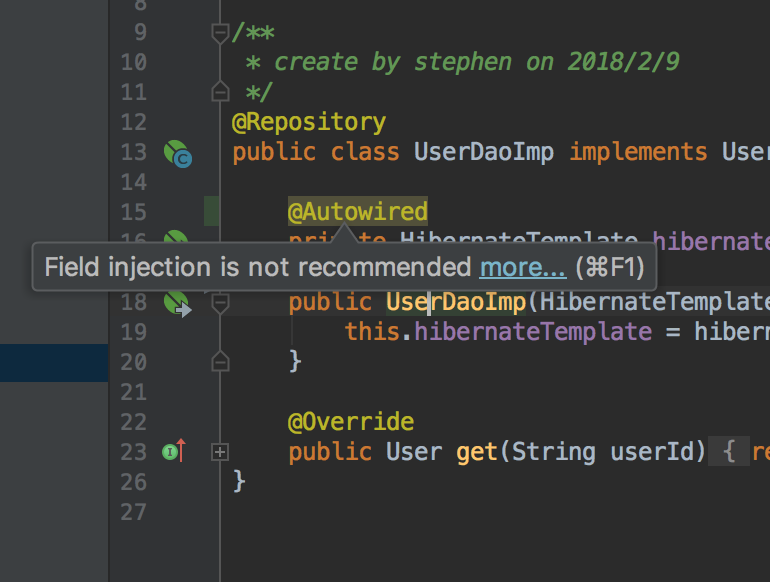
@Autowired注解可以在構造函數、類成員屬性、getset方法添加注解注入bean,但是類成員屬性的注入方法是不推薦的

總結下來,使用屬性注入會產生如下問題
對象和注入的容器有著很緊的耦合
對象間的耦合被隱藏了,外部無法看到,不利于復雜度控制
如果沒有注入容器,對象無法創建
當一個類有多個屬性注入,你感知不到他的復雜度。而當你使用構造函數注入時,就會發現,要穿入的參數過多。也是不利于復雜度控制
5.dao的實現技術
sessionFactory
@Repository
public class UserDaoImp implements UserDao {

    private SessionFactory sessionFactory;

    @Autowired
    public UserDaoImp(SessionFactory sessionFactory) {
        this.sessionFactory = sessionFactory;
    }

    @Override
    public User get(String userId) {
        return sessionFactory.openSession().load(User.class, userId);
    }
}
hibernateTemplate
@Repository
public class UserDaoImp implements UserDao {

    @Autowired
    private HibernateTemplate hibernateTemplate;

    public UserDaoImp(HibernateTemplate hibernateTemplate) {
        this.hibernateTemplate = hibernateTemplate;
    }

    @Override
    public User get(String userId) {
        return hibernateTemplate.get(User.class, userId);
    }
}
hibernateTemplate封裝了SessionFactory,數據庫操作變得更簡單。
如下給出實現hibernateTemplate分頁的代碼。
@Override
public List<Order> getListByHql(String hql, int page, int pageSize) {
    return hibernateTemplate.execute(new HibernateCallback<List<Order>>() {
        @Override
        public List<Order> doInHibernate(Session session) throws HibernateException {
            Query<Order> query = session.createQuery(hql);
            query.setFirstResult((page - 1) * pageSize).setMaxResults(pageSize);
            //把結果返回
            return query.list();
        }
    });
}nested exception is java.lang.NoClassDefFoundError: org/aspectj/weaver/reflect/ReflectionWorld$ReflectionWorldException
這個錯誤顯然是沒有找到某個jar包。如果要定義aop,除了spring核心包之外,還需要自行下載這兩個jar。
aopalliance.jar
aspectjweaver.jar
檢查一下jar包,發現沒有aspectjweaver.jar,下載并加入到項目路徑即可。
到此,關于“IDEA中怎么引入spring的命名空間”的學習就結束了,希望能夠解決大家的疑惑。理論與實踐的搭配能更好的幫助大家學習,快去試試吧!若想繼續學習更多相關知識,請繼續關注億速云網站,小編會繼續努力為大家帶來更多實用的文章!
免責聲明:本站發布的內容(圖片、視頻和文字)以原創、轉載和分享為主,文章觀點不代表本網站立場,如果涉及侵權請聯系站長郵箱:is@yisu.com進行舉報,并提供相關證據,一經查實,將立刻刪除涉嫌侵權內容。