您好,登錄后才能下訂單哦!
您好,登錄后才能下訂單哦!
這篇文章主要介紹“RocketMQ broker消息投遞流程處理PULL_MESSAGE請求的方法是什么”,在日常操作中,相信很多人在RocketMQ broker消息投遞流程處理PULL_MESSAGE請求的方法是什么問題上存在疑惑,小編查閱了各式資料,整理出簡單好用的操作方法,希望對大家解答”RocketMQ broker消息投遞流程處理PULL_MESSAGE請求的方法是什么”的疑惑有所幫助!接下來,請跟著小編一起來學習吧!
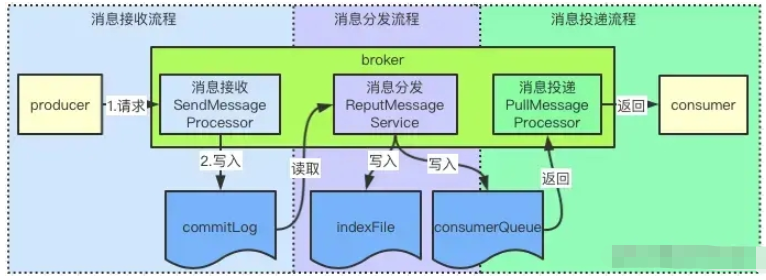
RocketMq消息處理整個流程如下:

消息接收:消息接收是指接收producer的消息,處理類是SendMessageProcessor,將消息寫入到commigLog文件后,接收流程處理完畢;
消息分發:broker處理消息分發的類是ReputMessageService,它會啟動一個線程,不斷地將commitLong分到到對應的consumerQueue,這一步操作會寫兩個文件:consumerQueue與indexFile,寫入后,消息分發流程處理 完畢;
消息投遞:消息投遞是指將消息發往consumer的流程,consumer會發起獲取消息的請求,broker收到請求后,調用PullMessageProcessor類處理,從consumerQueue文件獲取消息,返回給consumer后,投遞流程處理完畢。
以上就是rocketMq處理消息的流程了,接下來我們就從源碼來分析消息投遞的實現。
與producer不同,consumer從broker拉取消息時,發送的請求code為PULL_MESSAGE,processor為PullMessageProcessor,我們直接進入它的processRequest方法:
@Override
public RemotingCommand processRequest(final ChannelHandlerContext ctx, RemotingCommand request)
        throws RemotingCommandException {
    // 調用方法
    return this.processRequest(ctx.channel(), request, true);
}這個方法就只是調用了一個重載方法,多出來的參數true表示允許broker掛起請求,我們繼續,
/**
 * 繼續處理
 */
private RemotingCommand processRequest(final Channel channel, RemotingCommand request,
        boolean brokerAllowSuspend)throws RemotingCommandException {
    RemotingCommand response = RemotingCommand
        .createResponseCommand(PullMessageResponseHeader.class);
    final PullMessageResponseHeader responseHeader
        = (PullMessageResponseHeader) response.readCustomHeader();
    final PullMessageRequestHeader requestHeader = (PullMessageRequestHeader)
        request.decodeCommandCustomHeader(PullMessageRequestHeader.class);
    response.setOpaque(request.getOpaque());
    // 省略權限校驗流程
    // 1. rocketMq 可以設置校驗信息,以阻擋非法客戶端的連接
    // 2. 同時,對topic可以設置DENY(拒絕)、ANY(PUB 或者 SUB 權限)、PUB(發送權限)、SUB(訂閱權限)等權限,
    //    可以細粒度控制客戶端對topic的操作內容
    ...
    // 獲取訂閱組
    SubscriptionGroupConfig subscriptionGroupConfig =
        this.brokerController.getSubscriptionGroupManager()
        .findSubscriptionGroupConfig(requestHeader.getConsumerGroup());
    ...
    // 獲取訂閱主題
    TopicConfig topicConfig = this.brokerController.getTopicConfigManager()
        .selectTopicConfig(requestHeader.getTopic());
    ...
    // 處理filter
    // consumer在訂閱消息時,可以對訂閱的消息進行過濾,過濾方法有兩種:tag與sql92
    // 這里我們重點關注拉取消息的流程,具體的過濾細節后面再分析
    ...
    // 獲取消息
    // 1. 根據 topic 與 queueId 獲取 ConsumerQueue 文件
    // 2. 根據 ConsumerQueue 文件的信息,從 CommitLog 中獲取消息內容
    final GetMessageResult getMessageResult = this.brokerController.getMessageStore().getMessage(
        requestHeader.getConsumerGroup(), requestHeader.getTopic(), requestHeader.getQueueId(),
        requestHeader.getQueueOffset(), requestHeader.getMaxMsgNums(), messageFilter);
    if (getMessageResult != null) {
        // 省略一大堆的校驗過程
        ...
        switch (response.getCode()) {
            // 表示消息可以處理,這里會把消息內容寫入到 response 中
            case ResponseCode.SUCCESS:
                ...
                // 處理消息消息內容,就是把消息從 getMessageResult 讀出來,放到 response 中
                if (this.brokerController.getBrokerConfig().isTransferMsgByHeap()) {
                    final long beginTimeMills = this.brokerController.getMessageStore().now();
                    // 將消息內容轉為byte數組
                    final byte[] r = this.readGetMessageResult(getMessageResult,
                        requestHeader.getConsumerGroup(), requestHeader.getTopic(),
                        requestHeader.getQueueId());
                    ...
                    response.setBody(r);
                } else {
                    try {
                        // 消息轉換
                        FileRegion fileRegion = new ManyMessageTransfer(response.encodeHeader(
                            getMessageResult.getBufferTotalSize()), getMessageResult);
                        channel.writeAndFlush(fileRegion).addListener(new ChannelFutureListener() {
                            ...
                        });
                    } catch (Throwable e) {
                        ...
                    }
                    response = null;
                }
                break;
            // 未找到滿足條件的消息
            case ResponseCode.PULL_NOT_FOUND:
                // 如果支持掛起,就掛起當前請求
                if (brokerAllowSuspend && hasSuspendFlag) {
                    ...
                    PullRequest pullRequest = new PullRequest(request, channel, pollingTimeMills,
                        this.brokerController.getMessageStore().now(), offset, subscriptionData,
                        messageFilter);
                    // 沒有找到相關的消息,掛起操作
                    this.brokerController.getPullRequestHoldService()
                        .suspendPullRequest(topic, queueId, pullRequest);
                    response = null;
                    break;
                }
            // 省略其他類型的處理
            ...
                break;
            default:
                assert false;
        }
    } else {
        response.setCode(ResponseCode.SYSTEM_ERROR);
        response.setRemark("store getMessage return null");
    }
    ...
    return response;
}
在源碼中,這個方法也是非常長,這里我抹去了各種細枝末節,僅留下了一些重要的流程,整個處理流程如下:
權限校驗:rocketMq 可以設置校驗信息,以阻擋非法客戶端的連接,同時也可以設置客戶端的發布、訂閱權限,細節度控制訪問權限;
獲取訂閱組、訂閱主題等,這塊主要是通過請求消息里的內容獲取broker中對應的記錄
創建過濾組件:consumer在訂閱消息時,可以對訂閱的消息進行過濾,過濾方法有兩種:tag與sql92
獲取消息:先是根據 topic 與 queueId 獲取 ConsumerQueue 文件,根據 ConsumerQueue 文件的信息,從 CommitLog 中獲取消息內容,消息的過濾操作也是發生在這一步
轉換消息:如果獲得了消息,就是把具體的消息內容,復制到reponse中
掛起請求:如果沒獲得消息,而當前請求又支持掛起,就掛起當前請求
以上代碼還是比較清晰的,相關流程代碼中都作了注釋。
以上流程就是整個消息的獲取流程了,在本文中,我們僅關注與獲取消息相關的步驟,重點關注以下兩個操作:
獲取消息
掛起請求
獲取消息的方法為DefaultMessageStore#getMessage,代碼如下:
public GetMessageResult getMessage(final String group, final String topic, final int queueId,
        final long offset, final int maxMsgNums, final MessageFilter messageFilter) {
    // 省略一些判斷
    ...
    // 根據topic與queueId一個ConsumeQueue,consumeQueue記錄的是消息在commitLog的位置
    ConsumeQueue consumeQueue = findConsumeQueue(topic, queueId);
    if (consumeQueue != null) {
        minOffset = consumeQueue.getMinOffsetInQueue();
        maxOffset = consumeQueue.getMaxOffsetInQueue();
        if (...) {
            // 判斷 offset 是否符合要求
            ...
        } else {
            // 從 consumerQueue 文件中獲取消息
            SelectMappedBufferResult bufferConsumeQueue = consumeQueue.getIndexBuffer(offset);
            if (bufferConsumeQueue != null) {
                ...
                for (; i < bufferConsumeQueue.getSize() && i < maxFilterMessageCount;
                    i += ConsumeQueue.CQ_STORE_UNIT_SIZE) {
                    // 省略一大堆的消息過濾操作
                    ...
                    // 從 commitLong 獲取消息
                    SelectMappedBufferResult selectResult
                            = this.commitLog.getMessage(offsetPy, sizePy);
                    if (null == selectResult) {
                        if (getResult.getBufferTotalSize() == 0) {
                            status = GetMessageStatus.MESSAGE_WAS_REMOVING;
                        }
                        nextPhyFileStartOffset = this.commitLog.rollNextFile(offsetPy);
                        continue;
                    }
                    // 省略一大堆的消息過濾操作
                    ...
                }
            }
    } else {
        status = GetMessageStatus.NO_MATCHED_LOGIC_QUEUE;
        nextBeginOffset = nextOffsetCorrection(offset, 0);
    }
    if (GetMessageStatus.FOUND == status) {
        this.storeStatsService.getGetMessageTimesTotalFound().incrementAndGet();
    } else {
        this.storeStatsService.getGetMessageTimesTotalMiss().incrementAndGet();
    }
    long elapsedTime = this.getSystemClock().now() - beginTime;
    this.storeStatsService.setGetMessageEntireTimeMax(elapsedTime);
    getResult.setStatus(status);
    // 又是處理 offset
    getResult.setNextBeginOffset(nextBeginOffset);
    getResult.setMaxOffset(maxOffset);
    getResult.setMinOffset(minOffset);
    return getResult;
}
這個方法不是比較長的,這里僅保留了關鍵流程,獲取消息的關鍵流程如下:
根據topic與queueId找到ConsumerQueue
從ConsumerQueue對應的文件中獲取消息信息,如tag的hashCode、消息在commitLog中的位置信息
根據位置信息,從commitLog中獲取完整的消息
經過以上步驟,消息就能獲取到了,不過在獲取消息的前后,會進行消息過濾操作,即根據tag或sql語法來過濾消息,關于消息過濾的一些細節,我們留到后面消息過濾相關章節作進一步分析。
當broker無新消息時,consumer拉取消息的請求就會掛起,方法為PullRequestHoldService#suspendPullRequest:
public class PullRequestHoldService extends ServiceThread {
    private ConcurrentMap<String/* topic@queueId */, ManyPullRequest> pullRequestTable =
        new ConcurrentHashMap<String, ManyPullRequest>(1024);
    public void suspendPullRequest(final String topic, final int queueId,
            final PullRequest pullRequest) {
        String key = this.buildKey(topic, queueId);
        ManyPullRequest mpr = this.pullRequestTable.get(key);
        if (null == mpr) {
            mpr = new ManyPullRequest();
            ManyPullRequest prev = this.pullRequestTable.putIfAbsent(key, mpr);
            if (prev != null) {
                mpr = prev;
            }
        }
        mpr.addPullRequest(pullRequest);
    }
    ...
}在suspendPullRequest方法中,所做的工作僅是把當前請求放入pullRequestTable中了。從代碼中可以看到,pullRequestTable是一個ConcurrentMap,key 是 topic@queueId,value 就是掛起的請求了。
請求掛起后,何時處理呢?這就是PullRequestHoldService線程的工作了。
看完PullRequestHoldService#suspendPullRequest方法后,我們再來看看PullRequestHoldService。
PullRequestHoldService是ServiceThread的子類(上一次看到ServiceThread的子類還是ReputMessageService),它也會啟動一個新線程來處理掛起操作。
我們先來看看它是在哪里啟動PullRequestHoldService的線程的,在BrokerController的啟動方法start()中有這么一行:
BrokerController#start
public void start() throws Exception {
    ...
    if (this.pullRequestHoldService != null) {
        this.pullRequestHoldService.start();
    }
    ...
}這里就是啟動pullRequestHoldService的線程操作了。
為了探究這個線程做了什么,我們進入PullRequestHoldService#run方法:
@Override
public void run() {
    log.info("{} service started", this.getServiceName());
    while (!this.isStopped()) {
        try {
            // 等待中
            if (this.brokerController.getBrokerConfig().isLongPollingEnable()) {
                this.waitForRunning(5 * 1000);
            } else {
                this.waitForRunning(
                    this.brokerController.getBrokerConfig().getShortPollingTimeMills());
            }
            long beginLockTimestamp = this.systemClock.now();
            // 檢查操作
            this.checkHoldRequest();
            long costTime = this.systemClock.now() - beginLockTimestamp;
            if (costTime > 5 * 1000) {
                log.info("[NOTIFYME] check hold request cost {} ms.", costTime);
            }
        } catch (Throwable e) {
            log.warn(this.getServiceName() + " service has exception. ", e);
        }
    }
    log.info("{} service end", this.getServiceName());
}從代碼來看,這個線程先是進行等待,然后調用PullRequestHoldService#checkHoldRequest方法,看來關注就是這個方法了,它的代碼如下:
private void checkHoldRequest() {
    for (String key : this.pullRequestTable.keySet()) {
        String[] kArray = key.split(TOPIC_QUEUEID_SEPARATOR);
        if (2 == kArray.length) {
            String topic = kArray[0];
            int queueId = Integer.parseInt(kArray[1]);
            final long offset = this.brokerController.getMessageStore()
                .getMaxOffsetInQueue(topic, queueId);
            try {
                // 調用notifyMessageArriving方法操作
                this.notifyMessageArriving(topic, queueId, offset);
            } catch (Throwable e) {
                log.error(...);
            }
        }
    }
}這個方法調用了PullRequestHoldService#notifyMessageArriving(...),我們繼續進入:
public void notifyMessageArriving(final String topic, final int queueId, final long maxOffset) {
    // 繼續調用
    notifyMessageArriving(topic, queueId, maxOffset, null, 0, null, null);
}
/**
 * 這個方法就是最終調用的了
 */
public void notifyMessageArriving(final String topic, final int queueId, final long maxOffset,
    final Long tagsCode, long msgStoreTime, byte[] filterBitMap, Map<String, String> properties) {
    String key = this.buildKey(topic, queueId);
    ManyPullRequest mpr = this.pullRequestTable.get(key);
    if (mpr != null) {
        List<PullRequest> requestList = mpr.cloneListAndClear();
        if (requestList != null) {
            List<PullRequest> replayList = new ArrayList<PullRequest>();
            for (PullRequest request : requestList) {
                // 判斷是否有新消息到達,要根據 comsumerQueue 的偏移量與request的偏移量判斷
                long newestOffset = maxOffset;
                if (newestOffset <= request.getPullFromThisOffset()) {
                    newestOffset = this.brokerController.getMessageStore()
                        .getMaxOffsetInQueue(topic, queueId);
                }
                if (newestOffset > request.getPullFromThisOffset()) {
                    boolean match = request.getMessageFilter().isMatchedByConsumeQueue(tagsCode,
                        new ConsumeQueueExt.CqExtUnit(tagsCode, msgStoreTime, filterBitMap));
                    if (match && properties != null) {
                        match = request.getMessageFilter().isMatchedByCommitLog(null, properties);
                    }
                    if (match) {
                        try {
                            // 喚醒操作
                            this.brokerController.getPullMessageProcessor()
                                .executeRequestWhenWakeup(request.getClientChannel(),
                                request.getRequestCommand());
                        } catch (Throwable e) {
                            log.error("execute request when wakeup failed.", e);
                        }
                        continue;
                    }
                }
                // 超時時間到了
                if (System.currentTimeMillis() >=
                        (request.getSuspendTimestamp() + request.getTimeoutMillis())) {
                    try {
                        // 喚醒操作
                        this.brokerController.getPullMessageProcessor()
                            .executeRequestWhenWakeup(request.getClientChannel(),
                            request.getRequestCommand());
                    } catch (Throwable e) {
                        log.error("execute request when wakeup failed.", e);
                    }
                    continue;
                }
                replayList.add(request);
            }
            if (!replayList.isEmpty()) {
                mpr.addPullRequest(replayList);
            }
        }
    }
}這個方法就是用來檢查是否有新消息送達的操作了,方法雖然有點長,但可以用一句話來總結:如果有新消息送達,或者pullRquest hold住的時間到了,就喚醒pullRquest(即調用PullMessageProcessor#executeRequestWhenWakeup方法)。
在判斷是否有新消息送達時,會獲取comsumerQueue文件中的最大偏移量,與當前pullRquest中的偏移量進行比較,如果前者大,就表示有新消息送達了,需要喚醒pullRquest
前面說過,當consumer請求沒獲取到消息時,broker會hold這個請求一段時間(30s),當這個時間到了,也會喚醒pullRquest,之后就不會再hold住它了
我們再來看看 PullMessageProcessor#executeRequestWhenWakeup 方法:
public void executeRequestWhenWakeup(final Channel channel,
    final RemotingCommand request) throws RemotingCommandException {
    // 關注 Runnable#run() 方法即可
    Runnable run = new Runnable() {
        @Override
        public void run() {
            try {
                // 再一次調用 PullMessageProcessor#processRequest(...) 方法
                final RemotingCommand response = PullMessageProcessor.this
                    .processRequest(channel, request, false);
                ...
            } catch (RemotingCommandException e1) {
                log.error("excuteRequestWhenWakeup run", e1);
            }
        }
    };
    // 提交任務
    this.brokerController.getPullMessageExecutor()
        .submit(new RequestTask(run, channel, request));
}這個方法準備了一個任務,然后將其提交到線程池中執行,任務內容很簡單,僅是調用了PullMessageProcessor#processRequest(...) 方法,這個方法就是本節一始提到的處理consumer拉取消息的方法了。
在分析消息分發流程時,DefaultMessageStore.ReputMessageService#doReput方法中有這么一段:
private void doReput() {
    ...
    // 分發消息
    DefaultMessageStore.this.doDispatch(dispatchRequest);
    // 長輪詢:如果有消息到了主節點,并且開啟了長輪詢
    if (BrokerRole.SLAVE != DefaultMessageStore.this
            .getMessageStoreConfig().getBrokerRole()
            &&DefaultMessageStore.this.brokerConfig.isLongPollingEnable()){
        // 調用NotifyMessageArrivingListener的arriving方法
        DefaultMessageStore.this.messageArrivingListener.arriving(
            dispatchRequest.getTopic(),
            dispatchRequest.getQueueId(),
            dispatchRequest.getConsumeQueueOffset() + 1,
            dispatchRequest.getTagsCode(),
            dispatchRequest.getStoreTimestamp(),
            dispatchRequest.getBitMap(),
            dispatchRequest.getPropertiesMap());
    }
    ...
}這段就是用來主動喚醒hold住的consumer請求的,我們進入NotifyMessageArrivingListener#arriving方法:
 @Override
public void arriving(String topic, int queueId, long logicOffset, long tagsCode,
    long msgStoreTime, byte[] filterBitMap, Map<String, String> properties) {
    this.pullRequestHoldService.notifyMessageArriving(topic, queueId, logicOffset, tagsCode,
        msgStoreTime, filterBitMap, properties);
}
最終它也是調用了 PullRequestHoldService#notifyMessageArriving(...) 方法。
到此,關于“RocketMQ broker消息投遞流程處理PULL_MESSAGE請求的方法是什么”的學習就結束了,希望能夠解決大家的疑惑。理論與實踐的搭配能更好的幫助大家學習,快去試試吧!若想繼續學習更多相關知識,請繼續關注億速云網站,小編會繼續努力為大家帶來更多實用的文章!
免責聲明:本站發布的內容(圖片、視頻和文字)以原創、轉載和分享為主,文章觀點不代表本網站立場,如果涉及侵權請聯系站長郵箱:is@yisu.com進行舉報,并提供相關證據,一經查實,將立刻刪除涉嫌侵權內容。